This topic describes how to connect databases that are not on Alibaba Cloud to Database Autonomy Service (DAS). The databases include databases deployed in data centers, self-managed databases on VMs provided by third-party cloud service providers, and databases provided by third-party cloud service providers.
Prerequisites
The database that you want to connect to DAS is of one of the following types:
MySQL
MongoDB
PostgreSQL
Redis
NoteOnly Redis databases that run Redis 6.0 or earlier versions can be connected to DAS.
Usage notes
DAS opens only port 80. Database gateways can access DAS only by using port 80. Data is encrypted and transmitted by using gRPC and Transport Layer Security (TLS). This ensures data transmission security.
Connection modes
You can connect databases that are not on Alibaba Cloud to DAS in one of the following modes:
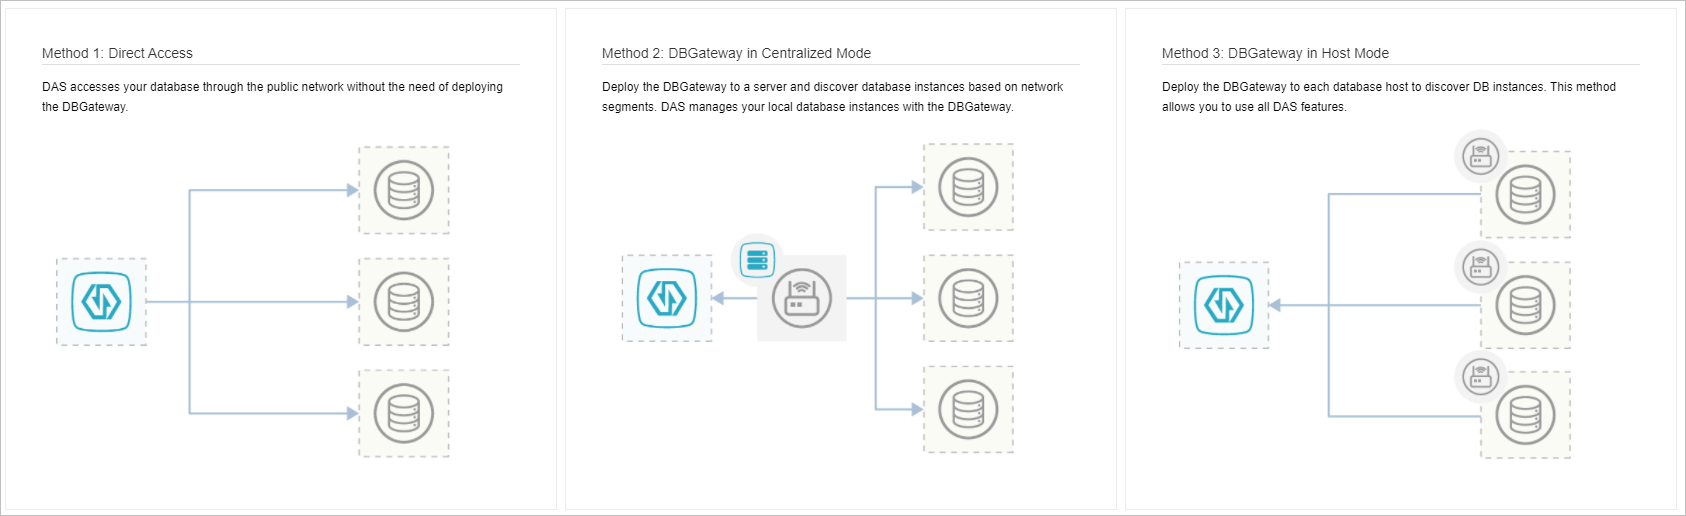
Direct mode: No DAS gateways (DBGateways) are deployed. DAS accesses your database over the Internet. You need to only enter your database account and password. Only MySQL, MongoDB, and Redis databases can be accessed in this mode.
Centralized mode: A DAS gateway is deployed on at least one server to automatically discover databases by means of CIDR blocks. We recommend that you deploy DAS gateways on two or more servers for disaster recovery.
Host mode: A DAS gateway is deployed on every server to automatically discover databases. All DAS features are supported in this mode, such as full request analysis, SQL response time analysis, and security audit. For more information, see the Features for three connection modes section of this topic.
DAS gateways can be deployed only on Linux servers.
Features for three connection modes
Feature | Direct mode | Centralized mode | (Recommend) Host mode |
Database metric monitoring | Supported | Supported | Supported |
Real-time performance monitoring | Supported | Supported | Supported |
Real-time session monitoring | Supported | Supported | Supported |
Storage analysis | Supported | Supported | Supported |
Slow request analysis | Supported | Supported | Supported |
Host metric monitoring | Not supported | Not supported | Supported |
Request diagnostics | Not supported | Not supported | Supported |
Full request analysis | Not supported | Not supported | Supported |
SQL response time analysis | Not supported | Not supported | Supported |
Security audit | Not supported | Not supported | Supported |
Connect databases to DAS in direct mode
Log on to the DAS console.
In the left-side navigation pane, choose Intelligent O&M Center > Instance Monitoring.
Click Access Instance in the upper-right corner of the page.
Click Other On-premise and Cloud Databases.
Click Method 1: Direct Access.
Configure the parameters that are described in the following table.
Parameter
Description
Select Region
The region that is nearest to the location of the database.
Select Engine
The type of the database.
Database Account
The account that is used to log on to the database.
Password
The password that is used to log on to the database.
Instances
The databases to be connected to DAS. You must specify the databases in the format of
Address:port.Click Test Connection.
If Verified is displayed in the Status column, click Save Instance. If Verified is not displayed, modify the parameters and then click Test Connection.
If you want to add another database, click Add More.
Connect databases to DAS in centralized mode
Log on to the DAS console.
In the left-side navigation pane, choose Intelligent O&M Center > Instance Monitoring.
Click Access Instance in the upper-right corner of the page.
Click Other On-premise and Cloud Databases.
Click Method 2: DBGateway in Centralized Mode.
In the dialog box that appears, select an access method.
NoteIf you have not deployed a DAS gateway in the corresponding virtual private cloud (VPC), click Deploy a new DAS DBGateway and search for instances.. If you have deployed a DAS gateway in the corresponding VPC, click Use existing DAS DBGateway to scan for new instances .
Deploy a new DAS DBGateway and search for instances.
Click Deploy a new DAS DBGateway and search for instances..
Select a network type and then click Generate Deployment Command.
NoteNetwork Type: Configure this parameter based on the connection mode between the host on which the DAS gateway is deployed and Alibaba Cloud. Examples:
For self-managed databases connected over the Internet, select Public Network (Classic Network).
For databases in data centers or databases from third-party cloud service providers that are connected over a leased line, select Proprietary Network (VPC/Leased Line).
Network Domain: Configure this parameter to manage databases from different environments, such as databases deployed in data centers and those provided by third-party cloud service providers.
Copy the deployment command. Then, log on to the corresponding host and run the command.
NoteIf
successfullyis returned, the DAS gateway is deployed. DAS can automatically discover the gateway. If the DAS gateway failed to be deployed, see the "Deployment issue troubleshooting" section of the Common issues about DBGateway topic to troubleshoot the issue.If Normal is displayed in the Current Status column, click Next.
Use existing DAS DBGateway to scan for new instances
Click Use existing DAS DBGateway to scan for new instances .
In the Select DBGateway step, select the DAS gateway that you want to use and then click Discover Instance.
In the Discover Instance step, scan and discover the databases that you want to connect to DAS.
You can use one of the following methods to discover databases:
Select Automatic Scan
Enter the CIDR block that you want to scan in the Scanned Address field.
Enter the port range in the Port Range field.
Click Scan.
Select Enter Instances
Enter databases in the correct format in the Instances field.
Click Scan.
NoteThe DAS gateway automatically scans and discovers the databases.
Click Next Step.
Configure the parameters that are described in the following table.
Parameter
Description
Select Engine
The type of the database.
Database Account
The account that is used to log on to the database.
Password
The password that is used to log on to the database.
IP Address
The IP address of the database server.
NoteThe database account must be granted the required permissions. For more information, see Permissions.
If the database has an existing account that is granted the required permissions, you can enter the account and password and then click Authorize.
If the database does not have an existing account that is granted the required permissions, you can enter a new database account and password and then click Generate Authorization Command. After you copy and run the authorization command on the database, click Authorize.
Click Authorize. If Accessed is displayed after you click Authorize, the connection is successful. The following common errors may also be displayed:
Unauthorized: No account or password is specified.
Connection Failed: Errors such as network failure or database downtime occur.
Authentication Failed: The database account or password is incorrect.
Insufficient Permissions: The database can be connected, but the permissions are insufficient. For more information, see Permissions.
Click OK.
Connect databases to DAS in host mode
Log on to the DAS console.
In the left-side navigation pane, choose Intelligent O&M Center > Instance Monitoring.
Click Access Instance in the upper-right corner of the page.
Click Other On-premise and Cloud Databases.
Click Method 3: DBGateway in Host Mode.
Select a network type and then click Generate Authorization Command.
NoteNetwork Type: Configure this parameter based on the connection mode between the host on which the DAS gateway is deployed and Alibaba Cloud. Examples:
For self-managed databases connected over the Internet, select Public Network (Classic Network).
For databases in data centers or databases from third-party cloud service providers that are connected over a leased line, select Proprietary Network (VPC/Leased Line).
Network Domain: Configure this parameter to manage databases from different environments, such as databases deployed in data centers or those provided by third-party cloud service providers.
Copy the deployment command. Log on to the corresponding device and run the command.
NoteIf
successfulis returned, the DAS gateway is deployed. DAS can automatically discover the gateway. If Normal is displayed in the Current Status column, click Next. If the DAS gateway failed to be deployed, see the "Deployment issue troubleshooting" section of the Common issues about DBGateway topic to troubleshoot the issue.Configure the parameters that are described in the following table.
Parameter
Description
Select Engine
The type of the database.
Database Account
The account that is used to log on to the database.
Password
The password that is used to log on to the database.
IP Address
The IP address of the database server.
NoteThe database account must be granted the required permissions. For more information, see Permissions.
If the database has an existing account that is granted the required permissions, you can enter the account and password and then click Authorize.
If the database does not have an existing account that is granted the required permissions, you can enter a new database account and password and then click Generate Authorization Command. After you copy and run the authorization command on the database, click Authorize.
Click Authorize. If Accessed is displayed after you click Authorize, the connection is successful. The following common errors may also be displayed:
Unauthorized: No account or password is specified.
Connection Failed: Errors such as network failure or database downtime occur.
Authentication Failed: The database account or password is incorrect.
Insufficient Permissions: The database can be connected, but the permissions are insufficient. For more information, see Permissions.
Click OK.
Related API operation
Operation | Description |
Connects a database instance to DAS. |