This topic describes how to install and configure a Data Transport Micro device after you receive the device.
Device introduction
LED indicators of the device

No.
Description
1
Indicates the device status.
Green: The device works as expected.
Yellow or red: The device does not work as expected. Contact Alibaba Cloud technical support.
2
Indicates the network status.
Green: The network is connected.
Red: A network exception occurred. Check whether the Ethernet cable is properly connected.
3
Indicate the hard disk status.
Green: The disks work as expected.
Yellow or red: The disks do not work as expected. Contact Alibaba Cloud technical support.
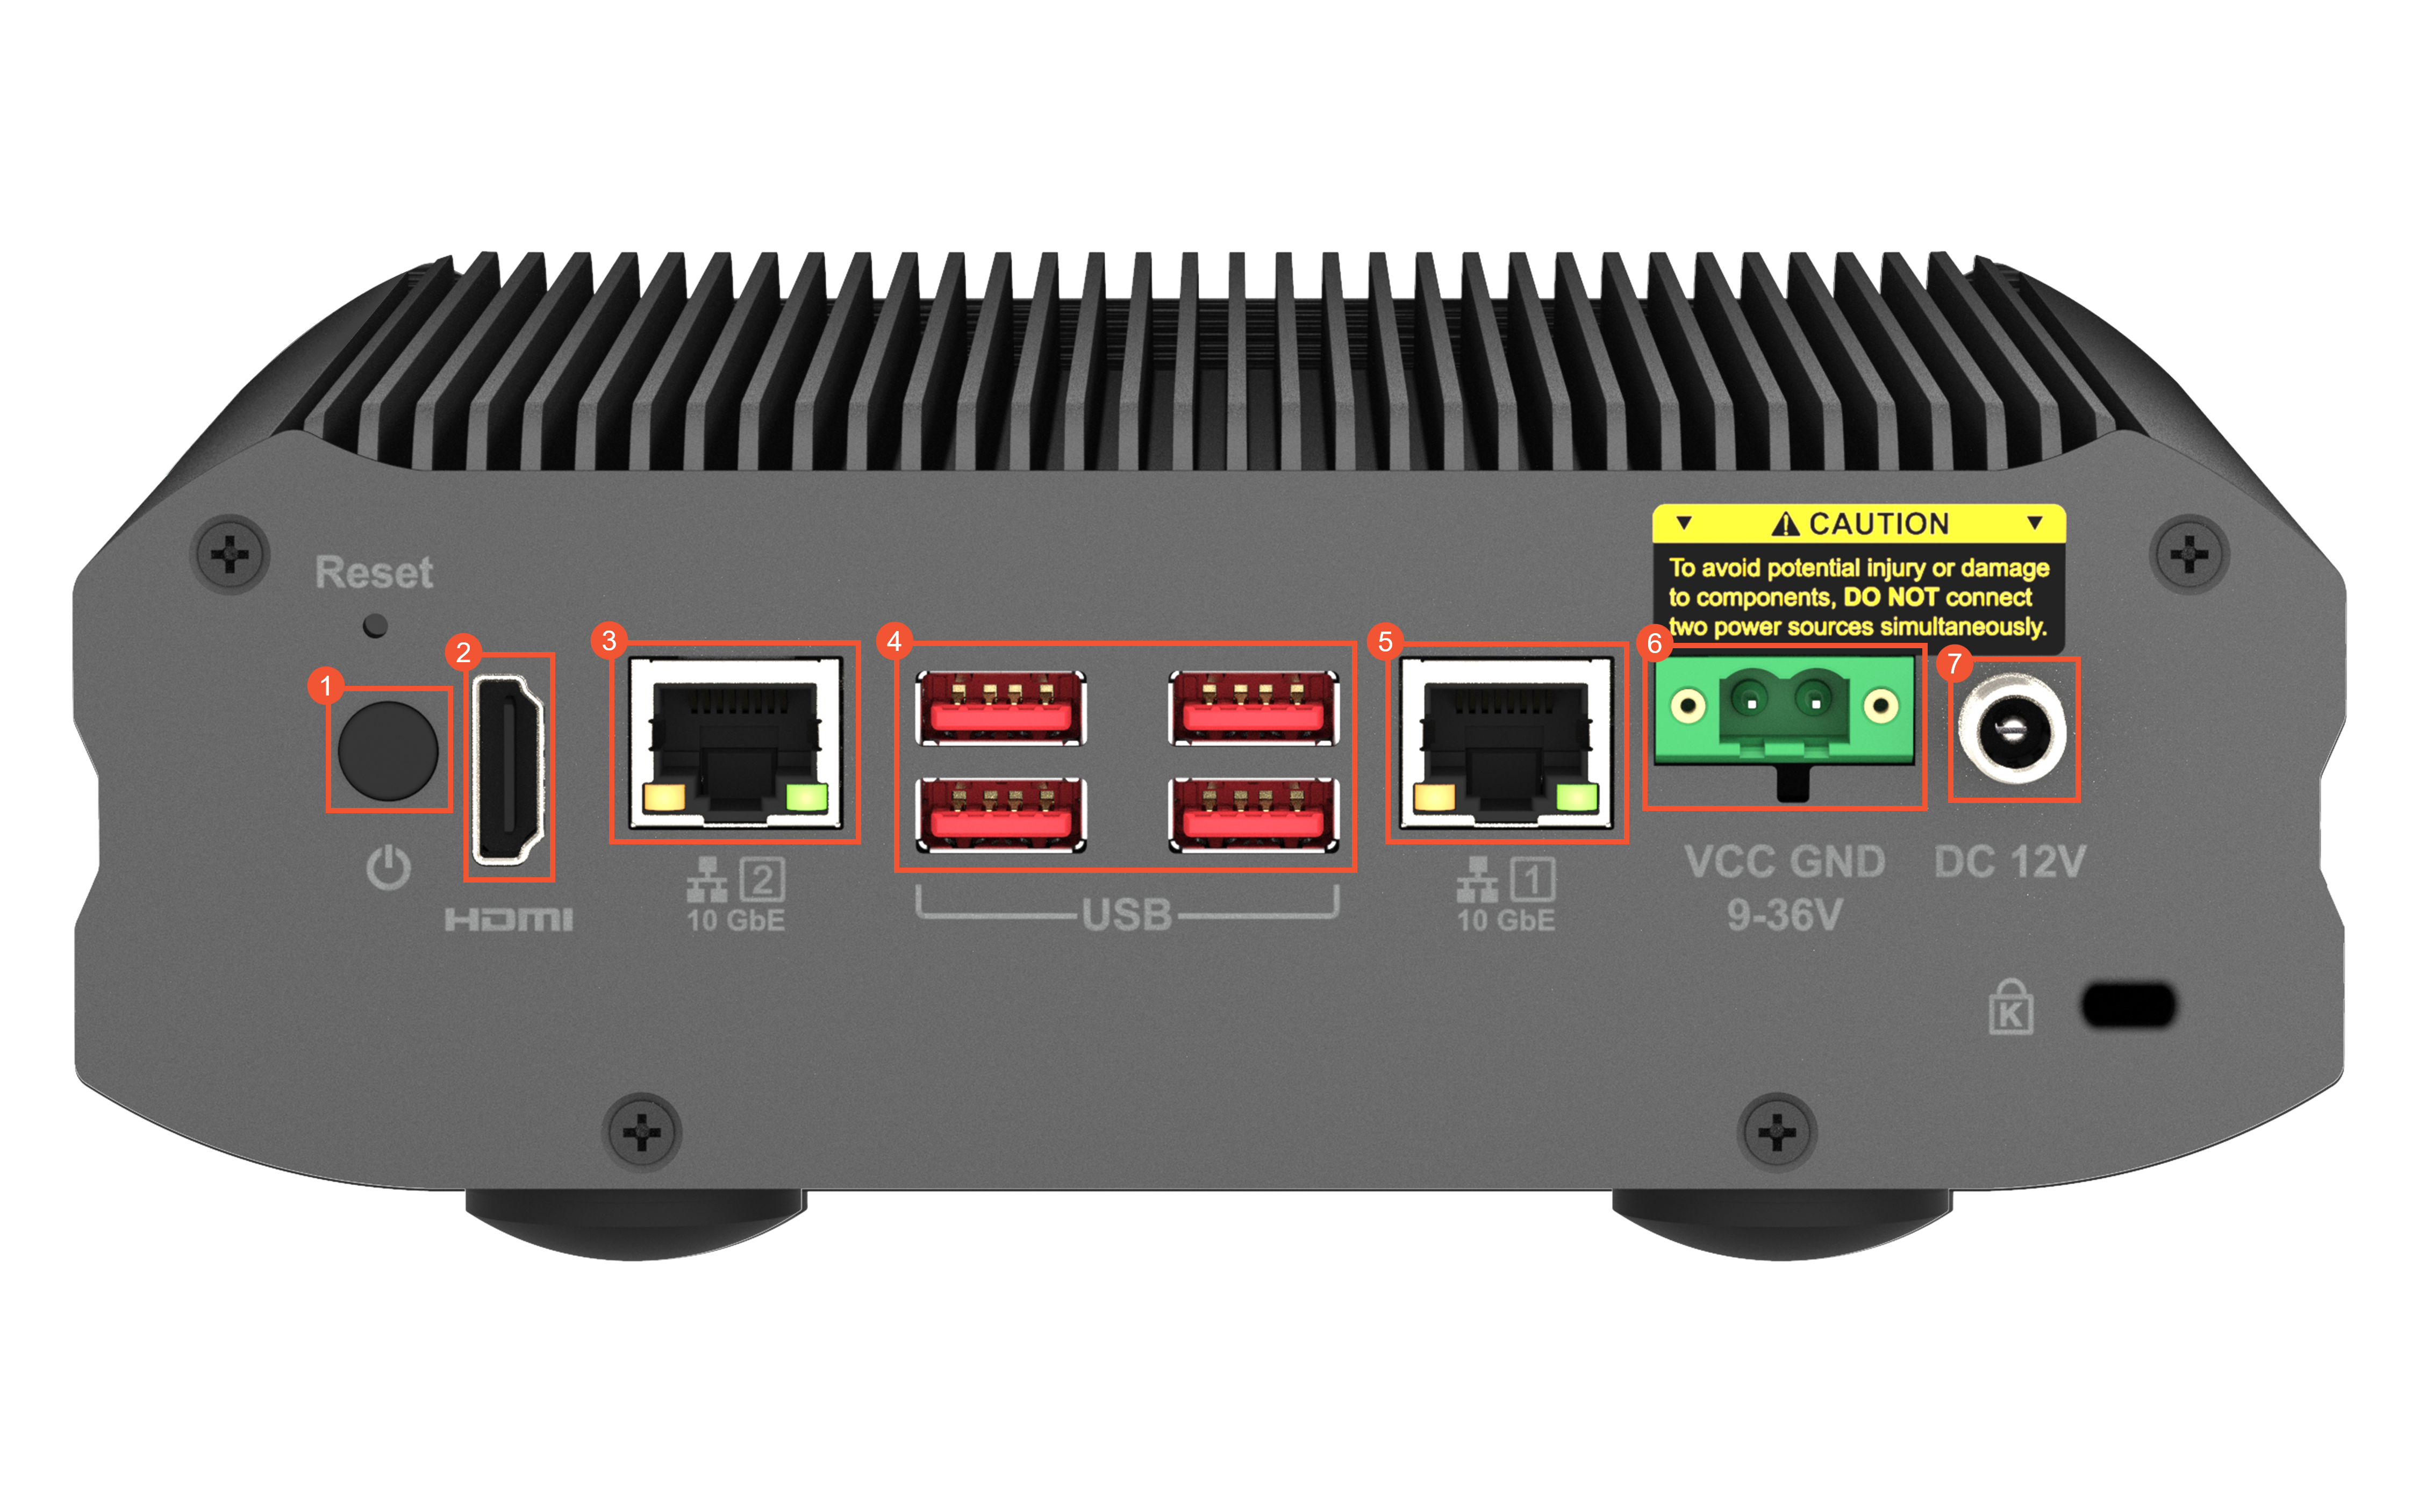
Device ports
No.
Description
1
The power button.
2
The High-Definition Multimedia Interface (HDMI) port.
3
The service port, which is a 10 Gbit/s copper Ethernet port.
4
Four USB-A 3.2 ports.
5
The management port, which is a 10 Gbit/s copper Ethernet port.
ImportantWe recommend that you do not use the management port as a service port.
6
The 4-pin terminal block port. Power supply: 9 V DC to 36 V DC.
7
The direct current (DC) input port. For the external power adapter, the output voltage is 12 V, the output power is 120 W, and the input voltage ranges from 100 V to 240 V.
The power cord, which is delivered together with the device.
The Ethernet cable, which is delivered together with the device.
Step 1: Mount the device on a rack
Unpack and inspect the device.
When you receive a Data Transport Micro device, you must check whether the device is intact or damaged. If the device is damaged, contact Alibaba Cloud technical support.
Use a power cord to connect the device based on the power socket of the rack. The power cord and power socket must follow the same standards, such as American standards or China national standards.
Check data ports.
The device board has two 10 Gbit/s network ports, one HDMI port, four USB-A 3.2 ports, one 4-pin terminal block port, and one DC input port.
After you use the power cord to connect the device, power on the device and check the running status.
To power on the device, you need to only press the power button. If the six LED indicators on the panel flash green, the device is being powered on. The LED indicators become steady green after the device is powered on. The six LED indicators indicate the device status, network status, and hard disk status.
Step 2: Log on to the device console
The default management IP address of the Data Transport Micro device is 192.168.1.1, and the subnet mask is 255.255.255.0. In this example, the management port is used.
Use an Ethernet cable to connect your laptop to the management port of the Data Transport Micro device.
Modify the local IP address of the laptop. The new IP address of the laptop and the management IP address of the device must belong to the same CIDR block. For example, change the local IP address to
192.168.1.2and the subnet mask to255.255.255.0.Open a browser and enter
http://192.168.1.1:5000to log on to the device console.Enter the username and password to log on to the device console.
NoteTo obtain the username and password, contact Alibaba Cloud technical support.
Step 3: Configure the service IP address
Log on to the device console.
Choose ControlPanel > Network & Virtual Switch > Interfaces.
Find the adapter that is in the Connected state, click the
 icon, and then select Configure.
 On the IPv4 tab, select Use static IP address. Configure the Fixed IP Address, Subnet Mask, and Default Gateway parameters based on your actual network configurations, and then click Apply.
NoteThe fixed IP address that you configured must be in the CIDR block to which the IP address of the source device belongs. Run a ping command to test whether the two IP addresses can communicate with each other.
Step 4: Check the hard disk status
Before you use the Data Transport Micro device, you must check the hard disk status. If you find problems in the hard disks or storage pools, contact Alibaba Cloud technical support.
In the device console, choose ControlPanel > System > Storage & Snapshots.
Choose Storage > Disks/VJBOD and switch the hard disks to check the status of each hard disk.
If Good is displayed in the Disk Information section, the hard disk works as expected.
To view the status of each storage pool and volume, choose Storage > Storage/Snapshots.
By default, the state of a storage pool is Locked and the state of a volume is Locked. Choose Manage > Unlock SED Storage Pool and enter the password to unlock the storage pool. Contact Alibaba Cloud technical support to obtain the password of the storage pool. After the storage pool and volume are unlocked, if Ready rather than Synchronizing is displayed in the Status column, the storage pool and volume are ready for use.
Step 5: Check whether the filedata shared folder exists
Before you use the Data Transport Micro device, you must check whether the filedata share folder exists.
In the device console, choose Privilege > Shared Folders. Check whether the filedata folder exists. In most cases, the filedata folder exists by default. If the filedata shared folder does not exist, you need to create a shared folder. For more information, see the (Optional) Create a shared folder section of this topic.
Click the edit icon next to the filedata folder.
Check the permissions granted on the filedata folder based. If the read and write permissions are granted on the filedata folder, the folder is in the normal state.
(Optional) Create a shared folder
Before you create a shared folder, you must log on to the Data Transport server and check whether a shared folder exists. If a shared folder exists, log on to the device console by using a browser and add the shared folder.
Log on to the Data Transport server to check whether a shared folder exists
Log on to the Data Transport server from a Linux or macOS host
Open the CLI.
Run the
<SSH username>@<Management IP address>command.The default management IP address is
192.168.1.1. For more information, see the Step 2: Log on to the device console section of this topic.Enter the password to log on to the Data Transport server.
Run the
cd /share/CACHEDEV1_DATAcommand to go to the directory. Then, run thelscommand to check whether thefiledatafolder exists.If the filedata folder exists, log on to the device console by using a browser. For more information, see the Step 5: Check whether the filedata shared folder exists section of this topic.
If the filedata folder does not exist, run the
mkdir filedatacommand to create a shared folder.
After the preceding operations are complete, use a browser to log on to the device console and add the shared folder. For more information, see the Create a shared folder in the device console section of this topic.
Log on to the Data Transport server from a Windows host
Download a remote connection tool on your laptop.
In this example, PuTTY is downloaded. You can select a version of PuTTY based on the version of your laptop. For more information, visit Download PuTTY.
Open PuTTY, set the parameters based on the steps in the following figure, and then log on to the Data Transport server.
Set the Host Name (or IP Address) parameter to the management IP address. The default management IP address is
192.168.1.1. For more information, see the Step 2: Log on to the device console section of this topic.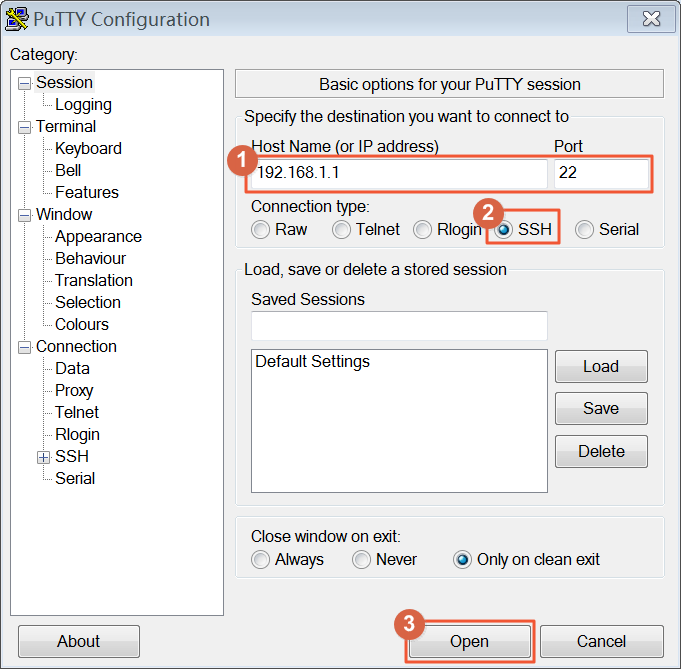
Run the
cd /share/CACHEDEV1_DATAcommand to go to the directory. Then, run thelscommand to check whether thefiledatafolder exists.If the filedata folder exists, log on to the device console by using a browser. For more information, see the Step 5: Check whether the filedata shared folder exists section of this topic.
If the filedata folder does not exist, run the
mkdir filedatacommand to create a shared folder.
After the preceding operations are complete, use a browser to log on to the device console and add the shared folder. For more information, see the Create a shared folder in the device console section of this topic.
Create a shared folder in the device console
Log on to the device console. For more information, see the Step 2: Log on to the device console section of this topic.
Choose ControlPanel > Privilege > Shared Folders.
Choose Create > Shared Folder. Set the following parameters when you create a shared folder:
Folder name: Enter filedata.
Path: Select Enter path manually, and then select filedata.
Click the edit icon next to the filedata folder.
Check whether the read and write permissions are granted on the filedata folder.
Choose ControlPanel > Network & File Services > Win/Mac/NFS and click Linux NFS Service.
Select Enable NFS v4 Service and click Apply.
What to do next
In the device console, you can also perform the following operations:
View logs
To view the device logs, choose ControlPanel > System > System Logs.
Configure the system time
Choose ControlPanel > System > General Settings > Time and click Edit.
Set the Time zone parameter to (GMT+08:00) Beijing, Chongqing, Hong Kong, Urumqi, modify the Time setting parameter, and then click Apply.