Kafka is a distributed message queue service that features high throughput and high scalability. Kafka is widely used for big data analytics such as log collection, monitoring data aggregation, streaming processing, and online and offline analysis. It is important for the big data ecosystem. This topic describes how to synchronize data from a PolarDB for Oracle cluster to a self-managed Kafka cluster by using Data Transmission Service (DTS). The data synchronization feature allows you to extend message processing capabilities.
Prerequisites
The source PolarDB for PostgreSQL (Compatible with Oracle) cluster must be of the latest version. For more information about how to update a cluster, see Version management.
The tables to be synchronized in the source PolarDB for PostgreSQL (Compatible with Oracle) cluster must contain primary keys or UNIQUE NOT NULL indexes.
In the source PolarDB for PostgreSQL (Compatible with Oracle) cluster, the wal_level parameter is set to logical. This indicates that the information required for logical encoding is added to the write-ahead logging (WAL) logs. For more information, see Configure cluster parameters.
Limits
In this scenario, DTS supports only incremental data synchronization.DTS does not support schema synchronization or full data synchronization.
A data synchronization task can synchronize data from only one database. To synchronize data from multiple databases, you must create a data synchronization task for each database.
To ensure that the delay time of data synchronization is accurate, DTS adds a heartbeat table named
dts_postgres_heartbeatto the source database. The following figure shows the schema of the heartbeat table.
If the source database has long-running transactions and the task contains incremental data synchronization, the write-ahead logging (WAL) logs before the long-running transactions are submitted may not be cleared and therefore pile up, resulting in insufficient storage space in the source database.
Billing
| Synchronization type | Task configuration fee |
| Schema synchronization and full data synchronization | Free of charge. |
| Incremental data synchronization | Charged. For more information, see Billing overview. |
Procedure
Purchase a data synchronization instance. For more information, see Purchase a DTS instance.
NoteOn the buy page, set Source Instance to POLARDB, Destination Instance to Kafka, and Synchronization Topology to One-way Synchronization.
Log on to the DTS console.
NoteIf you are redirected to the Data Management (DMS) console, you can click the
 icon in the
  to go to the previous version of the DTS console.
In the left-side navigation pane, click Data Synchronization.
In the upper part of the Synchronization Tasks page, select the region in which the destination instance resides.
Find the data synchronization instance and click Configure Task in the Actions column.
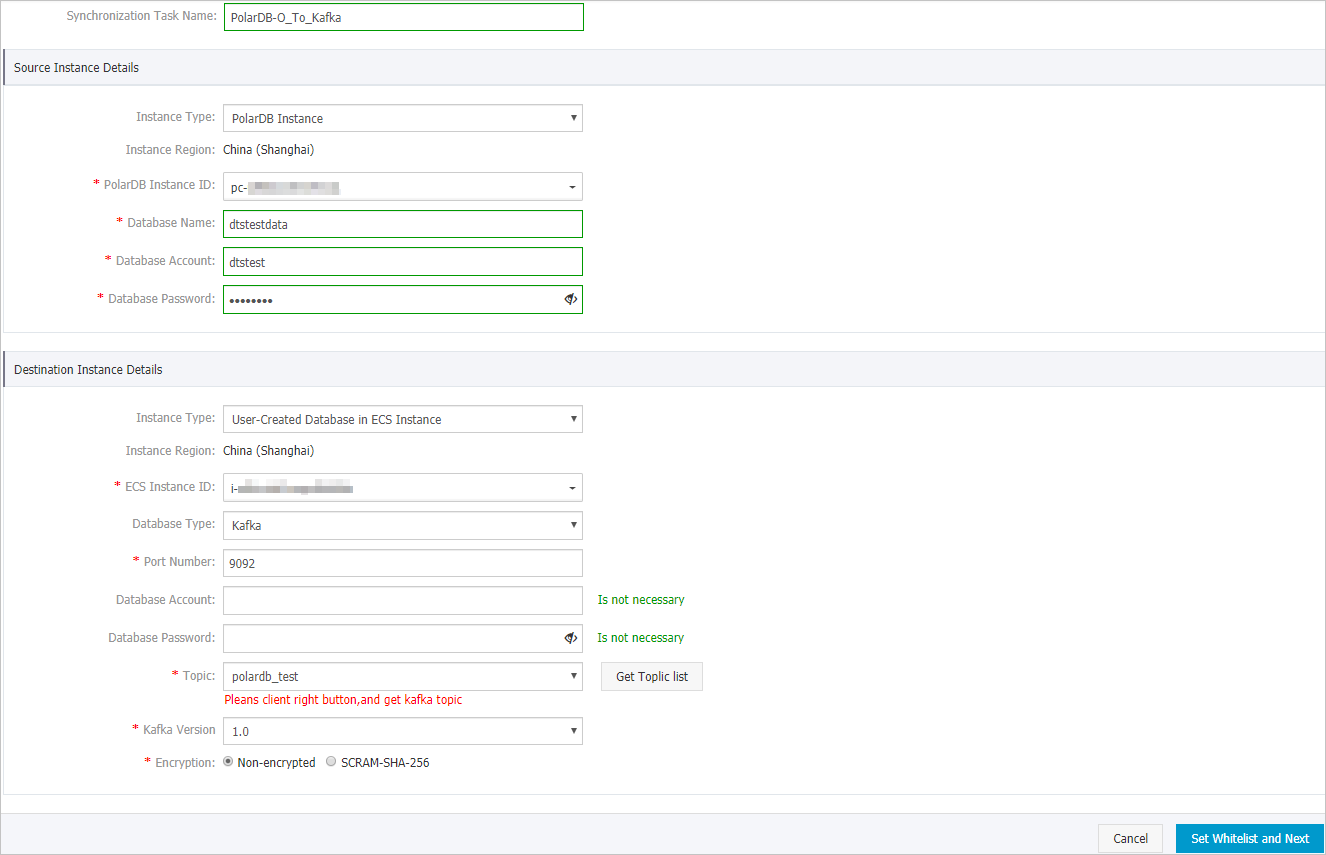
Configure the source and destination instances.
Section
Parameter
Description
N/A
Task Name
The task name that DTS automatically generates. We recommend that you specify a descriptive name that makes it easy to identify the task. You do not need to use a unique task name.
Source Database
Database Type
The value of this parameter is set to PolarDB Instance and cannot be changed.
Instance Region
The source region that you selected on the buy page. You cannot change the value of this parameter.
PolarDB Instance ID
The ID of the source PolarDB for Oracle cluster.
Database Name
The name of the source database.
Database Account
The privileged account of the source PolarDB for Oracle cluster. For more information about how to create a privileged database account, see Create a database account.
Database Password
The password of the database account.
Destination Database
Database Type
The access method of the self-managed Kafka cluster. In this example, User-Created Database with Public IP Address is selected.
NoteIf the self-managed Kafka cluster is of another type, you must set up the environment that is required for the database. For more information, see Preparation overview.
Instance Region
The destination region that you selected on the buy page. The value of this parameter cannot be changed.
ECS Instance ID
The ID of the ECS instance on which the Kafka cluster is deployed.
Database Type
The type of the destination database. Select Kafka.
Port Number
The service port number of the Kafka cluster. Default value: 9092.
Database Account
The username that is used to log on to the Kafka cluster. If no authentication is enabled for the Kafka cluster, you do not need to enter the username.
Database Password
The password that corresponds to the username. If no authentication is enabled for the Kafka cluster, you do not need to enter the password.
Topic
Click Get Topic List and select a topic name from the drop-down list.
Kafka Version
The version of the self-managed Kafka cluster.
Encryption
Select Non-encrypted or SCRAM-SHA-256 based on your business and security requirements.
In the lower-right corner of the page, click Set Whitelist and Next.
If the source or destination database is an Alibaba Cloud database instance, such as an ApsaraDB RDS for MySQL or ApsaraDB for MongoDB instance, DTS automatically adds the CIDR blocks of DTS servers to the IP address whitelist of the instance. If the source or destination database is a self-managed database hosted on an Elastic Compute Service (ECS) instance, DTS automatically adds the CIDR blocks of DTS servers to the security group rules of the ECS instance, and you must make sure that the ECS instance can access the database. If the self-managed database is hosted on multiple ECS instances, you must manually add the CIDR blocks of DTS servers to the security group rules of each ECS instance. If the source or destination database is a self-managed database that is deployed in a data center or provided by a third-party cloud service provider, you must manually add the CIDR blocks of DTS servers to the IP address whitelist of the database to allow DTS to access the database. For more information, see Add the CIDR blocks of DTS servers.
WarningIf the CIDR blocks of DTS servers are automatically or manually added to the whitelist of the database or instance, or to the ECS security group rules, security risks may arise. Therefore, before you use DTS to synchronize data, you must understand and acknowledge the potential risks and take preventive measures, including but not limited to the following measures: enhancing the security of your username and password, limiting the ports that are exposed, authenticating API calls, regularly checking the whitelist or ECS security group rules and forbidding unauthorized CIDR blocks, or connecting the database to DTS by using Express Connect, VPN Gateway, or Smart Access Gateway.
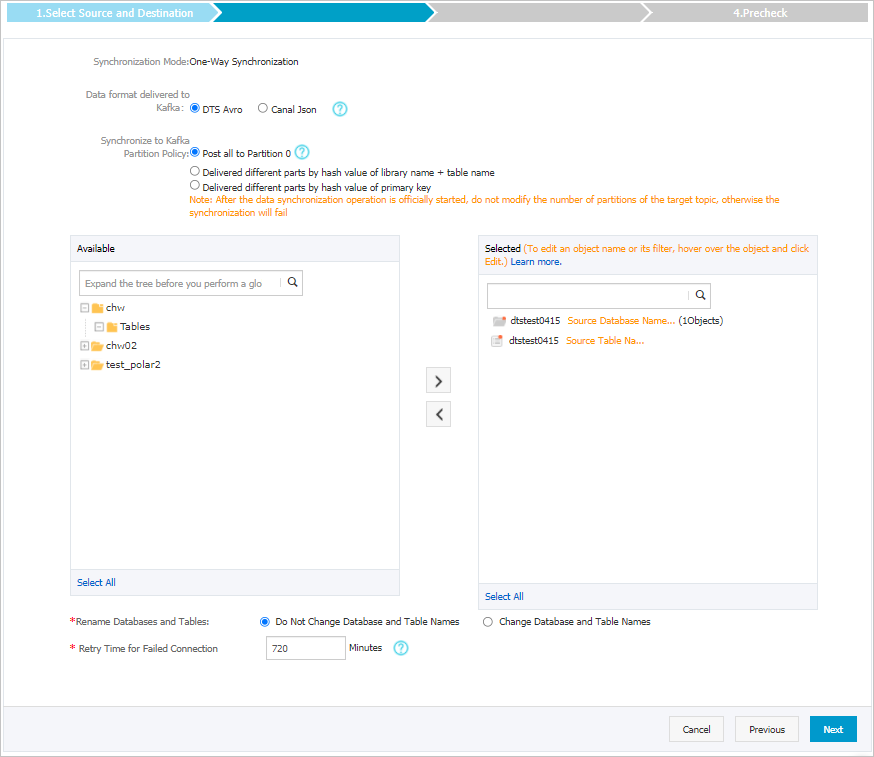
Select the objects to be synchronized.
Setting
Description
Select the objects to be synchronized
Select one or more tables from the Available section and click the
 icon to move the tables to the Selected section. You can select only tables as the objects to be synchronized. Note
DTS maps the table names to the topic name that you select in Step 6. If you want to change the topic name, you can move the pointer over the table and click Edit. You must specify a topic that exists in the Kafka cluster. For more information, see Rename an object to be synchronized.
Data format delivered to Kafka
The data that is synchronized to the Kafka cluster is stored in the Avro or SharePlex JSON format. For more information, see Data formats of a Kafka cluster.
Policy for Shipping Data to Kafka Partitions
Select a policy for data synchronization to Kafka partitions based on your business requirements. For more information, see Specify the policy for synchronizing data to Kafka partitions.
Rename Databases and Tables
You can use the object name mapping feature to rename the objects that are synchronized to the destination instance. For more information, see Object name mapping.
Retry Time for Failed Connections
By default, if DTS fails to connect to the source or destination database, DTS retries within the next 720 minutes (12 hours). You can specify the retry time based on your needs. If DTS reconnects to the source and destination databases within the specified time, DTS resumes the data synchronization task. Otherwise, the data synchronization task fails.
NoteWhen DTS retries a connection, you are charged for the DTS instance. We recommend that you specify the retry time based on your business needs. You can also release the DTS instance at your earliest opportunity after the source and destination instances are released.
In the lower-right corner of the page, click Next.
Select the initial synchronization type and filter options.

Parameter
Description
Initial synchronization
Initial Incremental Data Synchronization is selected by default. DTS synchronizes incremental data that is generated in the source database to the destination database.
Filter options
Ignore DDL in the incremental synchronization phase is selected by default. DTS does not synchronize DDL operations that are performed on the source database during incremental data synchronization.
NoteThe setting of this parameter does not take effect. DTS does not synchronize DDL operations that are performed on the source database regardless of whether you select this option.
In the lower-right corner of the page, click Precheck.
NoteBefore you can start the data synchronization task, DTS performs a precheck. You can start the data synchronization task only after the task passes the precheck.
If the task fails to pass the precheck, you can click the
 icon next to each failed item to view details.
 After you troubleshoot the issues based on the details, initiate a new precheck.
If you do not need to troubleshoot the issues, ignore the failed items and initiate a new precheck.
Close the Precheck dialog box after the following message is displayed: Precheck Passed. Then, the data synchronization task starts.
Wait until initial synchronization is complete and the data synchronization task enters the Synchronizing state.
You can view the status of the data synchronization task on the Synchronization Tasks page.
