After you modify table schemas in a self-service manner, you can publish the table schemas based on a process to ensure that the table schemas meet the design specifications of your enterprise and are consistent in different database environments. This greatly improves the success rate of publishing table schemas to the production environment. This topic describes how to publish table schemas based on a standard and secure research and development (R&D) process. In this example, a custom R&D process for schema design is used and consists of the Develop (Dev), Test, and Product nodes.
Background information
Benefit of schema design | Description |
Ensures the success rate of publishing table schemas to the production environment. | Before you publish a new table schema to the production environment, the schema design feature verifies the table schema on each node of an R&D process. This prevents unverified scripts that may cause publishing failures from being used to publish table schemas to the production environment. This also ensures the success rate of publishing table schemas to the production environment. |
Ensures the consistency of table schemas in different environments. | Data Management (DMS) changes table schemas in each database environment based on the R&D process. This prevents issues such as the test and publishing delays that are caused by failed schema changes in specific environments. |
Ensures the standardization of table schemas. | The R&D specifications for schema design include nearly 40 standards for multiple operations, such as creating tables, modifying table fields, and modifying table indexes. This allows developers to design table schemas that meet the R&D specifications of enterprises. This can prevent production failures that are caused by the publishing of table schemas that do not meet the specifications. In addition, the schema design feature can reduce the workload of O&M staff in checking specifications, improve R&D efficiency, and support the rapid iteration and publishing of table schemas. For more information, see Design specifications of table schemas. |
Overview
Customize an R&D process for schema design: optional. You can use the default R&D process that consists of the Dev and Product nodes. You can also customize an R&D process to meet your business requirements.
Configure a security rule set for a database instance: optional. Associate security rules, including the custom R&D process, with a database instance.
Design table schemas for a database: Submit a schema design ticket to ensure the consistency of table schemas in multiple databases and the success rate of publishing table schemas to the production environment.
Prepare a test environment
Create three ApsaraDB RDS for MySQL instances, and create accounts and databases in the database instances. For more information, see Create an ApsaraDB RDS for MySQL instance.
In this example, the database instances are named Schema_Design-dev, Schema_Design-test, and Schema_Design-product.
The databases are named dev_database, test_database, and product_database.
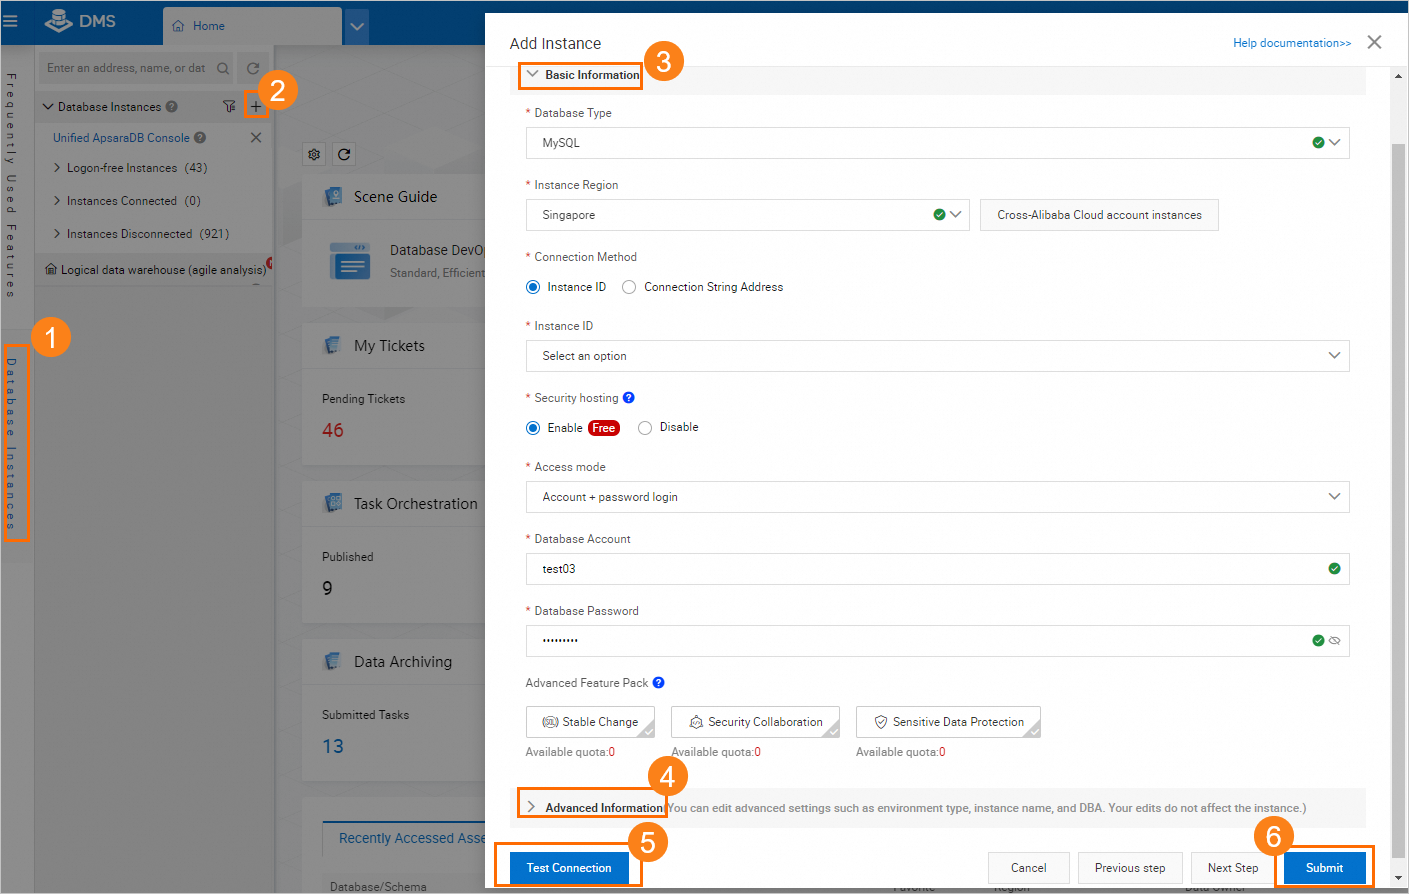
Register the created database instances with DMS by using an Alibaba Cloud account that has the permissions of a DMS administrator or a database administrator (DBA). Set the control mode of the database instances to Security Collaboration. Set the database environment type of Schema_Design-dev to Dev, the database environment type of Schema_Design-test to Test, and the database environment type of Schema_Design-product to Product. For more information, see Register an Alibaba Cloud database instance.
Mappings between the database instances and the nodes of the R&D process

1. Customize an R&D process for schema design
This section describes how to create a security rule set and configure an R&D process for schema design. The R&D process consists of the Dev, Test, and Product nodes.
1.1 Log on to DMS and go to the Security Rules page
Log on to the DMS console V5.0.
Move the pointer over the
 icon in the upper-left corner and choose .
If you use the DMS console in normal mode, choose in the top navigation bar.
1.2 (Optional) Create a security rule set
On the Security Rules page, click Create Rule Set in the upper-left corner. In the Create Rule Set dialog box, configure the parameters based on your business requirements. In this example, a security rule set named SD-DT is created.
After the security rule set is created, the Details page of the security rule set is automatically displayed in the DMS console.
1.3 Customize an R&D process
Configure the R&D process for schema design in the security rule set to specify the steps that are required to design table schemas and the operations that are allowed in each step.
Optional. Find the security rule set that you want to manage and click Edit in the Actions column to go to the Details page of the security rule set.
NoteIf the security rule set to be modified is newly created, skip this step.
In the left-side pane of the Details page, click Schema Design.
On the Schema Design tab, find the rule named R & D process and click Edit in the Actions column. Then, perform the following steps in the Change Configuration Item dialog box:
Change the name of the second node to
Testand change the database environment type toTest.Click Add Node to add a third node. Change the name of the third node to
Product, change the database environment type toProduct, and then select the check box in the Anchor column.NoteIf you select the check box in the Anchor column for a node and complete the node for a ticket, the ticket becomes published and cannot be modified.
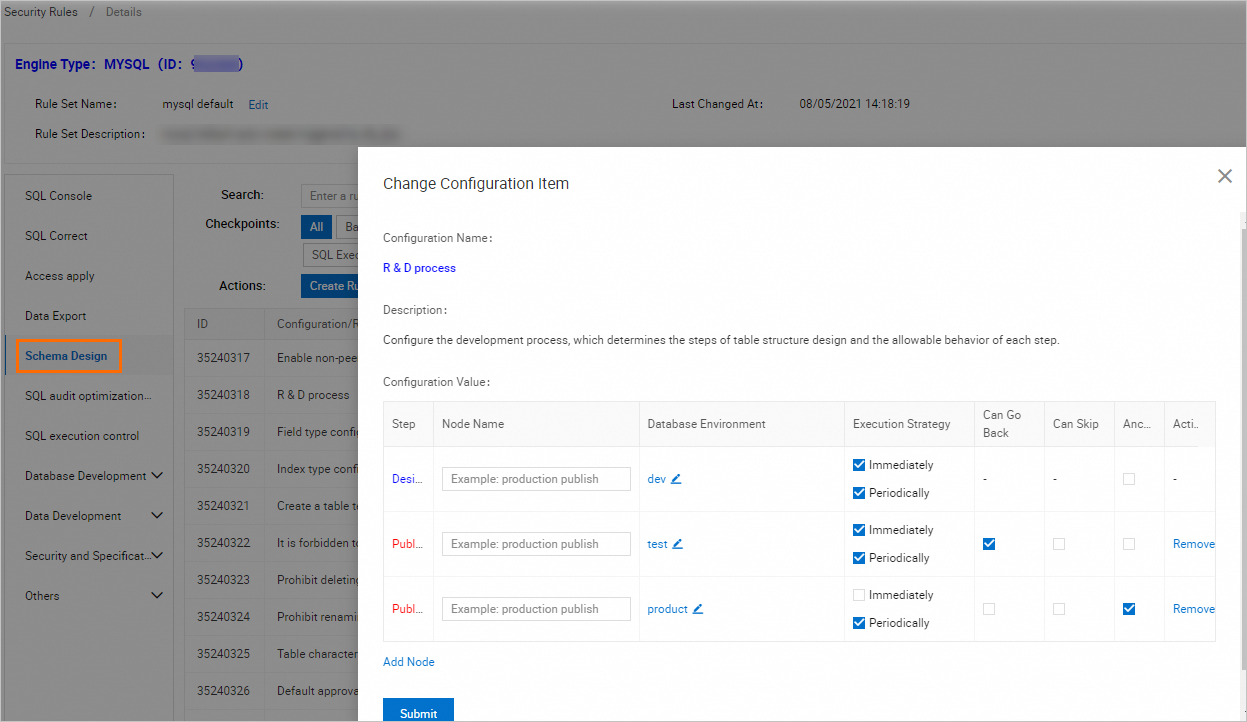
Click Submit.
2. Configure a security rule set for a database instance
Set the control mode of the Schema_Design-dev database instance to Security Collaboration and associate the SD-DT security rule set with the database instance.
On the homepage of the DMS console, right-click the Schema_Design-dev database instance in the left-side instance list.
In the shortcut menu that appears, choose .
3. Design table schemas for a database
This section describes how to use the configured R&D process for schema design to design, test, and publish a table schema for a database.
3.1 Go to the Schema Design wizard
- Log on to the DMS console V5.0.
In the top navigation bar, choose .
NoteIf you use the DMS console in simple mode, move the pointer over the
icon in the upper-left corner of the console and choose . In the upper-right corner of the page, click Schema Design.
3.2 Configure a schema design ticket
Create a schema design ticket.
In the Create Ticket step, select a database whose environment type is Dev from the Change Base Database drop-down list and configure other parameters based on your business requirements.
In this example, the dev_database database is selected.
In the Schema Design step, create a table in the dev_database database.
Click Import SQL Statements. In the Import SQL Statements dialog box, enter the SQL statements that are used to create the table, and then click OK.
Click Save. In the Precheck Result message, click Confirm Changes and Submit to Save.
Click Perform Changes to Base Database.
In the panel that appears, configure the Execution Strategy parameter, check whether the SQL statements to be executed are valid, and then click OK.
After an approver manually approves the change, DMS writes the new table schema to the dev_database database.
Click Go to Next Node.
NoteBefore you click Go to Next Node, you must modify and verify the new table schema of the dev_database database on this node. After you click Go to Next Node, DMS generates a
createscript and publishes the script to the next node.
On the Test node, synchronize the table schema created on the previous node to the test_database database.
Click Perform Changes to Target Database.
In the panel that appears, select the test_database database, set the Execution Strategy parameter to Execute Now, and then click OK.
After an approver approves the change, DMS writes the changed table schema to the test_database database.
ImportantThe next node is the Product node that is specified as an anchor. After you proceed to the Product node, you are not allowed to roll back to the previous node to perform design or publish operations.
Click Go to Next Node.
On the Product node, synchronize the table schema to the product_database database.
Click Perform Changes to Target Database.
In the panel that appears, select the product_database database, set the Execution Strategy parameter to Execute Now, and then click OK.
Wait until an approver approves the change.
After an approver approves the change, DMS writes the changed table schema to the product_database database. You can also write data to the product_database database.
After you click Go to Next Node, the R&D process for schema design ends and the ticket is automatically closed.
References
For more information about the security rules for the schema design feature, see Schema design.
For more information about the scenarios and features of the schema design feature, see Design schemas.
For more information about how to query the publishing details of a schema design ticket by calling an API operation, see ListDDLPublishRecords.