Background
Data Management Service (DMS) is a web service platform provided by Alibaba Cloud for data operations, data security management, and data development. DMS serves as a database client, supporting multiple database engines, such as MySQL, PostgreSQL, SQL Server, Oracle, Redis, and MongoDB. DMS supports unified permission management and stable changes for registered databases. It also integrates data development capabilities including data warehouse development and task orchestration.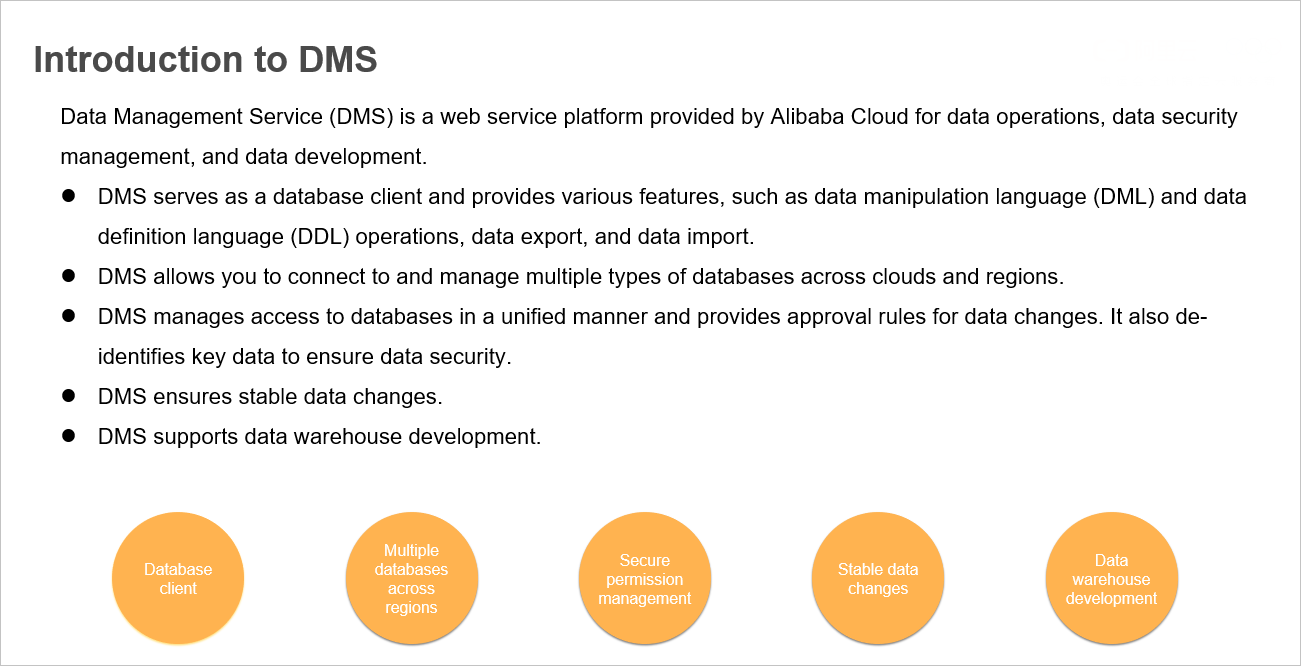
Scenarios of DMS-based data development
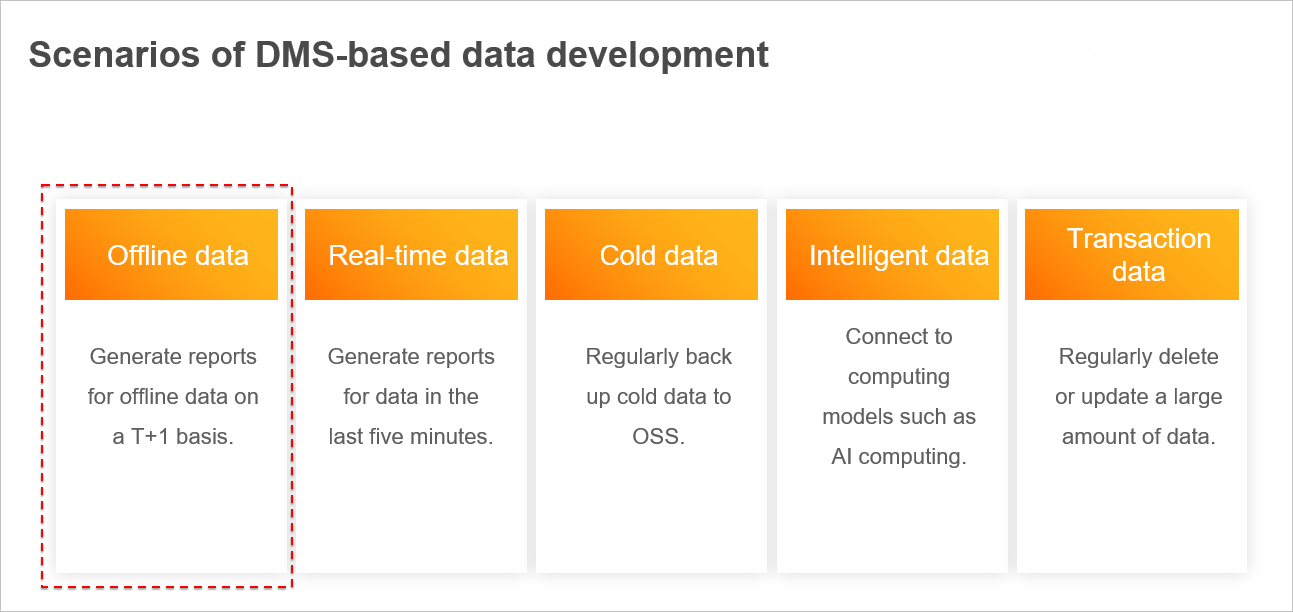
The data development capabilities provided by DMS can be used in various scenarios, such as:
- Offline data: Generate reports for offline data on a T+1 basis.
- Real-time data: Generate reports for data in the last five minutes.
- Intelligent data: Connect to computing models such as AI computing.
- Cold data: Regularly back up cold data to Object Storage Service (OSS).
Transaction data: Regularly delete or update a large amount of data.
This topic describes how to generate daily, weekly, and monthly reports on a T+1 basis by using the data development feature provided by DMS.
Generate daily, weekly, and monthly reports in the DMS console
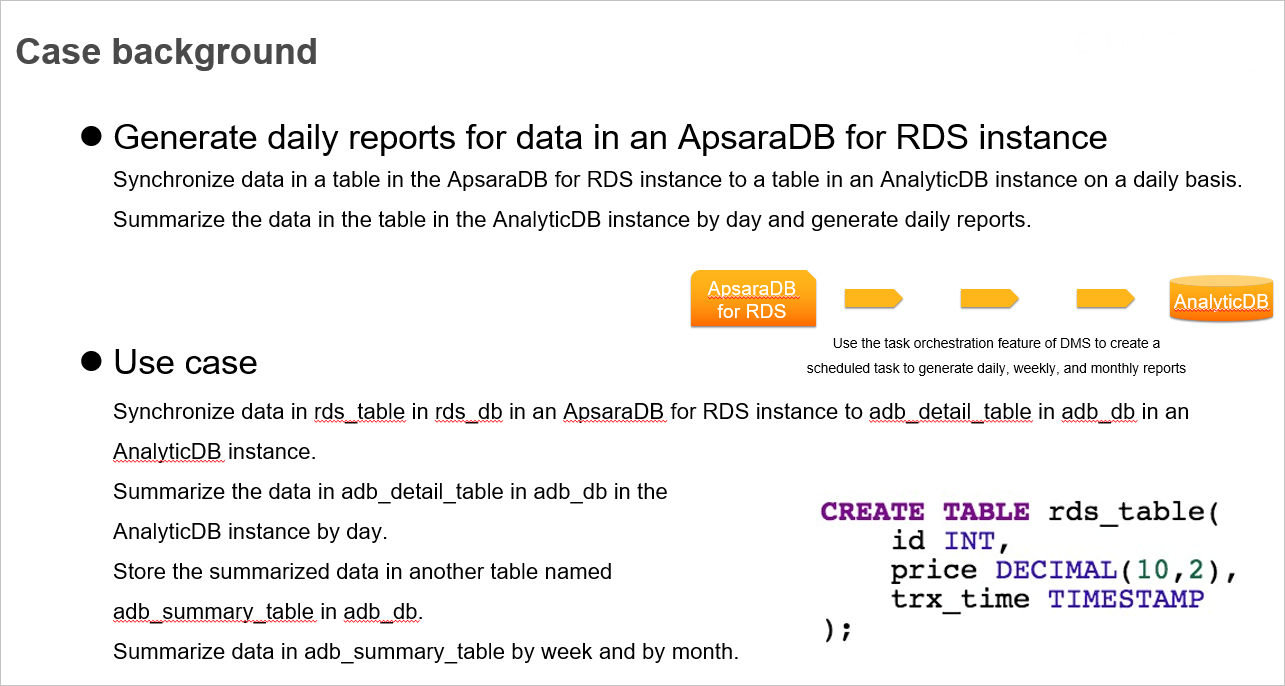
As the data volume increases exponentially, it is impossible for one database to provide all features that may be needed. Therefore, databases are classified into two types based on their features: online transaction processing (OLTP) databases and online analytical processing (OLAP) databases. OLTP databases, such as ApsaraDB RDS for MySQL provided by Alibaba Cloud, are mainly used to process transaction data, for example, business orders. OLAP databases, such as AnalyticDB for MySQL provided by Alibaba Cloud, are mainly used to analyze data, for example, to generate analysis reports. Before you analyze data and generate daily, weekly, and monthly reports in OLAP databases, you need to synchronize data by day from OLTP databases. For example, you can synchronize data by day from an ApsaraDB RDS for MySQL database to an AnalyticDB for MySQL database.
The database management feature provided by DMS allows you to manage ApsaraDB RDS for MySQL and AnalyticDB for MySQL databases at the same time. Therefore, you can synchronize data from ApsaraDB RDS for MySQL to AnalyticDB for MySQL and generate reports in the DMS console without switching databases. In addition, the task orchestration feature provided by DMS allows you to regularly synchronize data and generate daily, weekly, and monthly reports.
Case background
This topic provides a specific use case, involving a table named rds_table in a database named rds_db in an ApsaraDB for RDS instance and a table named adb_detail_table in a database named adb_db in an AnalyticDB instance. In this use case, data in rds_table is synchronized to adb_detail_table and summarized by day. The summarized data is stored in another table named adb_summary_table in adb_db. Data in adb_summary_table is then summarized by week and by month. Data of the previous day in rds_table is synchronized to adb_detail_table and summarized at 05:00 every day. You can execute the following SQL statement to create rds_table:
CREATE TABLE rds_table(id INT,price DECIMAL(10,2),trx_time TIMESTAMP);
Preparations
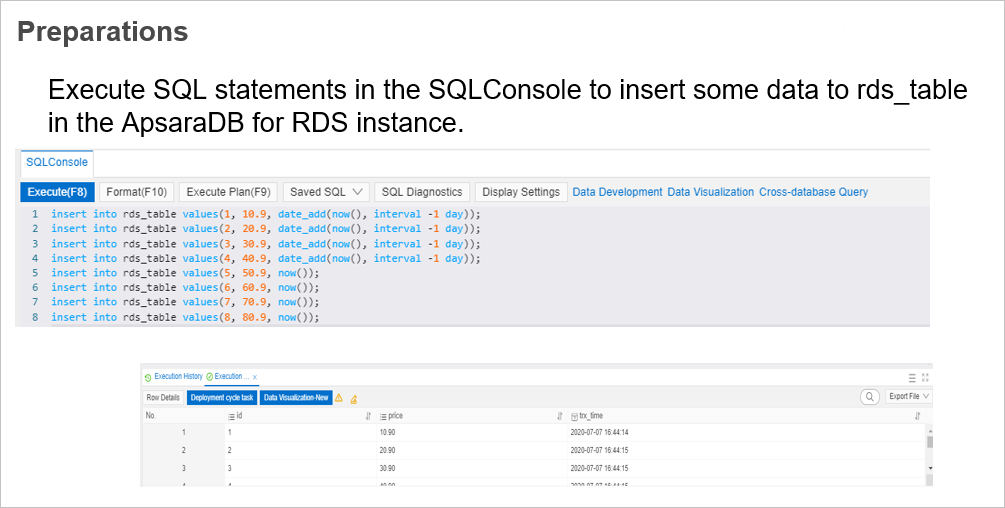
First, execute the following SQL statements in the SQLConsole to insert some data to rds_table:
insert into rds_table values(1, 10.9, date_add(now(), interval -1 day));insert into rds_table values(2, 20.9, date_add(now(), interval -1 day));insert into rds_table values(3, 30.9, date_add(now(), interval -1 day));insert into rds_table values(4, 40.9, date_add(now(), interval -1 day));insert into rds_table values(5, 50.9, now());insert into rds_table values(6, 60.9, now());insert into rds_table values(7, 70.9, now());insert into rds_table values(8, 80.9, now());
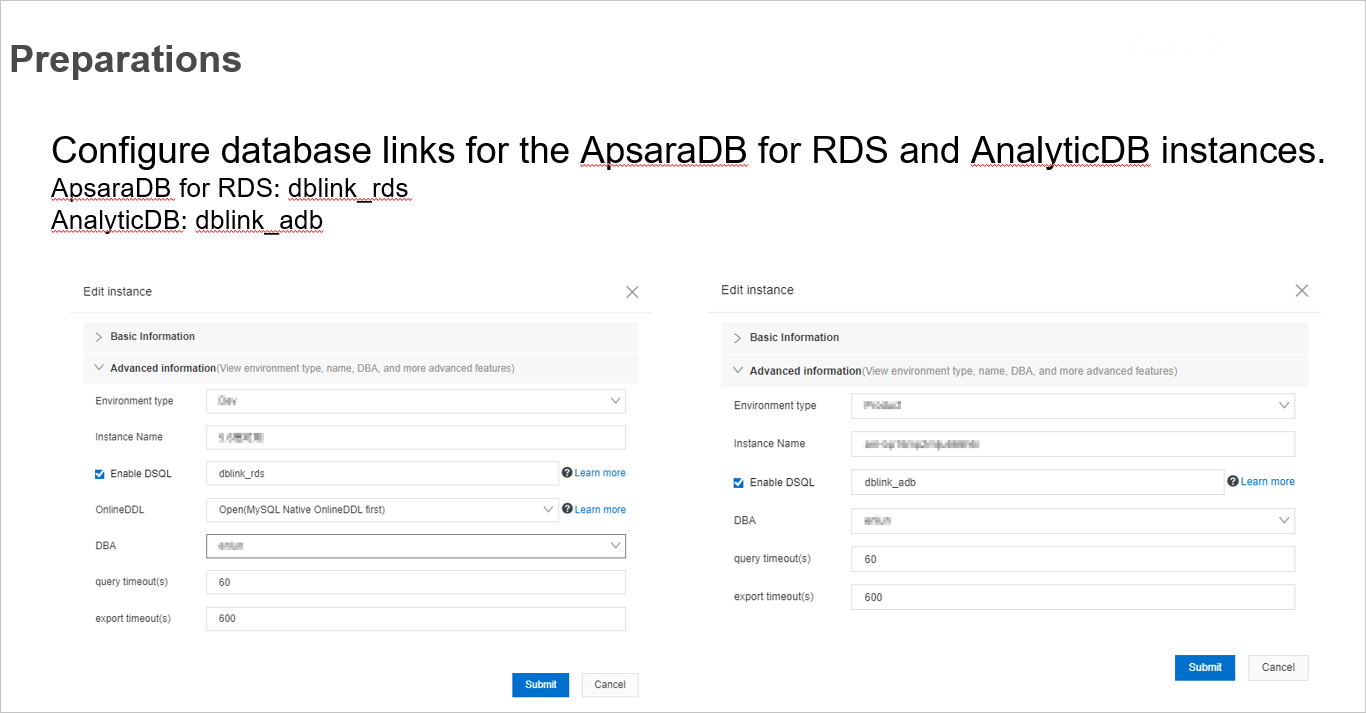
Then, configure database links for the ApsaraDB for RDS and AnalyticDB instances. To configure a database link for an instance in the DMS console, right-click the instance in the left-side navigation pane and select Edit instance. In the dialog box that appears, select Enable DSQL and enter a database link name in the Advanced information section. The following are the examples of database links configured for the two instances:
- Database link for the ApsaraDB for RDS instance: dblink_rds
Database link for the AnalyticDB instance: dblink_adb

Implement a task flow
This section describes how to synchronize data from an ApsaraDB for RDS instance to an AnalyticDB instance and then summarize the data.
Create a task flow
In the top navigation bar in the DMS console, choose Data Factory > Task orchestration. On the Task orchestration page, click New task flow in the Free orchestration tasks section. In the dialog box that appears, enter daily_weekly_monthly_report in the Task Flow Name field and click OK.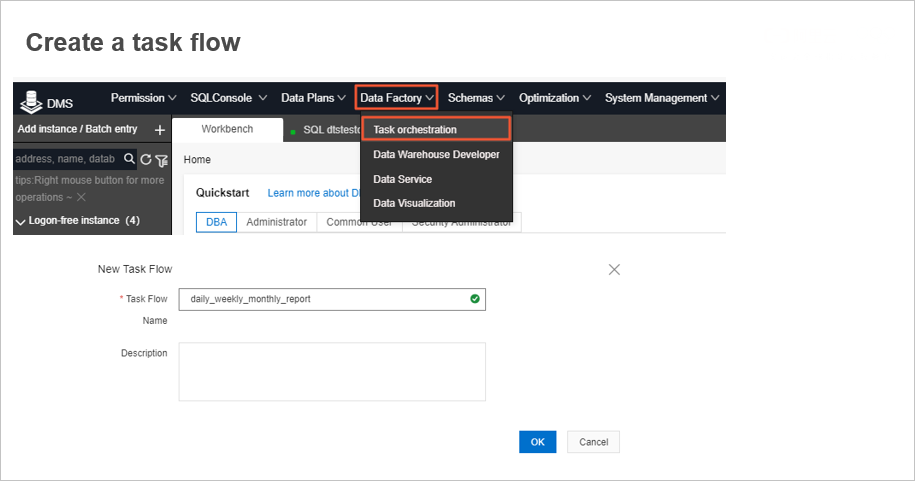
Create task nodes
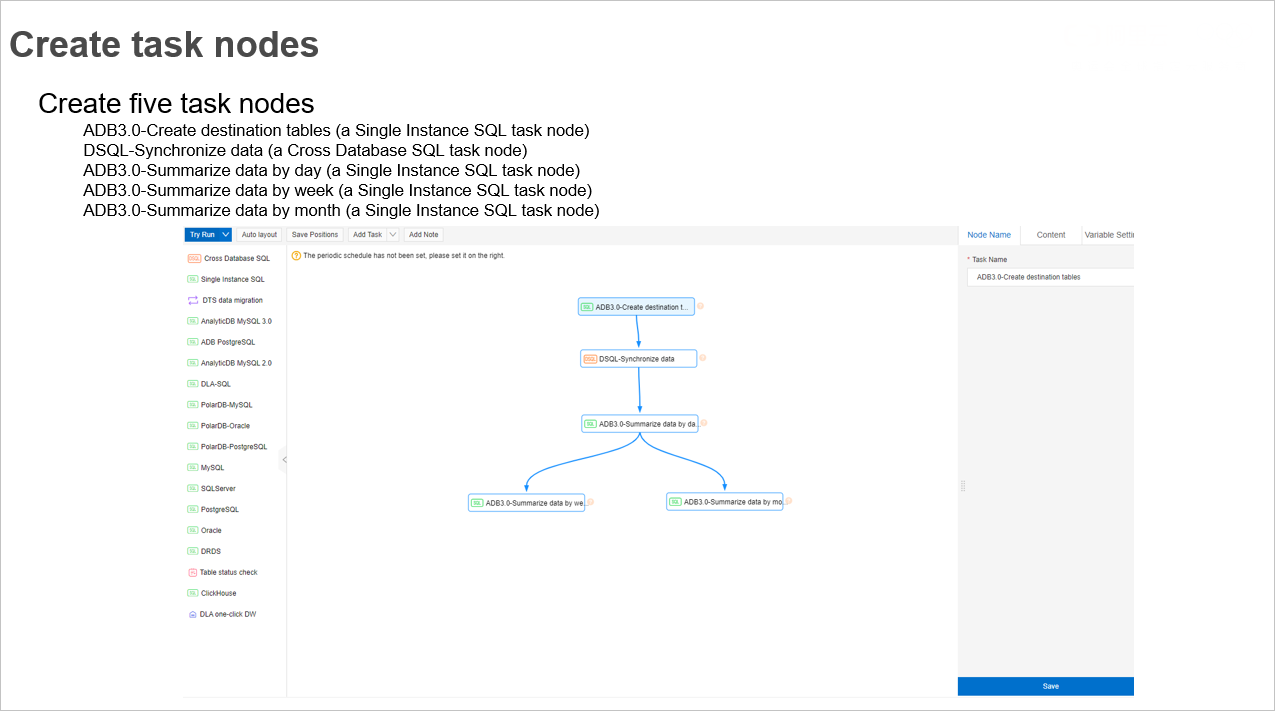
On the daily_weekly_monthly_report page that appears, create the following five task nodes in sequence:
- ADB3.0-Create destination tables: This node is a Single Instance SQL task node. It creates four tables in the AnalyticDB instance. One table is used to store data synchronized from the ApsaraDB for RDS instance and the other three tables are used to store summarized data.
- DSQL-Synchronize data: This node is a Cross Database SQL task node. It synchronizes data of the previous day in the ApsaraDB for RDS instance to the AnalyticDB instance.
- ADB3.0-Summarize data by day: This node is a Single Instance SQL task node. It summarizes data of the previous day in the AnalyticDB instance.
- ADB3.0-Summarize data by week: This node is a Single Instance SQL task node. It summarizes data of the previous week in the AnalyticDB instance.
ADB3.0-Summarize data by month: This node is a Single Instance SQL task node. It summarizes data of the previous month in the AnalyticDB instance.
Create the ADB3.0-Create destination tables task node
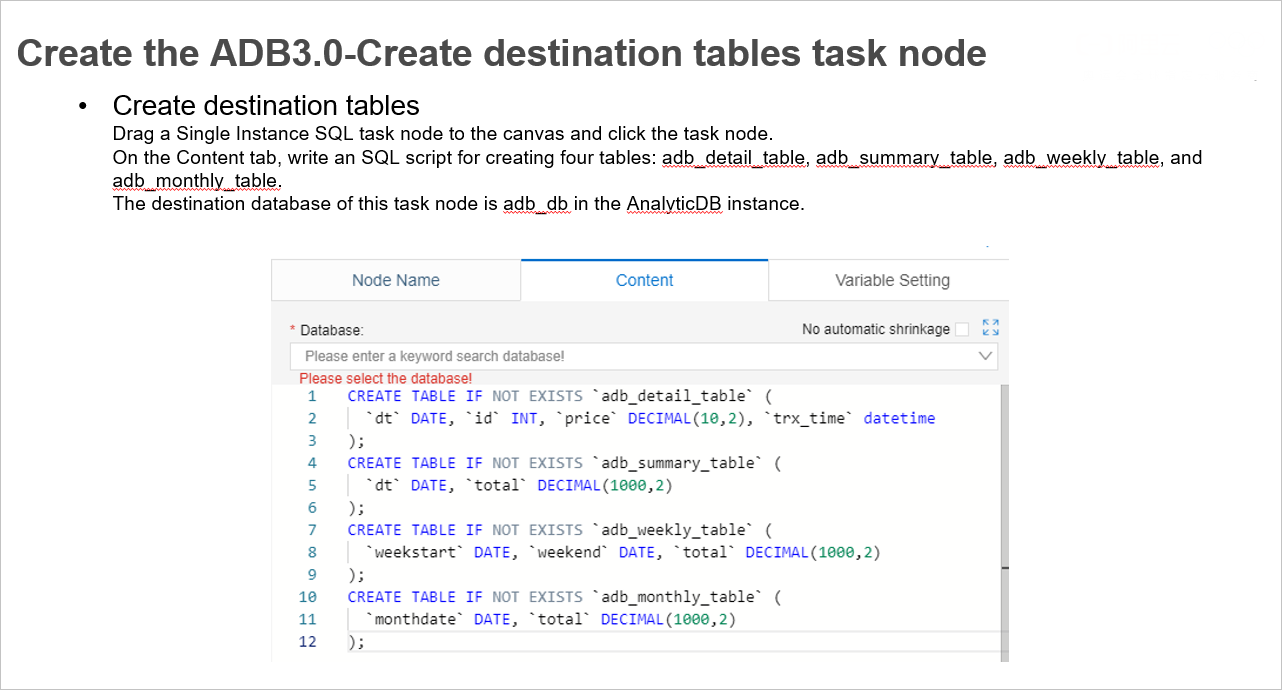
Drag a Single Instance SQL task node to the canvas and click the task node. On the Node Name tab, set Task Name to ADB3.0-Create destination tables. On the Content tab, write an SQL script for creating four tables in adb_db: adb_detail_table, adb_summary_table, adb_weekly_table, and adb_monthly_table. adb_detail_table is used to store data synchronized from the ApsaraDB for RDS instance. adb_summary_table, adb_weekly_table, and adb_monthly_table are respectively used to store daily, weekly, and monthly summarized data.
CREATE TABLE IF NOT EXISTS `adb_detail_table` (`dt` DATE, `id` INT, `price` DECIMAL(10,2), `trx_time` datetime);CREATE TABLE IF NOT EXISTS `adb_summary_table` (`dt` DATE, `total` DECIMAL(1000,2));CREATE TABLE IF NOT EXISTS `adb_weekly_table` (`weekstart` DATE, `weekend` DATE, `total` DECIMAL(1000,2));CREATE TABLE IF NOT EXISTS `adb_monthly_table` (`monthdate` DATE, `total` DECIMAL(1000,2));
Create the DSQL-Synchronize data task node
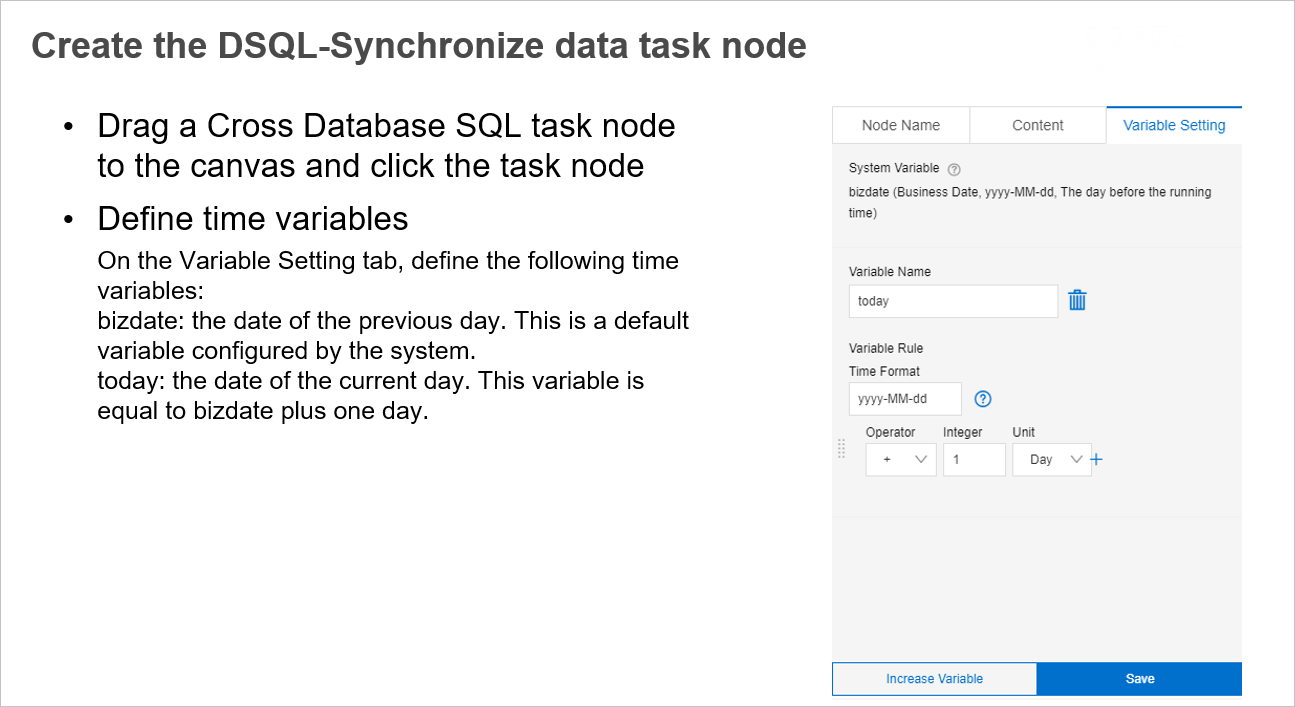
Drag a Cross Database SQL task node to the canvas and click the task node. On the Node Name tab, set Task Name to DSQL-Synchronize data. On the Variable Setting tab, define the time variables to be used in SQL statements for synchronizing data across databases.
Define time variables
In this example, define the following two time variables:
- bizdate: the date of the previous day. This is a default variable configured by the system.
- today: the date of the current day.
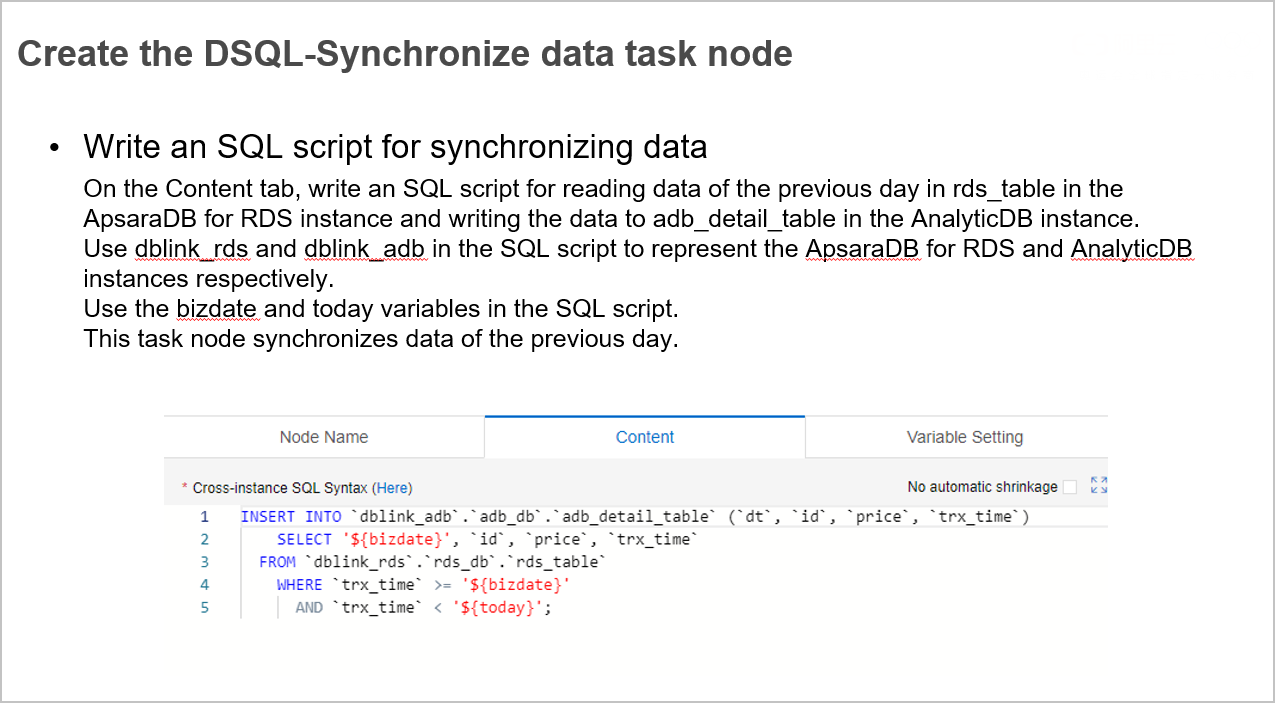
Write an SQL script for synchronizing data
On the Content tab, write an SQL script for reading data of the previous day in rds_table in the ApsaraDB for RDS instance (dblink_rds) and writing the data to adb_detail_table in the AnalyticDB instance (dblink_adb). Data of the previous day in rds_table is queried by using the defined time variables: bizdate and today. Each time this task node is run, only rows of data whose trx_time values fall between the values of bizdate and today will be read and written to adb_detail_table.
INSERT INTO `dblink_adb`.`adb_db`.`adb_detail_table` (`dt`, `id`, `price`, `trx_time`)SELECT '${bizdate}', `id`, `price`, `trx_time`FROM `dblink_rds`.`rds_db`.`rds_table`WHERE `trx_time` >= '${bizdate}'AND `trx_time` < '${today}';
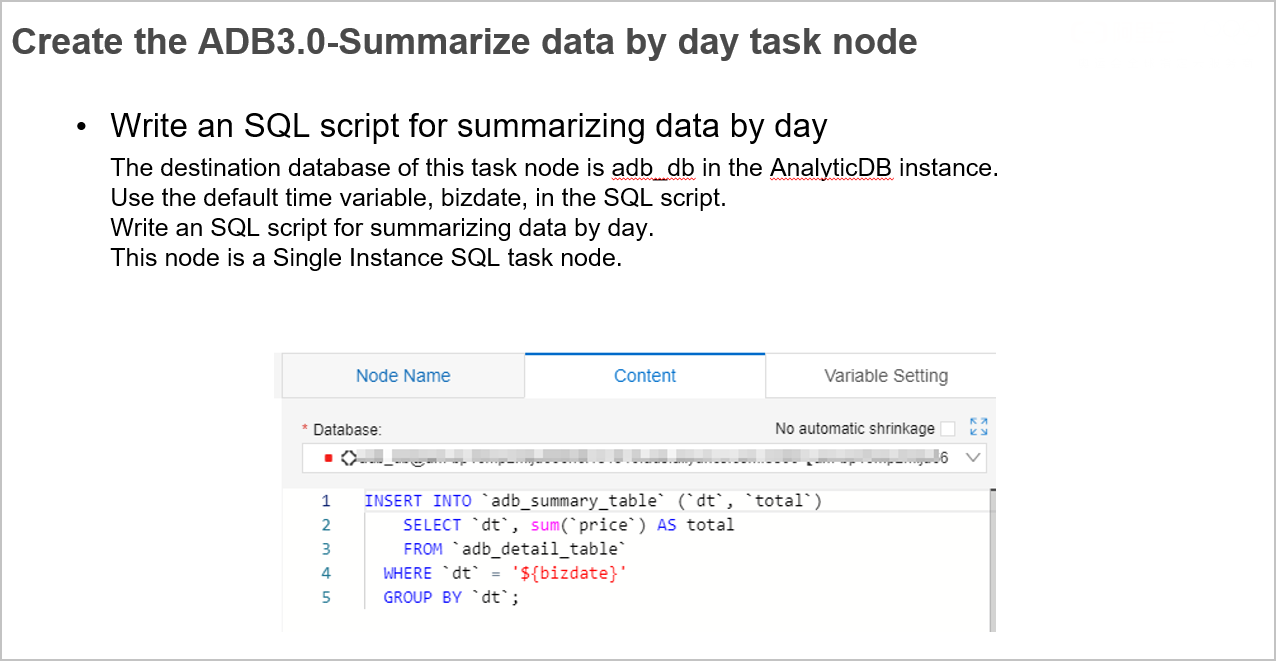
Create the ADB3.0-Summarize data by day task node
Drag a Single Instance SQL task node to the canvas and click the task node. On the Node Name tab, set Task Name to ADB3.0-Summarize data by day. On the Content tab, write the following SQL script. The script reads data of the previous day in adb_detail_table by using the bizdate variable, summarizes the data, and then writes the summarized data to adb_summary_table. The destination database of this task node is adb_db in the AnalyticDB instance.
INSERT INTO `adb_summary_table` (`dt`, `total`)SELECT `dt`, sum(`price`) AS totalFROM `adb_detail_table`WHERE `dt` = '${bizdate}'GROUP BY `dt`;
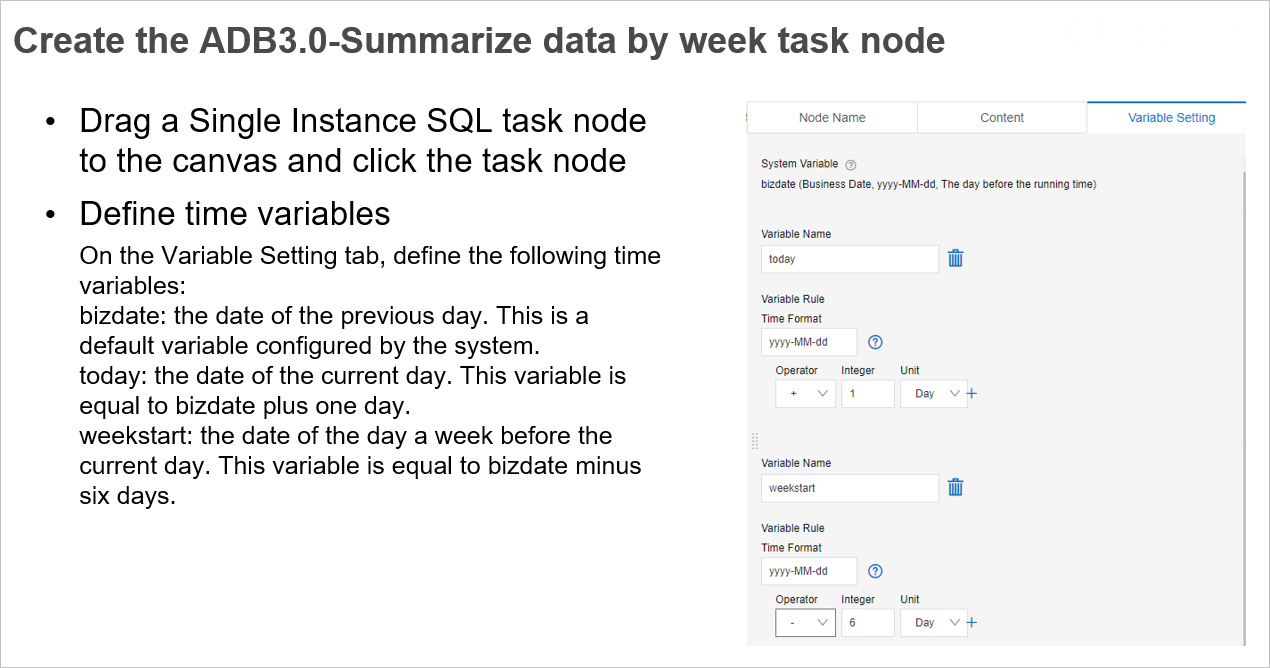
Create the ADB3.0-Summarize data by week task node
Drag a Single Instance SQL task node to the canvas and click the task node. On the Node Name tab, set Task Name to ADB3.0-Summarize data by week. On the Variable Setting tab, define the time variables to be used in SQL statements for summarizing data by week.
Define time variables
In this example, define the following three time variables:
- bizdate: the date of the previous day. This is a default variable configured by the system.
- today: the date of the current day.
- weekstart: the date of the day a week before the current day. This variable is equal to bizdate minus six days.
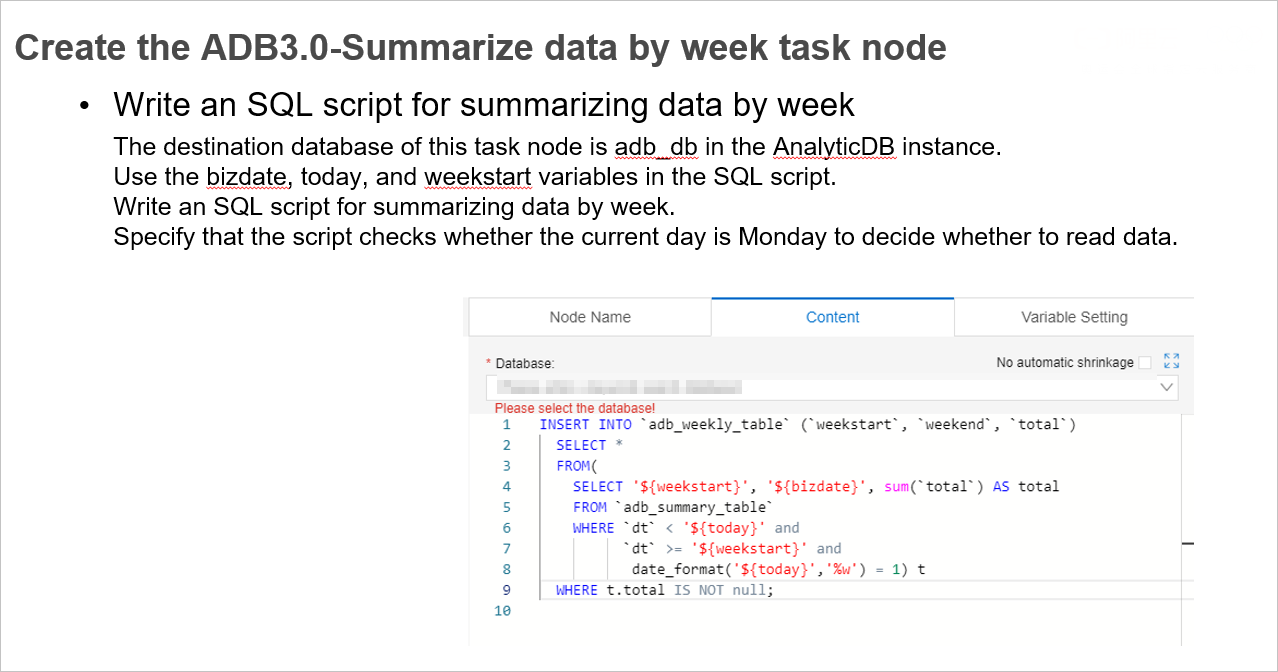
Write an SQL script for summarizing data by week
On the Content tab, write the SQL script. The script reads data of the previous week in adb_summary_table by using the bizdate, today, and weekstart variables. In addition, the script checks whether the current day is Monday to decide whether to read data. In this way, this task node will only be run every Monday to generate weekly reports.
INSERT INTO `adb_weekly_table` (`weekstart`, `weekend`, `total`)SELECT *FROM(SELECT '${weekstart}', '${bizdate}', sum(`total`) AS totalFROM `adb_summary_table`WHERE `dt` < '${today}' and`dt` >= '${weekstart}' anddate_format('${today}','%w') = 1) tWHERE t.total IS NOT null;
Create the ADB3.0-Summarize data by month task node
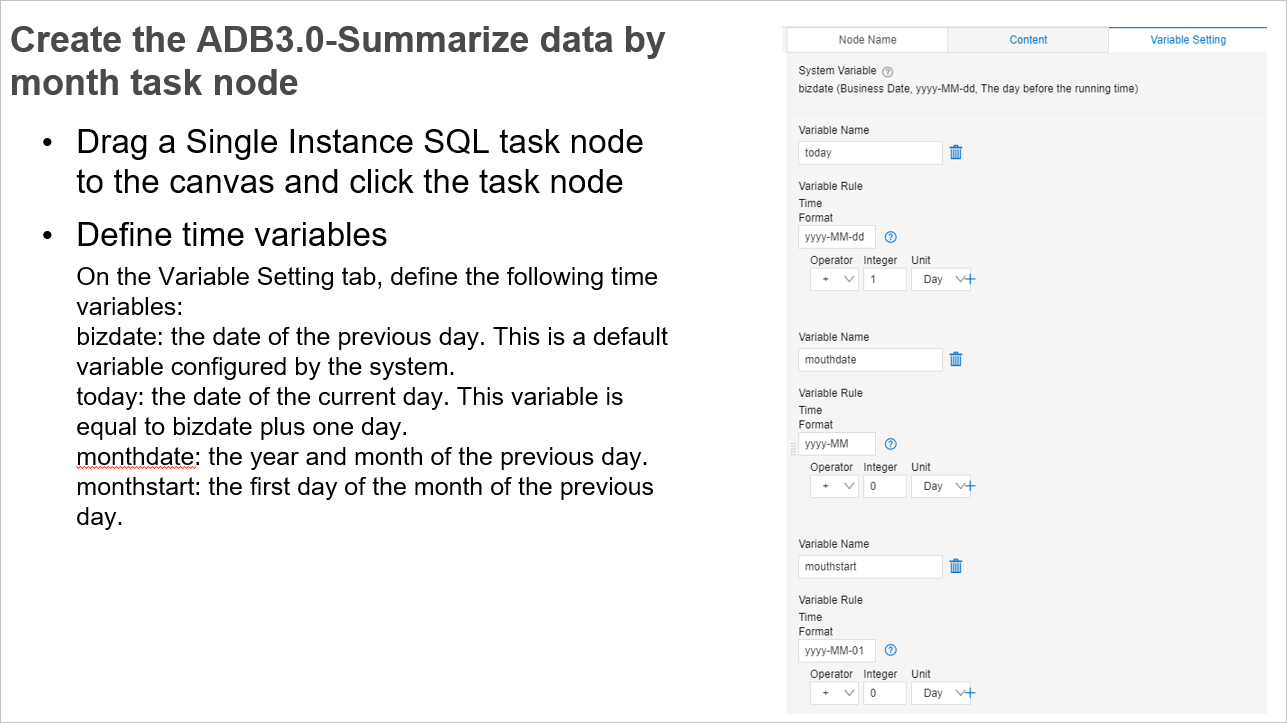
Drag a Single Instance SQL task node to the canvas and click the task node. On the Node Name tab, set Task Name to ADB3.0-Summarize data by month. On the Variable Setting tab, define the time variables to be used in SQL statements for summarizing data by month.
Define time variables
In this example, define the following four time variables:
- bizdate: the date of the previous day. This is a default variable configured by the system.
- today: the date of the current day.
- monthdate: the year and month of the previous day.
- monthstart: the first day of the month of the previous day.
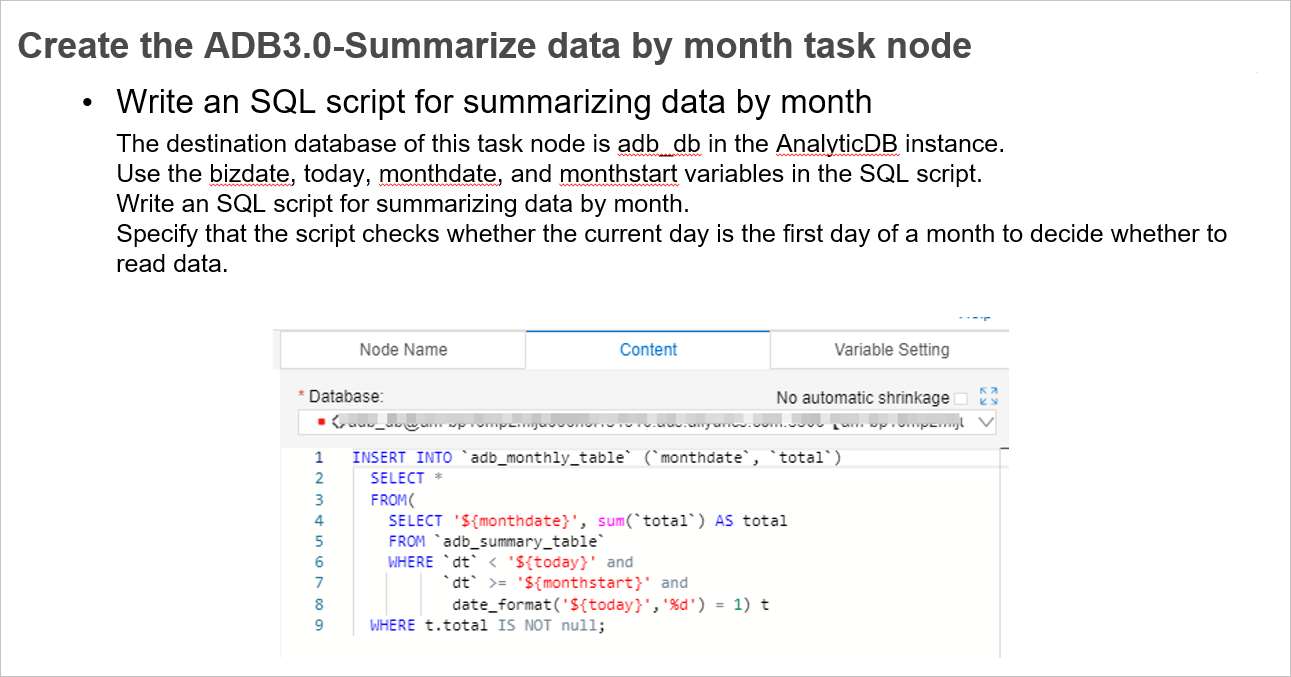
Write an SQL script for summarizing data by month
On the Content tab, write the following SQL script. The script reads data of the previous month in adb_summary_table by using the bizdate, today, monthdate, and monthstart variables. In addition, the script checks whether the current day is the first day of a month to decide whether to read data. In this way, this task node will only be run on the first day of every month to generate monthly reports.
INSERT INTO `adb_monthly_table` (`monthdate`, `total`)SELECT *FROM(SELECT '${monthdate}', sum(`total`) AS totalFROM `adb_summary_table`WHERE `dt` < '${today}' and`dt` >= '${monthstart}' anddate_format('${today}','%d') = 1) tWHERE t.total IS NOT null;
Run the task flow
After the preceding task nodes are configured, click Try Run in the upper-left corner to run the task flow. Go to the SQLConsole and query the tables in adb_db in the AnalyticDB instance, including adb_summary_table, adb_weekly_table, and adb_monthly_table.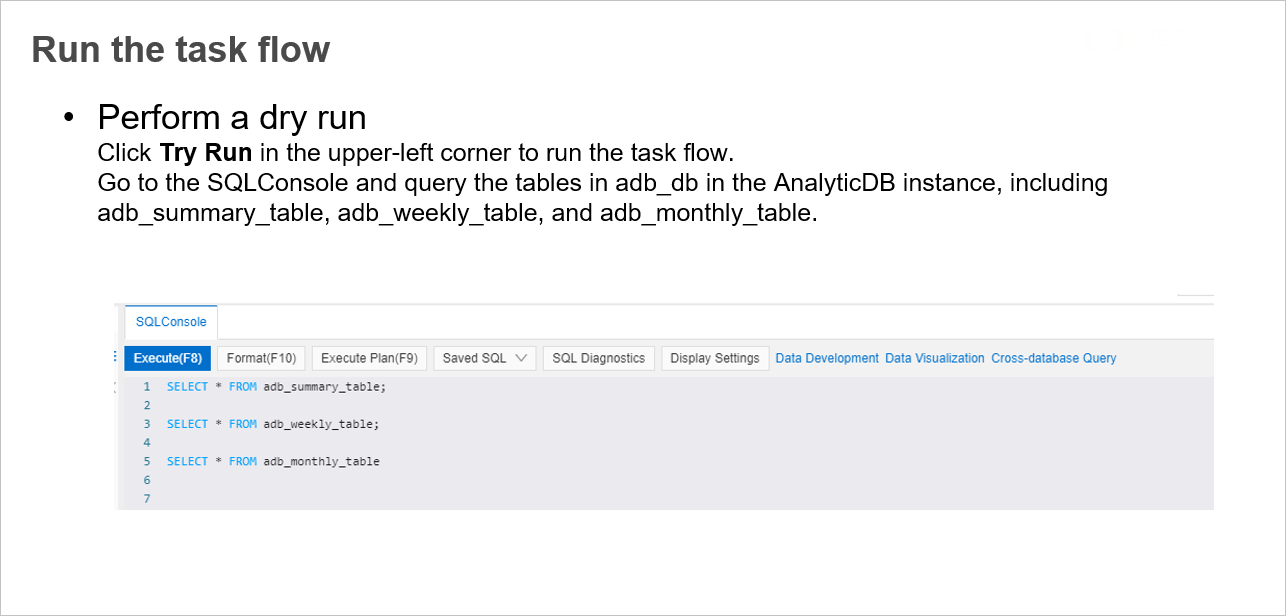
Configure a scheduling policy
After you click Try Run, the system will check whether the task flow is correctly configured. After the task flow is successfully run, click the blank area. On the Scheduling tab that appears, set the task flow to be run at 05:00 every morning.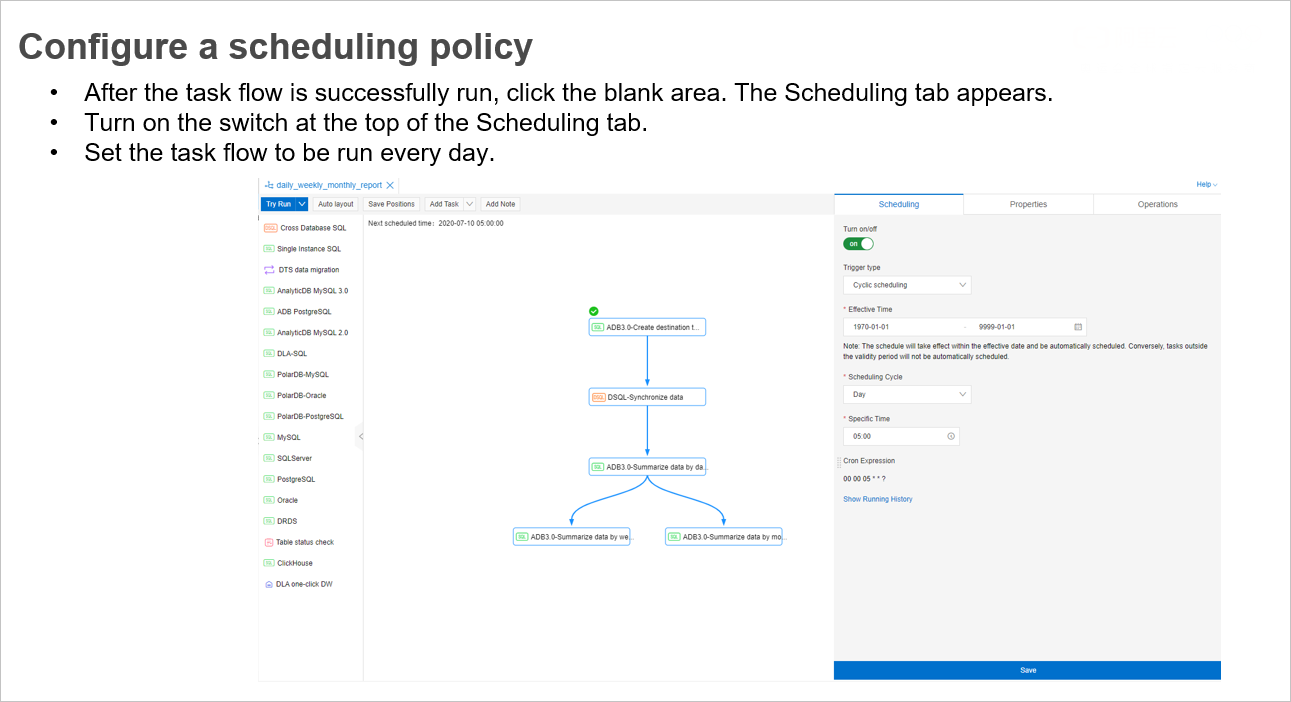
Considerations
- Before you create the task flow, you need to create a table named rds_table in rds_db in the ApsaraDB for RDS instance and a database named adb_db in the AnalyticDB instance.
- Make sure that one or more fields in rds_table record the time when a row of data is inserted.
- If the ApsaraDB for RDS instance is managed in the Secure Collaboration mode, to insert data to rds_table, you need to apply for the permission to change the table and modify security rules to allow SQL statements to be executed in the SQLConsole.
- If the ApsaraDB for RDS and AnalyticDB instances are both managed in the Secure Collaboration mode, to run SQL scripts written for the preceding task nodes, you need to apply for permissions and modify security rules to allow the scripts to be run.
Summary
With a specific use case, this topic describes in detail how to periodically synchronize data from an ApsaraDB for RDS instance to an AnalyticDB instance and generate daily, weekly, and monthly reports in DMS. In this use case, by configuring a task flow, T+1 reports of an ApsaraDB for RDS instance are automatically generated on a regular basis. This use case shows the powerful capabilities provided by DMS for synchronizing data and generating T+1 reports. DMS can help you manage data in ApsaraDB for RDS more efficiently and save your time.
Except for data synchronization and generation of daily, weekly, and monthly reports, the data development feature provided by DMS can also be used in other scenarios. For more information, see DMS documentation.