A task flow is a directed acyclic graph (DAG) that consists of one or more task nodes. You can create a complex task flow only by dragging and configuring task nodes.
Prerequisites
- You have logged on to a database.
Note If the database instance is managed in Flexible Management or Stable Change mode, you must log on to the database instance. If the database instance is managed in Security Collaboration mode, you do not need to log on to the database instance. For more information about control modes, see Control modes.
- The database type is supported. For more information about supported database types, see Supported database types and features.
Create and connect task nodes in a task flow
This section describes how to create and connect task nodes in a task flow. You can create one or more task nodes in the task flow.
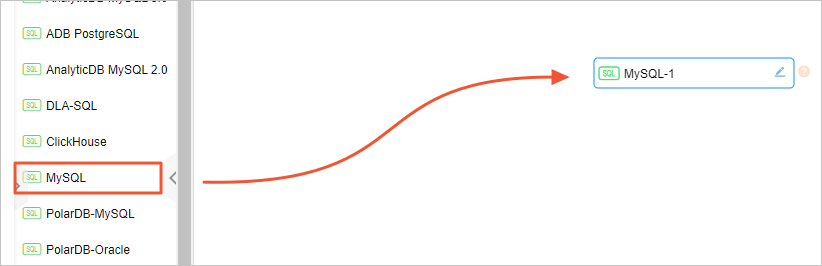
- From the left-side task node list, drag one or more task nodes that you want to create
to the blank area on the canvas. Note For more information about supported task nodes, see Task node types.
- Click the
 icon next to the task node name to change the name.
 - Click the task node. In the right-side pane, click the Content tab and edit the code of the task node.
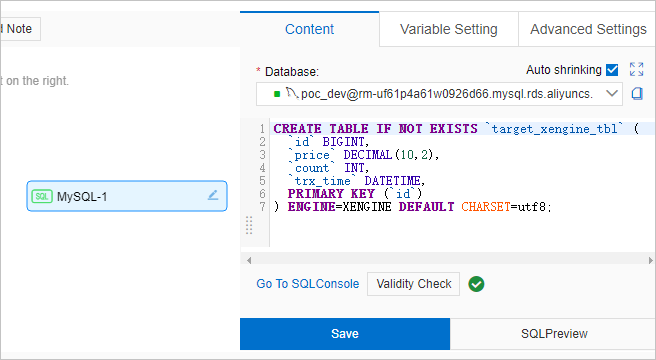 Note
Note- You can drag the Resize button to change the size of the right-side pane.
- If you have referenced variables in SQL statements, you can click SQLPreview to check whether the SQL statements are as expected. For more information about variables, see Configure variables.
- After you edit the code, you can click Validity Check to check whether the SQL statements can be executed.
- The SQL syntax of most databases is supported. Enter SQL statements that use the SQL syntax of the current database.
- Optional. If you have created multiple task nodes in the task flow, perform the following
steps: Move the pointer over a task node on the canvas, click and hold the circle,
and then draw a line from the circle to another task node.
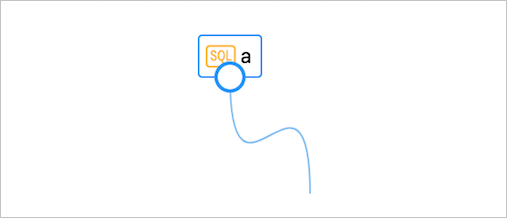 You can use this method to connect multiple tasks to form a task flow and configure the sequence for running the tasks. The following figure shows a sample task flow. In the task flow, the task
ais the first task to be run and the taskbis the second. After that, the taskscandeare run in parallel.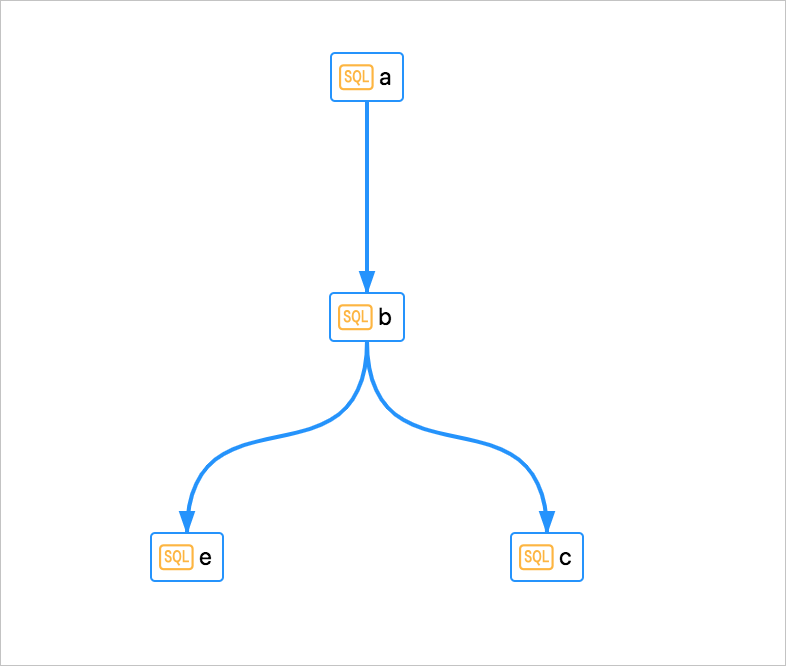 Then, you can configure scheduling properties to run the task flow at a regular interval or at a scheduled time. For more information, see Configure scheduling properties for the task flow.
You can perform a test run on the task flow. For more information, see Publish a task flow.
Configure scheduling properties for the task flow
You can schedule the task flow to be run as required. For example, you can schedule the task flow to be run by month, week, or day.
- On the tab that appears, set the parameters that are described in the following table.
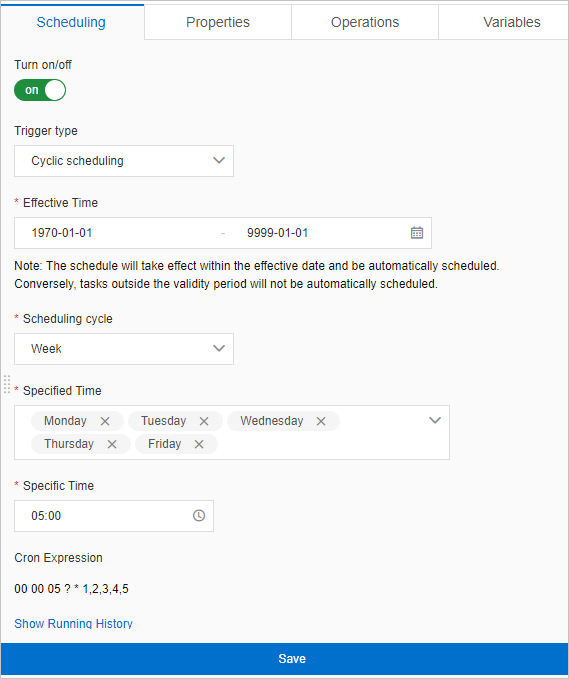
Table 1. Scheduling properties Parameter Description Scheduling Type The scheduling type of the task flow. Valid values: - Cyclic scheduling
- Schedule once
Note If you set this parameter to Schedule once, you need only to set the Specific Point in Time parameter.Effective Time The time period during which the scheduling properties take effect. The default time period is from January 1, 1970 to January 1, 9999, which indicates that the scheduling properties permanently take effect. Scheduling Cycle The scheduling cycle of the task flow. Valid values: Hour, Day, Week, and Month. Note If you set the Scheduling Cycle parameter to Hour, you must set the Timed Scheduling parameter.Timed Scheduling The time that you specify for running the task flow. You can set this parameter in the following ways: - Set the Starting Time, Intervals, and End Time parameters.
- Starting Time: the time when the task flow starts to be run.
- Intervals: the intervals at which the task flow is scheduled to be run. Unit: hours.
- End Time: the time when the task flow stops running.
- Set the Specified Time parameter. You can specify a point in time for running the task flow.
This parameter is displayed only when the Scheduling Cycle parameter is set to Hour.
Specified Time The time for running the task flow based on the scheduling cycle that you specify. This parameter is displayed only when the Scheduling Cycle parameter is set to Week or Month.
Specific Point in Time The specific point in time at which the task flow starts to be run. This parameter is displayed only when the Scheduling Cycle parameter is set to Day, Week, or Month.
Cron Expression The CRON expression that is automatically generated based on the scheduling cycle and time that you specify. For example, you can schedule a task flow to be run at 05:00 every business day, as shown in the following figure.
Configure basic properties for the task flow
This section describes how to configure basic properties for a task flow. You can configure the basic properties by setting parameters such as Task Flow Name, Owner, and Stakeholders.
- On the tab that appears, set the parameters that are described in the following table.
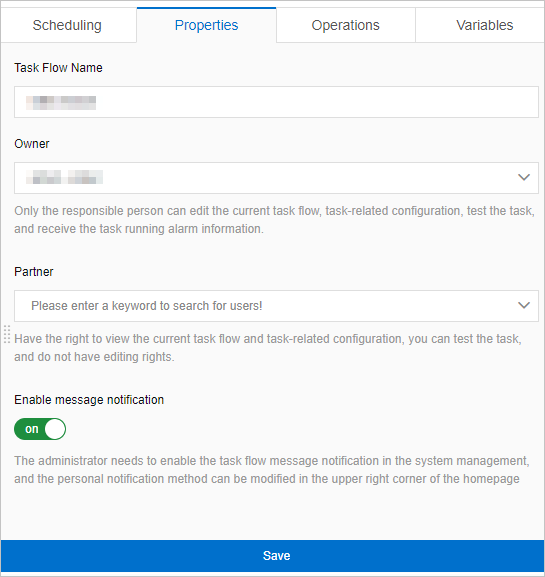
Parameter Description Task Flow Name The name of the task flow. Owner The owner of the task flow. The owner can modify the task nodes and configurations of the task flow and run tests. The owner can receive an alert if the task flow fails. Note If you want to change the owner of a published task flow, you must publish the task flow again after the owner is changed. For more information, see Publish a task flow.Stakeholders The one or more stakeholders of the task flow. The stakeholders can view, but not modify, the task nodes and configurations of the task flow. They can also run tests. Note DMS administrators and database administrators (DBAs) are the default stakeholders of each task flow. They can also change the owners of task flows.Enable message notification Specifies whether to enable message notification for the task flow. Note To enable message notification for a task flow, make sure that a notification rule is configured for the task flow. Only DMS administrators and DBAs can configure notification rules. For more information, see Manage notification rules.
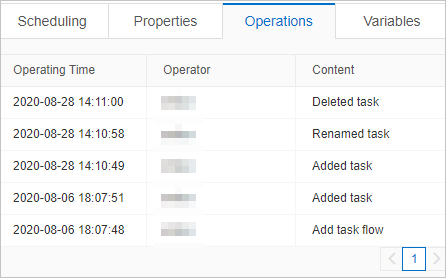
View the operation records of the task flow
This section describes how to view the operation records of a task flow.
- In the right-side pane, click the Operations tab. You can view all the operation records of the task flow.