The backup center can be used to back up and restore applications in Kubernetes clusters within the same region. This allows you to implement backup and disaster recovery for Kubernetes clusters.
Prerequisites
A cluster where the volume is restored is created. To ensure that you can use snapshots of Elastic Compute Service (ECS) instances to restore disk data, we recommend that you update the Kubernetes version of the cluster to 1.18 or later. For more information, see Create an ACK managed cluster, Create an ACK dedicated cluster (discontinued), or Create a cluster registration proxy and register a Kubernetes cluster that is deployed in a data center.
ImportantThe restore cluster must use the Container Storage Interface (CSI) plug-in. Application restoration is not supported in clusters that use FlexVolume or use csi-compatible-controller and FlexVolume.
The backup center is used to back up and restore applications. Before you run a restore task, you must install and configure system components in the restore cluster. Example:
aliyun-acr-credential-helper: You need to grant permissions to the restore cluster and configure acr-configuration.
alb-ingress-controller: You need to configure an ALBConfig.

The backup component is installed and permissions are granted in the cluster where the volume is backed up and the cluster where the volume is restored. For more information, see Install migrate-controller and grant permissions.
Migrate a WordPress application across ACK clusters in the same region
When you run a restore task, the API version of resources in the restore cluster automatically changes to the recommended version. For example, a Deployment whose API version is extensions/v1beta1 in a cluster that runs Kubernetes 1.16 automatically changes to apps/v1 when it is restored in a cluster that runs Kubernetes 1.28. For more information about how to use the backup center to migrate applications in an ACK cluster that runs an old Kubernetes version, see Use the backup center to migrate applications in an ACK cluster that runs an old Kubernetes version.
Examples
In this example, Cluster_A and Cluster_B are created in the China (Hohhot) region. An application that runs in Cluster_A is backed up. Then, the backup file of the application is used to restore the application in Cluster_B.
Deploy a WordPress application in a Kubernetes cluster and publish a blog post on the WordPress website. Use disks to store the text content and use NAS file systems to store the images in the blog post. This way, both disk volumes and NAS volumes are used to store the application data. Use the backup center feature to back up the WordPress application in the backup cluster. Then, restore the application and application data to the restore cluster and verify data and application integrity.
Procedure
Create Container Service for Kubernetes (ACK) managed clusters Cluster_A (backup cluster) and Cluster_B (restore cluster).
NoteTo ensure that you can use snapshots of ECS instances to restore disk data, we recommend that you update the Kubernetes version of Cluster_B to 1.18 or later.
Install the WordPress application in Cluster_A. For more information, see Deploy a WordPress application by using Helm.
Install the migrate-controller component in Cluster_A and grant permissions. Create a backup vault when you install the component.
For more information about how to install migrate-controller, see Install migrate-controller and grant permissions. When you install migrate-controller, the system automatically searches for backup vaults. If you have an existing backup vault, you do not need to create another one. For more information about how to create a backup vault, see Create a backup vault.
Create a backup task named 123backup-1 in Cluster_A. For more information, see Create a backup plan or back up instantly.
Back up the default namespace. After the 123backup-1 backup task enters the Completed state, you can view the backup task on the Backups and Snapshots tab of the Application Backup page in Cluster_B.
On the Application Backup page in Cluster_B, click Restore Now and select a backup vault for the backup task. Wait for the backup center to synchronize the backup record to the cluster. After the backup vault is initialized, you can select the backup file 123backup-1. For more information, see Restore applications and volumes.
NoteIf the system prompts you to initialize the backup vault when you select the backup vault, click Initialize Backup Vault to associate the backup vault with Cluster_B.
Verify that the restoration task is successfully completed.
In the left-side navigation pane of the details page of Cluster_B, choose . Find the WordPress application, click Details in the Actions column, and then check whether the WordPress application is in the Running state.
In the left-side navigation pane of the details page, choose .
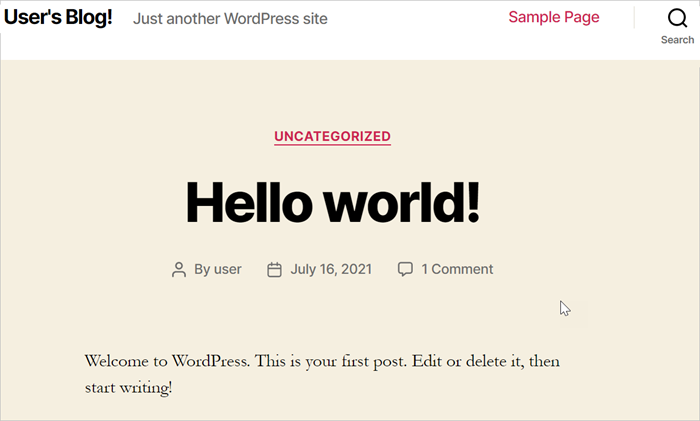
On the Services page, find the newly deployed application, and click the hyperlink in the External Endpoint column. The WordPress homepage appears.
References
For more information about how to migrate applications across clusters that use different volume plug-ins or run different Kubernetes versions, see Use the backup center to migrate applications in an ACK cluster that runs an old Kubernetes version.
For more information about how to migrate applications across regions, see Migrate applications across clusters in different regions.
For more information about how to use the CLI to migrate applications, see Use kubectl to back up and restore applications.