After you deploy a cluster that has the cloud-native AI component set installed, you can allocate cluster resources and view resource usage based on multiple dimensions. This helps you optimize the utilization of cluster resources. This topic describes basic O&M operations that you can perform on the cloud-native component set. For example, you can install the cloud-native AI component set, view resources dashboards, and manage users and quotas.
Background information
After you deploy a cluster that has the cloud-native AI component set installed, you can allocate cluster resources and view resource usage based on multiple dimensions. This helps you optimize the utilization of cluster resources.
If a cluster is used by multiple users, you must allocate a fixed amount of resources to each user in case the users compete for resources. The traditional method is to use Kubernetes resource quotas to allocate a fixed amount of resources to each user. However, the resource utilization varies by user groups. To improve the overall utilization of cluster resources, you can allow the users to share resources after you allocate cluster resources to them.
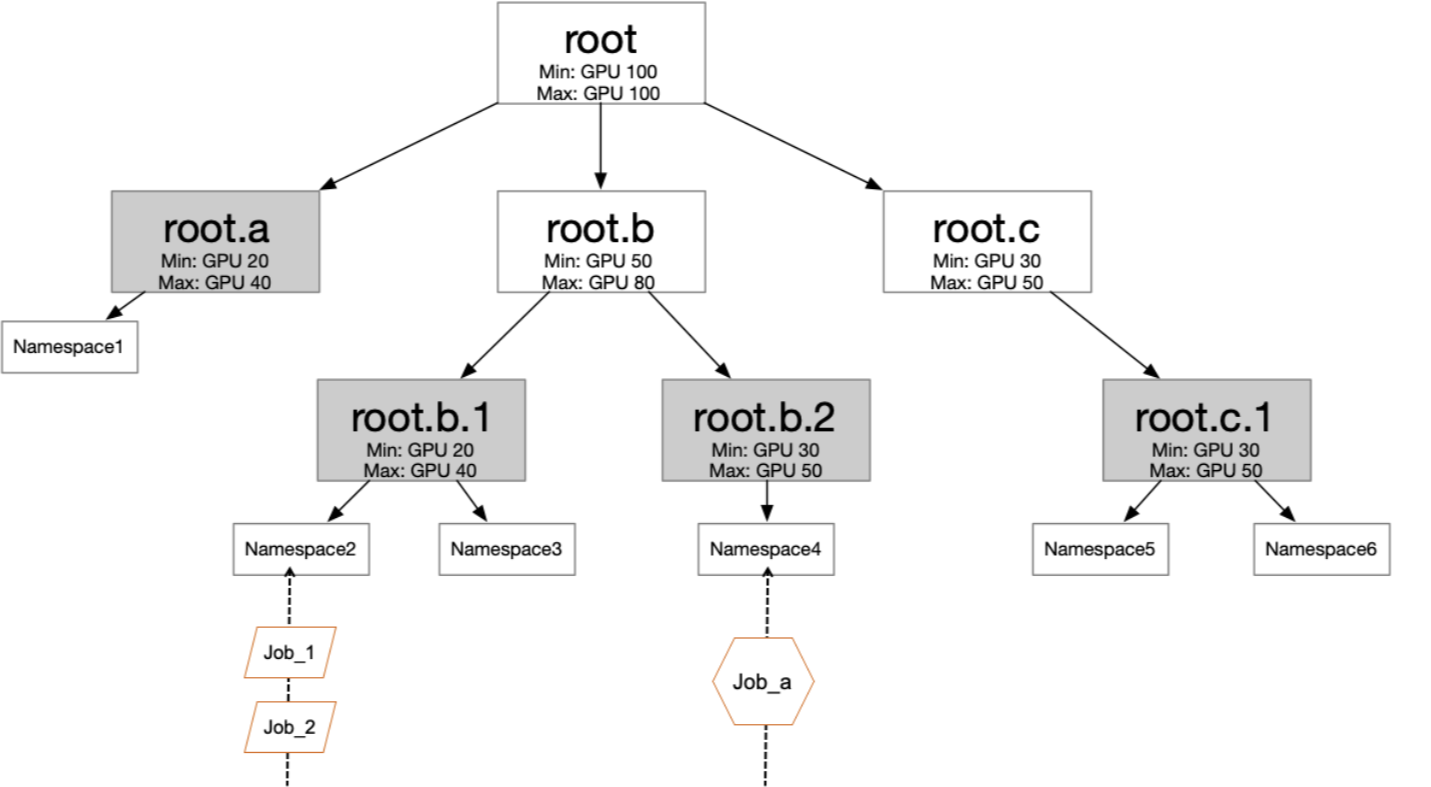
The following figure shows the organizational structure of an enterprise. You can set elastic quotas at different levels based on your business requirements. Each leaf node in the figure corresponds to a user group. To manage permissions and quotas separately, you can add users in a user group to one or more namespaces, and assign different roles to the users. This way, resources can be shared across user groups and users in the same user group can be isolated.
Prerequisites
- A Container Service for Kubernetes (ACK) Pro cluster is created. Make sure that Monitoring Agents and Log Service are enabled on the Component Configurations wizard page when you create the cluster. For more information, see Create an ACK Pro cluster.
- The Kubernetes version of the cluster is 1.18 or later.
Tasks
- Install the cloud-native AI component set.
- View resource dashboards.
- Set resource quotas by user groups.
- Manage users and user groups.
- Use idle resources to submit more workloads after the minimum amount of resources for each user is exhausted.
- Set the maximum amount of resources for each user.
- Set the minimum amount of resources for each user.
Step 1: Install the cloud-native AI component set
The cloud-native AI component set consists of components for task elasticity, data acceleration, AI task scheduling, AI task lifecycle management, AI Dashboard, and AI Developer Console. You can install the components based on your business requirements.
Deploy the cloud-native AI component set
- Log on to the ACK console.
- In the left-side navigation pane of the ACK console, click Clusters.
- On the Clusters page, find the cluster that you want to manage and click the name of the cluster or click Details in the Actions column. The details page of the cluster appears.
- In the left-side navigation pane of the details page, choose .
- On the Cloud Native AI Component Set page, click Deploy.
- On the Cloud-native AI Component Set page, select the components that you want to deploy and click Deploy Cloud-native AI Component Set. Then, the system checks the environment and dependencies, and automatically deploys the components after the precheck is completed. After the components are installed, you can view the following information in the Components list:
- You can view the names and versions of the components that are installed in the cluster. You can deploy or uninstall components.
- If a component is updatable, you can also update the component.
- After you install ack-ai-dashboard and ack-ai-dev-console, you can find the hyperlinks to AI Dashboard and AI Developer Console in the upper-left corner of the Cloud-native AI Suite page. You can click a hyperlink to log on to the corresponding component.

Install and configure AI Dashboard
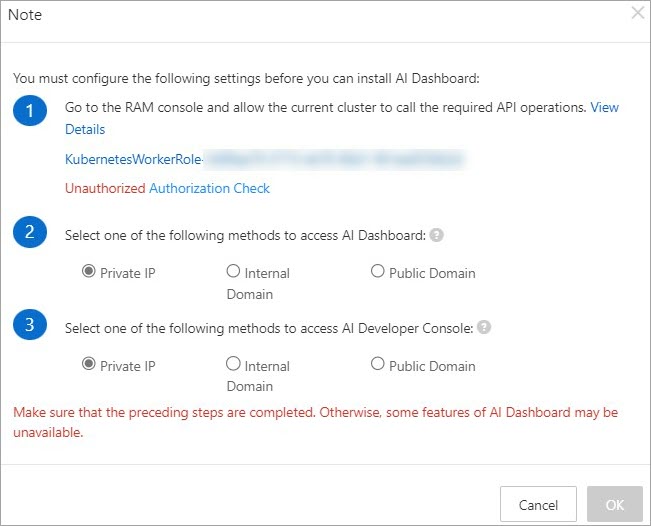
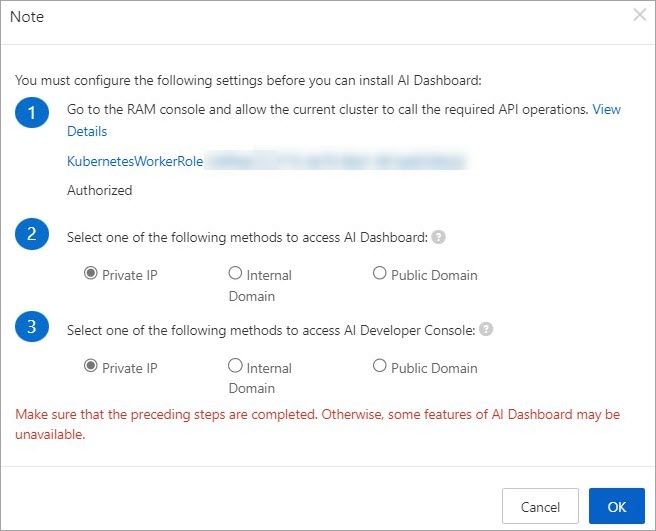
- In the Interaction Mode section of the Cloud-native AI Suite page, select Console. The Note dialog box appears, as shown in the following figure.
- In the Note dialog box, click the hyperlink to grant the required permissions to the worker role of the cluster.
- On the Permissions tab, click the name of the RAM policy.
- On the Policy Document tab, click Modify Policy Document. In the Modify Policy Document panel, add the following content to the
Actionfield in the Policy Document section:"ecs:DescribeInstances", "ecs:DescribeSpotPriceHistory", "ecs:DescribePrice", "eci:DescribeContainerGroups", "eci:DescribeContainerGroupPrice", "log:GetLogStoreLogs", "ims:CreateApplication", "ims:UpdateApplication", "ims:GetApplication", "ims:ListApplications", "ims:DeleteApplication", "ims:CreateAppSecret", "ims:GetAppSecret", "ims:ListAppSecretIds", "ims:ListUsers" - Click Next to edit policy Information. Then, click OK. Return to the Note dialog box and click Authorization Check. If the authorization is successful, Authorized is displayed and the OK button becomes available. Then, perform Step 3.
- Select the method to store the data of AI Dashboard. In this example, Pre-installed MySQL is selected. You can select ApsaraDB RDS in production environments. For more information, see Install and configure AI Dashboard and AI Developer Console.
- Click Deploy Cloud-native AI Component Set. After the status of AI Dashboard changes to Ready, AI Dashboard is ready for use.
(Optional) Create a dataset
You can create and accelerate datasets based on the requirements of algorithm developers. The following section describes how to create a dataset in AI Dashboard or by using the CLI.
fashion-mnist dataset
Use kubectl to create a persistent volume (PV) and a persistent volume claim (PVC) of the Object Storage Service (OSS) type on a cluster node.
- Create a PV and PVC based on the following YAML template:
apiVersion: v1 kind: PersistentVolume metadata: name: fashion-demo-pv spec: accessModes: - ReadWriteMany capacity: storage: 10Gi csi: driver: ossplugin.csi.alibabacloud.com volumeAttributes: bucket: fashion-mnist otherOpts: "-o max_stat_cache_size=0 -o allow_other" url: oss-cn-beijing.aliyuncs.com akId: "AKID" akSecret: "AKSECRET" volumeHandle: fashion-demo-pv persistentVolumeReclaimPolicy: Retain storageClassName: oss volumeMode: Filesystem --- apiVersion: v1 kind: PersistentVolumeClaim metadata: name: fashion-demo-pvc namespace: demo-ns spec: accessModes: - ReadWriteMany resources: requests: storage: 10Gi selector: matchLabels: alicloud-pvname: fashion-demo-pv storageClassName: oss volumeMode: Filesystem volumeName: fashion-demo-pv - Check the status of the PV and PVC.
- Run the following command to query the status of the PV:
kubectl get pv fashion-mnist-jackwgExpected output:
NAME CAPACITY ACCESS MODES RECLAIM POLICY STATUS CLAIM STORAGECLASS REASON AGE fashion-mnist-jackwg 10Gi RWX Retain Bound ns1/fashion-mnist-jackwg-pvc oss 8h - Run the following command to query the status of the PVC:
kubectl get pvc fashion-mnist-jackwg-pvc -n ns1Expected output:NAME STATUS VOLUME CAPACITY ACCESS MODES STORAGECLASS AGE fashion-mnist-jackwg-pvc Bound fashion-mnist-jackwg 10Gi RWX oss 8h
- Run the following command to query the status of the PV:
Accelerate a dataset
You can accelerate datasets on AI Dashboard. The following example shows how to accelerate a dataset named fashion-demo-pvc in the demo-ns namespace.
- Access AI Dashboard as an administrator.
- In the left-side navigation pane of AI Dashboard, choose .
- On the Dataset List page, find the dataset that you want to accelerate and click Accelerate in the Actions column. After the dataset is accelerated, the page in the following figure appears.

Step 2: View resource dashboards
You can view the usage of cluster resources based on multiple dimensions on resource dashboards provided by AI Dashboard. This helps you optimize resource allocation and improve resource utilization.
Cluster dashboard
- GPU Summary Of Cluster: displays the total number of GPU-accelerated nodes, the number of allocated GPU-accelerated nodes, and the number of unhealthy GPU-accelerated nodes in the cluster.
- Total GPU Nodes: displays the total number of GPU-accelerated nodes in the cluster.
- Unhealthy GPU Nodes: displays the number of unhealthy GPU-accelerated nodes in the cluster.
- GPU Memory(Used/Total): displays the ratio of GPU memory used by the cluster to the total GPU memory.
- GPU Memory(Allocated/Total): displays the ratio of GPU memory allocated by the cluster to the total GPU memory.
- GPU Utilization: displays the average GPU utilization of the cluster.
- GPUs(Allocated/Total): displays the ratio of the number of GPUs that are allocated by the cluster to the total number of GPUs.
- Training Job Summary Of Cluster: displays the numbers of training jobs that are in the following states: Running, Pending, Succeeded, and Failed.
Node dashboard
- GPU Node Details: displays information about the cluster nodes in a table. The following information is displayed: the name of each node, the IP address of each node, the role of each node, the GPU mode of each node (exclusive or shared), the number of GPUs provided by each node, the total amount of GPU memory provided by each node, the number of GPUs allocated on each node, the amount of GPU memory allocated on each node, the amount of GPU memory used on each node, and the average GPU utilization on each node.
- GPU Duty Cycle: displays the utilization of each GPU on each node.
- GPU Memory Usage: displays the memory usage of each GPU on each node.
- GPU Memory Usage Percentage: displays the percentage of memory usage per GPU on each node.
- Allocated GPUs Per Node: displays the number of GPUs allocated on each node.
- GPU Number Per Node: displays the total number of GPUs on each node.
- Total GPU Memory Per Node: displays the total amount of GPU memory on each node.
Training job dashboard
- Training Jobs: displays information about each training job in a table. The following information is displayed: the namespace of each training job, the name of each training job, the type of each training job, the status of each training job, the duration of each training job, the number of GPUs that are requested by each training job, the amount of GPU memory that is requested by each training job, the amount of GPU memory that is used by each training job, and the average GPU utilization of each training job.
- Job Instance Used GPU Memory: displays the amount of GPU memory that is used by each job instance.
- Job Instance Used GPU Memory Percentage: displays the percentage of GPU memory that is used by each job instance.
- Job Instance GPU Duty Cycle: displays the GPU utilization of each job instance.
Resource quota dashboard
- Elastic Quota Name: displays the name of the quota group.
- Namespace: displays the namespace to which resources belong.
- Resource Name: displays the type of resources.
- Max Quota: displays the maximum amount of resources that you can use in the specified namespace.
- Min Quota: displays the minimum amount of resources that you can use in the specified namespace when the cluster does not have sufficient resources.
- Used Quota: displays the amount of resources that are used in the specified namespace.
Step 3: Manage users and quotas
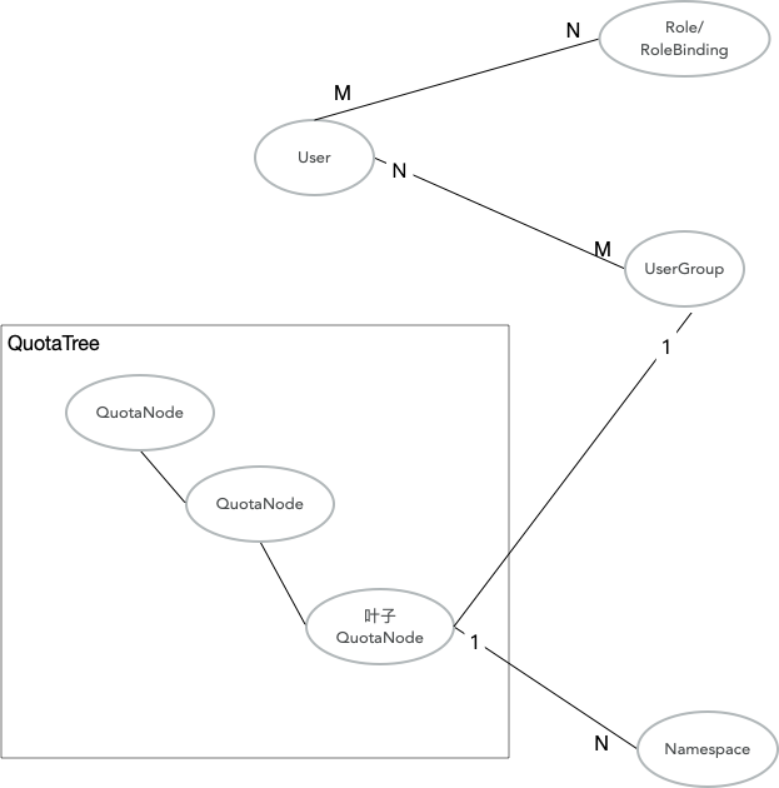
- Quota trees allow you to configure hierarchical resource quotas. Quota trees are used by the capacity scheduling plug-in. To optimize the overall utilization of cluster resources, you can allow users to share resources after you use quota trees to allocate resources to the users.
- Each user in Kubernetes owns a service account. The service account can be used as a credential to submit jobs and log on to the console. Permissions are granted to users based on user roles. For example, the admin role can log on to AI Dashboard and perform maintenance operations on a cluster. The researcher role can submit jobs, use cluster resources, and log on to AI Developer Console. The admin role has all permissions that the researcher role has.
- User groups are the smallest unit in resource allocation. Each user group corresponds to a leaf node in quota trees. Users must be associated with user groups before the users can use resources that are associated with the user groups.
The following section describes how to use a quota tree to set hierarchical resource quotas and how to use a user group to allocate resources to users. The following section also describes how to share and reclaim CPU resources by submitting a simple job.
Add a quota node and set resource quotas
You can set resource quotas by specifying the Min and Max parameters of each resource. The Min parameter specifies the minimum amount of resources that can be used. The Max parameter specifies the maximum amount of resources that can be used. After you associate namespaces with a leaf node of a quota tree, limits that are set on nodes between the root node and the leaf node apply to the namespaces.
- If no namespace is available, you must first create namespaces. If namespaces are available, you must make sure that the namespace that you select does not contain pods in the Running state.
kubectl create ns namespace1 kubectl create ns namespace2 kubectl create ns namespace3 kubectl create ns namespace4 - Create a quota node and associate it with a namespace.
Create users and user groups
A user can belong to one or more user groups. A user group can contain one or more users. You can associate user groups by users or associate users by user groups. You can allocate resources and grant permissions based on projects by using quota trees and user groups.
- Create users. For more information, see Generate the kubeconfig file and logon token of the newly created user.
- Create user groups. For more information, see Add a user group.
Capacity scheduling example
- Set both the minimum amount of CPU resources and maximum amount of CPU resources to 40 for the root node. This ensures that the quota tree has 40 CPU cores available.
- Set the minimum amount of CPU resources to 20 and the maximum amount of CPU resources to 40 for root.a and root.b.
- Set the minimum amount of CPU resources to 10 and the maximum amount of CPU resources to 20 for root.a.1, root.a.2, root.b.1, and root.b.2.
- Submit a task that runs five pods (5 pods x 5 cores/pod = 25 cores) to namespace1. The maximum amount of CPU resources is set to 20 for root.a.1. Therefore, four pods (4 pods x 5 cores/pod = 20 cores) can run as normal.
- Submit a task that runs five pods (5 pods x 5 cores/pod = 25 cores) to namespace2. The maximum amount of CPU resources is set to 20 for root.a.2. Therefore, four pods (4 pods x 5 cores/pod = 20 cores) can run as normal.
- Submit a task that runs five pods (5 pods x 5 cores/pod = 25 cores) to namespace3. The minimum amount of CPU resources is set to 10 for root.b.1. Therefore, two pods (2 pods x 5 cores/pod = 10 cores) can run as normal. The scheduler considers the priority, availability, and creation time of each task and reclaims CPU resources from root.a. The scheduler reclaims one CPU core from root.a.1 and one CPU core from root.a.2. As a result, three pods (3 pods x 5 cores/pod = 15 cores) are running in namespace1 and namespace2, separately.
- Submit a task that runs five pods (5 pods x 5 cores/pod = 25 cores) to namespace4. The minimum amount of CPU resources is set to 10 for root.b.2. Therefore, two pods (2 pods x 5 cores/pod = 10 cores) can run as normal. The scheduler considers the priority, availability, and creation time of each task and reclaims CPU resources from root.a. The scheduler reclaims one CPU core from root.a.1 and one CPU core from root.a.2. As a result, two pods (2 pods x 5 cores/pod = 10 cores) are running in namespace1 and namespace2, separately.
Perform the following operations:
- Create namespaces and a quota tree.
- Run the following command to create four namespaces. Run the following command to create namespace1:
kubectl create ns namespace1 - Create a quota tree based on the following figure.
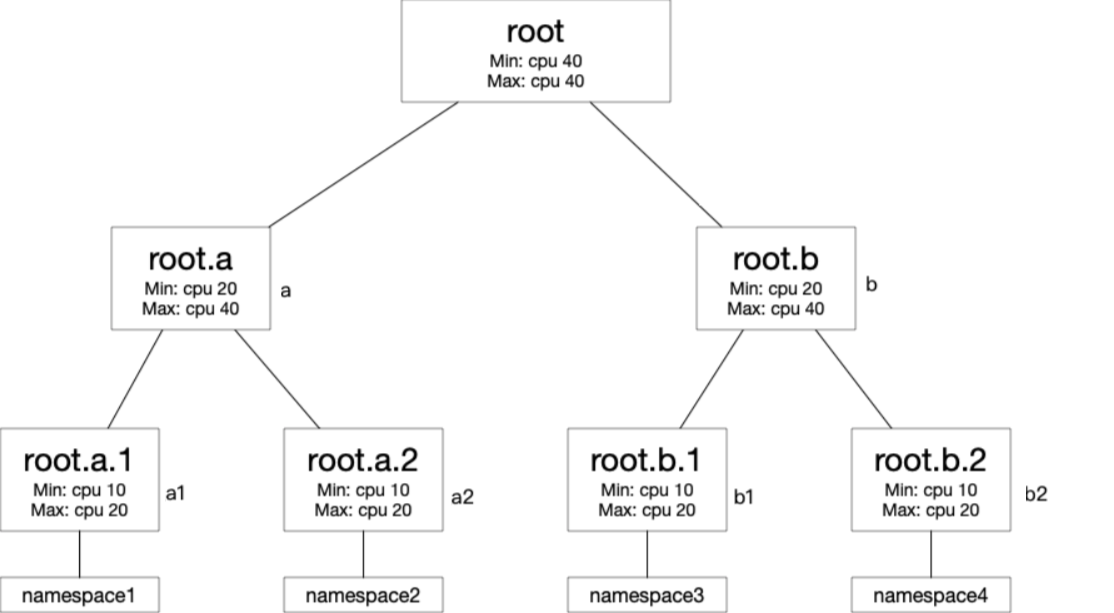
- Run the following command to create four namespaces.
- Create a Deployment in namespace1 by using the following YAML template. The Deployment provisions five pods and each pod requests five CPU cores. If you do not set elastic quotas, users can use only 10 CPU cores because the minimum amount of CPU resources is set to 10, which means that two pods are created. After you set elastic quotas:
- When 40 CPU cores are available in the cluster, four pods are created (4 pods x 5 core/pod = 20 cores).
- The last pod is in the Pending state because the maximum amount of resources (cpu.max=20) is reached.
apiVersion: apps/v1 kind: Deployment metadata: name: nginx1 namespace: namespace1 labels: app: nginx1 spec: replicas: 5 selector: matchLabels: app: nginx1 template: metadata: name: nginx1 labels: app: nginx1 spec: containers: - name: nginx1 image: nginx resources: limits: cpu: 5 requests: cpu: 5 - Create another Deployment in namespace2 by using the following YAML template. The Deployment provisions five pods and each pod requests five CPU cores. If you do not set elastic quotas, users can use only 10 CPU cores because the minimum amount of CPU resources is set to 10, which means that two pods are created. After you set elastic quotas:
- When 20 CPU cores (40 cores - 20 cores in namespace1) are available in the cluster, four pods (4 pods x 5 core/pod = 20 cores) are created.
- The last pod is in the Pending state because the maximum amount of resources (cpu.max=20) is reached.
- After you create the preceding two Deployments, the pods in namespace1 and namespace2 have used 40 CPU cores, which is the maximum number of CPU cores for the root node.
apiVersion: apps/v1 kind: Deployment metadata: name: nginx2 namespace: namespace2 labels: app: nginx2 spec: replicas: 5 selector: matchLabels: app: nginx2 template: metadata: name: nginx2 labels: app: nginx2 spec: containers: - name: nginx2 image: nginx resources: limits: cpu: 5 requests: cpu: 5 - Create a third Deployment in namespace3 by using the following YAML template. This Deployment provisions five pods and each pod requests five CPU cores.
- The cluster does not have idle resources. The scheduler reclaims 10 CPU cores from root.a to guarantee the minimum amount of CPU resources for root.b.1.
- Before the scheduler reclaims the temporarily used 10 CPU cores, it also considers other factors, such as the priority, availability, and creation time of the workloads of root.a. Therefore, after the pods of nginx3 are scheduled based on the reclaimed 10 CPU cores, two pods are in the Running state and the other three are in the Pending state.
- After 10 CPU cores are reclaimed from root.a, both namespace1 and namespace2 contain two pods that are in the Running state and three pods that are in the Pending state.
apiVersion: apps/v1
kind: Deployment
metadata:
  name: nginx4
  namespace: namespace4
  labels:
    app: nginx4
spec:
  replicas: 5
  selector:
    matchLabels:
      app: nginx4
  template:
    metadata:
      name: nginx4
      labels:
        app: nginx4
    spec:
      containers:
      - name: nginx4
        image: nginx
        resources:
          limits:
            cpu: 5
          requests:
            cpu: 5
The result shows the benefits of capacity scheduling in resource allocation.
