This topic describes how to use a Container Registry Personal Edition instance to create an image repository, configure building rules, and build images.
Usage notes
The timeout period for image building of Personal Edition is set to 30 minutes. If you have higher requirements for repository creation and image building, for example, if you want to use flexible configurations, custom parameters, and multi-arch image building, we recommend that you use Container Registry Enterprise Edition instances. For more information, see Use a Container Registry Enterprise Edition instance to build an image.
Before you use a Container Registry Personal Edition instance to build images, make sure that the base image in the Dockerfile meets the following requirements:
The base image can be a publicly-accessible Internet image that does not require authorization.
The base image can be a private Internet image that belongs to the same account and region as the Container Registry Personal Edition instance.
The base image cannot be a private image that resides in a region different from the Container Registry Personal Edition instance.
The base image cannot be an image that is built or optimized for a virtual private cloud (VPC) regardless of the region.
The base image cannot be an image provided by a third party.
For example, the base image in the Dockerfile can be a publicly-accessible Internet image of the Container Registry Personal Edition instance. However, the base image in the Dockerfile cannot be an image that is provided by a third party.
Features
To build images, you must bind a source code repository to your Container Registry Personal Edition instance. You can bind the source code repository after you create your Personal Edition instance.
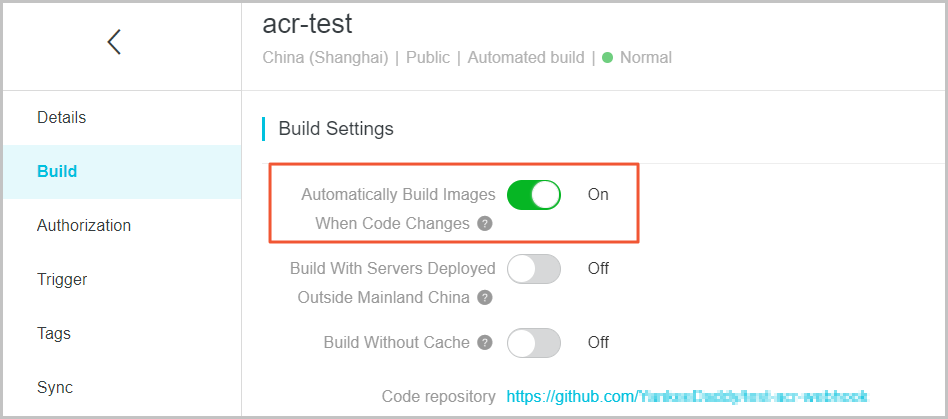
Automatically build images when code changes
After you turn on Automatically Build Images When Code Changes, an image is automatically built each time code is committed. This reduces manual workloads.
Log on to the Container Registry console.
In the top navigation bar, select a region.
In the left-side navigation pane, click Instances.
On the Instances page, click the Personal Edition instance that you want to manage.
In the left-side navigation pane of the management page of the Personal Edition instance, choose .
On the Repositories page, find the repository that you want to manage and click Manage in the Actions column.
In the left-side navigation pane, click Build. On the page that appears, turn on Automatically Build Images When Code Changes.
Build images on servers outside the Chinese mainland
The source code used for image building may be stored in a source code repository outside the Chinese mainland. Container Registry provides the Build With Servers Deployed Outside Chinese Mainland feature to help you build images by using servers outside the Chinese mainland. After an image is built on a server outside the Chinese mainland, the image is pushed to a repository in the specified region.
NoteImage pushes may time out if the cross-border network connection is unstable.
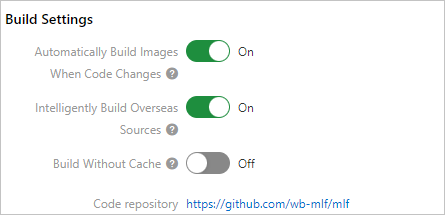
Build images without using cache
After you turn on Build Without Cache, Container Registry pulls the base image from the image repository each time you attempt to build an image. This prolongs image pulls. We recommend that you turn off Build Without Cache.
Multi-stage building
Container Registry supports multi-stage building.
Step 1: Bind a source code repository
In this example, GitHub is used to describe how to bind a source code repository to a Container Registry Personal Edition instance. For information about how to bind other source code repositories to a Container Registry Personal Edition instance, see Bind a source code hosting platform.
For information about how to bind a private GitLab code repository in a VPC, see Build a container image in a VPC.
Log on to the Container Registry console.
In the top navigation bar, select a region.
In the left-side navigation pane, click Instances.
On the Instances page, click the Personal Edition instance that you want to manage.
In the left-side navigation pane of the management page of the Container Registry Personal Edition instance, choose .
On the Code Source page, find GitHub and click Bind Account in the Actions column.
In the GitHub dialog box, click Go to the source code repository to bind account.
On the GitHub logon page, enter your username and password, and then click Sign in.
You are redirected to the Container Registry console and the following message appears: You have successfully bound the GitHub account.
Step 2: Create an image repository
Before you create an image repository, make sure that a namespace is created in the specified region. For more information, see Manage namespaces.
Log on to the Container Registry console.
In the top navigation bar, select a region.
In the left-side navigation pane, click Instances.
On the Instances page, click the Personal Edition instance that you want to manage.
In the left-side navigation pane of the management page of the Personal Edition instance, choose .
On the Repositories page, click Create Repository.
In the Repository Info step, configure Namespace, Repository Name, Repository Type, and Summary. In this example, set Repository Type to Private. Then, click Next.
NoteYou cannot build images based on an on-premises repository.
In the Code Source step, configure Code Source, Build Settings, and Build Rules, and then click Create Repository.
Parameter
Description
Code Source
Select the code source. In this example, click the GitHub tab to select GitHub and then select the namespace and repository.
Build Settings
Automatically Build Images When Code Changes: The building rule is automatically triggered when code is committed from a branch.
Build With Servers Deployed Outside Chinese Mainland: Images are built on a server outside the Chinese mainland and then pushed to an image repository in the specified region. If the resources such as the source code repository and container image repository that you use to build the image are deployed in the Chinese mainland, we recommend that you disable the Build With Servers Deployed Outside Chinese Mainland feature to use servers deployed in the Chinese mainland.
Build Without Cache: The system pulls the base image from the image repository each time an image is built. This may extend the building period. You can disable Build Without Cache to accelerate image building.
Step 3: Configure building rules
If Build is not displayed in the left-side navigation pane of the management page of the image repository, the code source fails to be bound to the Personal Edition instance. You can refer to Step 1 to rebind a code source.
Log on to the Container Registry console.
In the top navigation bar, select a region.
In the left-side navigation pane, click Instances.
On the Instances page, click the Personal Edition instance that you want to manage.
In the left-side navigation pane of the management page of the Personal Edition instance, choose .
On the Repositories page, find the repository that you want to manage and click Manage in the Actions column.
In the left-side navigation pane of the management page of the image repository, click Build. In the Build Rules section, click Add Build Rule.
NoteIf you want to modify a building rule, select the rule that you want to modify and click Modify in the Actions column.
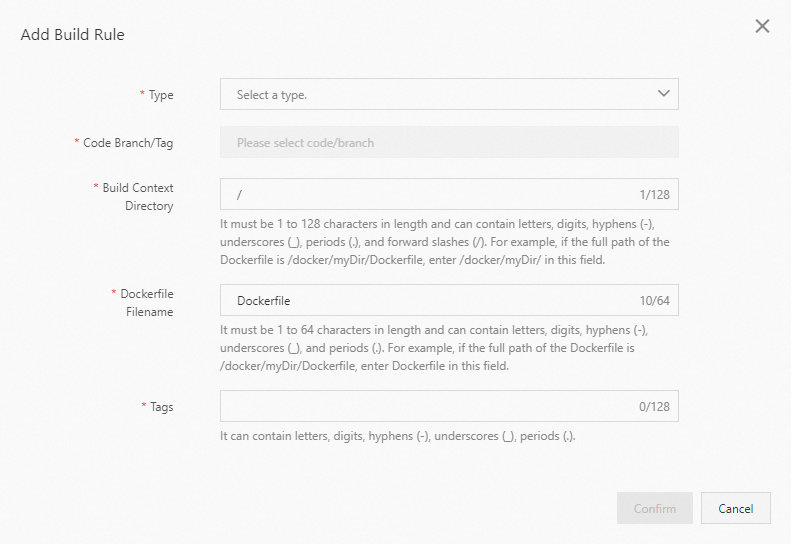
In the Add Build Rule dialog box, configure the building rule and click Confirm.
Parameter
Description
Type
The type of the source code repository. Valid values: Branch and Tag.
Code Branch/Tag
The code branch or tag that triggers the building rule.
Build Context Directory
The directory of the Dockerfile. This is a subdirectory of the branch or tag directory. For example, if the branch directory is Master/ and the Dockerfile is in the Master/ directory, the directory of the Dockerfile is Master/Dockerfile.
Dockerfile Filename
The filename of the Dockerfile. The default value is Dockerfile.
Tags
The tags of the image. Example: latest.
Step 4: Build an image
Log on to the Container Registry console.
In the top navigation bar, select a region.
In the left-side navigation pane, click Instances.
On the Instances page, click the Personal Edition instance that you want to manage.
In the left-side navigation pane of the management page of the Personal Edition instance, choose .
On the Repositories page, find the repository that you want to manage and click Manage in the Actions column.
In the left-side navigation pane of the repository management page, click Build.
In the Build Rules section, select the building rule that you want to use and click Build in the Actions column.
After the image building is complete, a building record is generated.
NoteSelect the building record that you want to view and click Log in the Actions column to view the building log.
After the image building is complete, click Tags in the left-side navigation pane to view the created images.
To view all images, click Build in the left-side navigation pane. On the Build Settings section of the page that appears, turn on Build with Servers Deployed Outside Chinese Mainland and Build Without Cache and remain the default enabled status of Automatically Build Images When Code Changes. Then, click Tags in the left-side navigation pane to view all image tags.