[Customer Management] page is designed to facilitate customer creation, invitation, and the viewing of the invitation process.
1. How to Create Customers
Step 1 to Step 4 are operated by Partner side.
Step 5 to Step 11 are operated by Customer side.
Step 1: Create Customer
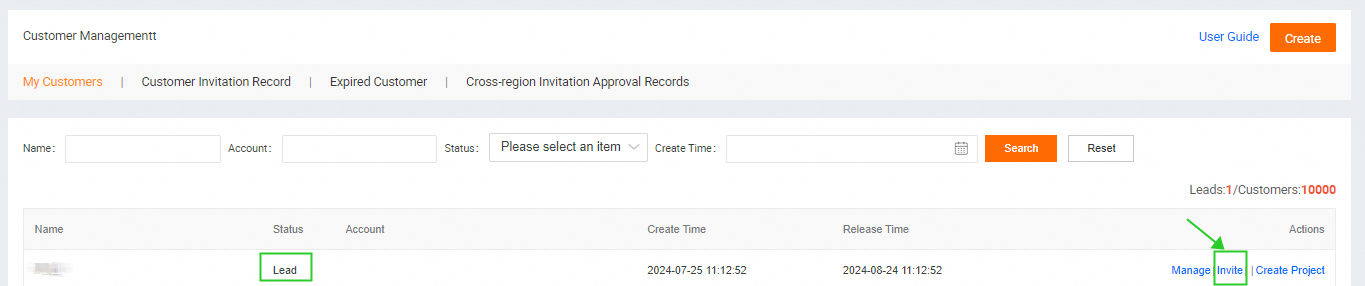
Click [Customer Center] → [Customer Management] → [My Customers]→ click [Create].
(For the end user information that is generated from Leads, you can skip the create step)

Step 2: Submit Information
Complete all required fields and click [Submit]
[Within Contract Region] refers to whether the country where the reported customer's account is registered falls within the business development areas agreed upon in the Partner Contract. If the registration extends beyond this range, please select [No], choose the corresponding regional information, and provide a reason for the report. The system will automatically trigger a cross-region reporting approval, which typically takes 5-7 working days. Please submit with caution.
[Customer Country/Region] refers to the country where the customer's account is registered. The drop-down menu shows all agreed business development areas in the partner contract. Ensure the customer’s country information matches what was provided by the partner during registration to avoid association issues.

Step 3: Invite Customer
A record of the customer's information will be generated and displayed on the page, with the customer status shown as [Lead]. This status is valid for 30 days. Within this period, please click [Invite] to proceed with the formal customer invitation process.
If a customer remains in the [Lead] status for more than 30 days, they will be automatically moved to the [Expired Customers] page. If the partner still intends to invite the customer, a new record must be created.
If the invited customer is a cross-region client, the relevant information will be automatically recorded on the [Cross-region Invitation Approval Records] page, where you can view the approval results. Once approved, the customer will appear on the [My Customers] page for further invitation actions.
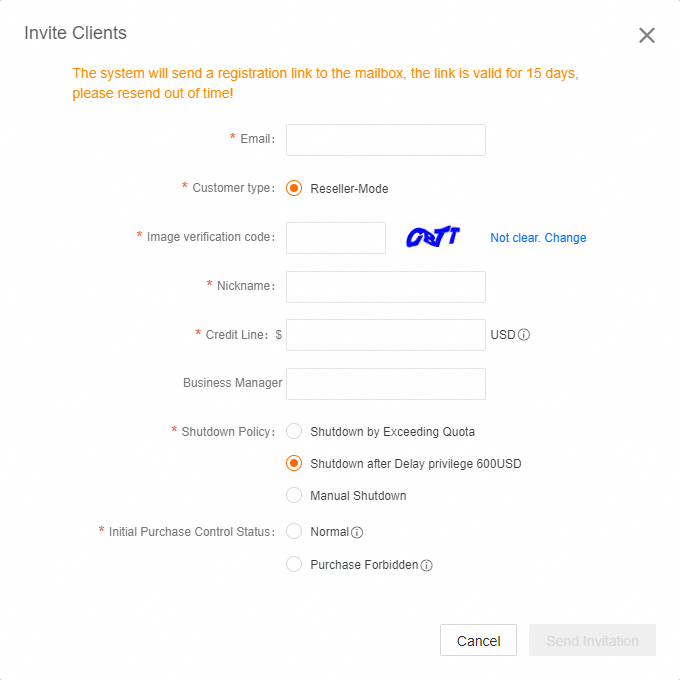
Step 4: Send Invitation
Fill in the information and click [Send Invitation].
The invitation link remains valid until the customer’s status expires.
If the customer cannot find the invitation link, partners can resend it within the validity period.
To resend the invitation link, visit the [Customer Invitation Record] subpage to set the initial Nickname, Credit Line, and Shutdown Policy. Find the target record, click [Edit] to update customer information, and then click [Confirm] followed by [Send Invitation].
To ensure the invitation email is sent to the target customer, please enter the correct email address without any spaces, as they can cause errors.
[Customer type] Select 'Reseller-Mode' for resellers and 'Agency-Mode' for agencies.
[Credit Line] refers to the total budget allocated by the partner to the customer. Currently, only USD is supported, with a minimum quota of 0.
[Business Manager] Fill in the name of the person in charge of this customer.
[Shutdown Policy] Refer to the shutdown policy document for details.
[Initial Purchase Control Status] Customers with 'Normal' status can make new purchases immediately after being associated with the partner. Customers with 'Purchase Forbidden' status cannot. Partners should manually update the Purchase Control Status to allow new purchases later.
Step 5: Customer Receive Reminder
When the partner successfully clicks [Send Invitation], the customer should receive the following email in their mailbox.

Step 6: Click Link in E-mail to Register
Click [click here] in the email.

Step 7: Create New Account
Click [Create New Account].

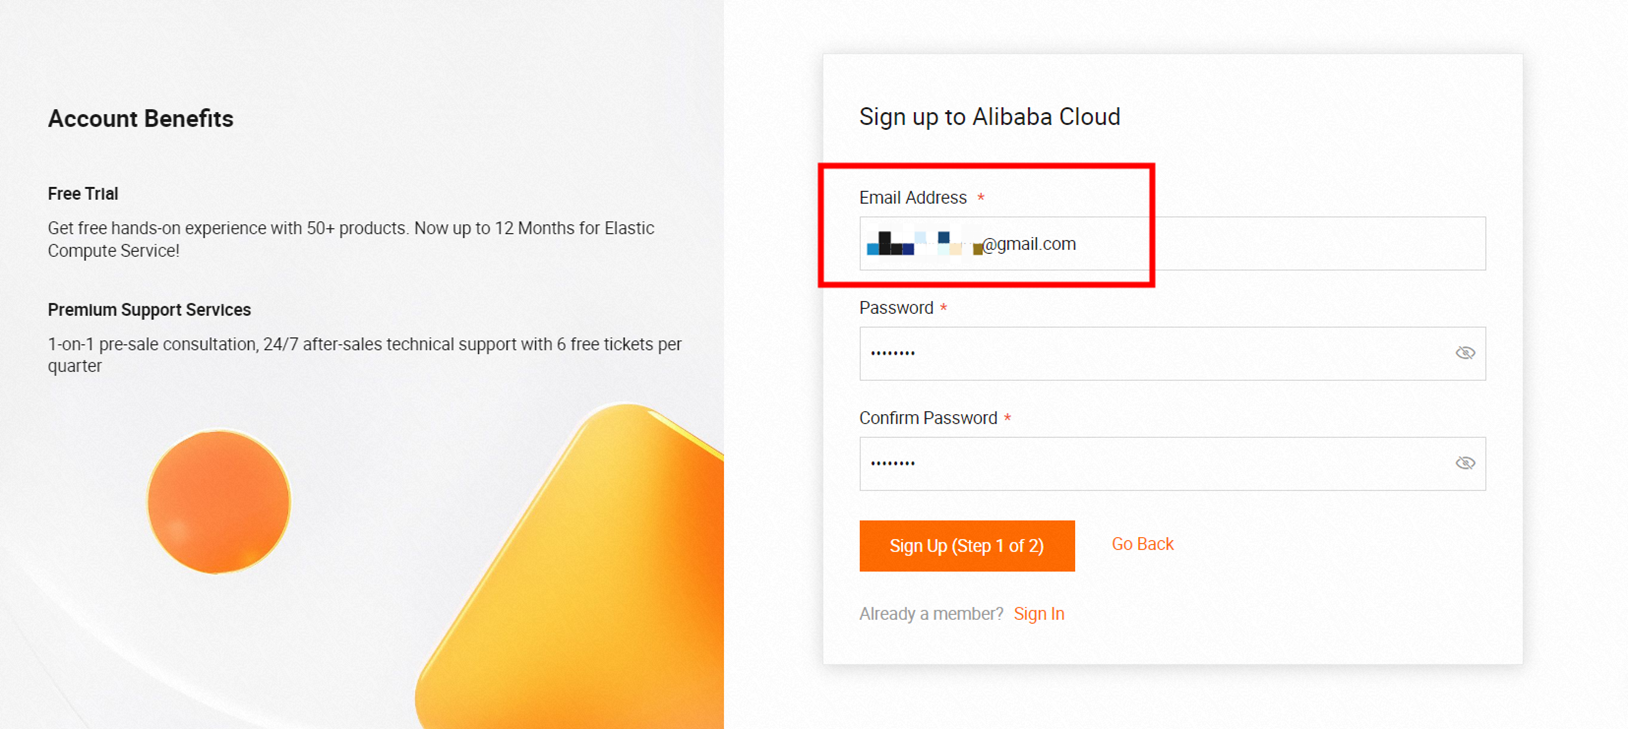
Step 8: Fill in E-mail Address and Password
Enter the email address where you received the invitation email and set a password.
Step 9: Select Account Type
Choose [Business Account] or [Individual Account].

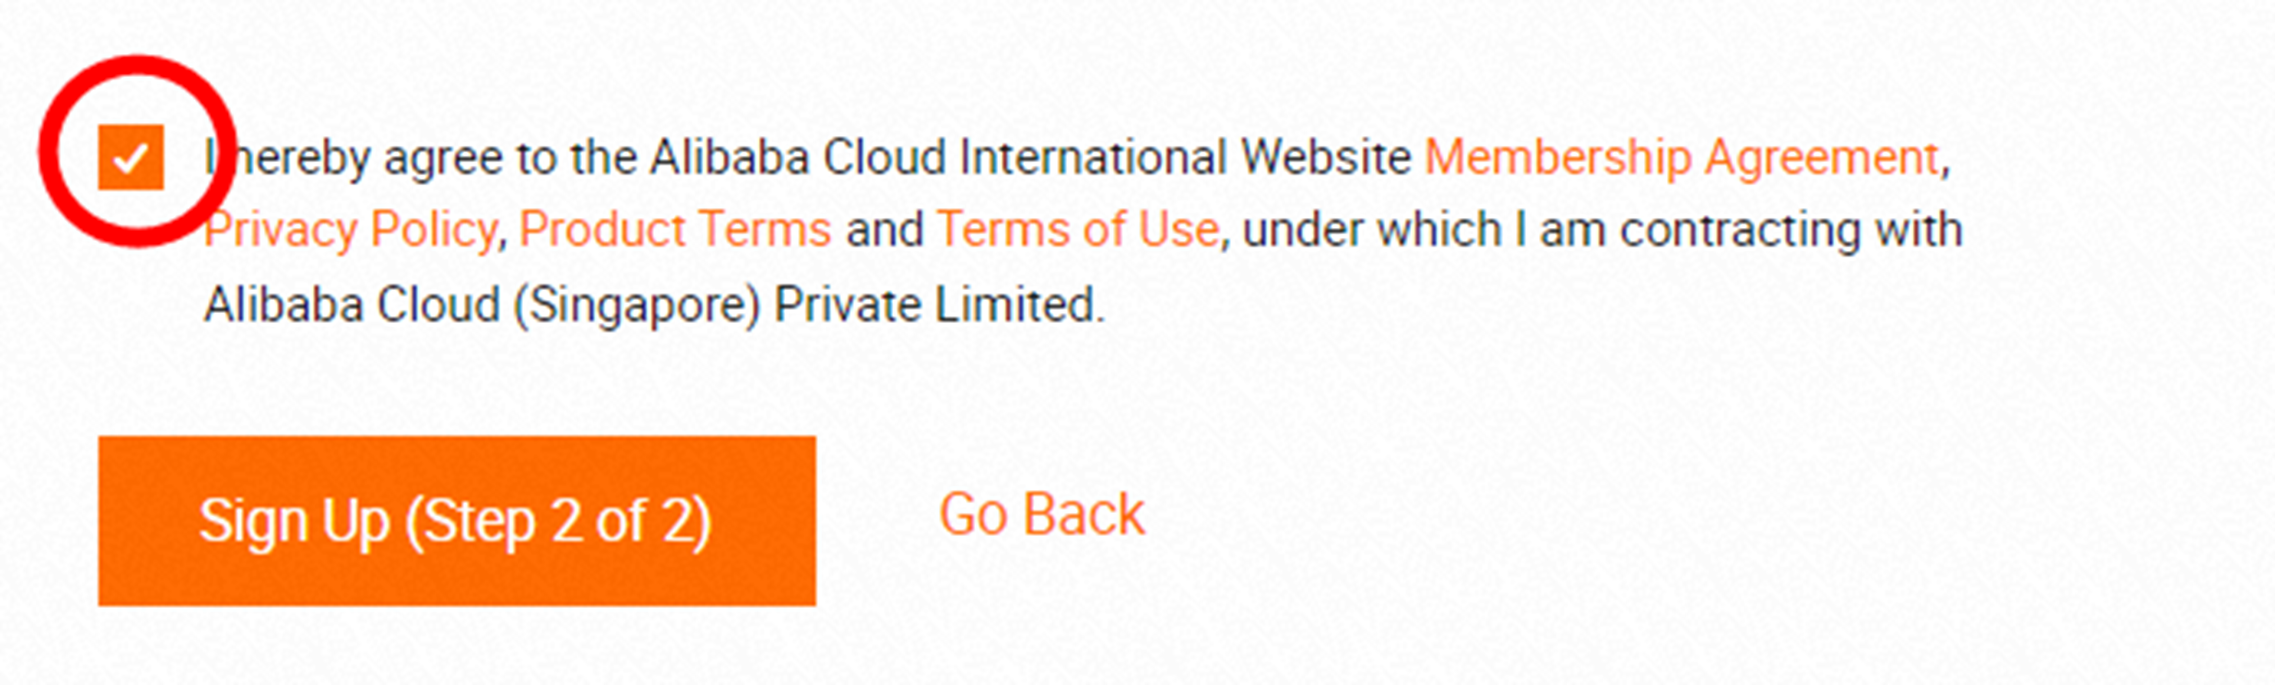
Step 10: Account Authentication
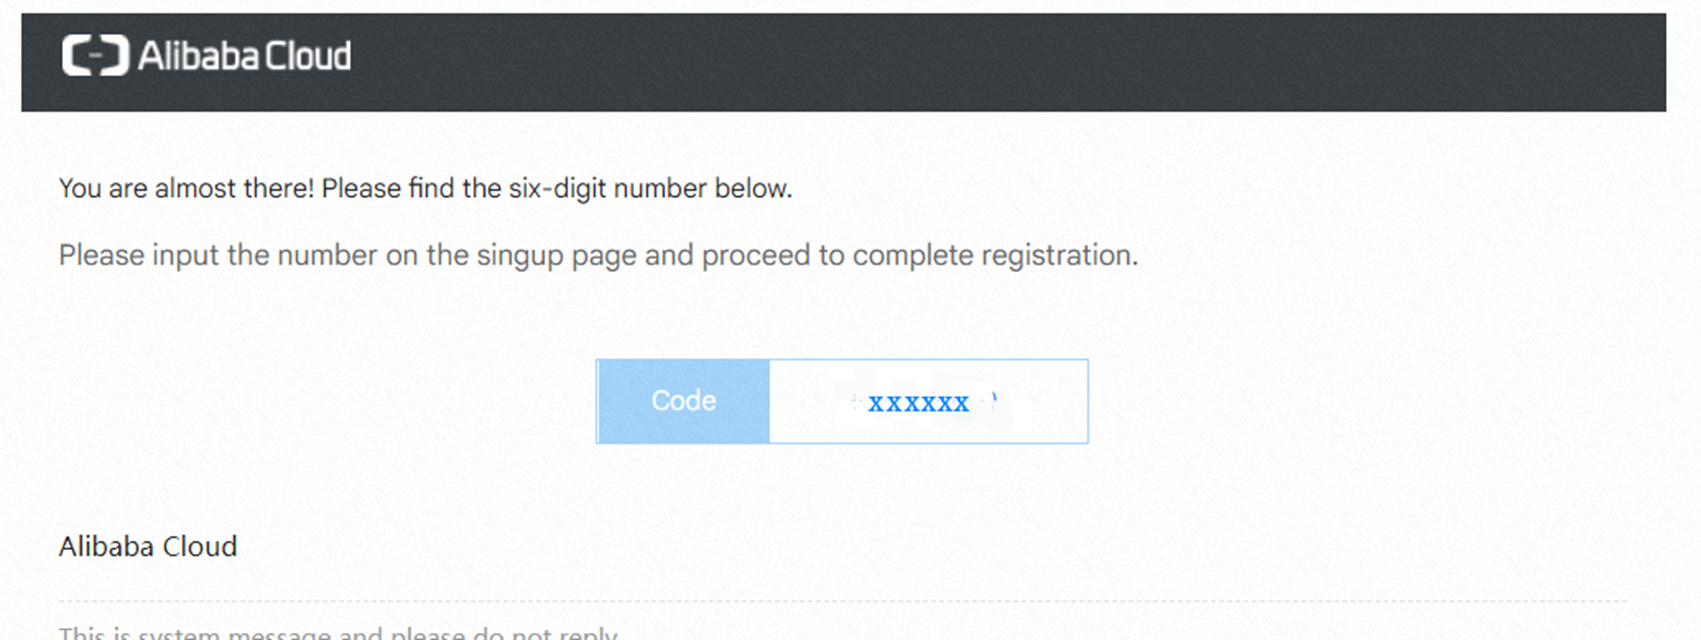
Choose to verify the account either by phone or email.

After click [Send], the invited email address will receive an E-mail with the title in green box. Open this E-mail to view the verification code and enter it into the corresponding page. Check the prompt and click [Sign Up(Step 2 of 2)].

Step 11: Fill in Basic Account Information
[Business account] needs to fill in the relevant information in the figure below. After filling in, the account application is successful. In this case, Partner's ACPN platform will show that the customer is associated. Therefore, End User Customer registration is done and its distribution relationship is successfully linked to Partner.


Existing customers can NOT associate with Partner by above steps, they should contact BD to help with submit the Account Migration Application and provide formal confirmation evidence;
The association may fail if the address information does not match, the partner's credit has been invalid, the taxation information of the Partner account has been invalid, or the Billing Information of the Partner account is insufficient.
Please double check the information to be submitted. If above steps have been followed and the association still failed, please contact customer service on official website.
2. Interface Description
2.1. My Customers
Customers created in this page will be classified as Endusers.

[Name]: Entity name been entered when creating customer
[Account]: Alibaba Cloud account registered by customer in the official website of Alibaba Cloud
[Status]: "Lead" refers to valid customer who has been created but not linked yet. "Official" refers to customer who has been created and linked successfully.
[Create]: Check 1.How To Create Customers for details.
[Manage]: Review the lead information of a customer, including Customer Information, Account Information and Customer Project.
[Invite]: Check 1.How To Create Customers for details.
[Create Project]: Click here and navigate to [Project Management]. When customer has business projects management or support request to follow up, Alibaba Cloud will provide relevant services accordingly.
If the following text [You cannot record new customers.], please review the total amount of [Customers] at right side of [My Customers], and contact BD for amount adjustment if any.

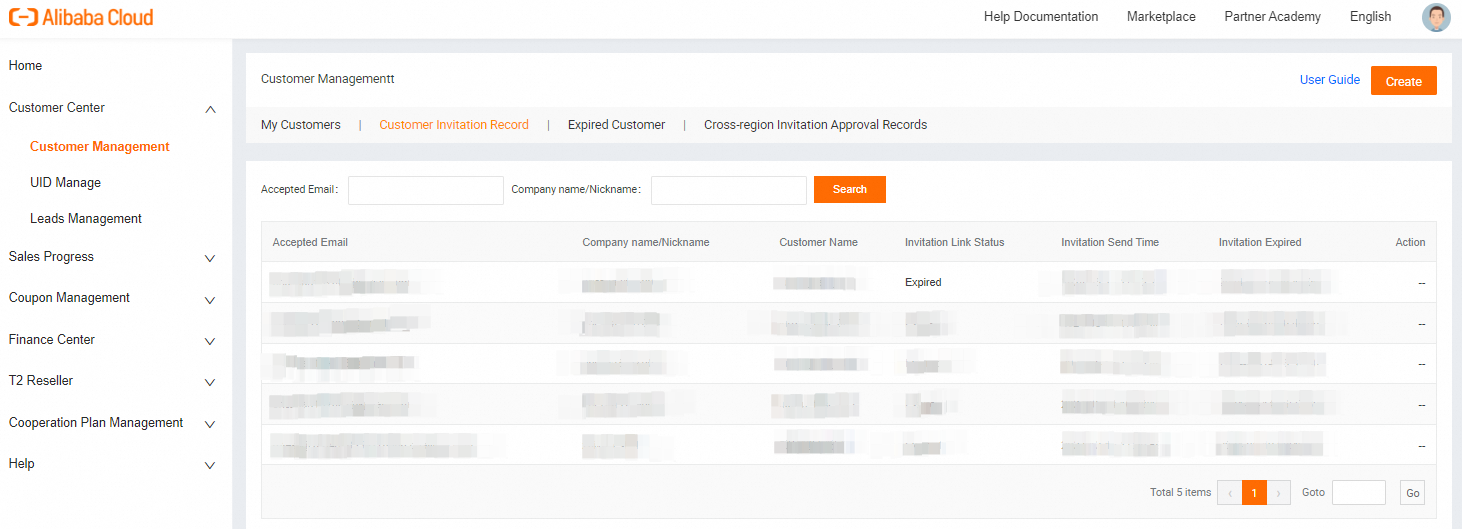
2.2. Customer Invitation Record
Display the customers have been created and Partners have sent out invitation links.
Including customer email information, Customer Entity Nickname identified when inviting customer, Customer Name entered when creating customer, the invitation valid status and valid period.
Provide edited invitation information, and invitation link resend function within valid period.
2.3. Expired Customer
There is a list of created customers who have not completed their invitations within 30 days.

2.4. Cross-region Invitation Approval Records
When the account registration country of customer invited by partner exceeds the business development area already agreed in partner contract, selecting No in Within Contract Region will trigger Cross-region Application and relevant information will be displayed on this page.

3. FAQ
Receive the following error message when inviting customers
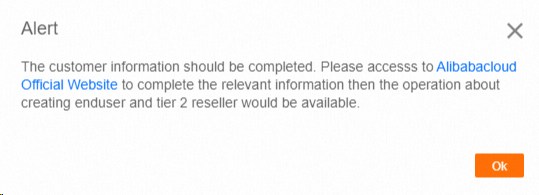
Partners receive this message because customer information is incomplete, please click text in blue [Alibabacloud Official Website] and fill in information accordingly, or access to the link below.
https://myaccount.alibabacloud.com/user_info.htm#/account/basic