Cloud Enterprise Network (CEN) instances are isolated from each other by default. Connecting a single virtual private cloud (VPC) to multiple CEN instances breaks that isolation selectively — the shared VPC can communicate with each CEN, while the CENs remain invisible to each other.
This setup is a good fit for workloads that:
Run in separate CEN instances that must stay isolated from each other
All need access to a common internal service — such as DNS, Network Time Protocol (NTP), or a security scanner — hosted in a dedicated VPC
Must not communicate directly between CENs
Scenario

This tutorial uses VPC3 as the shared services VPC. VPC3 connects to both transit routers (TR1 in CEN1 and TR2 in CEN2). VPC1 and VPC2 each connect only to their own transit router.
After configuration:
VPC1 can reach VPC3, and VPC3 can reach VPC1
VPC2 can reach VPC3, and VPC3 can reach VPC2
VPC1 and VPC2 cannot reach each other
The isolation holds at the routing layer. VPC1's route table only contains a route to VPC3's CIDR block — there is no entry pointing to VPC2. When VPC1 sends traffic toward VPC2, the transit router drops the packets because no matching route exists in its route table.
Prerequisites
Before you begin, make sure that you have:
Two CEN instances named
CEN1andCEN2, each with one transit router in the China (Hangzhou) region —TR1in CEN1 andTR2in CEN2Three VPCs in China (Hangzhou), not yet connected to any transit router, with the following configuration:
Three ECS instances, each deployed under a different VPC, named ECS1, ECS2, and ECS3
| Parameter | VPC1 | VPC2 | VPC3 |
|---|---|---|---|
| IPv4 CIDR block | 10.0.0.0/8 | 172.16.0.0/12 | 192.168.0.0/16 |
| vSwitch 1 | Zone J, 10.0.0.0/24 | Zone J, 172.16.0.0/24 | Zone J, 192.168.0.0/24 |
| vSwitch 2 | Zone K, 10.0.1.0/24 | Zone K, 172.16.1.0/24 | Zone K, 192.168.1.0/24 |
| ECS instance (in vSwitch 1) | ECS1: 10.0.0.1 | ECS2: 172.16.0.1 | ECS3: 192.168.0.1 |
CIDR blocks across the three VPCs must not overlap. In regions where Enterprise Edition transit routers support multiple zones, create vSwitches in at least two zones for disaster recovery.
For instructions on creating each resource, see Create a CEN instance, Create a transit router, Create a VPC and a vSwitch, and Create an ECS instance.
Step 1: Connect VPCs to transit routers
Create four VPC connections in total. Each connection links one VPC to one transit router. The general steps are the same for all four connections — only the parameters differ.
To create a VPC connection:
Log on to the CEN console. On the Instances page, click the CEN instance ID.
On the Basic Information > Transit Router tab, find the transit router and click Actions in the Create Connection column.
On the Connection with Peer Network Instance page, configure the parameters from the table below, then click OK.
Use the following parameters for each of the four connections:
| Parameter | VPC1 → TR1 | VPC2 → TR2 | VPC3 → TR1 | VPC3 → TR2 |
|---|---|---|---|---|
| CEN | CEN1 | CEN2 | CEN1 | CEN2 |
| Transit router | TR1 | TR2 | TR1 | TR2 |
| Instance type | VPC | VPC | VPC | VPC |
| Region | China (Hangzhou) | China (Hangzhou) | China (Hangzhou) | China (Hangzhou) |
| Resource owner ID | Same Account | Same Account | Same Account | Same Account |
| Billing method | Pay-as-you-go | Pay-as-you-go | Pay-as-you-go | Pay-as-you-go |
| Attachment name | Attach1 | Attach2 | Attach3-1 | Attach3-2 |
| Network instance | VPC1 | VPC2 | VPC3 | VPC3 |
| vSwitch | Zone J: vSwitch 1; Zone K: vSwitch 2 | Zone J: vSwitch 1; Zone K: vSwitch 2 | Zone J: vSwitch 1; Zone K: vSwitch 2 | Zone J: vSwitch 1; Zone K: vSwitch 2 |
For Advanced Settings, select the first two options and leave the third unchecked:
Associate with Default Route Table of Transit Router — the VPC connection is automatically associated with the default route table of the transit router, which the transit router uses to forward traffic
Propagate System Routes to Default Route Table of Transit Router — the system routes of the VPC are advertised to the transit router's default route table, enabling communication with other connected network instances
Automatically Creates Route That Points to Transit Router and Adds to All Route Tables of Current VPC — leave this unchecked; you will configure the VPC route tables manually in Step 2
If you enable the third option, the system automatically adds routes for 10.0.0.0/8, 172.16.0.0/12, and 192.168.0.0/16 to all route tables of the VPC, with next hops pointing to the VPC connection. If any of those destination CIDR blocks already exist in the VPC route table, the automatic update fails — click Initiate Route Check to verify, then add the routes manually. For IPv6 traffic, after creating the VPC connection, enable route synchronization or manually add IPv6 route entries pointing to the VPC connection.
Step 2: Configure route tables
Add custom route entries to the route tables of all three VPCs so that traffic is directed to the transit router.
Log on to the VPC console.
In the left-side navigation pane, click Route Tables.
In the top menu bar, select the China (Hangzhou) region.
Click the ID of the route table for
VPC1.On the details page, click the Route Entry List tab, then the Custom Route Entry tab.
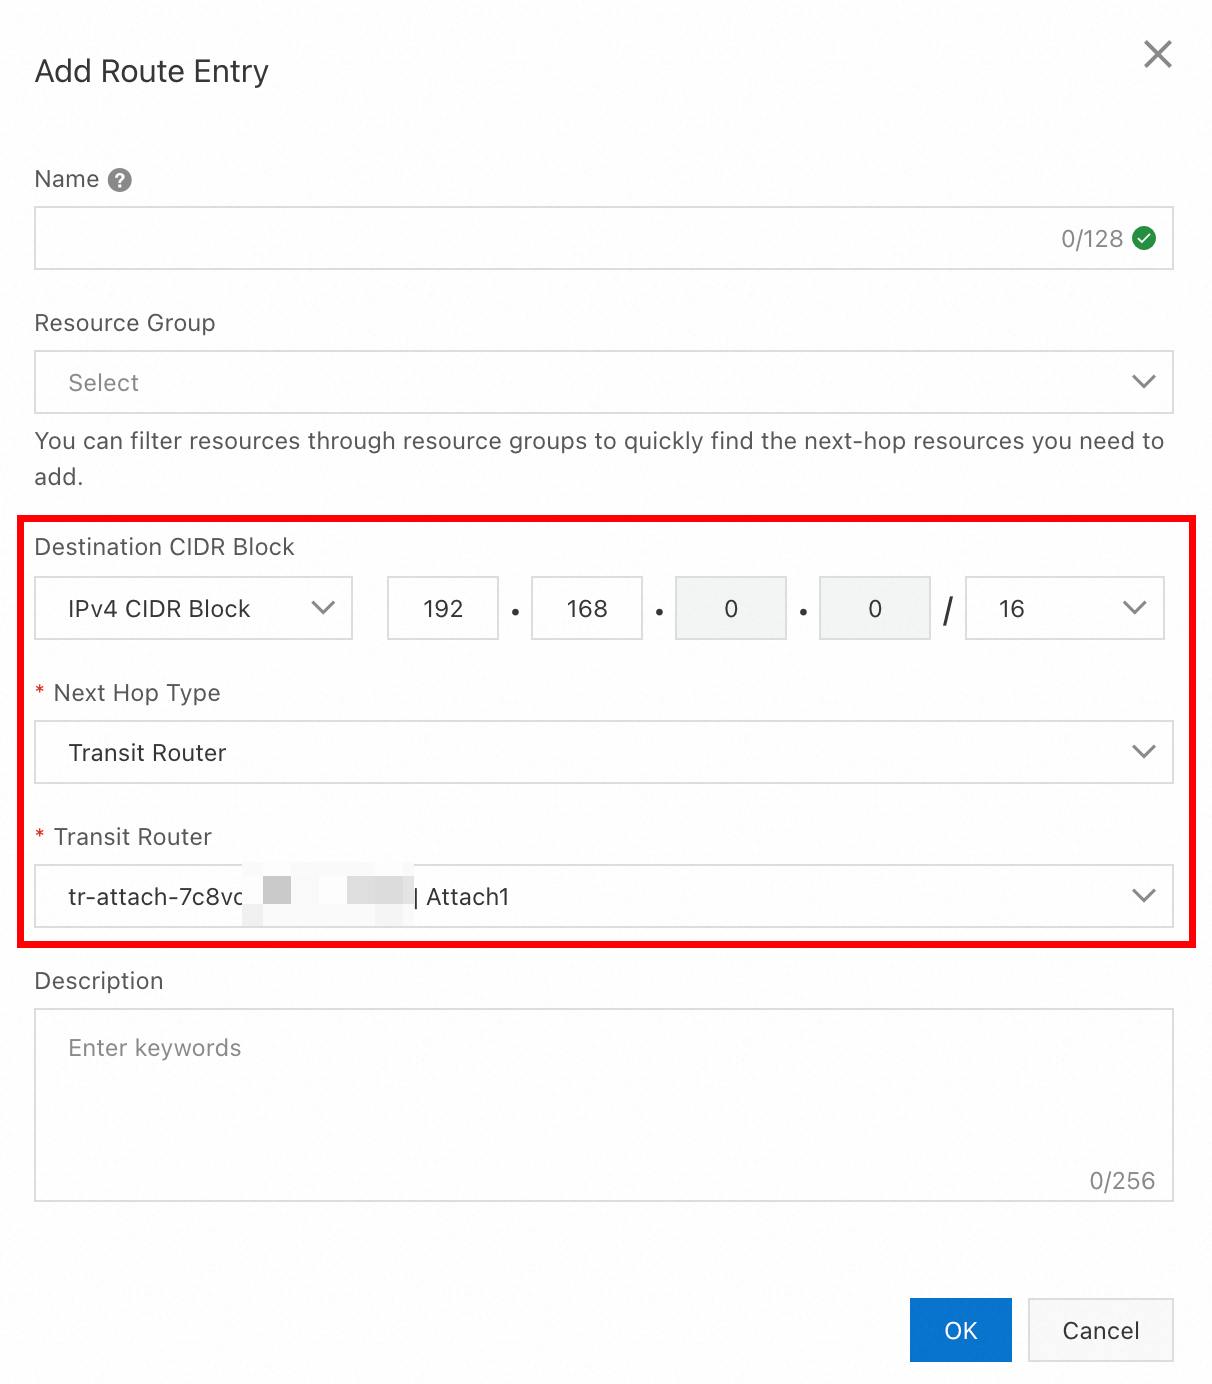
Click Add Route Entry. In the panel that appears, set the destination CIDR block to
192.168.0.0/16, set Next Hop Type to Transit Router, selectAttach1, and click OK.
Repeat steps 4–6 for
VPC2andVPC3, using the parameters in the table below.
| VPC | Destination CIDR block | Next hop | Route type |
|---|---|---|---|
| VPC1 | 192.168.0.0/16 | Attach1 | Custom |
| VPC2 | 192.168.0.0/16 | Attach2 | Custom |
| VPC3 | 10.0.0.0/8 | Attach3-1 | Custom |
| VPC3 | 172.16.0.0/12 | Attach3-2 | Custom |
After this step, each VPC has exactly the routes it needs. VPC1 and VPC2 have a route to VPC3's CIDR block, but no route to each other — this is what keeps them isolated while both can reach VPC3.
Verify the configuration
Before running the ping tests, make sure the security group rules for all three ECS instances allow ICMP traffic. See Query security group rules and Add security group rules.

Log on to ECS1 and ping ECS3:
ping 192.168.0.1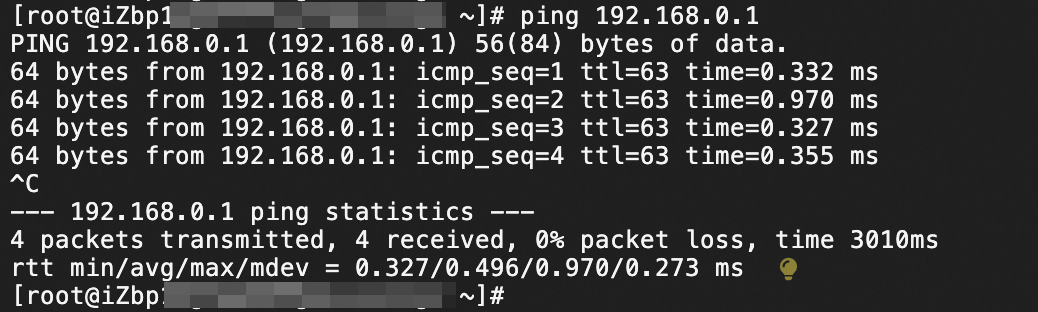
A successful ping confirms that VPC1 and VPC3 are connected.
Run the following checks to verify both connectivity and isolation:
| Test | From | To | Expected result | What it confirms |
|---|---|---|---|---|
ping 192.168.0.1 | ECS1 | ECS3 | Success | VPC1 and VPC3 are connected |
ping 192.168.0.1 | ECS2 | ECS3 | Success | VPC2 and VPC3 are connected |
ping 172.16.0.1 | ECS1 | ECS2 | Failure | VPC1 and VPC2 are isolated |
FAQ
How many CEN instances can I create in one Alibaba Cloud account?
The default limit is five. To request a higher limit, see Quota.
How many transit routers can a VPC connect to?
The default limit is five. To request a higher limit, see Quota.
What do I do if connectivity tests fail?
Check the route tables of the relevant VPCs and the transit router to make sure round-trip route entries exist for both directions. Also check the security group rules and the OS-level firewall settings on the ECS instances. For a step-by-step troubleshooting guide, see FAQs.