Alibaba Cloud Auto Scaling is a service that automatically adjusts the computing power (the number of instances) based on business requirements and policies. When you run containerized applications on elastic container instances, you can use Auto Scaling to scale in or out elastic container instances based on workloads. This can reduce costs while ensuring the normal operation of your business.
Description
Auto Scaling is a cloud service that automatically adds or removes instances based on workload changes and scaling policies. You can use Auto Scaling to ensure sufficient computing resources, prevent idle resources, and reduce costs. For more information, see What is Auto Scaling?
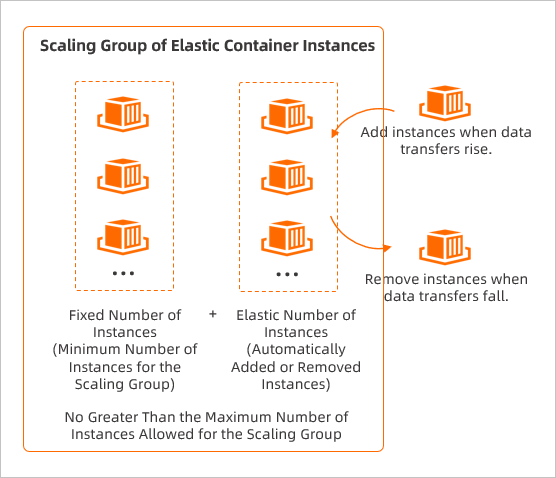
You can add elastic container instances that run the same service to a scaling group, configure the minimum number of instances in the scaling group to ensure daily business operations, and configure the maximum number of instances in the scaling group to prevent excessive costs. You can also run scheduled tasks or event-triggered tasks based on scaling rules to automatically scale in or out elastic container instances in the scaling group. The following figure shows the feature of Auto Scaling in elastic container instances.
In the following scenarios, you can use Auto Scaling to scale in or out elastic container instances:
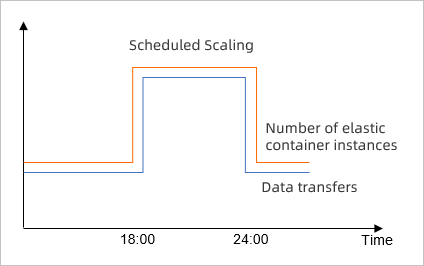
Changes in data transfers are predictable and instances need to be scaled at specific points in time.
For example, if your game enterprise has a sharp increase in data transfers from 18:00:00 to 24:00:00 every day, you can create a scheduled task to scale out elastic container instances at 18:00:00 and scale in instances at 24:00:00 every day.
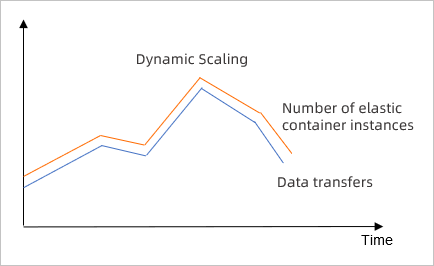
Changes in data transfers are unpredictable and instances need to be automatically scaled based on metrics.
For example, if the changes in data transfers of your video streaming enterprise are unpredictable, you can create an event-triggered task to monitor the CPU utilization of elastic container instances in a scaling group. The system automatically scales in or out instances based on the monitoring result to maintain the CPU utilization at 60%.
Procedure
The following figure shows how to use Auto Scaling to automatically scale in or out elastic container instances:

If you set the Instance Configuration Source parameter to Select Existing Instance when you create a scaling group, Auto Scaling automatically creates and enables a scaling configuration. In this case, you can enable the scaling group without the need to manually create a scaling configuration.
Create a scaling group
A scaling group is used to manage elastic container instances that are designed for the same scenario. You can use a scaling group to specify the maximum number and minimum number of instances, the instance template that you want to use to scale in and out instances, and the policy to remove instances. This way, the scaling group can manage instances based on your business requirements. For more information, see Create a scaling group.
Create a scaling configuration
When Auto Scaling scales up a scaling group, Auto Scaling creates elastic container instances based on the scaling configuration and adds the elastic container instances to the scaling group. For more information, see Create a scaling configuration of the Elastic Container Instance type.
NoteIn most cases, container images are large in size. The startup speed of elastic container instances is compromised when you pull container images. We recommend that you enable automatic match of image caches when you create a scaling configuration. This way, elastic container instances can be created in an accelerated manner.
Enable the scaling group
Scaling events occur only in scaling groups that are in the Enabled state. When a scaling group has an active scaling configuration, a message prompts you to enable the scaling group. You can also go to the Scaling Groups page to manually enable a scaling group. For more information, see Enable a scaling group.
Creates a scaling rule
Scaling rules are used to trigger scaling activities. You can create scaling rules of one of the following types based on your business requirements:
Simple scaling rule: specifies the number of instances that you want to increase or decrease, or specifies the number of instances that you want to maintain in a scaling group.
Target tracking scaling rule: allows you to select a metric and configure a target value for the metric. Then, the system scales in or out instances to maintain the metric value close to the target value.
For more information, see Create a scaling rule.
Execute the scaling rule
You can use one of the following methods to execute a scaling rule and scale in or out elastic instances in a scaling group: For more information, see Execute a scaling rule.
Manual execution: This method is suitable for addressing temporary business demands.
Automatic execution by triggering a scheduled task: You can use a scheduled task to execute a scaling rule at a specified point in time. This method is suitable for managing workload fluctuations that follow specific patterns. For more information about scheduled tasks, see Overview.
Automatic execution by triggering an event-triggered task: You can use an event-triggered task to monitor a specific metric, report alerts, and execute a scaling rule. This method is suitable for managing workload fluctuations that do not follow specific patterns. For more information about event-triggered tasks, see Overview.
Configuration examples
Scenario | Sample configuration | Effect |
Your enterprise requires 10 elastic container instances for daily data transfers. However, the data transfers dramatically increase from 18:00:00 to 23:00:00 every day. Your enterprise must increase five elastic container instances during this period. |
| During the off-peak hours, 10 elastic container instances support daily data transfers. During peak hours from 18:00:00 to 23:00:00, 15 elastic container instances are used. |
Your enterprise requires 10 elastic container instances for daily data transfers. However, your enterprise cannot predict the changes in data transfers and the number of elastic container instances that must be increased or decreased. |
| The system continuously monitors the CPU utilization of elastic container instances in the scaling group and automatically scales in or out elastic container instances based on the scaling triggering conditions in the event-triggered task. This way, the system maintains the CPU utilization smaller than 60% while retaining at least 10 elastic container instances in the scaling group to ensure normal business operation. |