If you want to build high-availability clusters, implement low-cost failover, manage networks in a more precise manner, and enable Internet access, you can enable automatic attachment of secondary elastic network interfaces (ENIs) to Elastic Compute Service (ECS) instances during scale-out events. If you want to release ECS instances during off-peak hours or you want to disable Internet access, you can enable automatic detachment of secondary ENIs that have EIPs from ECS instances and enable automatic release of the secondary ENIs during scale-in events. This improves the resource utilization and cost efficiency.
An ENI is a virtual network interface controller (NIC) that can be attached to an ECS instance that resides in a virtual private network (VPC). ENIs can be classified into the following types: primary ENIs and secondary ENIs. For more information, see Overview of ENIs.
An EIP is a public IP address that you can independently purchase and own. The EIP provides services as expected until you release it. You can associate EIPs with or disassociate EIPs from resources, such as ECS instances and ENIs, based on your business requirements. For more information, see Elastic IP addresses.
Prerequisites
A scaling group is created and is in the Enabled state. For more information, see Manage scaling groups.
The permissions to access other cloud resources are granted to CloudOps Orchestration Service (OOS). For more information, see Use RAM to grant permissions to OOS.
A Resource Access Management (RAM) role is created.
The trusted service of the RAM role is CloudOps Orchestration Service. The name of the RAM role is
OOSServiceRole.The required policies are attached to the RAM role.
When you use OOS to execute tasks, ECS, Auto Scaling, and EIP resources are used. You must attach the following system policies to the
OOSServiceRolerole:AliyunECSFullAccess
AliyunESSFullAccess
AliyunEIPFullAccess
Enable automatic attachment of secondary ENIs that have EIPs to ECS instances during scale-out events
Create a lifecycle hook.
The following table describes the parameter settings used in this example. For parameters that are not included in the following table, retain the default settings. For more information, see Manage lifecycle hooks.
Parameter
Description
Name
Enter
ESSHookForAttachNicWithEip.Scaling Activity
Select Scale-out Event.
Timeout Period
Configure the Timeout Period parameter based on your business requirements. In this example, this parameter is set to 300. Unit: seconds.
ImportantThe timeout period is the period of time during which you can perform custom operations on instances. If the timeout period is shorter than the period of time that is required to perform custom operations, the operations may fail. We recommend that you estimate the period of time that is required to perform custom operations on instances and configure the Timeout Period parameter based on your estimates.
Send Notification When Lifecycle Hook Takes Effect
Select OOS Template and perform the following operations:
Select Public Templates.
Select
ACS-ESS-LifeCycleCreateNetworkInterfaceAndEipAndAttachToInstanceto enable automatic attachment of secondary ENIs that have EIPs to ECS instances during scale-out events.Click Configure Parameters next to
ACS-ESS-LifeCycleCreateNetworkInterfaceAndEipAndAttachToInstance.The following list describes the parameter settings used in this example. For parameters that are not included in the following list, retain the default settings.
InternetChargeType: You can set this parameter to PayByBandwidth or PayByTraffic. PayByBandwidth specifies that you are charged based on the specified bandwidth. PayByTraffic specifies that you are charged based on the actual traffic. In this example, this parameter is set to PayByBandwidth.
Bandwidth: In this example, this parameter is set to 5. A value of 5 specifies that the peak EIP bandwidth is 5 Mbit/s.
OOSAssumeRole: In this example, this parameter is set to
OOSServiceRole.
Trigger a scale-out event.
In this example, a scale-out event is triggered by manually executing a scaling rule to add one ECS instance to the scaling group. You can also execute a scheduled task or an event-triggered task to automatically trigger a scale-out event. For more information, see Manage scaling rules.
NoteIf you manually execute a scaling rule to trigger a scale-out event, the lifecycle hook feature takes effect. If you manually add an ECS instance to the scaling group, the lifecycle hook feature does not take effect.
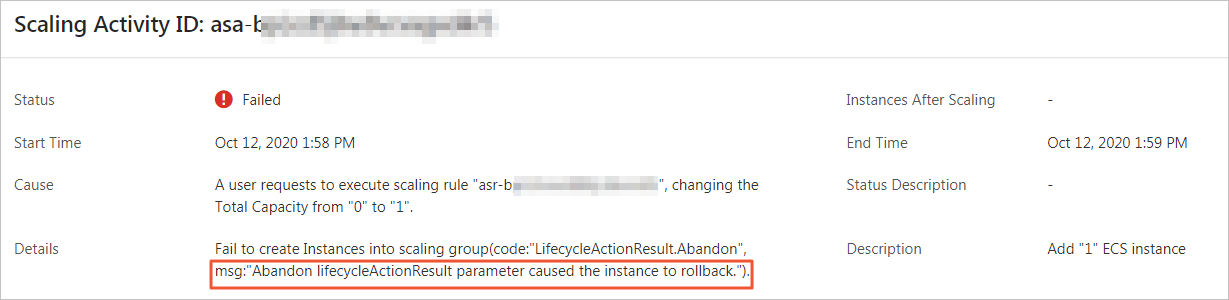
After the scale-out event is triggered, Auto Scaling adds one ECS instance to the scaling group. The
ESSHookForAttachNicWithEiplifecycle hook causes the ECS instance to enter the Pending Add state, and Auto Scaling notifies CloudOps Orchestration Service (OOS) to attach a secondary ENI that has an EIP to the ECS instance.If the scale-out event fails, the following error is reported. In this case, you can go to the OOS console to view the execution status of the O&M operations. For more information, see (Optional) View the execution status of the OOS template.
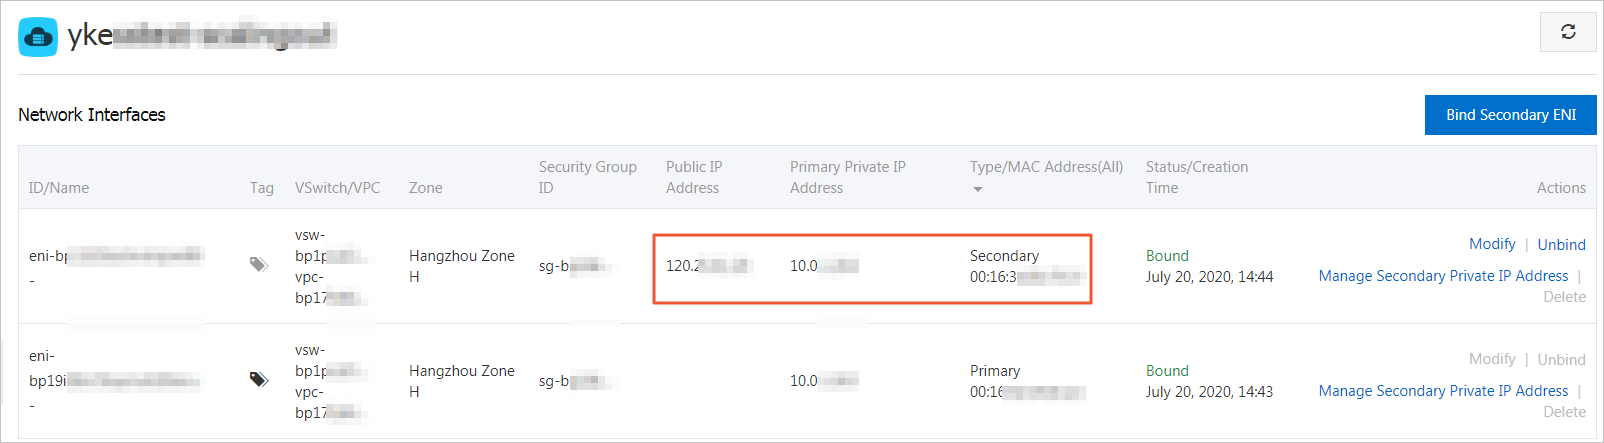
Check whether a secondary ENI that has an EIP is automatically attached to the ECS instance.
Choose to find the scaled-out ECS instance. Then, click the instance ID in the ECS Instance ID/Name column to go to the instance details page.
On the instance details page, click the ENIs tab to view the ENI attached to the ECS instance.
An ENI that has an EIP is attached to the ECS instance, as shown in the following figure.
 Note
NoteIf the ECS instance is created but no ENI is attached to the ECS instance or no EIP is allocated to the ENI, you can check the execution status of the O&M operations in the OOS console.
(Optional) View the execution status of the OOS template
On the execution details page that appears, you can view the related information. In the Basic Information section, you can view the execution ID and status. In the Execution Steps and Results section, you can view the execution details and the corresponding logs. For more information, see View the details of an execution.
ImportantIf the execution fails, an error message is displayed on the execution details page.
(Optional) Configure the secondary ENI.
After secondary ENIs are bound to ECS instances, some images used by the instances may not recognize the IP addresses of the secondary ENIs and configure routes for the secondary ENIs. If this issue occurs, the secondary ENIs cannot be used as expected on the instances. For more information, see Configure a secondary ENI.
Enable automatic detachment of secondary ENIs that have EIPs from ECS instances during scale-in events
Create a lifecycle hook.
The following table describes the parameter settings used in this example. For parameters that are not included in the following table, retain the default settings. For more information, see Manage lifecycle hooks.
Parameter
Description
Name
Enter
ESSHookForDeleteNicAndEip.Scaling Activity
Select Scale-in Event.
Timeout Period
Configure the Timeout Period parameter based on your business requirements. Unit: seconds. In this example, this parameter is set to 300.
ImportantThe timeout period is the period of time during which you can perform custom operations on instances. If the timeout period is shorter than the period of time that is required to perform custom operations, the operations may fail. We recommend that you estimate the period of time that is required to perform custom operations on instances and configure the Timeout Period parameter based on your estimates.
Send Notification When Lifecycle Hook Takes Effect
Select OOS Template and perform the following operations:
Select Public Templates.
Select
ACS-ESS-LifeCycleDetachNetworkInterfaceAndDeleteEipto enable automatic detachment of secondary ENIs that have EIPs from ECS instances during scale-in events.Click Configure Parameters next to
ACS-ESS-LifeCycleDetachNetworkInterfaceAndDeleteEip.Set the OOSAssumeRole parameter to
OOSServiceRoleand retain the default settings for other parameters.
Trigger a scale-in event.
In this example, a scale-in event is triggered by manually executing a scaling rule to remove one ECS instance from the scaling group. You can also execute a scheduled task or an event-triggered task to automatically trigger a scale-in event. For more information, see Manage scaling rules.
NoteIf you manually execute a scaling rule to trigger a scale-in event, the lifecycle hook feature takes effect. If you manually remove an existing ECS instance from the scaling group, the lifecycle hook feature does not take effect.
After the scale-in event is triggered, Auto Scaling removes one ECS instance from the scaling group. The
ESSHookForDeleteNicAndEiplifecycle hook causes the ECS instance to enter the Pending Remove state, and Auto Scaling notifies OOS to automatically release the secondary ENI that has an EIP of the ECS instance.Check whether the secondary ENI attached to the ECS instance and the EIP are automatically released.
You can go to the Elastic Network Interfaces and Elastic IP Addresses pages to check whether the corresponding ENI and EIP exist. If the ENI and EIP do not exist, the EIP and ENI are released.
NoteIf the ECS instance is removed from the scaling group but the ENI or the EIP still exists, you can check the execution status of the O&M operations in the OOS console.
(Optional) View the execution status of the OOS template
On the execution details page, you can view the related information. In the Basic Information section, you can view the execution ID and status. In the Execution Steps and Results section, you can view the execution details and the corresponding logs. For more information, see View the details of an execution.
ImportantIf the execution fails, an error message is displayed on the execution details page.
FAQ
If you fail to execute an O&M task, troubleshoot the issue based on the error message in the execution result. For more information, see FAQ.
The following table describes the common error message.
Error message | Cause | Solution |
Forbidden.Unauthorized message: A required authorization for the specified action is not supplied. | You have not authorized Auto Scaling to perform the current action. | Check whether the OOSServiceRole RAM role has the required permissions. |
Forbidden.RAM message: User not authorized to operate on the specified resource, or this API doesn't support RAM. | The RAM user or RAM role does not have the permissions to operate the corresponding resources. | Check whether the OOSServiceRole RAM role has the required permissions. For example, you can grant the OOS permissions to the RAM role. Before OOS can manage the resources that are declared in the OOS template, you must grant the required permissions to the RAM role. |
LifecycleHookIdAndLifecycleActionToken.Invalid message: The specified lifecycleActionToken and lifecycleActionId you provided does not match any in process lifecycle action. | The ongoing lifecycle hook action has ended or been stopped. | Assess the timeout period of the lifecycle hook to make sure that the O&M tasks specified in the OOS template can be complete within the allotted time limit. |
References
If you use an EIP, you are charged public traffic fees, EIP configuration fees (public IP retention fees), and EIP binding fees. For more information, see Billing overview.
You can enable automatic binding of EIPs to ECS instances to ensure service availability and enable automatic unbinding of EIPs from ECS instances during scale-in events to improve resource utilization and cost efficiency. For more information, see Automatically bind and release EIPs.