Application Real-Time Monitoring Service (ARMS) automatically instruments Java applications running on Container Service for Kubernetes (ACK) and Container Compute Service (ACS). Install the ack-onepilot component in your cluster and add three labels to your Deployment. ARMS then collects traces, application topology, API call metrics, and error and latency data without any code changes.
The installation steps for ACK and ACS are identical. This guide uses ACK as the example.
How it works
The ack-onepilot component (ARMS Agent Onboarding Assistant) runs as a controller in your cluster. When a labeled pod starts, ack-onepilot injects the ARMS Java agent into the pod automatically. When a new agent version is released, ack-onepilot upgrades the agent on the next application restart. To pin a specific version, see Control agent versions manually.
For details on the injection mechanism, see How ack-onepilot works.
The legacy arms-pilot component is no longer maintained. ack-onepilot is its replacement and is fully compatible -- migration requires no changes to your application configuration. For migration steps, see Uninstall arms-pilot and install ack-onepilot.
Process overview
Setting up ARMS monitoring takes three steps:
Install ack-onepilot -- Deploy the monitoring component through the ACK console.
Grant ARMS permissions -- Configure cluster authentication for ARMS (varies by cluster type).
Label your Deployment -- Add three labels to your pod template to enable auto-instrumentation.
Prerequisites
Before you begin, make sure that you have:
An ACK or ACS cluster:
ACK clusters: ACK managed cluster | ACK One registered cluster | ACK dedicated cluster (no longer available for new creation) | ACK serverless cluster
ACS clusters: Create an ACS cluster
A namespace in the cluster (see Manage namespaces and quotas). This guide uses
arms-demoas the example namespaceA JDK version that meets the requirements (see Supported JDK versions)
Maximum JVM heap memory (
-Xmx) greater than 256 MB
Step 1: Install ack-onepilot
Log on to the ACK console. On the Clusters page, click the cluster name.
In the left-side navigation pane, click Add-ons. Search for ack-onepilot.
On the ack-onepilot card, click Install.
In the dialog box, keep the default parameter values and click OK.
ack-onepilot supports up to 1,000 pods by default. For every additional 1,000 pods, allocate 0.5 CPU cores and 512 MB of memory to the component.
After installation, upgrade, configure, or uninstall ack-onepilot from the Add-ons page.
Step 2: Grant ARMS permissions
The required permissions depend on your cluster type. Find your cluster type and follow the corresponding instructions.
ACK managed clusters
ACK managed clusters with an ARMS Addon Token are automatically authorized. Check whether the token exists before proceeding.
Check for the ARMS Addon Token:
Log on to the ACK console. Click Clusters, then click the cluster name.
In the left-side navigation pane, choose Configurations > Secrets. Select kube-system from the Namespace drop-down list.
Look for the secret named
addon.arms.tokenon the Secrets page.
If
addon.arms.tokenexists -- the cluster is already authorized. Skip to Step 3.If
addon.arms.tokendoes not exist -- manually add the required permission policies (see below).
If a cluster has ARMS Addon Token, ARMS performs password-free authorization on the cluster. ARMS Addon Token may not exist in some ACK managed clusters. We recommend that you check whether an ACK managed cluster has ARMS Addon Token before you use ARMS to monitor applications in the cluster.
Add permission policies manually:
On the Clusters page, click the cluster name.
On the Basic Information tab of the Cluster Information page, click the link next to Worker RAM Role in the Cluster Resources section.
On the page that appears, click Grant Permission on the Permissions tab.
In the Grant Permission panel, add these two policies, then click Grant permissions:
Policy Access scope AliyunTracingAnalysisFullAccess Full access to Managed Service for OpenTelemetry AliyunARMSFullAccess Full access to ARMS
ACK dedicated clusters and registered clusters
ACK dedicated clusters and ACK One registered clusters require two things:
Your Alibaba Cloud account must have the AliyunARMSFullAccess and AliyunSTSAssumeRoleAccess permissions. See Manage permissions for RAM users.
The ack-onepilot component must have an AccessKey pair with ARMS permissions.
Provide the AccessKey pair to ack-onepilot using either of these methods.
Method 1: Specify the AccessKey pair in Helm
Log on to the ACK console. Click Clusters, then click the cluster name.
In the left-side navigation pane, choose Applications > Helm. Click Update next to ack-onepilot.
Replace the
accessKeyandaccessKeySecretvalues with your AccessKey ID and AccessKey secret. Click OK.NoteTo get an AccessKey pair, see Create an AccessKey pair.
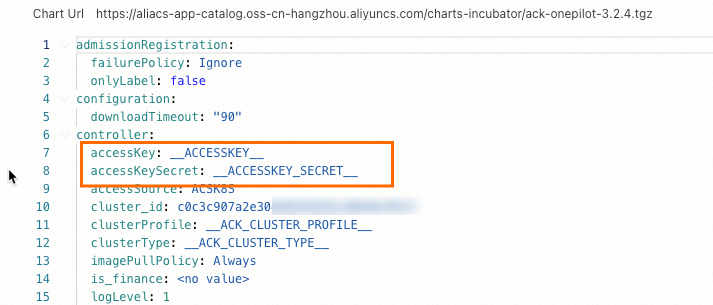
Restart the application Deployment.
Method 2: Use a Kubernetes Secret
Log on to the ACK console. Click Clusters, then click the cluster name.
In the left-side navigation pane, choose Configurations > Secrets. Select the ack-onepilot namespace and create a Secret to store your AccessKey ID and AccessKey secret.
NoteTo get an AccessKey pair, see Create an AccessKey pair.

In the left-side navigation pane, choose Workloads > Deployments. Click the ack-onepilot component (typically named
ack-onepilot-ack-onepilotin theack-onepilotnamespace).In the upper-right corner, click Edit. In the Environment Variables section, add these two variables and reference the Secret values: Click OK.
Environment variable Description ONE_PILOT_ACCESSKEYReferences the AccessKey ID stored in the Secret ONE_PILOT_ACCESSKEY_SECRETReferences the AccessKey secret stored in the Secret 
ACK serverless clusters (ASK) and ECI-integrated clusters
Complete authorization on the Resource Access Authorization page, then restart all pods of the ack-onepilot component.
Step 3: Label your Deployment
Add three labels to the spec.template.metadata.labels section of your Deployment YAML to enable ARMS monitoring:
labels:
  armsPilotAutoEnable: "on"
  armsPilotCreateAppName: "<your-deployment-name>"    # Replace <your-deployment-name> with your application name.
aliyun.com/app-language: java| Label | Value | Description |
|---|---|---|
armsPilotAutoEnable | "on" | Enables automatic agent injection for the pod |
armsPilotCreateAppName | "<your-deployment-name>" | The application name displayed in the ARMS console. Replace with your application name. |
aliyun.com/app-language | java | Specifies the application language for the agent |
The labels must be in spec.template.metadata.labels (the pod template), not in metadata.labels (the Deployment metadata). Placing labels in the wrong location is a common cause of monitoring data not appearing.
Apply the labels to an existing Deployment
Log on to the ACK console. Click Clusters, then click the cluster name.
In the left-side navigation pane, choose Workloads > Deployments.
On the Stateless page, click
 > YAML Edit next to the target application.
Add the three labels to
spec.template.metadata.labelsand click Update.
For more information about application security, see What is application security?.
For more information about application security billing, see Billing overview.
Create a new Deployment with monitoring enabled
On the Stateless page, click Create from YAML and include the labels in your Deployment definition.
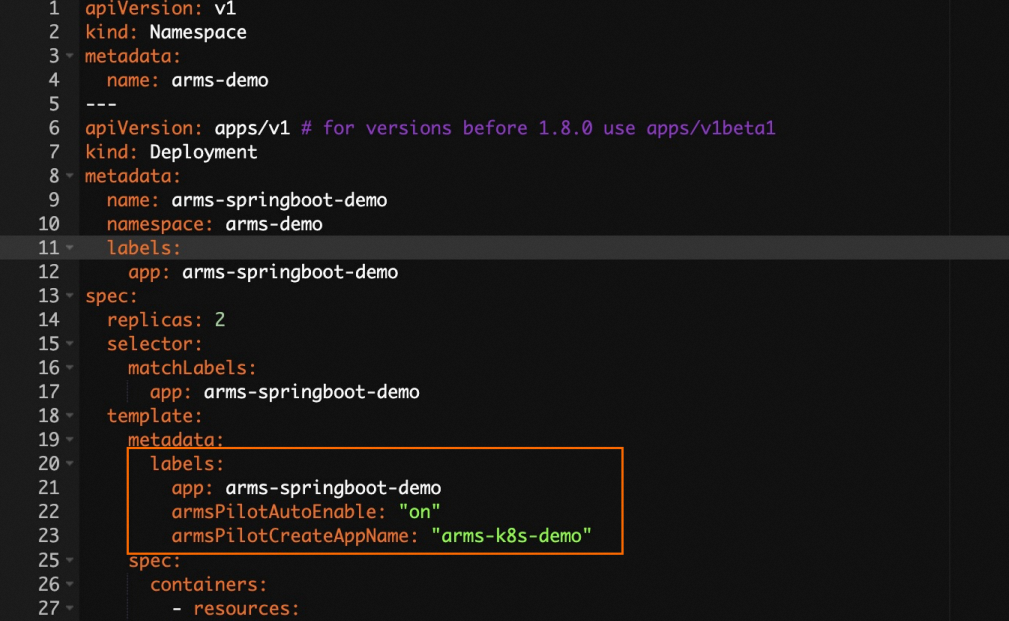
Expand to view the full YAML example (Java)
apiVersion: v1
kind: Namespace
metadata:
  name: arms-demo
---
apiVersion: apps/v1 # for versions before 1.8.0 use apps/v1beta1
kind: Deployment
metadata:
  name: arms-springboot-demo
  namespace: arms-demo
  labels:
    app: arms-springboot-demo
spec:
  replicas: 2
  selector:
    matchLabels:
      app: arms-springboot-demo
  template:
    metadata:
      labels:
        app: arms-springboot-demo
        armsPilotAutoEnable: "on"
        armsPilotCreateAppName: "arms-k8s-demo"
    spec:
      containers:
        - resources:
            limits:
              cpu: 0.5
          image: registry.cn-hangzhou.aliyuncs.com/arms-docker-repo/arms-springboot-demo:v0.1
          imagePullPolicy: Always
          name: arms-springboot-demo
          env:
            - name: SELF_INVOKE_SWITCH
              value: "true"
            - name: COMPONENT_HOST
              value: "arms-demo-component"
            - name: COMPONENT_PORT
              value: "6666"
            - name: MYSQL_SERVICE_HOST
              value: "arms-demo-mysql"
            - name: MYSQL_SERVICE_PORT
              value: "3306"
---
apiVersion: apps/v1 # for versions before 1.8.0 use apps/v1beta1
kind: Deployment
metadata:
  name: arms-springboot-demo-subcomponent
  namespace: arms-demo
  labels:
    app: arms-springboot-demo-subcomponent
spec:
  replicas: 2
  selector:
    matchLabels:
      app: arms-springboot-demo-subcomponent
  template:
    metadata:
      labels:
        app: arms-springboot-demo-subcomponent
        armsPilotAutoEnable: "on"
        armsPilotCreateAppName: "arms-k8s-demo-subcomponent"
    spec:
      containers:
        - resources:
            limits:
              cpu: 0.5
          image: registry.cn-hangzhou.aliyuncs.com/arms-docker-repo/arms-springboot-demo:v0.1
          imagePullPolicy: Always
          name: arms-springboot-demo-subcomponent
          env:
            - name: SELF_INVOKE_SWITCH
              value: "false"
            - name: MYSQL_SERVICE_HOST
              value: "arms-demo-mysql"
            - name: MYSQL_SERVICE_PORT
              value: "3306"
---
apiVersion: v1
kind: Service
metadata:
  labels:
    name: arms-demo-component
  name: arms-demo-component
  namespace: arms-demo
spec:
  ports:
    - name: arms-demo-component-svc
      port: 6666
      targetPort: 8888
  selector:
    app: arms-springboot-demo-subcomponent
---
apiVersion: apps/v1 # for versions before 1.8.0 use apps/v1beta1
kind: Deployment
metadata:
  name: arms-demo-mysql
  namespace: arms-demo
  labels:
    app: mysql
spec:
  replicas: 1
  selector:
    matchLabels:
      app: mysql
  template:
    metadata:
      labels:
        app: mysql
    spec:
      containers:
        - resources:
            limits:
              cpu: 0.5
          image: registry.cn-hangzhou.aliyuncs.com/arms-docker-repo/arms-demo-mysql:v0.1
          name: mysql
          ports:
            - containerPort: 3306
              name: mysql
---
apiVersion: v1
kind: Service
metadata:
  labels:
    name: mysql
  name: arms-demo-mysql
  namespace: arms-demo
spec:
  ports:
    - name: arms-mysql-svc
      port: 3306
      targetPort: 3306
  selector:
    app: mysql
Verify monitoring data
On the Stateless page, click > ARMS Console in the Actions column of the target application to view the application monitoring details.

FAQ
Why is the monitoring data abnormal after I change the cluster or namespace of an application?
How do I use ack-onepilot when a VPC connection cannot be established?
Why does an ARMS agent fail to be installed for an application in an ACK cluster?
Why are the suffixes of application names missing after I update the applications?