This topic describes how to use the Web Player SDK for common playback controls, such as autoplay, custom player skins and controls, and video screenshots. This topic also explains how to integrate and use features for long videos and play video streams that use the H.265 or H.266 encoding protocol.
Playback control
Autoplay
If you set autoplay to true and the video does not play automatically, this is a common issue. Most modern browsers block autoplay with sound to avoid disturbing users.
For example, Chrome's autoplay policy is as follows:
Muted autoplay is always allowed.
Autoplay with sound is allowed in the following scenarios:
The user has interacted with the webpage, such as by clicking or tapping.
The user's video viewing behavior on a website has exceeded a certain threshold. For example, if a user frequently watches videos on a specific website, Chrome allows that site to autoplay videos with sound. This policy is controlled internally by Chrome and cannot be influenced by your program.
The user has added the website to their home screen on a mobile device or installed a Progressive Web App (PWA) on a desktop device.
To handle this, you can perform the following operations:
Set mute to true to enable autoplay with the sound muted. For more information, see Aliplayer API reference.
Set autoplayPolicy: { fallbackToMute: true } to try playing with sound first. If it fails, the player will try to play with the sound muted. For more information, see Aliplayer API reference.
Note that some browsers, such as the browser in WeChat, may also block muted autoplay. Therefore, autoplay is not guaranteed to work in all cases.
For more information about browser autoplay policies, see the documentation for Chrome or Safari.
Continuous playback
Continuous playback means that the next video in a sequence automatically plays after the current one finishes. The behavior of continuous playback is affected by the playback method, player mode, and playback scenario.
URL-based playback
For the Web Player SDK, you can subscribe to the
endedevent. In theendedevent, you can call theloadByUrlmethod with the URL of the next video. The following example shows the code:function endedHandle() { var newUrl = ""; player.loadByUrl(newUrl); } player.on("ended", endedHandle);Vid+PlayAuth playback
In the
endedevent, you can call thereplayByVidAndPlayAuthmethod with thevidand a newplayauthvalue. The following example shows the code:function endedHandle() { var newPlayAuth = ""; player.replayByVidAndPlayAuth(vid,newPlayAuth); } player.on("ended", endedHandle);ImportantThe default validity period of a
playauthis 100 seconds. When you call thereplayByVidAndPlayAuthmethod, you must obtain a new playback credential.
Handling address protocol switching
If the original video is in MP4 format and the new video URL points to an HLS stream, you must create a new player instance. The following example shows the code:
function endedHandle()
{
    var newUrl = ""; // The new playback URL
    player.dispose(); // Destroy the player
     // Recreate the player
   setTimeout(function(){
     player = new Aliplayer({
              id: 'J_prismPlayer',
              autoplay: true,
              playsinline:true,
              source:newUrl
         });
      }
   },1000);
}
player.on("ended", endedHandle);
Customize the player skin and controls
The Web Player SDK lets you customize the player skin and control the display and position of components, such as the control bar and error UI.
Player control bar UI
You can modify the skinLayout property to customize which components are displayed and their positions. For more information, see Configure the skinLayout property.
Default configurations for ApsaraVideo VOD
skinLayout:[
   {name: "bigPlayButton", align: "blabs", x: 30, y: 80},
    {name: "H5Loading", align: "cc"},
    {name: "errorDisplay", align: "tlabs", x: 0, y: 0},
    {name: "infoDisplay"},
    {name:"tooltip", align:"blabs",x: 0, y: 56},
    {name: "thumbnail"},
    {
      name: "controlBar", align: "blabs", x: 0, y: 0,
      children: [
        {name: "progress", align: "blabs", x: 0, y: 44},
        {name: "playButton", align: "tl", x: 15, y: 12},
        {name: "timeDisplay", align: "tl", x: 10, y: 7},
        {name: "fullScreenButton", align: "tr", x: 10, y: 12},
        {name:"subtitle", align:"tr",x:15, y:12},
        {name:"setting", align:"tr",x:15, y:12},
        {name: "volume", align: "tr", x: 5, y: 10}
      ]
    }
  ]
Error UI
The Web Player SDK provides a default error UI and two ways to customize it. For more information, see Customize the error UI in H5.
Customize the skin using CSS
You can keep the player's original layout and display, but customize the skin by rewriting CSS to modify the background color, visibility, font, position, and other attributes.
Rewrite the UI
To rewrite the UI, you must subscribe to error events.
Web Player SDK skin
If the default Web Player SDK UI does not meet your needs, you can configure the player's CSS styles to specify a custom skin.
Set the web player skin
NoteFor more information, see the player's CSS configuration file aliplayer-min.css. The following code shows an example of how to modify the big play button. For more information, see Set the player skin.
.prism-player .prism-big-play-btn {
  width: 90px;
  height: 90px;
  background: url("//gw.alicdn.com/tps/TB1YuE3KFXXXXaAXFXXXXXXXXXX-256-512.png") no-repeat -2px -2px;
}
Customize the video thumbnail
You can set a thumbnail for each video that you upload to ApsaraVideo VOD. You can set or modify video thumbnails in several ways. Before you upload a video, you can select a specific image as the thumbnail or capture a frame from the video to use as the thumbnail. You can also update the thumbnail after the video is uploaded. The following methods are available for setting a thumbnail:
Set the thumbnail in the ApsaraVideo VOD console. For more information, see Set a video thumbnail.
Set the thumbnail using the player's cover property.
var player = new Aliplayer({
 "id": "player-con",
 "source":"//player.alicdn.com/video/aliyunm****.mp4",
  "cover":"URL of the thumbnail",
},
 function () { }
);
Video screenshots
Web Player SDK V2.1.0 and later supports taking screenshots during video playback. The captured image is of the image or jpeg type. You must enable the screenshot feature separately. The data returned from a screenshot includes the current playback time, and the image in base64 and binary formats.
Enable the screenshot feature
Enable the screenshot feature in the web player
ImportantThe screenshot feature is not supported for FLV videos in the Safari browser. The screenshot button does not appear even if it is enabled. In addition, the Web Player SDK uses Canvas to take screenshots. Therefore, you must add a cross-domain access header to your playback domain name. For more information, see Configure cross-domain access.
You can add the snapshot UI to the skinLayout array. The following example shows the code:
    skinLayout:[
    {name: "bigPlayButton", align: "blabs", x: 30, y: 80},
    {
      name: "H5Loading", align: "cc"
    },
    {name: "errorDisplay", align: "tlabs", x: 0, y: 0},
    {name: "infoDisplay"},
    {name:"tooltip", align:"blabs",x: 0, y: 56},
    {name: "thumbnail"},
    {
      name: "controlBar", align: "blabs", x: 0, y: 0,
      children: [
        {name: "progress", align: "blabs", x: 0, y: 44},
        {name: "playButton", align: "tl", x: 15, y: 12},
        {name: "timeDisplay", align: "tl", x: 10, y: 7},
        {name: "fullScreenButton", align: "tr", x: 10, y: 12},
        {name:"subtitle", align:"tr",x:15, y:12},
        {name:"setting", align:"tr",x:15, y:12},
        {name: "volume", align: "tr", x: 15, y: 10},
        {name: "snapshot", align: "tr", x: 5, y: 12},
      ]
    }
  ]
To take screenshots with the Web Player SDK, you must set the video's cross-origin attribute to allow anonymous cross-domain access. The following example shows the code:
  extraInfo:{
    crossOrigin:"anonymous"
  }
Set the size and quality of screenshots
You can use the setSnapshotProperties(width,height,rate) method to set the size and quality of the screenshot. The default size is 100%. The following example shows the code:
// Set the width, height, and quality of the screenshot to 300, 200, and 0.9, respectively.
// The height and width are in pixels. The quality can be a number between 0 and 1. The default is 1.
player.setSanpshotProperties(300,200,0.9)
Subscribe to screenshot events
When a screenshot is taken, the snapshoted event is triggered and returns the screenshot data. The following example shows the code:
player.on("snapshoted", function(data) {
     console.log(data.paramData.time);
     console.log(data.paramData.base64);
     console.log(data.paramData.binary);
 });
Parameter descriptions:
time: The point in the video's playback time when the screenshot was taken.
base64: The base64 string of the screenshot. You can use this string directly for
imgdisplay.binary: The binary data of the screenshot. You can use this data for uploads.
Screenshot watermarks
You can set the snapshotWatermark property to add a watermark to screenshots. The following table describes the parameters of this property.
Parameter | Description |
left | The distance from the left edge. |
top | The height of the top-left corner. This includes the height of the text. |
text | The watermark text. |
font | Set the text format. You can set multiple properties at once, separated by spaces.
|
strokeColor | Set the color for the stroke. |
fillColor | Set the fill color for the drawing. |
Example:
snapshotWatermark:{
    left:"100",
    top:"100",
    text:"Test watermark",
    font:"italic bold 48px SimSun",
    strokeColor:"red",
    fillColor:'green'
  }
Disable dragging the progress bar
To prevent users from dragging the progress bar to change the playback position, you can set the disableSeek:true property.
const player = new Aliplayer({
  id: "player-con",
  disableSeek: true,
  source: "https://player.alicdn.com/video/aliyunmedia.mp4",
}, function (player) {
    console.log("The player is created");
  }
);
Long video scenarios
Adaptive bitrate switching for HLS
For adaptive bitrate streaming, you can pass a multi-bitrate URL (a master playlist) to the `source` parameter and set isVBR:true. Adaptive bitrate streaming supports automatic and manual switching of video definitions based on the network environment.
Get the current playback URL
Adaptive bitrate: player._hls.levels[player._hls.currentLevel]
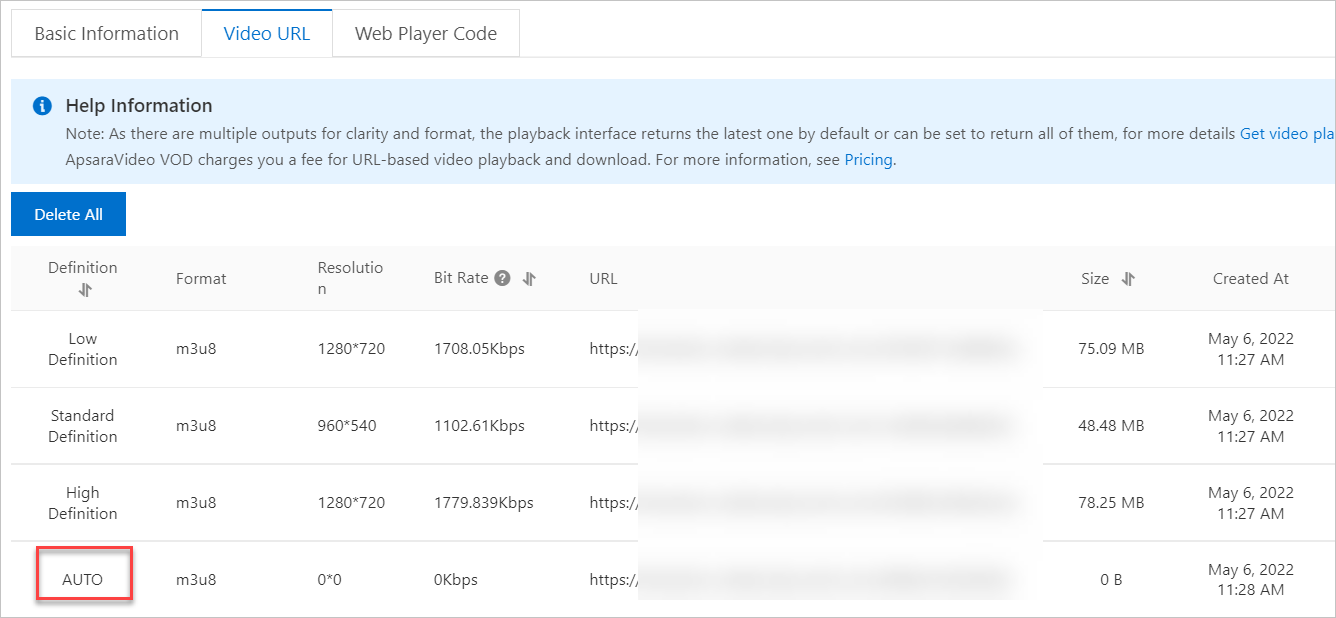
The current bitrate cannot be displayed in Auto mode in the Safari browser.
HLS video streams must be packaged using an adaptive bitrate streaming transcoding template group. In the ApsaraVideo VOD console, go to Configuration Management > Media Processing > Transcoding Template Groups to configure the template group and produce the corresponding video stream. For more information, see Configure video or subtitle packaging templates.
The following is the sample code:
varplayer = newAliplayer({
 "id":"player-con",
 "source":"adaptive bitrate URL",
 "isVBR":true,
 },
 function () { }
);
The following figure shows the result.

External subtitles
The Web Player SDK supports the following types of WebVTT subtitles:
Subtitles embedded in HLS (M3U8) files: The player supports HLS videos with embedded WebVTT subtitles using the Vid+PlayAuth method or the URL method. The HLS video can be an M3U8 file that is generated by transcoding with a subtitle packaging template in ApsaraVideo VOD or an M3U8 file that is generated by other means.
External subtitles: You can add external WebVTT subtitles using the
textTracksparameter or thesetTextTracksmethod. For more information about the API, see the Aliplayer API reference.
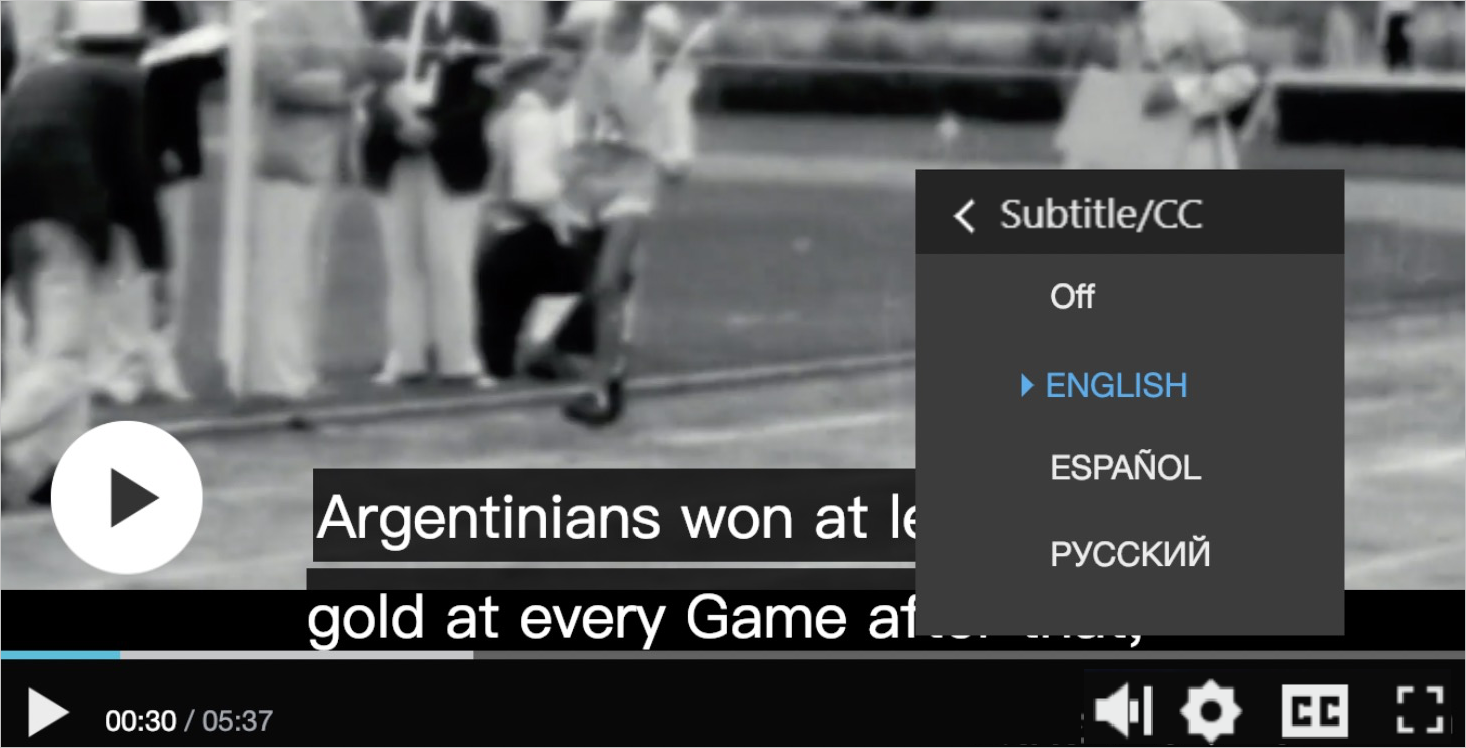
In addition to the default UI operations, the Web Player SDK provides CCService to meet custom user needs, such as setting a default language based on the browser's language. You can access the subtitle service through the player._ccService property. The subtitle service provides the following APIs:
Function name | Parameter | Description |
switch | language | Switch subtitles |
open | Not applicable | Enable subtitles |
close | Not applicable | Disable subtitles |
getCurrentSubtitle | Not applicable | Get the language value of the current subtitle |
The following example shows the code:
// Switch subtitles
var lang = 'zh-Hans/en-US';
player._ccService.switch(lang);
player._ccService.updateUI(lang); // The API does not update the UI by default. Call this manually if needed.

// Enable subtitles
var result = player._ccService.open();
player._ccService.updateUI(result.language);

// Disable subtitles
player._ccService.close();
player._ccService.updateUI();
To modify the subtitle style, you have two options:
Option 1: Use WebVTT cue settings. You can write the styles in the subtitle file. For more information, see the WebVTT standard.
Option 2: Modify the styles using CSS.
The following example changes the subtitles to black text on a white background.
  .prism-cue > div:first-child,
  video::cue {
    font-size: 14px !important;
    color: #000 !important;
    background-color: rgba(255, 255, 255, .8) !important; /* Native iOS subtitle rendering does not support background color */
}The player chooses the most suitable rendering solution between custom and native rendering. The two selectors, .prism-cue > div:first-child and video::cue, ensure that the styles can be modified in both rendering solutions.
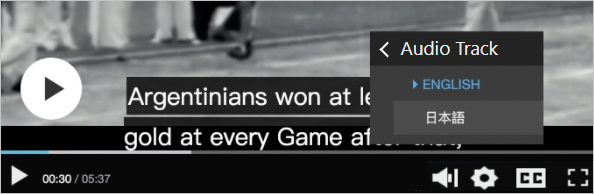
Multi-audio tracks
No extra settings are required for the player. The following figure shows the result.
Multi-language
The Web Player SDK supports Chinese and English by default and automatically enables Chinese or English resources based on the browser's language settings. In addition to these two languages, the SDK also lets you define custom languages. The Web Player SDK also supports multi-region playback for ApsaraVideo VOD. This allows Vid+PlayAuth playback of video resources from regions such as Southeast Asia and Europe.
Language setting property
The Web Player SDK provides the language property to specify the language. This property has a higher priority than the browser's language setting. The default value of this property is empty. The following example shows the code:
var player = new Aliplayer({
    id: "player-con",
    source: "",
    width: "100%",
    height: "500px",
    autoplay: true,
    language: "en-us",
  }, function (player) {
    console.log("Player created successfully");
  });
English version of the player
var player = new Aliplayer({
 "id": "player-con",
 "source": "",
 "language": "en-us" //zh-cn: Chinese. en-us: English.
 },
 function (player) {}
);
Custom language
To support languages other than Chinese and English, you can use the custom language feature. You can use the languageTexts property to specify language resources. The languageTexts property uses an object literal format. The key is the value of the language property, and the value is a JSON object that contains the translated resources for the specified language. The following is a code sample:
If you are unsure which resources to translate, you can use the online translation resource input tool. Click to open the online configuration tool. In the top navigation bar, choose More Settings > Language. After you select or enter a language key, a language translation page appears. On this page, you can translate the required resources into the corresponding language. After you submit the translation, the code is generated.
var player = new Aliplayer({
 "id": "player-con",
 "source": "",
 "language": "CustomLanguage",// Name it yourself, a string is fine
"languageTexts":{
    "CustomLanguage":{
        "Pasue":"CustomLanguage Pause"
        // For other player fields, see https://player.alicdn.com/lang.json?spm=a2c4g.11186623.0.0.5a746515vnwUSi&file=lang.json
            }
        }
    },
    function (player) {}
);
Support for multi-region playback
ApsaraVideo VOD is available in the following regions: Shanghai, Frankfurt, and Singapore. The Vid+PlayAuth and STS playback methods of the Web Player SDK support multi-region playback. When the player determines which region's video the user wants to play, it calls the ApsaraVideo VOD service in that region to obtain the video's playback URL.
Vid+PlayAuth playback: The player parses the Region from the playauth to obtain the video from the corresponding region. Therefore, you do not need to specify the region for playback.
STS playback: You can use the player's Region property to specify which region's video to play. The default value for Region is
'cn-shanghai'. Other valid values are `cn-shanghai`, `eu-central-1`, and `ap-southeast-1`. The following example shows the code:var player = new Aliplayer({ id: "player-con", width: "100%", height: "500px", autoplay: true, language: "en-us", vid : '1e067a2831b641db90d570b6480f****', accessKeyId: '',// The AccessKey ID of the temporary STS token, returned when generating the STS token. securityToken: '',// The STS token, which needs to be generated by calling the STS service's AssumeRole API. accessKeySecret: ''// The AccessKey secret of the temporary STS token, returned when generating the STS token. region:'eu-central-1',// Frankfurt region }, function (player) { console.log("Player created successfully"); });
Play H.265/H.266 encoded video streams
Prerequisites
The Web Player SDK supports playing H.265 encoded video streams from V2.14.0 and H.266 encoded video streams from V2.20.2. To use this feature, you must apply for a license and purchase the H.265 playback value-added service for the Web Player SDK. For more information, see Manage licenses.
For information about the supported audio and video formats for H.265/H.266 encoding in the Web Player SDK, see Supported protocols.
Before you use the H.265/H.266 video stream playback feature, make sure that you understand the player's environment requirements and browser compatibility. The following table describes the details.
Item
Description
Environment requirements
The player requests video resources in segments using Asynchronous JavaScript and XML (AJAX). Therefore, the video service must support the following features:
Support for range requests.
Support for OPTIONS requests. Browsers such as Firefox send an OPTIONS request before initiating an AJAX request with a range header.
Compatibility
H.265
Devices with iOS 11 or later natively support H.265 video playback.
Some Android device browsers already support hardware decoding of H.265 videos, such as the system's built-in browser, WeChat browser, UC Browser, and QQ Browser.
For software decoding scenarios in browsers such as Chrome, Edge, and Firefox, compatibility depends on the browser's support for the WebAssembly API. For support details, see WebAssembly. Due to performance issues with WebAssembly in older versions, Chrome and Chromium-based browsers must be version 74 or later.
H.266
Currently, no browser natively supports H.266 playback, so the player uses a software decoding solution. This requires a certain level of compatibility with the browser's WebAssembly API. For support details, see WebAssembly. Due to performance issues with WebAssembly in older versions, Chrome and Chromium-based browsers must be version 74 or later.
iOS versions below 16.4 and most mid-to-low-end Android models cannot software-decode H.266.
Software decoding performance
H.265
On desktop browsers, multi-threaded decoding supports videos up to 2K at 30 fps. Single-threaded decoding supports videos up to 1080p at 30 fps.
On mobile browsers, single-threaded decoding supports videos up to 720p at 30 fps. Mobile software decoding performance mainly depends on chip performance. Tests show that the following chips can smoothly software-decode 720p/30fps videos in a single thread.
Snapdragon 855 and later
Kirin 820 and later
Dimensity 800 and later
H.266
On desktop browsers, multi-threaded decoding supports videos up to 1080p at 30 fps. Single-threaded decoding supports videos up to 720p at 30 fps.
On mobile browsers, single-threaded decoding supports videos up to 720p at 30 fps. Mobile software decoding performance mainly depends on chip performance. Tests show that the following chips can smoothly software-decode 720p/30fps videos in a single thread.
Snapdragon 855 and later
Kirin 820 and later
Quick integration
H.265 integration
<div class="prism-player" id="player-con"></div>
<script>
var options = {
  id: "player-con",
  source: "//demo.example.com/video/test/h265/test_480p_mp4_h265.mp4",
  enableH265: true,
  license: {
    domain: "example.com",
    key: "example-key"
  }
}
var player = new Aliplayer(options);
</script>
H.266 integration
<div class="prism-player" id="player-con"></div>
<script>
var options = {
  id: "player-con",
  source: "//demo.example.com/video/test/h266/test_480p_mp4_h266.mp4",
  enableH266: true,
  license: {
    domain: "example.com",
    key: "example-key"
  }
}
var player = new Aliplayer(options);
</script>
Parameter | Description |
id | The element where the player is mounted. Make sure this element exists in the DOM. |
source | The playback URL. You can pass the URL of a video stream encoded in H.264, H.265, or H.266. |
enableH265/enableH266 | If the source you pass might be a URL for an H.265 or H.266 encoded video stream, set this to true. The player will preload a small amount of data to detect the codec and determine if the current device environment supports playing H.265 or H.266 encoded video. Note After you enable this feature, the Web Player SDK pulls the stream for detection. This consumes some traffic and increases the startup time. |
license.domain | The site domain name you provided when you applied for the license. For example, if you embed the Web Player SDK in `example.com/product/vod`, enter the site's domain name |
license.key | The key assigned after a successful license application. It is a 49-character string. |
To pass videos of multiple definitions, you can use the following method to pass the source. For more information about supported definitions, see Multi-definition playback.
When you set up multi-definition playback, the source list supports only videos of the same codec. This means all videos that are passed must be encoded in H.265, H.266, or H.264.
{
  //...other parameters
  source: JSON.stringify({
      FD: '//h265_fd.mp4',
      HD: '//h265_hd.mp4'
    }),
}
Decoding solution selection logic
The Web Player SDK selects the optimal decoding solution based on the video encoding type and the current browser environment. The selection logic is as follows:
If a video is H.265 encoded, the player detects the capabilities of the current browser and prioritizes the highest-performance decoding and rendering solution. The selection order is: Video source playback > MSE playback > WASM software decoding + Canvas playback.
If WASM software decoding is required, the player enables the highest-performance decoding features based on the support of the current browser, including multi-threading and single instruction multiple data (SIMD).
Fallback playback
H.265 fallback playback
If H.265 video playback fails or stutters, we recommend that you display a friendly message in the player or add fallback logic to automatically switch to H.264 video playback. Common reasons for H.265 video playback failure or stuttering include the following:
Reason 1: The current browser does not support the APIs required for software decoding and rendering, such as WebAssembly, Canvas, and Web Worker.
Reason 2: Video decoding is abnormal because of video encoding or decoder compatibility issues.
Reason 3: The hardware performance of the current device is insufficient. This causes the software decoding speed to be unable to support normal-speed video playback.
By subscribing to the events of the Web Player SDK, you can detect when H.265 video playback is abnormal.
Listen for the player's error event. An error_code between 4300 and 4304 indicates an H.265- or H.266-related error. This applies to the scenarios in Reason 1 and Reason 2.
Listen for the player's h265DecoderOverload event. This applies to the scenario in Reason 3.
The following example shows how to listen for events:
player.on('error', (e) => {
        var code = String(e.paramData.error_code);
    if (['4300', '4301', '4302', '4303', '4304'].indexOf(code) > -1) {
      // If an API is not supported or a decoding error occurs, prompt the user or fall back.
    }
});

player.on('h265DecoderOverload', (e) => {
    var data = e.paramData;
    // data.decodedFps - Current software decoding frames per second
    // data.fps - Current video frame rate
    // data.playbackRate - Current playback rate
    // When decodedFps < (fps * playbackRate) for more than 5 seconds, this event is triggered.
    // Playback may stutter. Consider prompting the user or falling back.
});
The following example shows how to add fallback logic:
  var player;

  // Create the player
  function createPlayer(_options) {
    player && player.dispose();
    player = new Aliplayer(_options);
    player.on('error', (e) => {
      var code = String(e.paramData.error_code);
      if (['4300', '4301', '4302', '4303', '4304'].indexOf(code) > -1) {
        fallbackTo264(_options)
      }
    });
    player.on('h265DecoderOverload', () => {
      // We recommend falling back after this event is triggered twice, as a single trigger may be due to decoding fluctuations.
      fallbackTo264(_options)
    })
    return player;
  }

  // Fallback
  function fallbackTo264(_options) {
      // Specify the source as the fallback H.264 video URL
      _options.source = '//h264.mp4';
      // Disable enableH265 to skip codec detection
      _options.enableH265 = false;
      createPlayer(_options);
  }

  // Initialize
  var options = {
    id: "player-con",
    source: "//h265.mp4",
    enableH265: true
  }
  createPlayer(options)
H.266 fallback playback
If H.266 video playback fails or stutters, we recommend that you display a friendly message in the player or add fallback logic to automatically switch to H.264 video playback. Common reasons for H.266 video playback failure or stuttering include the following:
Reason 1: The current browser does not support the APIs required for software decoding and rendering, such as WebAssembly, Canvas, and Web Worker.
Reason 2: Video decoding is abnormal because of video encoding or decoder compatibility issues.
By subscribing to the events of the Web Player SDK, you can detect when H.266 video playback is abnormal.
Listen for the player's error event. An error_code between 4300 and 4304 indicates an H.265- or H.266-related error. This applies to the scenarios in Reason 1 and Reason 2.
The following example shows how to listen for events:
player.on('error', (e) => {
        var code = String(e.paramData.error_code);
    if (['4300', '4301', '4302', '4303', '4304'].indexOf(code) > -1) {
      // If an API is not supported or a decoding error occurs, prompt the user or fall back.
    }
});
The following example shows how to add fallback logic:
  var player;

  // Create the player
  function createPlayer(_options) {
    player && player.dispose();
    player = new Aliplayer(_options);
    player.on('error', (e) => {
      var code = String(e.paramData.error_code);
      if (['4300', '4301', '4302', '4303', '4304'].indexOf(code) > -1) {
        fallbackTo264(_options)
      }
    });
    return player;
  }

  // Fallback
  function fallbackTo264(_options) {
      // Specify the source as the fallback H.264 video URL
      _options.source = '//h264.mp4';
      // Disable enableH266 to skip codec detection
      _options.enableH266 = false;
      createPlayer(_options);
  }

  // Initialize
  var options = {
    id: "player-con",
    source: "//h266.mp4",
    enableH266: true
  }
  createPlayer(options)
API
The Aliplayer API reference lists all the properties, methods, and events that are supported by the Web Player SDK, with detailed explanations and examples. H.265/H.266 playback supports only a subset of these. The supported items are as follows:
Supported properties
source, autoplay, rePlay, preload, cover, width, height, skinLayout, waitingTimeout, vodRetry, keyShortCuts, keyFastForwardStep
Supported methods
play, pause, replay, seek, dispose, getCurrentTime, getDuration, getVolume, setVolume, loadByUrl, setPlayerSize, setSpeed, setSnapshotProperties, fullscreenService, getStatus, setRotate, getRotate, setImage, setCover, setProgressMarkers, setPreviewTime, getPreviewTime, isPreview
Supported events
ready, play, pause, canplay, playing, ended, hideBar, showBar, waiting, timeupdate, snapshoted, requestFullScreen, cancelFullScreen, error, startSeek, completeSeek, h265PlayInfo, h266PlayInfo
NoteThe h265PlayInfo and h266PlayInfo events notify you of the solution (renderType) and features (simd/wasmThreads) that are used for the current H.265 or H.266 playback.
Error codes
The following table lists the error codes that are related to H.265/H.266 playback. For other error codes, see Aliplayer API reference.
Error code | Meaning |
4300 | Cannot play H.265/H.266 video. wasm/worker/canvas/audiocontent/webgl is not supported. |
4301 | Internal coroutine scheduling error. |
4302 | Decoding error. |
4303 | Abnormal buffer overflow. |
4304 | Unknown video container format (not MP4). |
Set up a multi-threaded environment
In WebAssembly software decoding scenarios, you can enable multi-threading to ensure better decoding performance. WebAssembly threads depend on SharedArrayBuffer. However, due to security concerns, major browsers have disabled SharedArrayBuffer by default. You can enable SharedArrayBuffer in one of the following two ways:
For the Chrome desktop browser, you can register your website through Origin Trials.
Enable cross-origin isolation in the browser.
Setup example
The main logic of this example is to localize all required resources, such as images, scripts, and videos, within the project and return the following two headers for resource requests:
Cross-Origin-Opener-Policy: same-origin
Cross-Origin-Embedder-Policy: require-corp
After deployment, you can check the browser's console. If self.crossOriginIsolated is true and SharedArrayBuffer is defined, SharedArrayBuffer is successfully enabled.
After the environment is successfully verified, you can use the player to play H.265 or H.266 videos. Listen for the h265PlayInfo or h266PlayInfo event. If event.paramData.wasmThreads is true, the player has enabled multi-threaded decoding.
Live time shifting
Enable live time shifting
To use the time shifting feature, you must enable it in the ApsaraVideo Live service. For more information, see Time shifting.
To enable the time shifting feature in the player, you must set the following properties:
Name
Description
isLive
Set the value to true.
liveTimeShiftUrl
The URL for querying time shifting information.
liveStartTime
The start time of the live stream.
liveOverTime
The end time of the live stream.
liveShiftSource
The HLS address for live time shifting.
NoteThis only needs to be set when the source is an FLV live stream.
liveShiftMinOffset
Recording time-shifted segments takes time. Seeking too close to the live time can result in a 404 error because the segment has not yet been generated. There is a default minimum seek time, which can be configured with this parameter. The unit is seconds, and the default value is 30 (assuming 10-second segments, ensuring at least 3 segments are available).
Live time shifting UI
The time shifting UI consists of a progress bar for the time-shiftable range and a time display:
NoteThe time display area, from left to right, shows the current playback time, live stream end time, and current live time.
Adjust the live stream end time
During playback, you can call the
liveShiftSerivce.setLiveTimeRangemethod to adjust the start or end time of the live stream. The UI updates accordingly. The following example shows the code:player.liveShiftSerivce.setLiveTimeRange(“”,’2018/01/04 20:00:00’)Switch between FLV live streaming and HLS time shifting
Due to latency, we recommend that you use the FLV format for the live stream and the HLS format for the time-shifting stream.
The Web Player SDK supports the following mode:
The source property specifies the FLV live stream address.
The liveShiftSource property specifies the HLS address.
The following is an example.
{
 source:'http://localhost/live****/example.flv',
 liveShiftSource:'http://localhost/live****/example.m3u8',
}
Deploy the web player on your own server
By default, Web Player SDK resources such as JS and CSS files are stored on a Content Delivery Network (CDN). To deploy these resources on your own server, you can follow these steps.
Download the player resources.
In addition to the two main files,
aliplayer-min.jsandaliplayer-min.css, the Web Player SDK dynamically references other resource files. You must obtain the complete resource folder.Download address: Web Player Custom Deployment Resource Plan.tar.gz
Unzip and deploy.
Unzip the resource package that you downloaded in the previous step. Deploy all sub-files in the folder to your server. Do not include the parent folder itself or adjust the internal file hierarchy.
Initialize the player with a custom path.
For example, assume that your custom deployment reference addresses are as follows.
https://player.alicdn.com/assets/skins/default/aliplayer-min.css
https://player.alicdn.com/assets/aliplayer-min.js
Perform the following steps for initialization.
Reference your JS and CSS addresses at the top of the page.
<head>
  <link rel="stylesheet" href="https://player.alicdn.com/assets/skins/default/aliplayer-min.css" />
  <script charset="utf-8" type="text/javascript" src="https://player.alicdn.com/assets/aliplayer-min.js"></script>
</head>
Initialize the player and specify the
assetPrefixparameter.The
assetPrefixparameter is the prefix of your custom deployment address. For example, if the player needs to play an HLS video, it dynamically references thehttps://player.alicdn.com/assets/hls/aliplayer-hls2-min.jsfile. Make sure that the file is placed at the correct address.new Aliplayer({ assetPrefix: 'https://player.alicdn.com/assets' // ... other parameters })