Migrate your self-managed RabbitMQ cluster to Message Queue for RabbitMQ to resolve stability issues such as message backlogs and split-brain, and to gain high concurrency, a distributed architecture, and flexible scaling.
Before you begin
Message Queue for RabbitMQ is a message queuing service developed by Alibaba Cloud based on proprietary distributed message storage technology. It adheres to the AMQP 0-9-1 protocol but is not simply a managed version of open-source RabbitMQ. Its architecture prevents stability issues such as memory leaks and server failures caused by message backlogs, and eliminates the split-brain problem in distributed systems. It also offers high scalability and flexible pay-as-you-go billing to reduce costs.
However, Message Queue for RabbitMQ differs from open-source RabbitMQ in some features. Before migrating, conduct a technical capability and cost-benefit evaluation to ensure that the service meets your needs.
Pre-migration assessment
Technical assessment
-
Message Queue for RabbitMQ and open-source RabbitMQ differ in features, service, performance, exchanges, and queues. Before migrating, review these differences to determine if Message Queue for RabbitMQ meets your needs. For a detailed comparison, see Comparison with open-source RabbitMQ.
-
Message Queue for RabbitMQ imposes limits on clusters, API calls, and characters. Before migrating, evaluate whether these limits meet your business requirements. For more information, see Instance types.
-
We recommend that you choose a dedicated serverless instance. These instances support open-source authentication and permissions, enabling seamless migration from open-source RabbitMQ to the cloud.
Cost assessment
Message Queue for RabbitMQ offers both subscription and serverless instances with various specifications. For differences between specifications, see Instance types.
Compared to subscription instances, serverless instances offer better elasticity and cost efficiency. For billing rules, see Billing for serverless instances.
You can estimate your self-managed RabbitMQ cluster's send/receive operations, queue count, and message volume by using the following methods.
-
Number of queues: On the Overview page of the open-source RabbitMQ console, view Global counts to obtain the number of metadata objects such as Queues and Exchanges.
-
Number of send/receive operations and message volume:
-
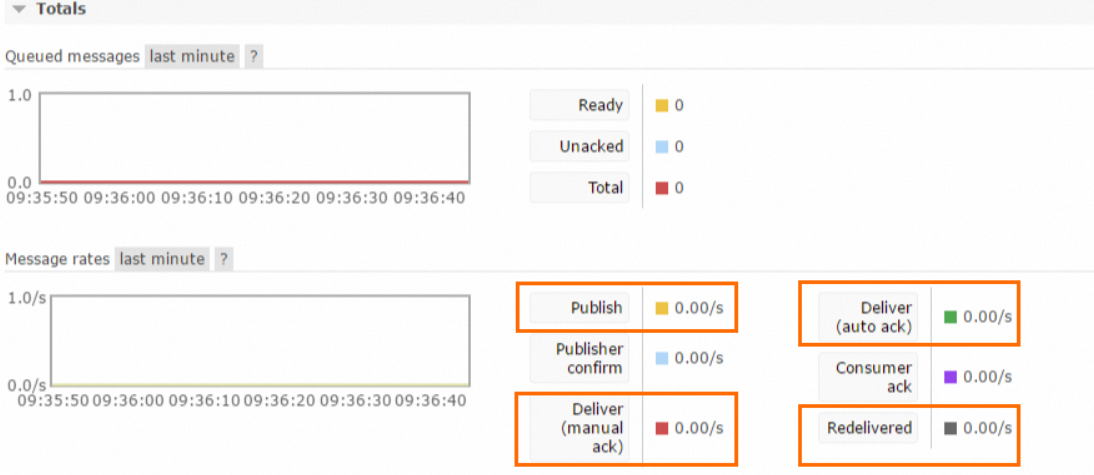
Method 1: On the Overview page of the open-source RabbitMQ management console, view Message rates and calculate the sum of the Publish, Deliver (manual ack)/Deliver (auto ack), and Redelivered metrics.
-
Method 2: Use a Prometheus Grafana dashboard to view the cluster-wide QPS and message volume for inbound and outbound message traffic.
-
Migration procedure
Migrate metadata
To migrate metadata, export it from your open-source RabbitMQ cluster and import it into your Message Queue for RabbitMQ instance. After a successful import, Message Queue for RabbitMQ creates the corresponding vhosts, queues, exchanges, and bindings in the target Message Queue for RabbitMQ instance. For detailed steps, see Migrate metadata to the cloud.
Create users
Open-source clients must use a username and password to authenticate with a Message Queue for RabbitMQ broker. Connections are established only after successful authentication. Message Queue for RabbitMQ supports the following two identity and permission management modes. For more information, see User and permission management.
-
Open-source authentication and authorization
You can create custom usernames and passwords, and manage permissions by importing metadata .
-
Resource Access Management (RAM)
You can generate usernames and passwords from the AccessKey ID and AccessKey Secret of a RAM user.
Establish a network connection
Message Queue for RabbitMQ provides a PrivateLink endpoint that allows you to connect to the cloud through Cloud Enterprise Network (CEN).
If you use the open-source authentication and authorization mode and have already configured a PrivateLink endpoint, skip this step.
Migrate message data
Migration strategy
To ensure a smooth migration, migrate message data on a per-vhost basis by switching client connection configurations and using the RabbitMQ Shovel plug-in.
Benefits
-
Ensures smooth business migration.
-
Guarantees no data loss.
-
Eliminates the need to map complex mesh topologies of inter-application calls.
Migration steps
Choose the appropriate migration steps based on your scenario:
-
For zero-downtime migration:
-
If a queue's producers and consumers are in the same application, see Scenario 1.
-
If a queue's producers and consumers are in separate applications, see Scenario 2.
-
For complex scenarios where the self-managed RabbitMQ cluster is already running Shovel tasks, see Scenario 3 .
-
-
For migration with a maintenance window: If your business can tolerate brief downtime, see Scenario 4.
Scenario 1: Zero-downtime migration (unified applications)

-
Start with a canary release: switch a few service nodes to the cloud instance by updating their client configurations. Verify the following:
-
Producers can send messages to the cloud queue.
-
Consumers can consume messages from the cloud queue.
-
End-to-end functionality and performance meet expectations.
-
-
After confirming the canary nodes are working correctly, configure and enable the Shovel plug-in on your self-managed RabbitMQ cluster. This will migrate the existing backlogged messages from queues in the specified vhost to the corresponding queues in the cloud instance.
-
Switch the RabbitMQ connection configuration to the cloud instance for all remaining service nodes by using a rolling update. At this point:
-
All new messages are written directly to the cloud queues.
-
All consumers fetch messages from the cloud queues.
-
The self-managed cluster no longer receives new messages and only serves as the source for the Shovel to drain the remaining backlog.
-
-
Monitor the message backlog on the self-managed cluster queues. Once the backlog is cleared, stop the Shovel task.
-
You can check the backlog for a vhost's queues in the management console of your self-managed RabbitMQ cluster. A queue's backlog is cleared when its ready and unacknowledged message counts are both 0.
In the RabbitMQ Management console, on the Queues page, the Messages group shows the number of ready messages in the Ready column and the number of unacknowledged messages in the Unacked column.
ImportantIf your code sends delayed messages to an x-delayed-message exchange, these messages do not enter the queue or count toward the backlog until their delay period expires. Before stopping the Shovel task, wait for at least as long as the maximum configured message delay to ensure that all delayed messages enter their queues.
Scenario 2: Zero-downtime migration (separate applications)

-
Configure and enable the Shovel plug-in on your self-managed RabbitMQ cluster to migrate the existing backlogged messages from all relevant queues in the target vhost to the corresponding queues in the cloud instance.
-
Start the consumer services for the cloud RabbitMQ instance so they begin fetching messages from the cloud queues.
-
After verifying that the cloud consumers are working correctly, stop the consumer services connected to the self-managed cluster.
-
Start the producer services for the cloud RabbitMQ instance. Verify that new messages are successfully published to the cloud queues and are processed by the consumers.
-
After confirming that new messages are flowing into the cloud queues and being consumed correctly, stop the producer services connected to the self-managed cluster.
-
At this point, all new messages go directly to the cloud queues, while the Shovel continues to move any remaining messages from the self-managed cluster.
-
Monitor the message backlog on the self-managed cluster queues. Once the backlog is cleared, stop the Shovel task.
Scenario 3: Zero-downtime migration (with existing Shovel tasks)

-
Stop the producer and consumer services connected to the self-managed cluster, and update their configurations to point to the cloud RabbitMQ instance.
-
Start the producer and consumer services connected to the cloud instance and verify that they are working correctly.
-
On the self-managed cluster, configure a new Shovel task (Shovel A) to migrate the message backlog from all relevant queues in vhost A to the corresponding queues in the cloud instance.
-
Pause the existing Shovel task (Shovel B) that moves messages from vhost B to vhost A. Modify Shovel B's destination to point to the corresponding queue in the cloud RabbitMQ instance, and then re-enable Shovel B.
-
Monitor the message backlog in the queues of vhost B on the self-managed cluster. Once the backlog is cleared, delete the Shovel B task.
-
Monitor the message backlog in the queues of vhost A on the self-managed cluster. Once the backlog is cleared, delete the Shovel A task.
Scenario 4: migration with downtime

-
Stop the producer and consumer services connected to the self-managed cluster.
-
Update the RabbitMQ configuration in your services to point to the cloud RabbitMQ instance.
-
Start the producer and consumer services for the cloud instance and verify that they are working correctly.
-
On your self-managed RabbitMQ cluster, configure and enable the Shovel plug-in to migrate all remaining messages from the queues to the corresponding queues in the cloud instance.
-
Monitor the message backlog on the self-managed cluster queues. Once the backlog is cleared, stop the Shovel task.
Using the Shovel plug-in
-
Log in to your self-managed cluster and run the following command in the command line to enable the Shovel plug-in:
rabbitmq-plugins enable rabbitmq_shovel rabbitmq_shovel_management
-
Log in to the management console of your self-managed RabbitMQ cluster. In the top navigation bar, click Admin, and then click Shovel Management on the right. In the Add a new shovel section, configure the Source and Destination, then click Add shovel.
-
Source configuration format: For the URI, enter
amqp://{username}:{password}@{ip}:{port}/{vhost}. In this URI:usernameandpasswordare your credentials,ipis the IP address of your self-managed cluster,portis the communication port (typically5672), andvhostis the source vhost. -
Destination configuration format: For the URI, enter
amqp://{username}:{password}@{endpoint}:{port}/{vhost}. In this URI:usernameandpasswordare the static credentials created in the Message Queue for RabbitMQ console,endpointis the endpoint address of your Message Queue for RabbitMQ instance,portis5672, andvhostis the destination vhost.
You must also configure the Virtual host, a required Name, the protocol (such as AMQP 0.9.1), and the source and destination queue names. Other parameters include Prefetch count, Auto-delete (default is Never), Add forwarding headers (default is No), Reconnect delay, and Acknowledgement mode (default is On confirm).
-
-
After the Shovel is added, go to the Shovel Status page to check its status. A running state indicates that the task started successfully.
-
Once the message backlog in the queues of your self-managed RabbitMQ cluster is cleared, delete the Shovel task.
On the Shovel details page, expand the Delete this shovel section at the bottom and click the Delete this shovel button.
References
For more information about the Shovel plug-in, see the Shovel Plugin documentation.