In ApsaraDB RDS for PostgreSQL, SSL encryption supports the certificates that are managed by Alibaba Cloud and custom certificates. This topic describes how to configure a custom certificate to enable SSL encryption.
Prerequisites
The RDS instance runs PostgreSQL 10 or later and uses cloud disks.
NoteServerless RDS instances are not supported.
OpenSSL is installed.
NoteLinux operating systems are provided with OpenSSL. If you use a Linux operating system, you do not need to install OpenSSL. If you use a Windows operating system, you must download the OpenSSL software package and install OpenSSL. For more information, see the Win32/Win64 OpenSSL page.
Usage notes
After SSL encryption is enabled, the CPU utilization and the read and write latencies increase.
After SSL encryption is enabled, you must close the existing connection and establish a new connection to make SSL encryption take effect.
When you configure a custom certificate, modify the content of the configured custom certificate, or disable SSL encryption, the RDS instance restarts. The restart process requires about 3 minutes. We recommend that you perform these operations during off-peak hours.
Step 1: Create a custom certificate
When you create a private key for a server certificate or self-signed certificate, do not enable password encryption. If you enable password encryption, SSL encryption cannot be enabled.
In this example, Community Enterprise Operating System (CentOS) is used. If you use a Windows operating system, you can run the following openssl commands in the same way that you use in a CentOS operating system. In addition, you must manually copy or edit commands instead of the cp and vim commands.
Create a self-signed certificate and a private key for the self-signed certificate. The self-signed certificate is saved in a file named server-ca.crt. The private key is saved in a file named server-ca.key.
openssl req -new -x509 -days 365 -nodes -out server-ca.crt -keyout server-ca.key -subj "/CN=root-server-ca"Create a certificate signing request (CSR) file and a private key for the server certificate. The CSR file is named server.csr. The private key is saved in a file named server.key.
Each custom certificate can protect one or more endpoints. You can use one of the following methods to generate a CSR file:
If you want to protect a single endpoint, run the following command:
openssl req -new -nodes -text -out server.csr -keyout server.key -subj "/CN=pgm-bpxxxxx.pg.rds.aliyuncs.com"NoteReplace
pgm-bpxxxxx.pg.rds.aliyuncs.comwith the endpoint that you want to protect. For more information about how to view the endpoint, see View and change the endpoints and port numbers of an ApsaraDB RDS for PostgreSQL instance.If you want to protect multiple endpoints, run the following command:
Copy the openssl.cnf file for temporary use.
cp /etc/pki/tls/openssl.cnf /tmp/openssl.cnfNoteIf you use a Windows operating system, the openssl.cnf file is stored in the Installation directory of OpenSSL\bin\cnf directory. You can copy the openssl.cnf file to any other directory on your computer.
Run the following command to open the openssl.cnf file:
vim /tmp/openssl.cnfEnter
ito enable the edit mode. Then, add the following content to the openssl.cnf file:# Add the following content at the end of the [ req ] element. req_extensions = v3_req # Add the [ v3_req ] element. [ v3_req ] basicConstraints = CA:FALSE keyUsage = nonRepudiation, digitalSignature, keyEncipherment subjectAltName = @alt_names # Add the [ alt_names ] element. Then, enter the endpoint that you want to protect following each Domain Name System (DNS) record. [ alt_names ] DNS.1 = pgm-bpxxxxx.pg.rds.aliyuncs.com DNS.2 = pgm-bpxxxxx.pg.rds.aliyuncs.comPress
Escto exit the edit mode. Then, enter:wqto save the file and exit.Create a certificate signing request (CSR) file and a private key for the server certificate. The CSR file is named server.csr. The private key is saved in a file named server.key.
openssl req -new -nodes -text -out server.csr -keyout server.key -config /tmp/openssl.cnfWhen the server.csr file is being created, you are prompted to configure the following parameters based on your business requirements.
Parameter
Description
Example value
Country Name
The code of the country. Specify a two-letter country code defined by the International Organization for Standardization (ISO).
CN
State or Province Name
The province.
ZheJiang
Locality Name
The city.
HangZhou
Organization Name
The name of the enterprise.
Alibaba
Organizational Unit Name
The name of the department.
Aliyun
Common Name
The domain name that you want to protect by using the certificate. The domain name is specified in the openssl.cnf file. You do not need to configure this parameter.
-
Email Address
You do not need to configure this parameter.
-
A challenge password
You do not need to configure this parameter.
-
An optional company name
You do not need to configure this parameter.
-
Create a server certificate. The server certificate is saved in a file named server.crt.
If you want to protect a single endpoint, run the following command:
openssl x509 -req -in server.csr -text -days 365 -CA server-ca.crt -CAkey server-ca.key -CAcreateserial -out server.crtIf you want to protect multiple endpoints, run the following command:
openssl x509 -req -in server.csr -text -days 365 -CA server-ca.crt -CAkey server-ca.key -CAcreateserial -out server.crt -extensions v3_req -extfile /tmp/openssl.cnf
After you complete the preceding configurations, run the ls command to view the generated files:
# ls
server-ca.crt  server-ca.key  ca.srl  server.crt  server.csr  server.key
The following list describes the files:
server.crt: the file that contains the server certificate
server.key: the file that contains the private key of the server certificate
server-ca.crt: the file that contains the self-signed certificate
server-ca.key: the file that contains the private key of the self-signed certificate
Step 2: Use the created custom certificate to enable SSL encryption
After a custom certificate is configured, the status of the RDS instance changes from Running to Modifying SSL. After about 3 minutes, the status changes back to Running.
Go to the Instances page. In the top navigation bar, select the region in which the RDS instance resides. Then, find the RDS instance and click the ID of the instance.
Log on to the ApsaraDB RDS console. Find the RDS instance and click the ID of the instance. In the left-side navigation pane, click . On the page that appears, click the SSL tab.
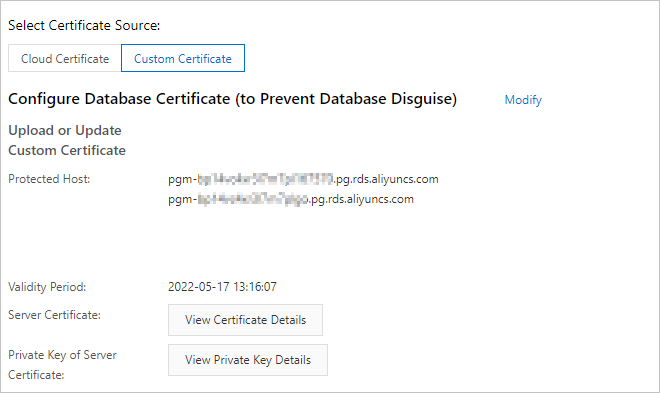
Set the Select Certificate Source parameter to Custom Certificate. Click Configuration next to Configure Database Certificate (to Prevent Database Disguise). In the dialog box that appears, configure the Server Certificate and Private Key of Server Certificate parameters and click OK.

Parameter
Description
Server Certificate
The content of the server.crt file that you created. For more information, see Step 1: Create a custom certificate. Make sure that all the content from -----BEGIN CERTIFICATE----- to -----END CERTIFICATE----- is copied to this field.
Private Key of Server Certificate
The content of the server.key file that you created. For more information, see Step 1: Create a custom certificate. Make sure that all the content from -----BEGIN PRIVATE KEY----- to -----END PRIVATE KEY----- is copied to this field.
When you request a custom certificate, you can select multiple endpoints that you want to protect. If you select multiple endpoints, you can find multiple records in the Protected Host parameter.
Step 3: Connect to the RDS instance from the database client
You can connect to the RDS instance from a client over SSL. For more information, see Connect to an ApsaraDB RDS for PostgreSQL instance over SSL.
Step 4: (Optional) Update the created custom certificate
This operation triggers a restart of the RDS instance. Proceed with caution.
On the SSL tab, click Modify next to Configure Database Certificate (to Prevent Database Disguise). In the dialog box that appears, enter the new server certificate that you want to use and the private key of the new server certificate.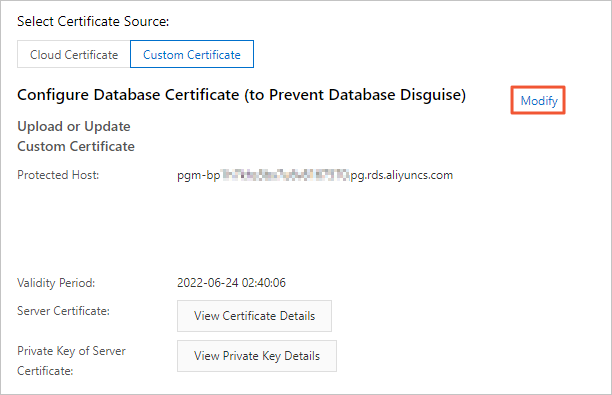
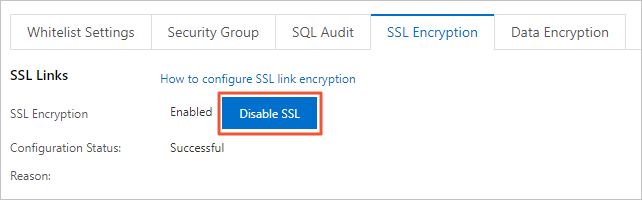
Step 5: (Optional) Disable SSL encryption
This operation triggers a restart of your RDS instance. Proceed with caution.
On the SSL tab, click Disable SSL.