The short video SDK allows you to create custom effects. By using a custom OpenGL ES shader that is created with OpenGL ES 3.0, you can have desired filters and transitions based on the effect configuration file. This topic does not cover know-how about OpenGL ES. We assume that you have a basic understanding of OpenGL ES and shading languages.
Overview
A filter or transition resource package folder contains an effect configuration file named config.json and some picture materials. When you edit or record a video in the short video SDK, you can use transitions and filters. To apply a filter or transition, specify a configured resource package folder when you call the related editing or recording operations.
Configure an effect configuration file
An effect configuration file is in JSON format and describes a complete rendering process. The configuration file has two levels. The first level describes basic information about the effect, and the second level uses a node tree to describe how the effect is implemented.
First level - basic information
The following table describes the basic information of an effect.
Parameter | Description |
name | The name of the effect. |
module | The module identifier. The value of this parameter must be |
version | The version number. Value: 1. |
type | The type of the effect. Valid values: 1 and 2. 1 indicates filter and 2 indicates transition. |
nodeTree | The node tree that is used to describe how the effect is implemented. For more information, see Second level - node tree. |
The following code shows how the configuration file of the Intense filter is configured.
{
    "name": "Intense",
    "module": "ALIVC_GECF",
    "version": 1,
    "type": 1,
    "nodeTree": [
        {
            "nodeId": 0,
            "name": "Intense",
            "fragment": "/** ...... */",
            "textures": [
                {
                    "name": "inputImageTexture",
                    "srcType": "INPUT_NODE",
                    "nodeId": 0
                },
                {
                    "name": "inputImageTexture2",
                    "srcType": "IMAGE",
                    "path": "color.png"
                }
            ]
        }
    ]
}
Second level - node tree
The node tree nodeTree contains one or more nodes and is used to describe a rendering process.
The following figure shows the rendering process in the short video SDK: 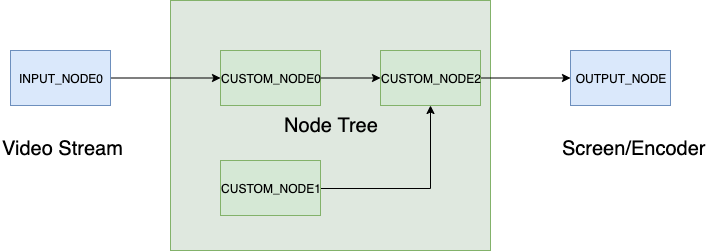
As shown in the preceding figure, the rendering process is abstracted into a tree structure that consists of a series of nodes.
The input node INPUT_NODE represents the input source. When you record a video, the input node is the image data stream collected by the camera. When you edit a video, the input node is the current video stream. In design, multiple input nodes can exist. For example, if you need to apply a transition between two video clips, the first video clip is INPUT_NODE0 and the second video clip is INPUT_NODE1.
The node tree in the middle represents the
nodeTreeparameter in the effect configuration file. A node tree can contain one or more rendering nodes. As you can see, the key to a node tree is the configuration of rendering nodes.The output node OUTPUT_NODE represents the rendered video stream. In preview mode, the output node generates content on the screen. In production mode, the output node generates content in the encoder.
Nodes
A node specifies the relevant configurations in a drawing process during rendering. The configurations contain the shader code and related parameter descriptions that are required for a custom effect. The following table describes the parameters that define a node.
Parameter | Description |
nodeId | The ID of the node. |
name | The name of the node. |
vertex | The vertex shader code. This parameter has the same function as the vertexPath parameter. You can declare either one of the two parameters. If you do not specify this parameter, the short video SDK performs the following implementation by default. |
vertexPath | The path to the file in which the vertex shader code resides. This parameter has the same function as the vertex parameter. You can declare either one of the two parameters. |
attributes | The list of attributes. This parameter is used to declare the names and types of attributes in vertex shading. Valid values of type: POSITION and TEXTURECOORD. POSITION indicates the vertex coordinate, and TEXTURECOORD indicates the texture coordinate. This parameter is optional. If you do not specify this parameter, the short video SDK performs the following implementation by default. |
fragment | The fragment shader code. This parameter has the same function as the fragmentPath parameter. You can declare either one of the two parameters. |
fragmentPath | The path to the file in which the fragment shader code resides. This parameter has the same function as the fragment parameter. You can declare either one of the two parameters. |
textures | The list of textures. This parameter is used to specify the attributes of
|
params | The list of uniforms. This parameter is used to specify the attributes of
|
Supported types of a uniform
Type | Example value |
INT | [1] |
FLOAT | [-2.0] |
VEC2I | [3, 2] |
VEC3I | [1, 2, 3] |
VEC4I | [4, 3, 2, 1] |
VEC2F | [-1.0, 1.0] |
VEC3F | [0.5, 0.5, 0.5] |
VEC4F | [1.0, -1.0, 1.0, -1.0] |
MAT3F | [1.0, 0.0, 0.0, 0.0, 1.0, 0.0, 0.0, 0.0, 1.0] |
MAT4F | [1.0, 0.0, 0.0, 0.0, 0.0, 1.0, 0.0, 0.0, 0.0, 0.0, 1.0, 0.0, 0.0, 0.0, 0.0, 1.0] |
The following code shows how the configuration file of the Translate transition is configured.
{
    "name": "Translate",
    "module": "ALIVC_GECF",
    "version": 1,
    "type": 2,
    "nodeTree": [
        {
            "nodeId": 0,
            "name": "Translate",
            "vertex": "/** ...... */",
            "attributes": [
                {
                    "name": "a_position",
                    "type": "POSITION"
                },
                {
                    "name": "a_texcoord",
                    "type": "TEXTURECOORD"
                }
            ],
            "fragment": "/** ...... */",
            "textures": [
                {
                    "name": "RACE_Tex0",
                    "srcType": "INPUT_NODE",
                    "nodeId": 0
                },
                {
                    "name": "RACE_Tex1",
                    "srcType": "INPUT_NODE",
                    "nodeId": 1
                }
            ],
            "params": [
                {
                    "name": "direction",
                    "type": "INT",
                    "value": [
                        0
                    ],
                    "maxValue": [
                        3
                    ],
                    "minValue": [
                        0
                    ]
                }
            ]
        }
    ]
}
Built-in variables
The short video SDK provides the following built-in variables that you can declare in the shader.
uniform highp float BUILTIN_PROGRESS; // The transition progress. Valid values: 0 to 1.
uniform highp float BUILTIN_WIDTH;    // The image width.
uniform highp float BUILTIN_HEIGHT;   // The image height.
Use an effect in the short video SDK
To use an effect, you need to create an effect object, apply the effect, and update the effect parameters based on your business requirements.
In the initialized effect object, you can obtain the AliyunEffectConfig object that describes the effect configurations. The internal structure of AliyunEffectConfig corresponds to the structure of the effect configuration file. If the configuration file of a custom effect contains the params parameter, you can obtain the AliyunParam object in the code from AliyunEffectConfig -> nodeTree -> params. value in the AliyunParam object is the value of the parameter. You can perform one of the following steps to update the effect parameters.
Update the parameters by calling the update method provided by the
AliyunValueobject.Update the parameters by calling the effect update method. For more information about how to update effect parameters, see step iii in the following section.
Procedure for the short video SDK for Android
Filters
Call
EffectFilter(String path)to create a filter object.pathspecifies the path of the filter folder.Call
int addAnimationFilter(EffectFilter filter);to apply the filter.Call
int updateAnimationFilter(EffectFilter filter);to update the filter parameters.
Transitions
Call
TransitionBase(String path)to create a transition object.pathspecifies the path of the transition folder.Call
int setTransition(int index, TransitionBase transition);to apply the transition.Call
int updateTransition(int clipIndex, TransitionBase transitionBase);to update the transition parameters.
Procedure for the short video SDK for iOS
Filters
Call
- (instancetype)initWithFile:(NSString *)path;ofAliyunEffectFilterto create a filter object.pathspecifies the path of the filter folder.Call
- (int)applyAnimationFilter:(AliyunEffectFilter *)filter;to apply the filter.Call
- (int)updateAnimationFilter:(AliyunEffectFilter *)filter;to update the filter parameters.
Transitions
Call
-(instancetype)initWithPath:(NSString *)path;ofAliyunTransitionEffectto create a transition object.pathspecifies the path of the transition folder.Call
- (int)applyTransition:(AliyunTransitionEffect *)transition atIndex:(int)clipIdx;to apply the transition.Call
-(int)updateTransition:(AliyunTransitionEffect *)transition atIndex:(int)clipIdx;to update the transition parameters.