When alert events fire across distributed systems, routing them to the right responders through the right channels is critical for fast resolution. Notification policies in Application Real-Time Monitoring Service (ARMS) define matching rules that filter alert events by tags, then deliver notifications to specified recipients through email, phone calls, text messages, webhooks, or chat apps such as DingTalk, Lark, and WeCom. Each policy also controls event grouping, repeat behavior, and escalation to reduce noise and prevent missed alerts.
How notification routing works
When an alert event fires, ARMS processes it through the following stages:
Silence check -- If the event matches a silence policy, it is suppressed. No notification policy is evaluated.
Matching rules -- The event's tags are compared against each notification policy's matching rules. A policy matches when all conditions within a rule are met (AND logic), and multiple rules within a policy use OR logic.
Event grouping -- Matched events are optionally grouped by specified fields to reduce notification noise.
Notification delivery -- Grouped or individual alerts are sent to the configured recipients through the selected channels.
Repeat and escalation -- If an alert is not resolved, ARMS can resend notifications at a set frequency or escalate to additional recipients.
Silence policies always take precedence -- a silenced event is never evaluated against notification policies.
Prerequisites
Before you begin, make sure that you have:
Notification recipients configured in ARMS. For details, see Manage notification recipients
Create a notification policy
Log on to the ARMS console. In the left-side navigation pane, choose Alert Management > Notification Policies.
On the Notification Policies page, click Create Notification Policy.
Enter a policy name at the top of the page.
Complete the following steps to configure the policy.
Step 1: Define matching rules
Matching rules determine which alert events trigger this notification policy. Configure them in the Matching Rule section.
Silence policies take precedence over notification policies. If an alert event matches a silence policy, it is silenced and is not matched by any notification policy. For details, see Silence policies.
Select a data source
| Option | Behavior |
|---|---|
| Specific source | Filters alert events from a specified integration only. |
| No preset source | Filters alert events from all integrations. |
Build matching rule expressions
Define expressions using tags. Use custom tags or select from existing ones:
Metric tags -- Tags from the metrics of an alert rule expression. For details about creating tags for Managed Service for Prometheus alert rules, see Create a Prometheus alert rule.
Default ARMS tags -- System-provided tags described in the following tables.
Common fields
| Tag | Description |
|---|---|
alertname | Alert name. |
clustername | Cluster name. |
severity | Severity level: P1, P2, P3, P4, or Default. |
namespace | Kubernetes namespace. |
pod_name | Pod name. |
System preset fields
| Tag | Description |
|---|---|
_aliyun_arms_integration_name | Integration name. The default integration reported by ARMS is ARMS-DEFAULT. |
_aliyun_arms_involvedObject_id | Alert object ID. |
_aliyun_arms_involvedObject_name | Alert object name. |
_aliyun_arms_region_id | Region ID. |
_aliyun_arms_alert_rule_id | Alert rule ID. |
_aliyun_arms_alert_type | Alert rule type: 101 (Prometheus alert), 5 (Application Monitoring alert), or 4 (Browser Monitoring alert). |
Combine conditions and rules
To require multiple conditions (AND logic), click Add Condition within the same rule.
To match any of several rules (OR logic), click Add Rule to add a separate rule.
The total size of all rule descriptions in a single notification policy cannot exceed 64 KB (approximately 100 rules, depending on complexity). If you exceed this limit, create an additional notification policy for the remaining rules.
Step 2: Configure event grouping
In the Event Grouping section, choose how to handle multiple alert events, then click Next.
| Option | Behavior |
|---|---|
| Do not group | Each alert event is sent as a separate notification. |
| Set grouping fields | Alert events with identical values in the specified fields are aggregated into a single notification. This reduces alert noise when related events fire simultaneously. |
Step 3: Set notification recipients and channels
In the Notification Objects section, configure who receives notifications and how, then click Next.
Click +Add Notification Recipient and select one or more recipients.
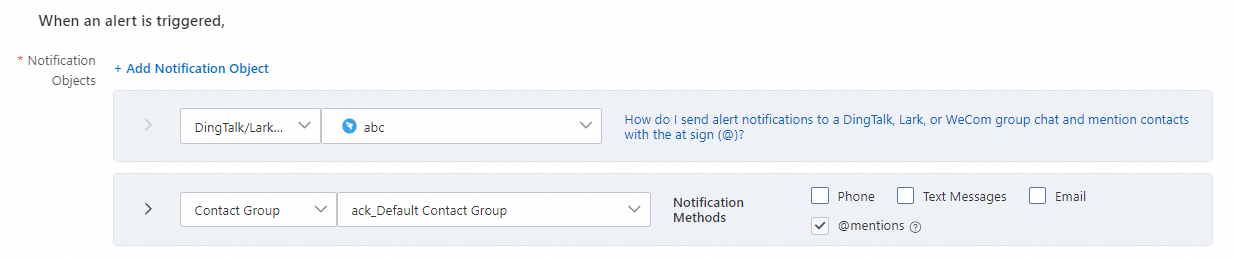
Recipient type Available channels Contact Phone call, text message, or email Contact Group Phone call, text message, or email On-call Schedule Phone call, text message, or email DingTalk/Lark/WeCom Chat app message General Webhook HTTP webhook call Choose whether to enable Send recovery notification. When enabled, ARMS notifies recipients after all related alert events are resolved and the alert status changes to Resolved.
Set a notification template. For details, see Configure notification and webhook templates.
Set the notification period. Notifications are sent only during this time window.
(Optional) Select a ticket system to push alerts to. For details, see Integrations.
Step 4: Configure repeat, escalation, and recovery behavior
In the Repeat/Escalate/Recover Policy section, define what happens when an alert persists, then click Next.
Resend notifications
When enabled, ARMS resends the alert notification at the frequency you specify until the alert is recovered. Use this to prevent alerts from being overlooked during long-running incidents.
Escalation policy
Escalation and resend serve different purposes: resend repeats the same notification to the same recipients, while escalation routes to other notification objects based on the escalation policy after a timeout.
| Option | Behavior |
|---|---|
| No escalation policy | The notification is sent once (or repeated if resend is enabled), but only to the original recipients. |
| Use escalation policy | If the alert is not recovered within the escalation timeout, ARMS sends notifications to additional recipients based on the escalation policy. |
Enable manual recovery
When enabled, alerts are not automatically recovered even if no new alert event occurs within the automatic recovery window defined in the alert integration. Change the alert status manually instead. This is useful for alerts that require human verification before closing.
Step 5: Add action integrations (optional)
In the Action Integration section, configure actions that run automatically when an alert is triggered or recovered. For details, see Execute an alert plan using an ARMS action integration.
Step 6: Save the policy
Click Save.
Manage notification policies
After creation, all notification policies appear on the Notification Policies page.
| Operation | Steps |
|---|---|
| Edit a policy | Click the policy name, or click Edit in the Actions column. Modify the policy and click Save. |
| Enable or disable a policy | Toggle the switch in the Status column. |
| Delete a policy | Click Delete in the Actions column, then click Confirm in the dialog box. |
| Copy a policy | Click Copy in the Actions column to create a duplicate. |