AnalyticDB for MySQL Spark lets you run interactive Spark jobs directly from a Jupyter environment, using elastic computing resources from your cluster. Choose between a Docker-based all-in-one setup that requires no manual installation, or a locally installed Jupyter Notebook connected through the ADB proxy.
Prerequisites
Before you begin, make sure that you have:
An AnalyticDB for MySQL Enterprise Edition, Basic Edition, or Data Lakehouse Edition cluster
A job resource group created for the cluster
A database account set up for the cluster:
Alibaba Cloud account: Create a privileged account
RAM user: Create a privileged account and a standard account, then associate the standard account with the RAM user
Account authorization completed
Spark application log storage configured
To configure log storage, go to the AnalyticDB for MySQL console, click the cluster ID, then choose Job Development > Spark JAR Development in the left-side navigation pane, and click Log Settings. Select the default path or enter a custom path. The custom path cannot be the root directory of OSS — it must contain at least one subfolder.
Usage notes
Interactive Jupyter jobs support Python 3.7 and Scala 2.12 only.
Spark resources are automatically released after the session is idle for 1,200 seconds (measured from the last executed code block). To change this timeout, run the following in a Jupyter Notebook cell:
%%configure -f
{
   "spark.adb.sessionTTLSeconds": "3600"
}
Choose a connection method
| Method | Best for | What's included |
|---|---|---|
| ADB Docker image (recommended) | Quick start, no local Jupyter setup | JupyterLab + SparkMagic + ADB proxy, pre-configured in one image |
| Locally installed Jupyter | Existing Jupyter environment you want to reuse | Install SparkMagic manually; start the ADB proxy separately |
Method 1: Use the ADB Docker image
This method starts a pre-configured JupyterLab environment inside a Docker container. The image includes SparkMagic and the ADB proxy — no additional installation is needed.
Start the Docker container
Pull the ADB Jupyter image:
docker pull registry.cn-hangzhou.aliyuncs.com/adb-public-image/adb-spark-public-image:adb.notebook.0.5.preStart the container:
Parameters:
Parameter Required Description Example -pNo Maps a host port to container port 8888.-p 8888:8888-vNo Mounts a host directory into the container to prevent file loss when the container stops. Recommended container path: /root/jupyter. Save notebook files to/tmpinside the container — they will appear at the host path after the container stops. See Volumes.-v /home/admin/notebook:/root/jupyter-dYes The cluster ID. Find it on the Clusters page in the ADB console. amv-bp164l********-rYes The job resource group name. Find it under Cluster Management > Resource Management > Resource Groups in the console. test-eYes The API endpoint of the cluster. See Endpoints. adb.aliyuncs.com-i/-kConditional Your Alibaba Cloud account or RAM user's AccessKey ID and AccessKey secret. See Accounts and permissions. Use this or -t, not both.LTAI****************-tConditional A Security Token Service (STS) token — a temporary credential for a RAM role. Obtain it by calling AssumeRole with an AccessKey pair. Use this or -i/-k, not both.— docker run -it \ -p {host-port}:8888 \ -v {host-path}:{docker-path} \ registry.cn-hangzhou.aliyuncs.com/adb-public-image/adb-spark-public-image:adb.notebook.0.5.pre \ -d {cluster-id} \ -r {resource-group-name} \ -e {api-endpoint} \ -i {ak-id} \ -k {ak-secret} \ -t {sts-token} # Use either -t (STS token) or -i/-k (AccessKey pair)Example:
docker run -it -p 8888:8888 -v /home/admin/notebook:/root/jupyter \
  registry.cn-hangzhou.aliyuncs.com/adb-public-image/adb-spark-public-image:adb.notebook.0.5.pre \
  -d amv-bp164l******** -r test -e adb.aliyuncs.com \
  -i LTAI**************** -k ****************
After the container starts, copy the URL from the output and open it in your browser:
[I 2023-11-24 09:55:09.852 ServerApp] nbclassic | extension was successfully loaded.
[I 2023-11-24 09:55:09.852 ServerApp] sparkmagic extension enabled!
[I 2023-11-24 09:55:09.853 ServerApp] sparkmagic | extension was successfully loaded.
[I 2023-11-24 09:55:09.853 ServerApp] Serving notebooks from local directory: /root/jupyter
[I 2023-11-24 09:55:09.853 ServerApp] Jupyter Server 1.24.0 is running at:
[I 2023-11-24 09:55:09.853 ServerApp] http://419e63fc7821:8888/lab?token=1e2caca216c1fd159da607c6360c82213b643605f11ef291
[I 2023-11-24 09:55:09.853 ServerApp]  or http://127.0.0.1:8888/lab?token=1e2caca216c1fd159da607c6360c82213b643605f11ef291
[I 2023-11-24 09:55:09.853 ServerApp] Use Control-C to stop this server and shut down all kernels (twice to skip confirmation).
Open
http://127.0.0.1:8888/lab?token=<token>to access JupyterLab.
If the container fails to start, check the proxy_{timestamp}.log file for error details.Method 2: Use a locally installed Jupyter Notebook
This method connects an existing Jupyter installation to ADB Spark through the ADB proxy. It involves three stages: install SparkMagic, start the proxy, then start Jupyter.
Stage 1: Install SparkMagic
All optional steps must be performed in strict order without skipping or reordering. If you skip any step, the on-duty engineer will not be able to analyze environment issues through Jupyter startup logs, and you will need to resolve any errors on your own.
Install SparkMagic:
pip install sparkmagicInstall ipywidgets:
pip install ipywidgets(Optional) Install wrapper kernels. The following example applies to JupyterLab 3.x. Run
pip show sparkmagicto find the SparkMagic installation path, then run:jupyter-kernelspec install sparkmagic/kernels/sparkkernel jupyter-kernelspec install sparkmagic/kernels/pysparkkernel jupyter-kernelspec install sparkmagic/kernels/sparkrkernel(Optional) Edit the SparkMagic configuration file at
~/.sparkmagic/config.jsonto change the Livy server address from127.0.0.1:5000to your preferred IP and port. For a full configuration reference, see the example config. The following shows the relevant fields:"kernel_python_credentials": { "username": "", "password": "", "url": "http://127.0.0.1:5000", "auth": "None" }, "kernel_scala_credentials": { "username": "", "password": "", "url": "http://127.0.0.1:5000", "auth": "None" }, "kernel_r_credentials": { "username": "", "password": "", "url": "http://127.0.0.1:5000" }(Optional) Enable server extensions to switch clusters from code:
jupyter server extension enable --py sparkmagic
Stage 2: Start the ADB proxy
Start the ADB proxy using either Docker or the command line.
Option A: Docker
Pull the ADB image:
docker pull registry.cn-hangzhou.aliyuncs.com/adb-public-image/adb-spark-public-image:adb.notebook.0.5.preStart the proxy container, which listens on port
5000:Parameter Required Description Example -pNo Maps a host port to container port 5000.-p 5000:5000-vNo Mounts a host directory into the container to prevent file loss when the container stops. -v /home/admin/notebook:/root/jupyter-dYes The cluster ID. Find it on the Clusters page in the ADB console. amv-bp164l********-rYes The job resource group name. Find it under Cluster Management > Resource Management > Resource Groups. test-eYes The API endpoint of the cluster. See Endpoints. adb.aliyuncs.com-i/-kConditional AccessKey ID and AccessKey secret. See Accounts and permissions. Use this or -t, not both.— -tConditional STS token for a RAM role. Obtain it by calling AssumeRole. Use this or -i/-k, not both.— docker run -it \ -p {host-port}:5000 \ -v {host-path}:{docker-path} \ registry.cn-hangzhou.aliyuncs.com/adb-public-image/adb-spark-public-image:adb.notebook.0.5.pre \ -d {cluster-id} \ -r {resource-group-name} \ -e {api-endpoint} \ -i {ak-id} \ -k {ak-secret} \ -t {sts-token} # Use either -t (STS token) or -i/-k (AccessKey pair)
Option B: Command line
Download and install the proxy package:
pip install aliyun-adb-livy-proxy-0.0.1.zipStart the proxy:
Run
adbproxy --helpto view all available parameters.Parameter Required Default Description --dbYes — The cluster ID. Find it on the Clusters page in the ADB console. --rgYes — The job resource group name. Find it under Cluster Management > Resource Management > Resource Groups. --endpointYes — The API endpoint. See Endpoints. --hostNo 127.0.0.1The local IP address the proxy binds to. --portNo 5000The port the proxy listens on. -i/-kConditional — AccessKey ID and AccessKey secret. See Accounts and permissions. Use this or -t, not both.-tConditional — STS token for a RAM role. Obtain it by calling AssumeRole. Use this or -i/-k, not both.adbproxy \ --db {cluster-id} \ --rg {resource-group-name} \ --endpoint {api-endpoint} \ --host 127.0.0.1 \ --port 5000 \ -i {ak-id} \ -k {ak-secret} \ -t {sts-token} # Use either -t (STS token) or -i/-k (AccessKey pair)After startup, the console displays proxy log messages confirming the service is running.
Stage 3: Start Jupyter
Start JupyterLab:
jupyter labIf you configured a custom listening address, specify it with --ip:
jupyter lab --ip=<custom-ip>After startup, copy the URL from the output and open it in your browser:
[I 2025-07-02 17:36:16.051 ServerApp] Serving notebooks from local directory: /home/newuser
[I 2025-07-02 17:36:16.052 ServerApp] Jupyter Server 2.16.0 is running at:
[I 2025-07-02 17:36:16.052 ServerApp] http://419e63fc7821:8888/lab?token=1e2caca216c1fd159da607c6360c82213b643605f11ef291
[I 2025-07-02 17:36:16.052 ServerApp]     http://127.0.0.1:8888/lab?token=1e2caca216c1fd159da607c6360c82213b643605f11ef291
[I 2025-07-02 17:36:16.052 ServerApp] Use Control-C to stop this server and shut down all kernels (twice to skip confirmation).
Open http://127.0.0.1:8888/lab?token=<token> to access Jupyter.
Run jobs in Jupyter
Configure Spark resources
When you open a new PySpark notebook, Spark starts with the following default configuration:
{
   "kind": "pyspark",
   "heartbeatTimeoutInSecond": "60",
   "spark.driver.resourceSpec": "medium",
   "spark.executor.resourceSpec": "medium",
   "spark.executor.instances": "1",
   "spark.dynamicAllocation.shuffleTracking.enabled": "true",
   "spark.dynamicAllocation.enabled": "true",
   "spark.dynamicAllocation.minExecutors": "0",
   "spark.dynamicAllocation.maxExecutors": "1",
   "spark.adb.sessionTTLSeconds": "1200"
}
To use custom Spark configuration parameters:
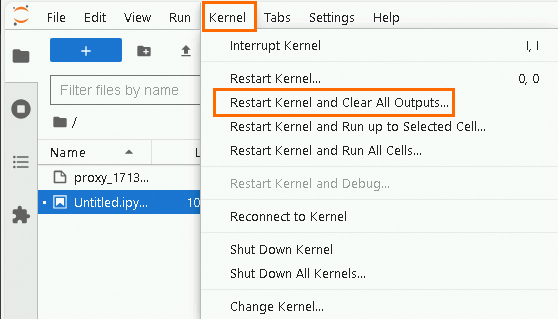
Restart the kernel: in the top navigation bar, choose Kernel > Restart Kernel and Clear All Outputs. Confirm that no Spark applications are running.
Enter your custom parameters using
%%configure -f: The following example allocates 32 executors with amediumspec (2 cores, 8 GB memory each), for a total of 64 ACUs:ImportantWhen specifying custom Spark parameters, set
spark.dynamicAllocation.enabledtofalse.%%configure -f { "spark.driver.resourceSpec": "large", "spark.sql.hive.metastore.version": "adb", "spark.executor.resourceSpec": "medium", "spark.adb.executorDiskSize": "100Gi", "spark.executor.instances": "32", "spark.dynamicAllocation.enabled": "false", "spark.network.timeout": "30000", "spark.memory.fraction": "0.75", "spark.memory.storageFraction": "0.3" }For the full parameter reference, see Spark application configuration parameters and the Spark documentation.
Click the
 button to apply the configuration.
Custom configuration parameters are reset when you close the notebook. On reopening, default parameters apply unless you run
%%configure -fagain.For interactive jobs, all configuration parameters are written directly to the JSON structure — not inside the
confobject required for batch jobs.
Run Spark jobs
Enter the
sparkcommand to start a SparkSession.Click Link in the return value to open the Spark UI, where you can view job logs and execution details.

Run Spark SQL by prefixing queries with
%%sql. The following example lists all databases in the cluster:ImportantThe
%%sqlprefix is required. Without it, the cell content is parsed as Python. Run%%helpto see all available magic commands.%%sql show databasesThe results match the databases available in your AnalyticDB for MySQL cluster.
