When your application needs to be scaled out, a new version is deployed, or a traffic burst is expected, you can use the warm-up feature of Service Mesh (ASM) to progressively increase request traffic within a custom time window. This ensures smooth transition and reduces the risks of service interruption, request timeout, and potential data loss caused by sudden bursts of load. This way, stable performance and high availability are guaranteed during application scaling and updates.
Prerequisites
An ASM instance of Enterprise Edition or Ultimate Edition is created, and the version of the ASM instance is 1.14.3 or later. For more information, see Create an ASM instance.
The cluster is added to the ASM instance. For more information, see Add a cluster to an ASM instance.
The Container Service for Kubernetes (ACK) cluster is connected by using kubectl. For more information, see Obtain the kubeconfig file of a cluster and use kubectl to connect to the cluster.
An ingress gateway is created. For more information, see Create an ingress gateway.
A sample application named Bookinfo is deployed. In this example, the reviews service is used. For more information, see Deploy an application in an ASM instance.
Background information
If the warm-up feature is disabled, a proportional amount of traffic is sent to the new pod when a pod is added. However, it takes time for some services to warm up before they can process all assigned requests. In this case, request timeout and data loss may occur, hampering user experience. For example, a web application running on a Java virtual machine (JVM) uses the horizontal pod autoscaling feature. After a pod is added, the pod is flooded with a large number of requests. Then, the requests are slowly responded or time out because the pod is warming up. The working principle of the warm-up feature is to allow a new pod to progressively receive traffic.
Use the warm-up feature
The warm-up feature allows you to specify a period of time for a service. When the warm-up feature is enabled, a new instance receives only a small number of requests when it is starting. The number of requests increases progressively during the specified period of time. When the specified period of time is over, the instance exits the warm-up mode.
The warm-up mode prevents new pods from being knocked down by a large number of requests. The new pods have time to warm up before processing requests that are distributed based on the specified load balancing policy.
This feature is helpful for applications that depend on cache and need to warm up to provide optimal performance. To enable this feature for a service, set the trafficPolicy.loadBalancer field in the YAML file of DestinationRule. Pay attention to the following fields:
loadBalancer: specifies the type of the load balancing policy. Valid values: ROUND_ROBIN and LEAST_REQUEST.
warmupDurationSecs: specifies the warm-up duration of a service. A newly created endpoint of the service remains in the warm-up mode for the specified period of time after it is created. During this period of time, Istio progressively increases the amount of traffic for the endpoint instead of sending a proportional amount of traffic.
The warm-up feature requires that the number of pod replicas of the application in the current zone cannot be zero. The following describes two scenarios:
The ACK cluster on the data plane is deployed only in the zone A: If an application has one pod replica in zone A, the warm-up feature takes effect when you start the second one.
The ACK cluster on the data plane is deployed in the zone A and B: If an application has only one pod replica in zone A, the warm-up feature does not take effect when you start the second one in zone B. By default, a scheduler is deployed across zones. In this case, the warm-up feature takes effect when you start the third one.
Sample YAML file for DestinationRule:
apiVersion: networking.istio.io/v1alpha3
kind: DestinationRule
metadata:
  name: mocka
spec:
  host: mocka
  trafficPolicy:
    loadBalancer:
      simple: ROUND_ROBIN
      warmupDurationSecs: 100s
Step 1: Configure a routing rule and access the ingress gateway
In this example, the number of replicated pods for the reviews-v3 Deployment in the ACK cluster is scaled to zero first.
Define the ingress gateway.
Create a file named bookinfo-gateway.yaml that contains the following content:
Run the following command to deploy bookinfo-gateway:
kubectl apply -f bookinfo-gateway.yaml
Create a service named reviews.
Create a file named reviews.yaml that contains the following content:
Run the following command to deploy the reviews service:
kubectl apply -f reviews.yaml
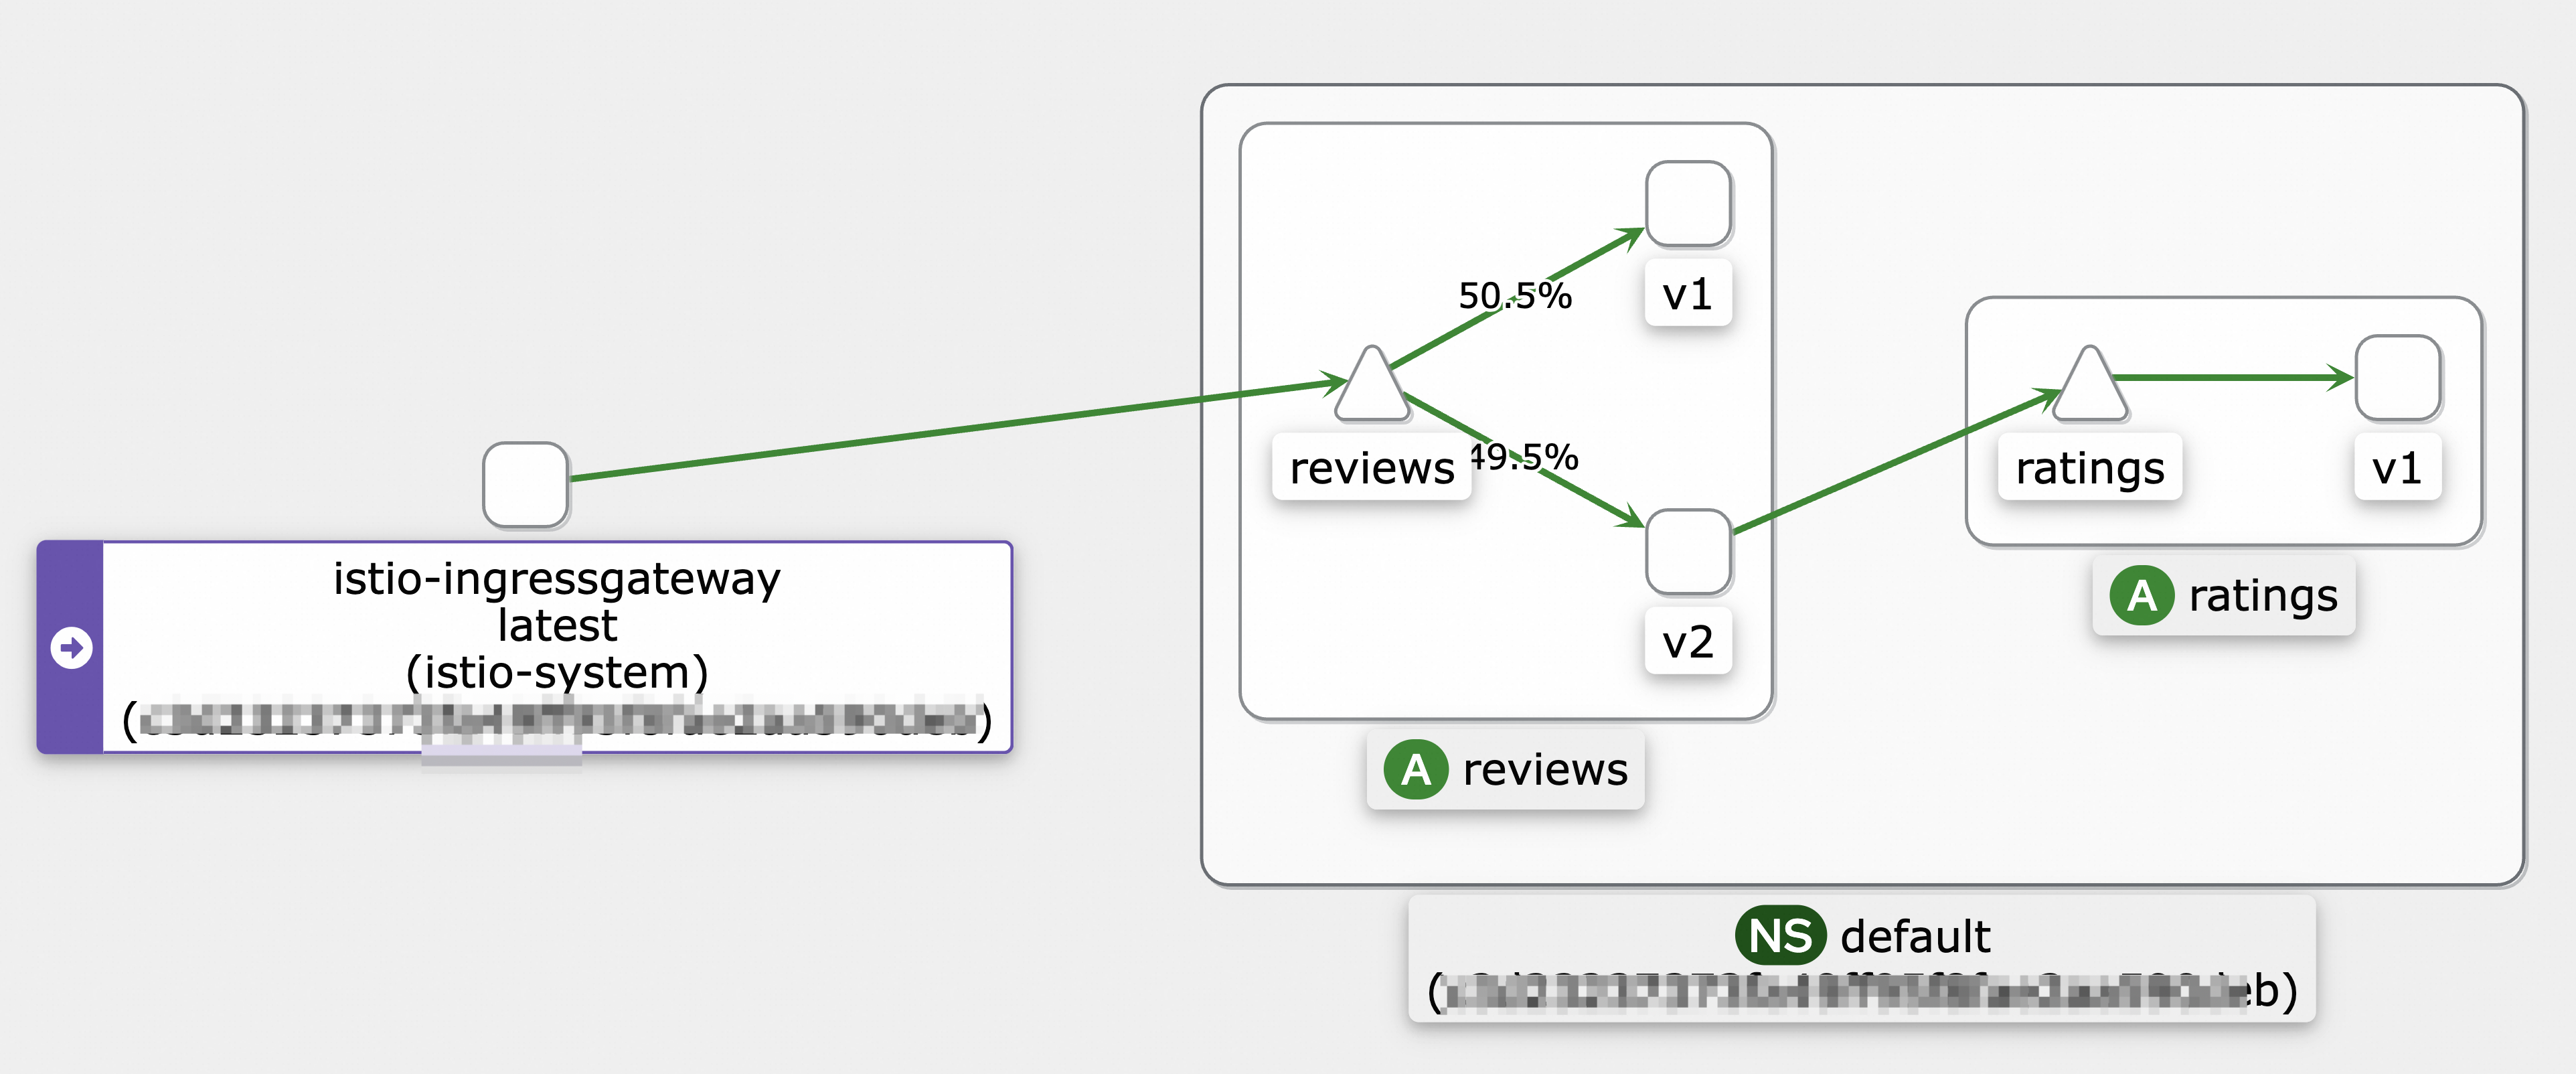
Continuously access the IP address of the ingress gateway and view the topology of your service mesh.
In this example, a hey command is used to send requests for 10 seconds to simulate stress scenarios. For more information about how to download and install hey, see hey. For more information about how to enable the observability feature of ASM and view the topology, see Use Mesh Topology to view the topology of an application.
hey -z 10s -q 100 -c 4 http://${IP address of the ingress gateway}/reviews/0The following figure shows the call topology.
Step 2: View the number of requests sent to a new pod
Log on to the ASM console.
In the left-side navigation pane, choose .
On the Mesh Management page, find the ASM instance that you want to configure. Click the name of the ASM instance or click Manage in the Actions column.
In the left-side navigation pane, choose .
If the version of the ASM instance is earlier than 1.17.2.35, click the Monitoring instrument tab on the Monitoring indicators page. On the Monitoring instrument tab, click the Cloud ASM Istio Service tab and select the reviews service.
If the version of the ASM instance is 1.17.2.35 or later, click the Cloud ASM Istio Work load tab on the Monitoring indicators page, select reviews-v3 from the Workload drop-down list, and then select source from the Reporter drop-down list.
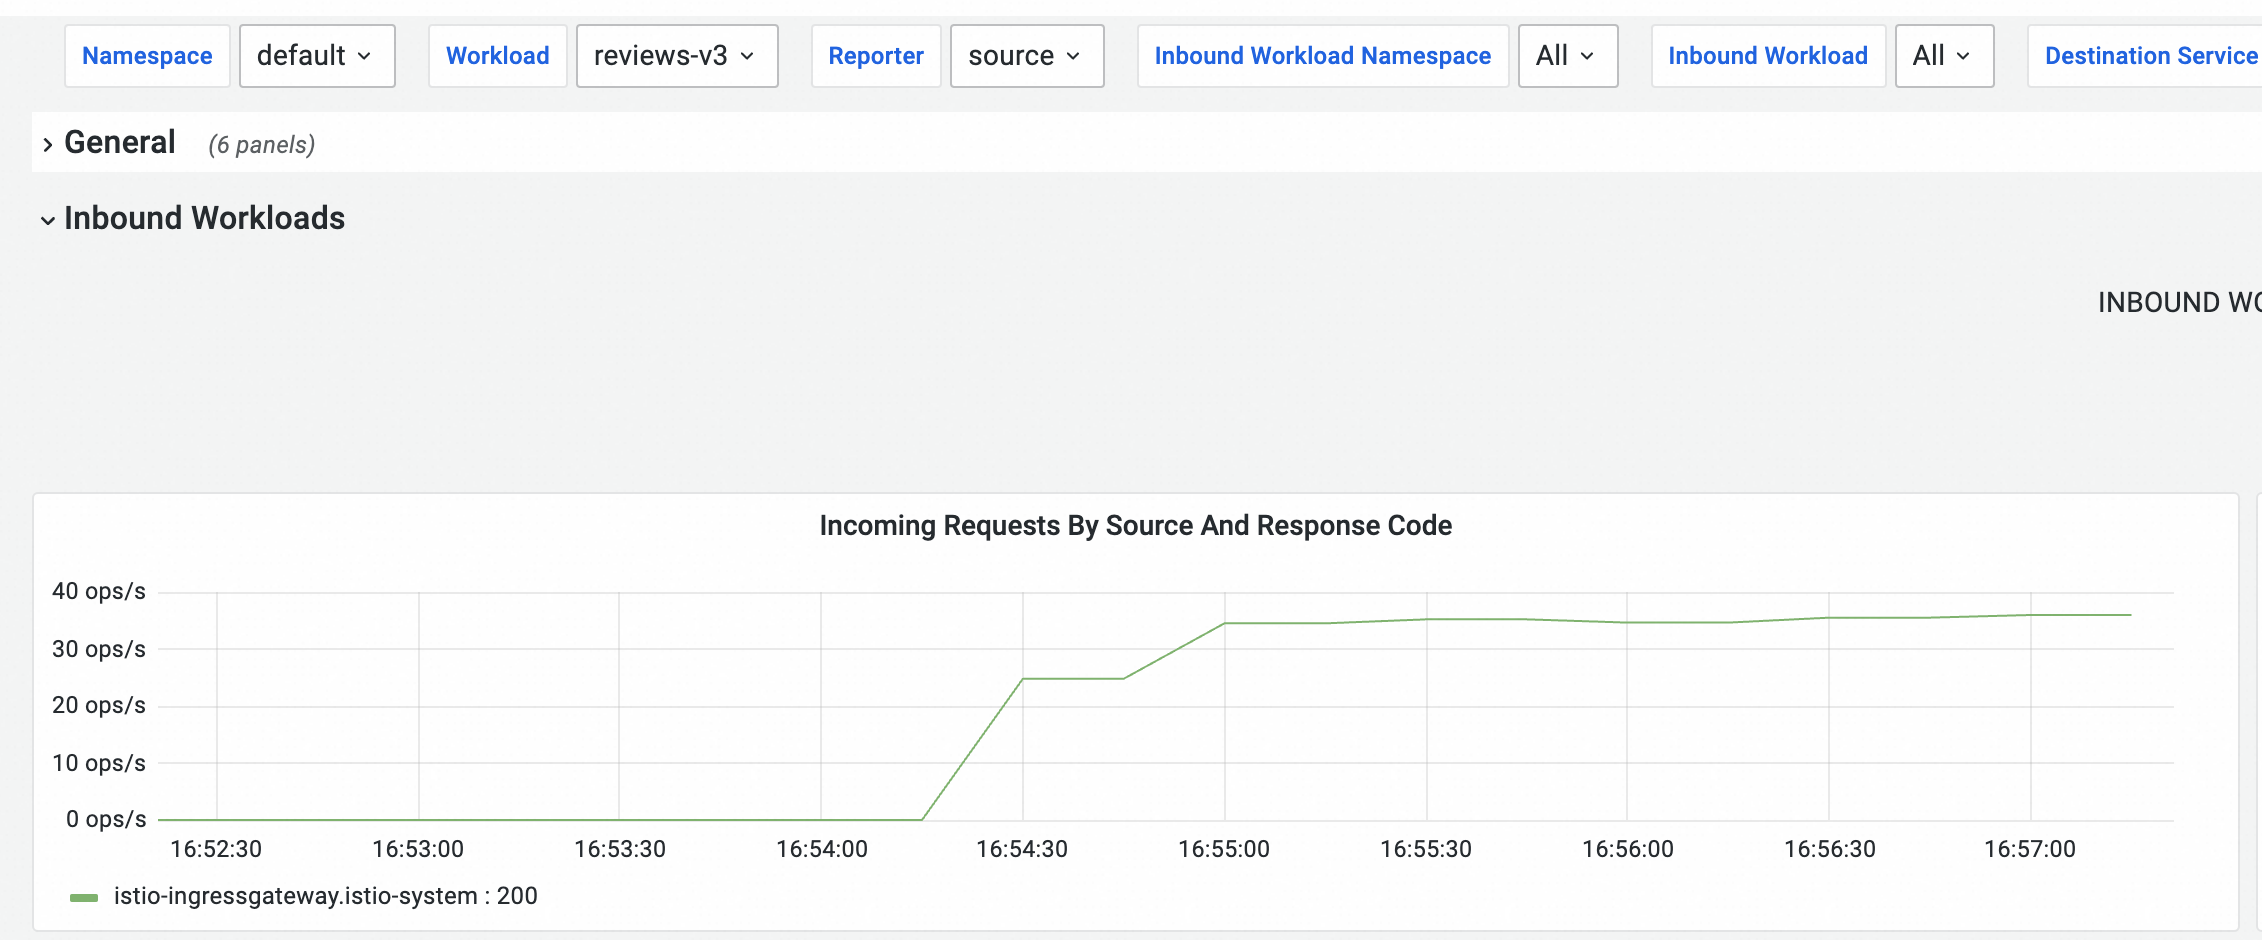
Send requests for stress testing and observe monitoring data.
Make sure that the warm-up feature is disabled. Scale the number of replicated pods for the reviews-v3 Deployment in the ACK cluster from zero to one.
Run the following command to send requests to the ingress gateway for stress testing.
In this example, the stress test lasts for 120 seconds.
hey -z 120s -q 100 -c 4 http://${IP address of the ingress gateway}/reviews/0Observe the dashboard on the Prometheus Monitoring page.
The pod of reviews-v3 starts receiving requests at a stable rate about 45 seconds after the stress test begins. The amount of time required depends on the stress testing environment.
Scale the number of replicated pods for the reviews-v3 Deployment in the ACK cluster to zero.
Step 3: Enable the warm-up feature
Update the reviews.yaml file to contain the following content:
Add the
warmupDurationSecsfield and set the value to120s.apiVersion: networking.istio.io/v1beta1 kind: DestinationRule metadata: name: reviews spec: host: reviews trafficPolicy: loadBalancer: simple: ROUND_ROBIN warmupDurationSecs: 120sRun the following command to update the reviews service:
kubectl apply -f reviews.yaml
Step 4: View the effect of the warm-up feature
Scale the number of replicated pods for the reviews-v3 Deployment in the ACK cluster from zero to one.
Run the following command to send requests to the ingress gateway for stress testing.
In this example, the stress test lasts for 150 seconds.
hey -z 150s -q 100 -c 4 http://${IP address of the ingress gateway}/reviews/0On the Cloud ASM Istio Service tab, view the dashboard for the service mesh.
The pod of reviews-v3 starts receiving requests at a stable rate about 120 seconds after the stress test begins. The amount of time required depends on the stress testing environment.
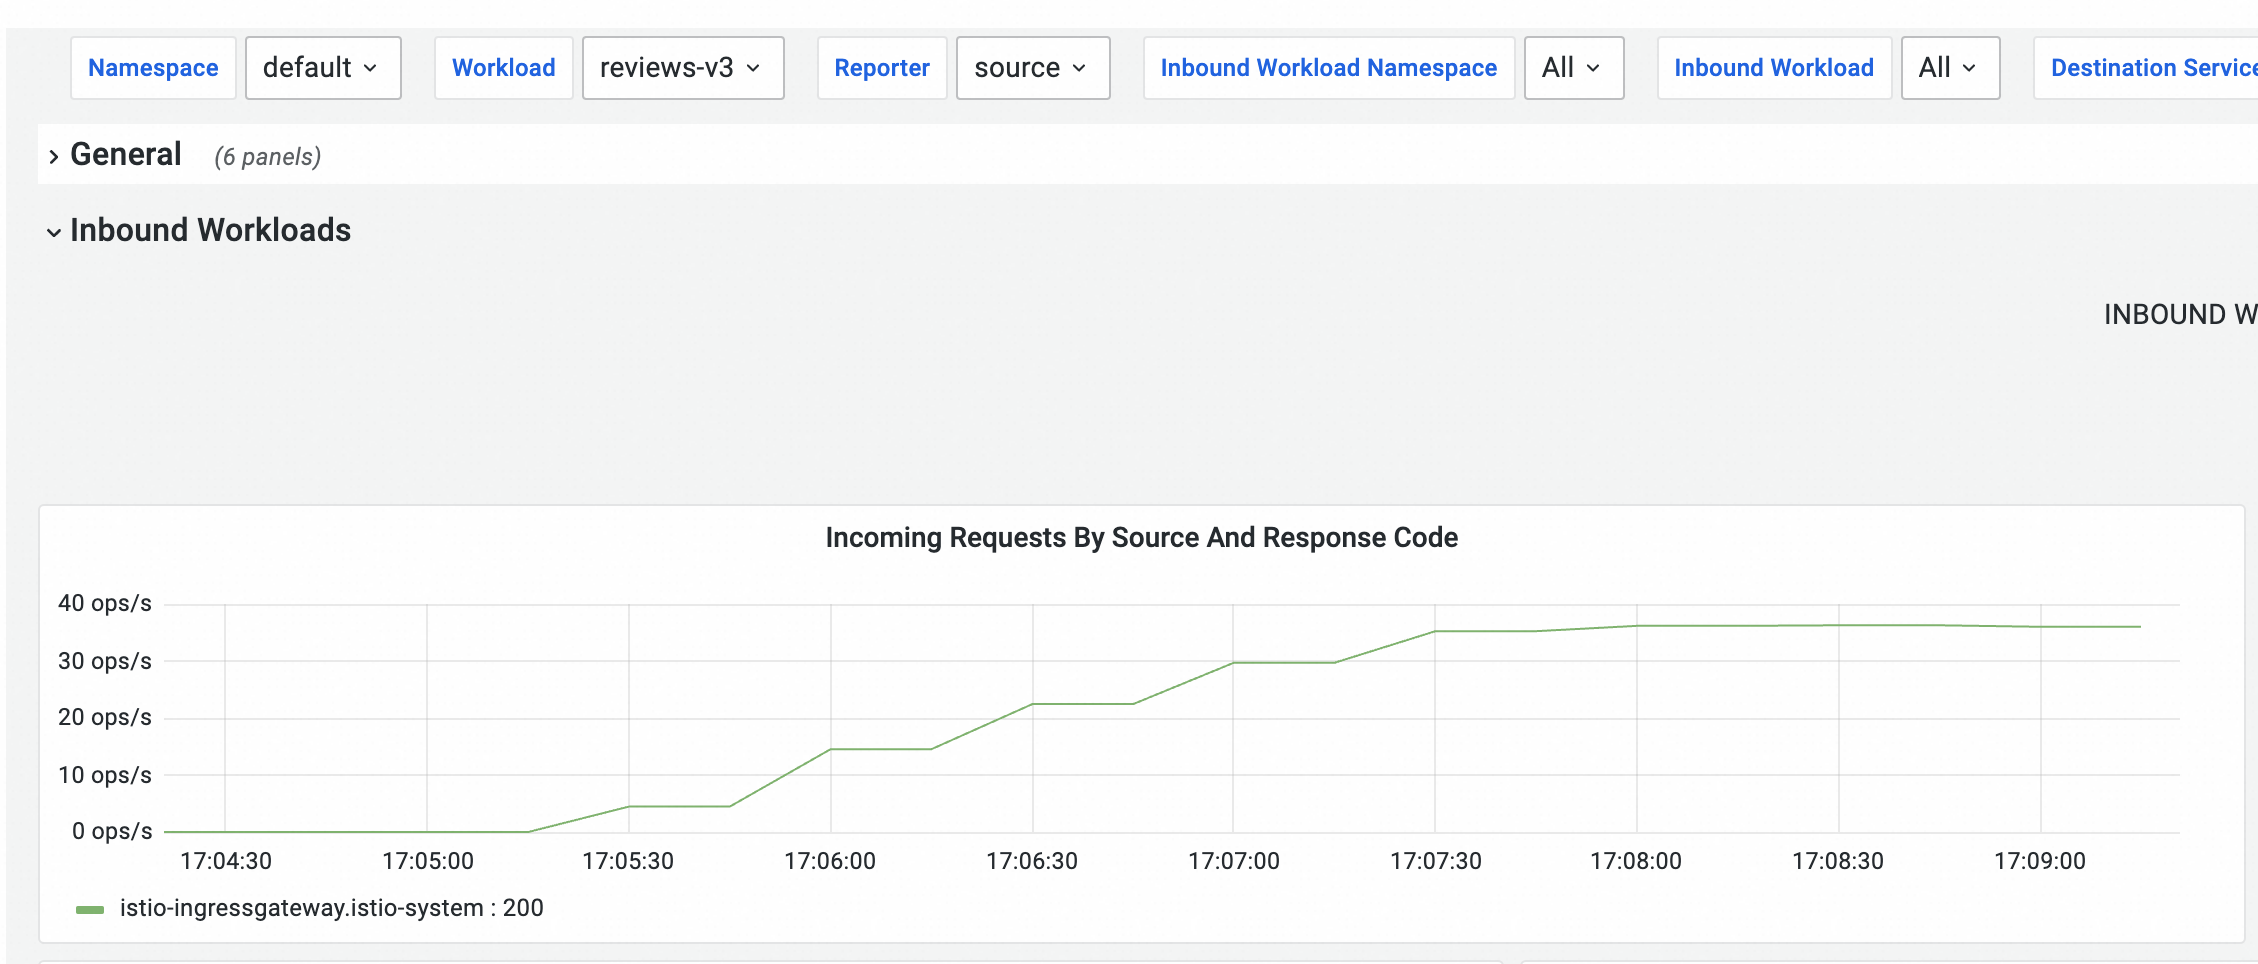 This curve is not smooth because metrics are collected at intervals. In fact, the traffic to the reviews-v3 pod increases smoothly. If you have enabled log collection for a sidecar proxy, you can search for the logs of the sidecar proxy in the Simple Log Service console. The logs in the last 5 minutes are displayed.
  When the warm-up feature is enabled, a new instance receives only a small number of requests when it is starting. The number of requests increases progressively during the specified period of time. When the specified period of time is over, the instance exits the warm-up mode.
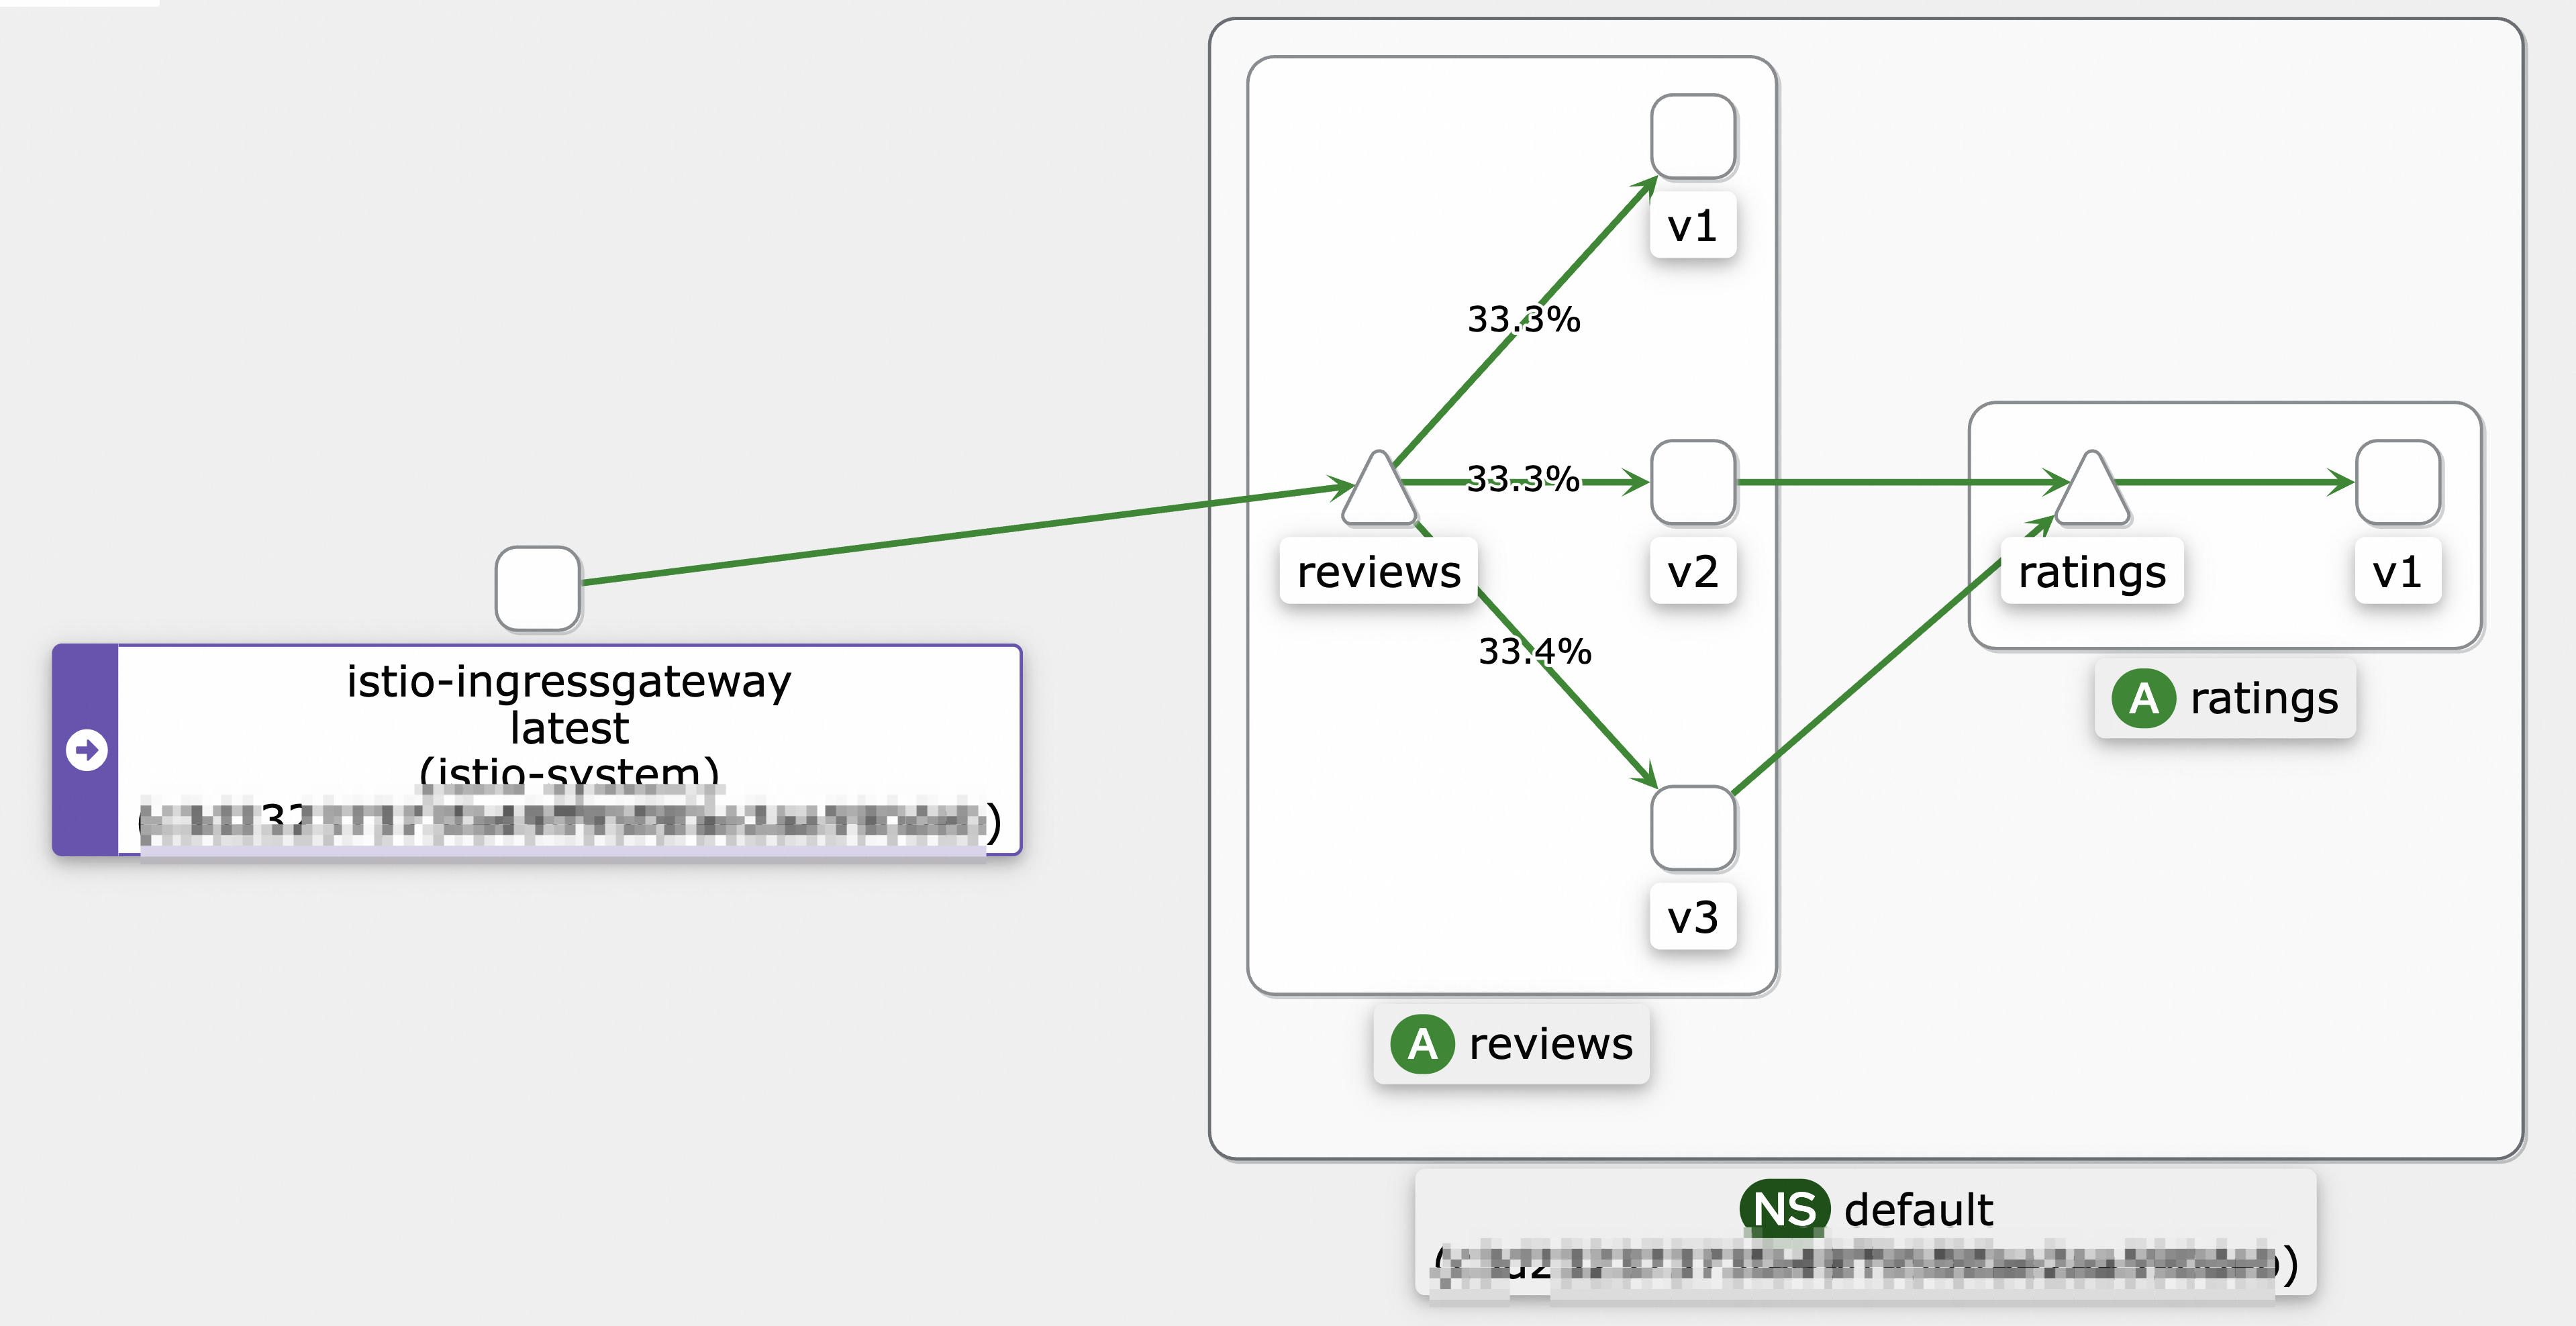
 When the warm-up feature is enabled, it takes about 150 seconds before traffic is evenly distributed to reviews-v1, reviews-v2, and reviews-v3.
References
You can configure local throttling or global throttling to keep traffic within configured thresholds to ensure continuous availability and stable performance of services. For more information, see Configure local throttling in Traffic Management Center and Use ASMGlobalRateLimiter to configure global throttling for inbound traffic directed to a service into which a sidecar proxy is injected.
You can use ASMAdaptiveConcurrency to dynamically adjust the maximum number of concurrent requests that are allowed for a service based on the sampled request data. If the number of concurrent requests exceeds the maximum value supported by the service, excess requests are rejected to protect the service. For more information, see Use an ASMAdaptiveConcurrency to implement adaptive concurrency control.
Circuit breaking is a traffic management mechanism used to protect your system from further damage in the event of a system failure or overload. For more information, see Configure the connectionPool field to implement circuit breaking.