When microservices communicate across a mesh, you often need to direct specific requests to specific service versions -- for canary releases, A/B tests, or environment isolation. Traffic labeling in Alibaba Cloud Service Mesh (ASM) attaches custom tags to requests as they flow through the mesh, so downstream routing rules, throttling policies, and circuit breakers can act on those tags.
ASM provides the TrafficLabel CustomResourceDefinition (CRD) to define labeling rules. Apply a TrafficLabel resource to a namespace or a specific workload, and ASM injects the labeling logic into Envoy proxy filters automatically.
Use cases
Canary releases -- Route a percentage of traffic to a new version by matching a header value.
A/B testing -- Split traffic between variants using label-based routing rules.
Environment isolation -- Tag traffic as
stagingorproductionand route it to the corresponding backends.
Prerequisites
Before you begin, make sure that you have:
An ASM instance running version 1.17 or later
A Kubernetes cluster associated with your ASM instance
kubectlconfigured to connect to the cluster
ASM 1.17 introduced apiVersion: istio.alibabacloud.com/v1 for the TrafficLabel CRD. If you previously configured TrafficLabel in a Container Service for Kubernetes (ACK) cluster using apiVersion: istio.alibabacloud.com/v1beta1, change the apiVersion to istio.alibabacloud.com/v1 and reapply the resource. To update your ASM instance, see Update an ASM instance. For earlier ASM versions, submit a ticket for assistance.
How traffic labeling works
A TrafficLabel resource defines two things:
Scope -- Which workloads to label (all workloads in a namespace, or a subset selected by pod labels).
Rules -- Where to extract the label value from (request headers, pod labels, or trace context).
When a request enters a gateway or sidecar proxy, the proxy evaluates the TrafficLabel rules, resolves a label value, and attaches it as a new header on outbound requests. Downstream services can then match on this header for routing decisions.
CRD structure overview
The following skeleton shows how TrafficLabel fields nest together:
apiVersion: istio.alibabacloud.com/v1
kind: TrafficLabel
metadata:
  name: <label-name>              # Name of this TrafficLabel resource
  namespace: <namespace>          # Namespace where this resource applies
spec:
  workloadSelector:               # (Optional) Omit to apply to all workloads in the namespace
    labels:
      <key>: <value>              # Match workloads by label, e.g., app: productpage
  rules:
  - labels:
    - name: <traffic-label-name>  # Header name for the label (must follow HTTP header naming rules)
      valueFrom:
      - <variable-1>             # Primary source for the label value
      - <variable-2>             # Fallback if variable-1 returns empty
Field reference
Spec
| Field | Type | Required | Description |
|---|---|---|---|
workloadSelector | WorkloadSelector | No | Selects the workloads to label. If omitted, labeling applies to all workloads in the namespace. |
rules | TrafficLabelRule[] | Yes | One or more labeling rules. |
WorkloadSelector
| Field | Type | Required | Description |
|---|---|---|---|
labels | map<string, string> | No | Key-value pairs that match workload labels. |
TrafficLabelRule
| Field | Type | Required | Description |
|---|---|---|---|
labels | Label[] | Yes | The traffic labels to attach. |
Label
| Field | Type | Required | Description |
|---|---|---|---|
name | string | Yes | The traffic label name. Must comply with HTTP request header naming conventions. |
valueFrom | string[] | Yes | An ordered list of variables. The proxy evaluates them in sequence and uses the first non-empty result. See valueFrom variables. |
valueFrom variables
The valueFrom field accepts an ordered list of variables. The proxy evaluates them in sequence and uses the first non-empty result as the label value.
The four variables divide into two groups based on where they apply:
| Variable | Applies to | Source of label value |
|---|---|---|
$getInboundRequestHeader(headerName) | Gateways only | Inbound request header at the gateway |
$getExternalInboundRequestHeader(headerName, contextId) | Sidecar proxies only | Inbound request header, correlated across the call chain via a context map |
$getLocalOutboundRequestHeader(headerName) | Sidecar proxies only | Outbound request header set by the application |
$getLabel(labelName) | Gateways and sidecar proxies | Pod label on the gateway or workload pod |
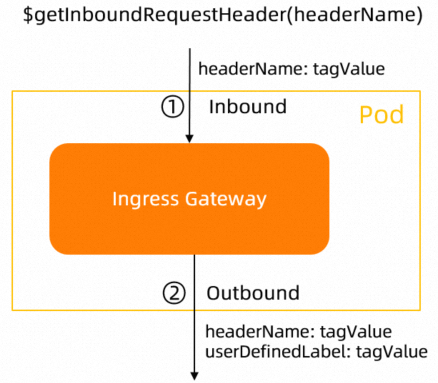
Gateway variable
$getInboundRequestHeader(headerName)
Reads the headerName header from the inbound request entering the gateway. The gateway adds a new outbound header using the label name defined in the TrafficLabel CRD as the key and the extracted value as the value.
If headerName is left blank, the gateway reads x-asm-prefer-tag by default.
Data flow:
Client request                    Gateway                         Upstream service
     |                              |                                   |
     |-- headerName: tagValue ----->|                                   |
     |                              |-- userDefinedLabel: tagValue ---->|
     |                              |                                   |
Sidecar proxy variables
$getExternalInboundRequestHeader(headerName, contextId)
Reads the headerName header from the inbound request entering the sidecar proxy and stores the value in an internal context map keyed by contextId. This map persists for 30 seconds in Envoy memory.
Parameters (both required):
| Parameter | Description | Example |
|---|---|---|
headerName | The request header key to read. | x-asm-prefer-tag |
contextId | A header field that persists across the call chain, used to correlate inbound and outbound traffic. Typically a trace ID. | x-request-id |
How the context map works:
An inbound request arrives at the sidecar. The proxy reads
headerNameto gettagValueand storesmap<contextId, tagValue>.When the application initiates an outbound request, the proxy looks up
contextIdin the context map.If a match is found, the proxy adds two headers to the outbound request:
headerName: tagValueuserDefinedLabel: tagValue(using the label name from the TrafficLabel CRD)
Data flow:
Inbound request       Sidecar proxy (context map)          Outbound request
     |                         |                                 |
     |-- headerName: tagValue  |                                 |
     |-- contextId: ctx123 --->| store: ctx123 -> tagValue       |
     |                         |                                 |
     |          App initiates outbound request                   |
     |                         |-- contextId: ctx123 ----------->|
     |                         |   (lookup: ctx123 -> tagValue)  |
     |                         |-- headerName: tagValue -------->|
     |                         |-- userDefinedLabel: tagValue -->|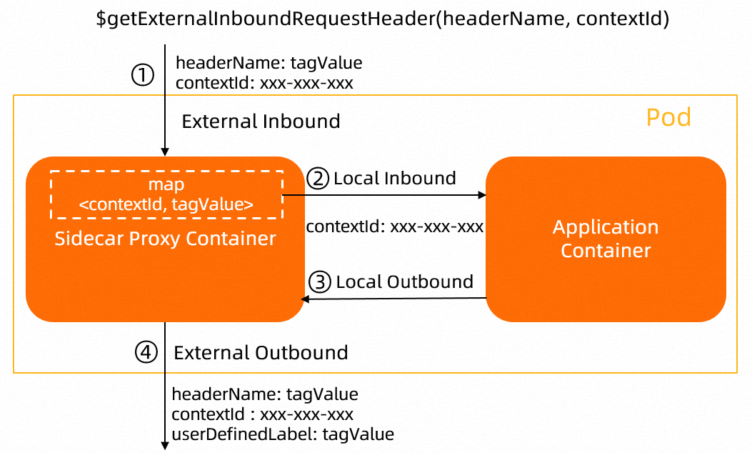
The context map (
map<contextId, tagValue>) is stored in Envoy proxy memory for 30 seconds by default.When your application is connected to a tracing system, use the trace ID as
contextId. Different tracing systems use different trace IDs. For details, see Tracing.Applications must propagate the relevant HTTP headers for Istio proxies to correlate spans into a complete trace. See Enable distributed tracing in ASM.
If the application does not propagate
contextId, the sidecar proxy cannot look up the label value from the context map, and the outbound request will not be labeled.
$getLocalOutboundRequestHeader(headerName)
Reads the headerName header from the outbound request that the application sends to the sidecar proxy. The proxy adds a new outbound header using the label name from the TrafficLabel CRD as the key and the extracted value as the value.
Use this variable when the application itself sets a header on its outbound requests.
Data flow:
Application container          Sidecar proxy              Upstream service
     |                              |                          |
     |-- headerName: tagValue ----->|                          |
     |                              |-- userDefinedLabel: tagValue -->|
     |                              |                          |
Pod label variable
$getLabel(labelName)
Reads the labelName label from the gateway pod or sidecar workload pod and adds the value to outbound traffic. If labelName is blank, the proxy reads the ASM_TRAFFIC_TAG label by default.
Example: If a Deployment pod has the label ASM_TRAFFIC_TAG: test, the variable $getLabel(ASM_TRAFFIC_TAG) returns test.
apiVersion: apps/v1
kind: Deployment
metadata:
  name: productpage-v1
  labels:
    app: productpage
    version: v1
spec:
  replicas: 1
  selector:
    matchLabels:
      app: productpage
      version: v1
  template:
    metadata:
      annotations:
        sidecar.istio.io/logLevel: debug
      labels:
        app: productpage
        version: v1
        ASM_TRAFFIC_TAG: test    # This value is read by $getLabel(ASM_TRAFFIC_TAG)
    spec:
      serviceAccountName: bookinfo-productpage
      containers:
      - name: productpage
        image: docker.io/istio/examples-bookinfo-productpage-v1:1.16.2
        imagePullPolicy: IfNotPresent
        ports:
        - containerPort: 9080
        volumeMounts:
        - name: tmp
          mountPath: /tmp
      volumes:
      - name: tmp
        emptyDir: {}
Label traffic for a specific workload
This example labels the traffic of the productpage workload. The label value is resolved from the inbound request header header1 (correlated by x-request-id), falling back to the pod label header2.
Both examples on this page require ASM 1.17 or later and use the Bookinfo sample application.
Deploy the Bookinfo application. See Deploy an application in an ASM instance.
Save the following YAML to
productpage-trafficlabel.yaml:apiVersion: istio.alibabacloud.com/v1 kind: TrafficLabel metadata: name: productpage namespace: default spec: workloadSelector: labels: app: productpage # Only applies to the productpage workload rules: - labels: - name: asm-labels-test-a # Outbound header name for the label valueFrom: - $getExternalInboundRequestHeader(header1, x-request-id) # Primary: read from inbound header - $getLabel(header2) # Fallback: read from pod labelApply the resource:
kubectl apply -n default -f productpage-trafficlabel.yamlVerify that the Envoy filter was injected into the
productpageproxy: Look for thecom.aliyun.traffic_labelfilter underdynamic_listenersorhttp_filters:kubectl exec -it -n default deploy/productpage-v1 -c istio-proxy -- \ curl localhost:15000/config_dump{ "name": "com.aliyun.traffic_label", "typed_config": { "@type": "type.googleapis.com/envoy.config.filter.traffic_label.v3alpha.TrafficLabel", ... } }Confirm that unselected workloads are not affected. Run the same check against the
detailspod: An empty result confirms that no labeling filter was injected, as expected.kubectl exec -it -n default deploy/details-v1 -c istio-proxy -- \ curl localhost:15000/config_dump | grep traffic_label
Label traffic at the namespace level
Omit workloadSelector to label traffic for all workloads in a namespace. This example labels all workloads in the default namespace.
Save the following YAML to
all-workload-for-ns-trafficlabel.yaml:apiVersion: istio.alibabacloud.com/v1 kind: TrafficLabel metadata: name: all-workload-for-ns namespace: default spec: rules: # No workloadSelector -- applies to every workload in "default" - labels: - name: asm-labels-test-b valueFrom: - $getExternalInboundRequestHeader(header1, x-request-id) - $getLabel(header2)Apply the resource:
kubectl apply -n default -f all-workload-for-ns-trafficlabel.yamlVerify that the labeling filter is now present on all workloads. Check the
detailspod: Expected output: The filter is now injected into every workload in the namespace.kubectl exec -it -n default deploy/details-v1 -c istio-proxy -- \ curl localhost:15000/config_dump | grep traffic_label"@type": "type.googleapis.com/envoy.config.filter.traffic_label.v3alpha.TrafficLabel",
Related topics
Deploy an application in an ASM instance -- Set up workloads in your mesh before configuring traffic labels.
Enable distributed tracing in ASM -- Propagate trace headers required by
$getExternalInboundRequestHeader.Update an ASM instance -- Upgrade to ASM 1.17+ if you are on an older version.