Use Secrets to store sensitive information in Kubernetes clusters, such as passwords, API keys, and certificates. This topic describes how to create Secrets in the Container Service for Kubernetes (ACK) console, mount Secrets as volumes to pods, and expose Secrets as environment variables.
Prerequisites
Before you begin, make sure you have:
-
A Secret and a pod in the same cluster and namespace (required when mounting a Secret as a volume)
-
A kubectl client connected to the cluster. See Connect to an ACK cluster by using kubectl
Background information
You can use a Secret in a pod in the following scenarios:
-
Mount the Secret as a volume to the pod.
-
Expose the Secret as environment variables for the pod.
For more information about Secrets, see Secrets.
Create a Secret
The following steps create a Secret named secret-test that stores a username and password.
Secret values must be Base64-encoded. To encode a value, run echo -n 'your-value' | base64.
-
Log on to the ACK console and click Clusters in the left navigation pane.
-
On the Clusters page, find the target cluster and click its name. In the left pane, choose Workloads > Deployments.
-
On the Deployments page, click Create from YAML in the upper-right corner.
-
Select Custom, paste the following YAML content into the editor, and click Create.
apiVersion: v1
kind: Secret
metadata:
  name: secret-test
type: Opaque
data:
  username: admin   # Must be Base64-encoded
  password: 12345   # Must be Base64-encoded
For a form-based approach, see Manage Secrets.
Mount a Secret as a volume
When you mount a Secret as a volume, each key in the Secret becomes a file in the mount directory. The file content is the corresponding value.
Use the CLI
The following example mounts secret-test into a pod at /srt, making the username and password keys available as files.
Create a file named example0.yaml:
apiVersion: v1
kind: Pod
metadata:
  name: pod0
spec:
  containers:
  - name: redis
    image: redis
    volumeMounts:
    - name: srt
      mountPath: "/srt"
      readOnly: true
  volumes:
  - name: srt
    secret:
      secretName: secret-test
Apply the manifest:
kubectl apply -f example0.yamlUse the console
-
Log on to the ACK console and click Clusters in the left navigation pane.
-
On the Clusters page, find the target cluster and click its name. In the left pane, choose Workloads > Deployments.
-
On the Deployments page, click Create from Image. See Create a stateless application by using a Deployment for full Deployment configuration details.
-
On the Basic Information wizard page, configure the parameters and click Next.
-
On the Container wizard page, go to the Volume section and click Add Local Storage. Set the following fields, then click Next:
Field Value PV Type Secret Mount Source The Secret created in Create a Secret Container Path The path inside the container where the Secret files will appear 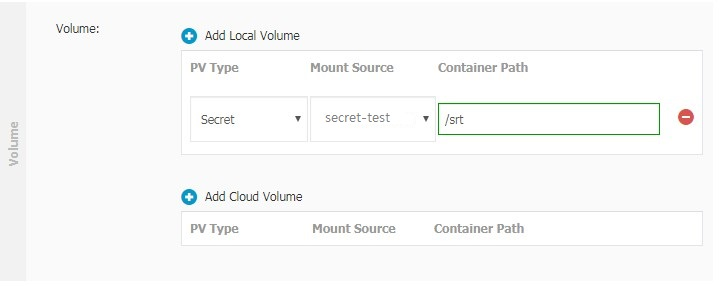
-
On the Advanced wizard page, configure any remaining parameters and click Create.
Expose a Secret as environment variables
When you expose a Secret as environment variables, each key-value pair in the Secret maps to an environment variable in the container.
Use the CLI
The following example references the username and password keys from secret-test as environment variables USERNAME and PASSWORD in a pod.
Create a file named example1.yaml:
apiVersion: v1
kind: Pod
metadata:
  name: pod1
spec:
  containers:
  - name: redis
    image: redis
    env:
      - name: USERNAME
        valueFrom:
          secretKeyRef:
            name: secret-test
            key: username
      - name: PASSWORD
        valueFrom:
          secretKeyRef:
            name: secret-test
            key: password
Apply the manifest:
kubectl apply -f example1.yamlUse the console
-
Log on to the ACK console and click Clusters in the left navigation pane.
-
On the Clusters page, find the target cluster and click its name. In the left pane, choose Workloads > Deployments.
-
On the Deployments page, click Create from Image. See Create a stateless application by using a Deployment for full Deployment configuration details.
-
On the Basic Information wizard page, configure the parameters and click Next.
-
On the Container wizard page, go to the Environments section and click Add. Set the following fields for each environment variable:
Field Value Type Secrets Variable name Name of the environment variable (for example, USERNAME)Value/ValueFrom Select the Secret created in Create a Secret and the key ( usernameorpassword) to reference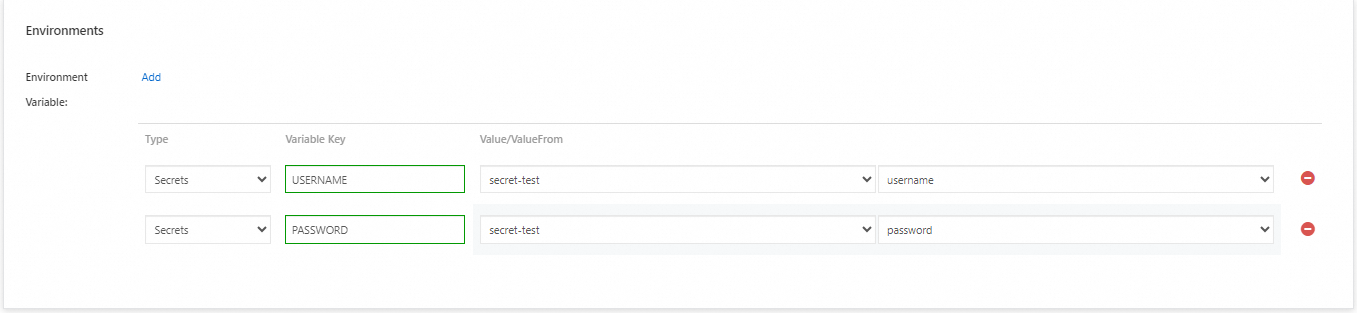
-
On the Advanced wizard page, configure any remaining parameters and click Create.
What's next
-
Manage Secrets — create, view, and delete Secrets using the ACK console
-
Secrets — Kubernetes official documentation on Secret types, immutability, and best practices