In Function Compute, you can create aliases for function versions. Using aliases and versions together, you can implement continuous integration and release within a Software Development Life Cycle (SDLC). This topic describes aliases and explains how to manage them in the Function Compute console.
What is an alias?
In Function Compute, an alias is a pointer to a specific function version. Aliases allow you to easily publish versions, perform rollbacks, and implement canary releases. An alias must be associated with a function or version. When you use an alias to access a function, Function Compute resolves the alias to the version to which it points. The client that calls the function does not need to know the specific version.
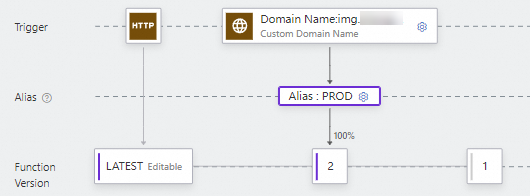
For example, consider an HTTP trigger. Without an alias, you must manually update the version number associated with the trigger each time a new version is published. This process can disrupt client services. Using an alias enables smooth version upgrades. For example, you can point an alias named PROD to the stable version 1. Clients can then invoke version 1 of the function using the PROD alias (Figure 1). When you publish version 2, you can simply update the PROD alias to point to version 2. Clients can then invoke version 2 of the function using the PROD alias (Figure 2).
Smooth version upgrade
Figure 1. Publish version 1

After you publish version 1, you can continue to develop new features on the LATEST version. Because clients use the alias to invoke the function, you can simply update the PROD alias to point to version 2 when you are ready to publish it. When a client invokes the function using the PROD alias, Function Compute resolves the alias to version 2. This process enables simple version updates and iterations.
Figure 2. Publish version 2
Quick rollback
If version 2 has an issue, you can simply point the PROD alias back to version 1 to roll back to the previous version. This operation does not affect the clients.
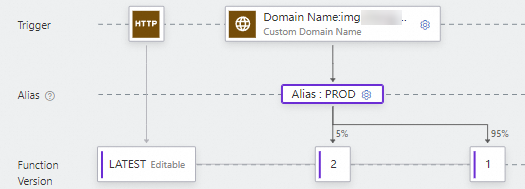
Canary release
You can also use an alias to control traffic for a canary release. For example, you can send 5% of the production traffic to the new version 2 for canary testing. Then, you can gradually shift all traffic to version 2. This method reduces the risks associated with deploying a new version.
Figure 3. Canary release
Configuration items supported by aliases
The configuration items supported by an alias are independent of the function code and main function configurations. They relate only to function triggering and execution, such as triggers, elasticity policies, and task modes. An alias represents a different environment. By setting configurations on an alias, you can switch versions without changing the function code or function configurations. For example, if you configure a trigger on an alias, the version of the function to which the alias points can be invoked by this trigger.
The following table lists the configuration items that can be associated with versions and/or aliases. A ![]() indicates that the configuration item supports binding to a version or an alias, while a
indicates that the configuration item supports binding to a version or an alias, while a ![]() signifies that it does not support binding.
signifies that it does not support binding.
Configuration items | Version | Alias |
Code logic |
|
|
|
| |
Instance specifications, instance concurrency, instance lifecycle hook |
|
|
|
| |
|
| |
|
| |
Layer, environment variable, logging, network, storage, health check, custom DNS, permissions (role) |
|
|
Before you start
Create an alias
Log on to the Function Compute console. In the navigation pane on the left, choose .
In the top navigation bar, select a region. On the Functions page, click the target function.
On the function details page, click the Manage Aliases tab. On the page that appears, click Create Alias.
In the Create Alias panel, configure the parameters and click OK.
The following table describes the parameters.
Configuration item
Description
Name
The name of the alias to create.
Description
The description of the alias.
Major Version
Set the major version for the alias.
Enable Canary Release
Specifies whether to enable a canary release version. To enable a canary release, set the following configuration items.
Canary Release Version
Set the canary release version for the alias.
Canary Release Version Weight
The percentage of traffic to switch to the canary release version. For example, if you set this parameter to 5%, 5% of the traffic is allocated to the canary release version and 95% of the traffic is allocated to the major version.
On the Manage Aliases page, you can view the alias that you created. You can also edit existing aliases or delete aliases that you no longer need.
When you delete an alias, only the alias is deleted. The versions and triggers to which the alias points are not deleted.
More information
You can set the minimum number of instances for a function to 1 or more to reserve elastic resources in advance. This ensures that the version to which the alias points has sufficient pre-warmed resources. For more information, see Configure an elasticity policy for the minimum number of instances.
In addition to using the console, you can use Serverless Devs to configure an alias for a function. For more information, see Common commands of Serverless Devs.