This topic describes how to use the data forwarding feature on the Message Forwarding page in the IoT Platform console to establish machine-to-machine (M2M) communication. In this topic, a connection between a smart lamp and a mobile app is established.
Background information
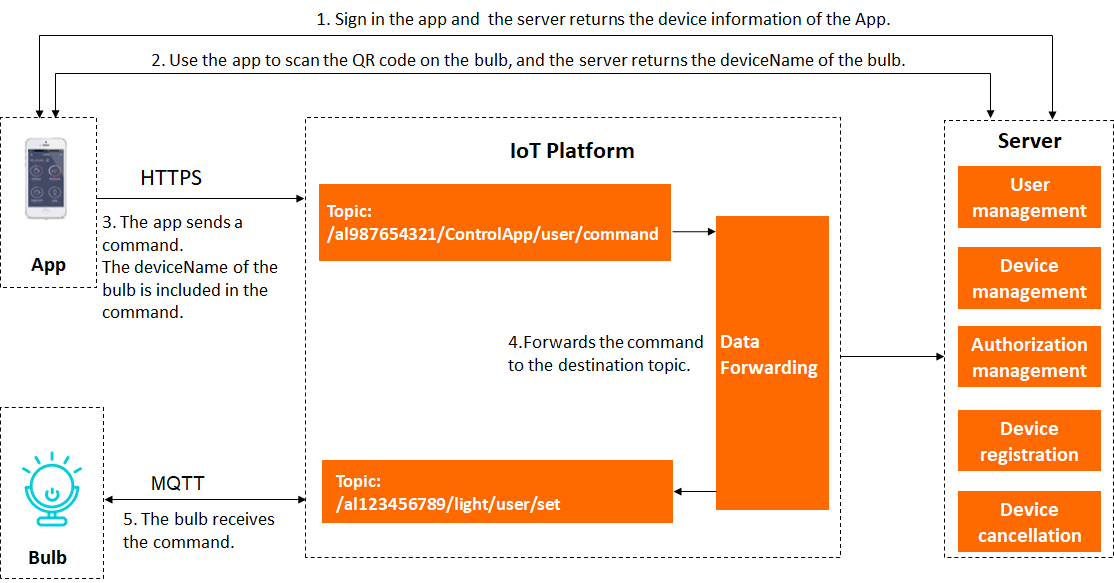
The following figure shows how to control a smart lamp by using a mobile app.
Create a product and a device
In the IoT Platform console, go to the details page of the instance that you want to manage and create a product and device for the mobile app. For more information, see Create a product and Create a device.
In this example, a product named MobileApp is created. The Node Type parameter is set to Directly Connected Device and the default values are used for other parameters.
A device whose DeviceName is ControlApp is created.
In this example, the ProductKey of the MobileApp product is al987654321.
After you create the product and the device for the mobile app, you can connect the mobile app to IoT Platform as a device.
When a registered user logs on to the mobile app, your business server sends the device information to the mobile app. This way, the mobile app can be connected to IoT Platform as a device.
Add a custom topic on which the mobile app has the Publish permission. The mobile app can use the topic to send commands to the smart lamp.
In this example, the
/al987654321/ControlApp/user/commandtopic is added. For more information, see Use custom topics for communication.Configure the mobile app.
In this example, HTTPS is used as a communication protocol between the mobile app and IoT Platform.
Format of a command that the mobile app sends to the smart lamp:
{
    "TargetDevice": "light",
    "Switch": 0,
    "Timestamp": 1557750407000
}
For information about how to configure Link SDKs, see Link SDKs.
In the IoT Platform console, go to the details page of the instance that you want to manage. Create a product and device for the smart lamp and define features for the product. For more information, see Create a product, Create multiple devices at a time, and Add a TSL feature.
In this example, a product named SmartLamp is created. The Node Type parameter is set to Directly Connected Device and the default values are used for other parameters.
A device whose DeviceName is light is created.
In this example, the ProductKey of the SmartLamp product is al123456789.
You can add Thing Specification Language (TSL) features based on your business requirements. For example, you can add a TSL property named Switch and set the data type to Boolean to manage the switch of the smart lamp. The value 0 indicates off and the value 1 indicates on.
Add a custom topic on which the smart lamp has the Subscribe permission. The smart lamp can use the topic to receive commands that are sent by the mobile app.
In this example, the
/al123456789/light/user/settopic is added. For more information, see Use custom topics for communication.Use a Link SDK to connect the smart lamp to IoT Platform. This way, the smart lamp can receive and run the commands that are sent by the mobile app.
In this example, MQTT is used as a communication protocol between the smart lamp and IoT Platform. To receive commands, the smart lamp must subscribe to the
/al123456789/light/user/settopic. After the smart lamp receives a command, develop a function to run the command.For information about how to configure Link SDKs, see Link SDKs.
Configure a parser
Configure a parser to forward commands from the mobile app to the topic to which the smart lamp subscribes.
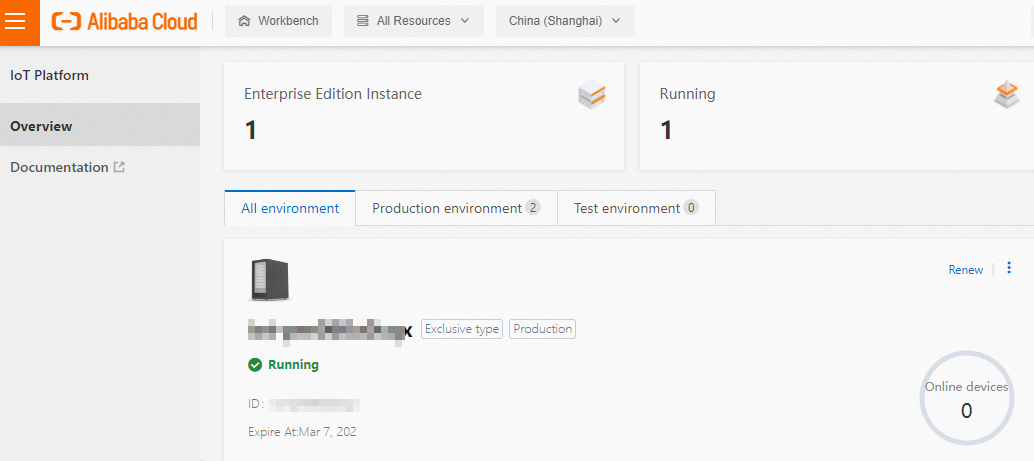
Log on to the IoT Platform console.
On the Overview page, select an environment, find the instance that you want to manage, and click the instance ID or instance name.
ImportantThis step is required only if Enterprise Edition instances are available. If the Enterprise Edition instances are unavailable in the region that you selected, skip this step. For information about supported regions and instances, see Overview.
In the left-side navigation pane, choose . Then, perform the following steps to configure a parser to forward messages:
Create a data source
For more information about the parameters described in the following steps, see Create a data source.
On the Data Source tab, perform the following steps to create a data source:
ImportantIf the previous version of the Data Forwarding page appears, click Go to New Version in the upper-right corner of the page. After the new version of the Data Forwarding page appears, click Data Source.
On the Data Source tab, click Create Data Source.
In the Create Data Source dialog box, enter a name for the data source. Example: AppData.
Click OK.
On the AppData page, click Add Topic.
In the Add Topic dialog box, select a topic whose messages that you want to process and click OK.
In the example, the /al987654321/ControlApp/user/command topic of the
ControlAppdevice and the values of the TargetDevice, Timestamp, and Switch fields need to be obtained from messages.
Create a data destination
For more information about the parameters described in the following steps, see Create a data destination.
Go to the Data Forwarding page and click Data Destination.
On the Data Destination tab, click Create Data Destination.
In the Create Data Destination dialog box, enter a name for the data destination. Example: OtherTopic. Then, set the Product parameter to SmartLamp.
Click OK.
Configure and start a parser.
For more information about the parameters described in the following steps, see Configure a parser.
Click Parser. On the Parser tab, perform the following steps to create a parser:
Click Create Parser.
In the Create Parser dialog box, enter a name for the parser. Example: DataParser.
Click OK.
On the DataParser page, associate a data source.
In the Data Source step of the wizard, click Associate Data Source.
In the Associate Data Source dialog box, select AppData from the Data Source drop-down list.
Click OK.
On the DataParser page, click Data Destination in the wizard to associate a data destination.
In the upper-right corner of the Data Destination section, click Associate Data Destination.
In the Associate Data Destination dialog box, select OtherTopic from the Data Destination drop-down list.
Click OK.
In the Data Destination section, view and save the data destination ID. In this example, the ID is 1000.
When you write a parser script, the data destination ID is required.
On the DataParser page, click Parser Script in the wizard to configure a parser script.
In the Edit Script section of the Parser Script step, specify the
/al123456789/light/user/settopic on which the smart lamp has the Subscribe permission to receive command from the mobile app.For more information about how to configure a parser script, see Script syntax. For more information about data forwarding functions, see Functions.
// Use the payload() function to obtain the data that is submitted by devices and convert the data to JSON-formatted data.
var data = payload("json");
// Specify a DeviceName. In this example, the TargetDevice parameter is set to light.
var dn = data.TargetDevice;
// Specify the topic that is used by the smart lamp to receive commands from the mobile app.
var topic_set = "/al123456789/"+dn+"/user/set";
// Specify the data that you want the smart lamp to receive from the mobile app.
writeIotTopic(1000, topic_set, data)
Click Save below the Edit Script section.
Click Debugging. In the Debugging panel, select a product and a device, specify a topic, and then enter payload data to check whether the script runs as expected.
The following result indicates that the script is executed.
action:
    transmit to republish[destinationId=1000], data:{"Switch":0,"Timestamp":1557750407000,"TargetDevice":"light"}
variables:
    data : {"Switch":0,"Timestamp":1557750407000,"TargetDevice":"light"}
    topic_set : /al123456789/light/user/set
    dn : light
Click Close.
Click Publish below the Edit Script section.
Go to the Data Forwarding page and click Parser. On the Parser tab, click Start in the Actions column of the DataParser parser.
In the message that appears, click OK to start the parser.
Transmit data between devices
Scan the QR code to bind the mobile app to the smart lamp.
After the mobile app sends the binding request, the server binds the mobile app to the smart lamp and returns the DeviceName of the smart lamp. The DeviceName that is returned is specified by the deviceName parameter. In this example, the DeviceName is light.
Send a command from the mobile app.
The mobile app sends a command to a custom topic. In this example, the command is sent to the
/al987654321/ControlApp/user/commandtopic.Then, IoT Platform sends the command to a topic that is used by the smart lamp to receive commands based on the message forwarding parser that you configured. In this example, the topic is
/al123456789/light/user/set.The smart lamp receives the command and performs the required operation.
NoteThe mobile app can also send a request to your server to unbind the smart lamp. After the smart lamp is unbound, you cannot use the mobile app to manage the smart lamp.