You can configure the YML parameters for your Alibaba Cloud Elasticsearch cluster to manage settings such as auto index creation, index deletion policies, audit logs, and Watcher. This topic explains how to configure YML parameters for cross-origin resource sharing (CORS), the remote reindex whitelist, audit logs, and queue sizes.
Usage notes
Since October 2020, adjustments to the Alibaba Cloud Elasticsearch network architecture have restricted some cross-cluster data migration scenarios that use the reindex API. If you need to use the reindex API to migrate data across clusters, follow the instructions in the usage notes in Migrate data from a self-managed Elasticsearch cluster to an Alibaba Cloud Elasticsearch cluster by using a private network connection.
For clusters in the China (Zhangjiakou) region and regions outside China, the network architecture adjustment schedule varies. You must submit a ticket to contact Alibaba Cloud Elasticsearch technical support to verify network connectivity.
Modify the configuration
Go to the details page of the cluster.
- Log on to the Alibaba Cloud Elasticsearch console.
- In the left-side navigation pane, click Elasticsearch Clusters.
- In the top navigation bar, select a resource group and a region. On the Clusters page, click the ID of the desired cluster.
- In the left-side navigation pane of the page that appears, click
Go to the YML file configuration page.
In the left-side navigation pane, click .
On the ES Cluster Configuration page, click Modify Configuration to the right of YML File Configuration.
In the YML File Configuration dialog box, configure the required parameters.
NoteTo view the content of
elasticsearch.yml, open the Kibana console and run theGET _cluster/settings?include_defaultscommand.Parameter
Description
Auto Indexing
Specifies whether to automatically create an index when a document is sent to a non-existent index.
This corresponds to the action.auto_create_index setting in the YML file. The default value is false.
Alibaba Cloud Elasticsearch disables auto index creation by default. You can enable it in one of the following ways:
ImportantAutomatically created indexes may not meet your requirements. Evaluate the impact before you enable this feature.
Enable this setting in Cluster Configuration in the console. This is a static change that triggers a cluster restart.
Enable it dynamically without a restart. Log on to the Kibana console and use one of the following commands to allow auto index creation:
Allow auto creation for all indexes
PUT /_cluster/settings { "persistent": { "action": { "auto_create_index": "true" } } }ImportantThis command allows the automatic creation of all indexes. To disable this feature, change
truetofalse.Allow auto creation for only specific indexes. The following example allows only system indexes to be created automatically:
PUT /_cluster/settings
{
  "persistent": {
    "action": {
      "auto_create_index": "+.*,-*"
    }
  }
}
Index Deletion
Specifies whether you must explicitly name an index to delete it. If you select Allow Wildcards, you can use wildcards to delete indexes in bulk. Deleted indexes cannot be recovered. Use this setting with caution.
This corresponds to the action.destructive_requires_name setting in the YML file. The default value is true.
Audit Log Indexing
When enabled, the system records audit logs for operations such as create, delete, update, and query on the Elasticsearch cluster. Audit logs consume disk space and can affect performance. Enable this feature only when required. For more information about the parameters, see Configure audit logs.
ImportantFor Elasticsearch 7.x and later, you can view audit logs in the console. This feature is available only in some regions. For more information, see Limitations. To view the logs, you must first enable Audit Log Indexing. For more information, see Query logs. For other versions, view audit logs in the cluster. For example, you can query indexes whose names start with .security_audit_log-* in the Kibana console.
This corresponds to the xpack.security.audit.enabled setting in the YML file. The default value is false.
Watcher
When enabled, you can use the Watcher feature of X-Pack. Periodically clean up the .watcher-history* indexes to prevent them from consuming excessive disk space.
This corresponds to the xpack.watcher.enabled setting in the YML file. The default value is false.
Other Configurations
The following parameters are also supported. Unless otherwise specified, these configurations are compatible with Elasticsearch 5.x, 6.x, and 7.x by default.
http.cors.enabled
http.cors.allow-origin
http.cors.max-age
http.cors.allow-methods
http.cors.allow-headers
http.cors.allow-credentials
Configure the remote reindex whitelist
reindex.remote.whitelist
Elasticsearch 7.x and 8.x versions support only the xpack.security.audit.logfile.events.include parameter. Versions 5.x and 6.x support the following parameters:
xpack.watcher.enabled
xpack.notification
xpack.security.audit.enabled
xpack.security.audit.index.bulk_size
xpack.security.audit.index.flush_interval
xpack.security.audit.index.rollover
xpack.security.audit.index.events.include
xpack.security.audit.index.events.exclude
xpack.security.audit.index.events.emit_request_body
xpack.security.audit.index.settings.index
LDAP feature
All versions except 5.x support the following:
xpack.security.authc.realms.ldap1
xpack.security.authc.realms.active_directory1
xpack.security.authc.realms.pki1
xpack.security.authc.realms.saml1
xpack.security.authc.realms.kerberos1
xpack.security.authc.token.enabled
thread_pool.bulk.queue_size (for 5.x and 6.x versions)
thread_pool.write.queue_size (for 6.x, 7.x, and 8.x versions)
thread_pool.search.queue_size
Custom SQL plugin configuration
xpack.sql.enabled
By default, an Elasticsearch cluster enables the built-in SQL plugin in X-Pack. If you want to upload a custom SQL plugin, set xpack.sql.enabled to false.
Forced Update
Controls whether to force the YML configuration change. Valid values:
Close: The change is not forced. You can choose a change mode (in-place change or blue-green change) as needed. The system checks the health of the cluster, such as node availability and shard allocation status, to ensure the change is safe.
Enable: The change is forced. The system ignores the cluster health status, such as node failures or unassigned shards, potentially causing instability during the restart phase.
Update Mode
Specifies how to apply the changes to the YML file. Valid values:
NoteYou can configure the Forced Update parameter only when the Close parameter is set to Close.
In-place Update (Default): The system performs a rolling change on the nodes that need to be updated. Data is not copied during the change, and the duration is not affected by the data volume. However, this method may affect cluster performance.
Blue-green Update: The system adds the same number of new nodes, copies data, and then seamlessly switches traffic to the new nodes. This process is smoother but takes longer, and the IP addresses of the nodes change.
For more information about change modes, see Change modes.
ImportantConfiguring the YML file triggers a rolling restart of the cluster. If the indexes in the cluster have replicas and the cluster load is normal (CPU utilization is around 60%, heap memory usage is around 50%, and load_1m is lower than the number of CPU cores), the service typically remains available during the restart. The restart duration depends on the cluster size, data volume, and load. Perform this operation during off-peak hours.
If the cluster load is high, indexes have no replicas, and your workload involves a large number of write or query requests, occasional access timeouts may occur during the cluster change. Configure a retry mechanism in your client access scripts to minimize the impact on your services.
If a blue-green change is in progress for the YML configuration of a cluster (such as scaling up or down) and the cluster status is Updating, only an in-place change is supported for any additional changes. You can view the change history to check whether a blue-green change is in progress for the YML configuration.
Select This operation will restart the cluster. Continue? and click OK.
After you confirm, the Elasticsearch cluster restarts. During the restart, you can view the progress in the Tasks list. After the restart is complete, the YML file configuration takes effect.
Configure CORS access
You can configure cross-origin resource sharing (CORS) to control whether browsers from other origins can send requests to your Alibaba Cloud Elasticsearch cluster. In the YML file configuration panel, you can configure CORS by using the following parameters.
The parameters in the table are custom configurations that Alibaba Cloud Elasticsearch provides for HTTP support.
The parameters in the table support only static configuration. To apply changes, you must write the configuration to the elasticsearch.yml file.
The parameters in the table depend on the cluster's Network settings.
Parameter | Default | Description |
http.cors.enabled | false | Enables or disables CORS. When enabled, Elasticsearch allows requests from other origins.
|
http.cors.allow-origin | Specifies the origins from which requests are accepted. By default, cross-origin requests are not allowed and no origins are configured. Regular expressions are supported. For example, /https?:\/\/localhost(:[0-9]+)?/ allows requests that match this pattern. Warning An asterisk (*) is a valid value and allows the cluster to accept cross-origin requests from any origin. This setting poses a security risk and is not recommended. | |
http.cors.max-age | 1728000 (20 days) | The duration in seconds for which a browser can cache CORS configuration information obtained from an OPTIONS request. |
http.cors.allow-methods | OPTIONS, HEAD, GET, POST, PUT, DELETE | Specifies the allowed request methods. |
http.cors.allow-headers | X-Requested-With, Content-Type, Content-Length | Specifies the allowed request headers. |
http.cors.allow-credentials | false | Specifies whether the response header can include the Access-Control-Allow-Credentials information.
|
Configure the Reindex API whitelist
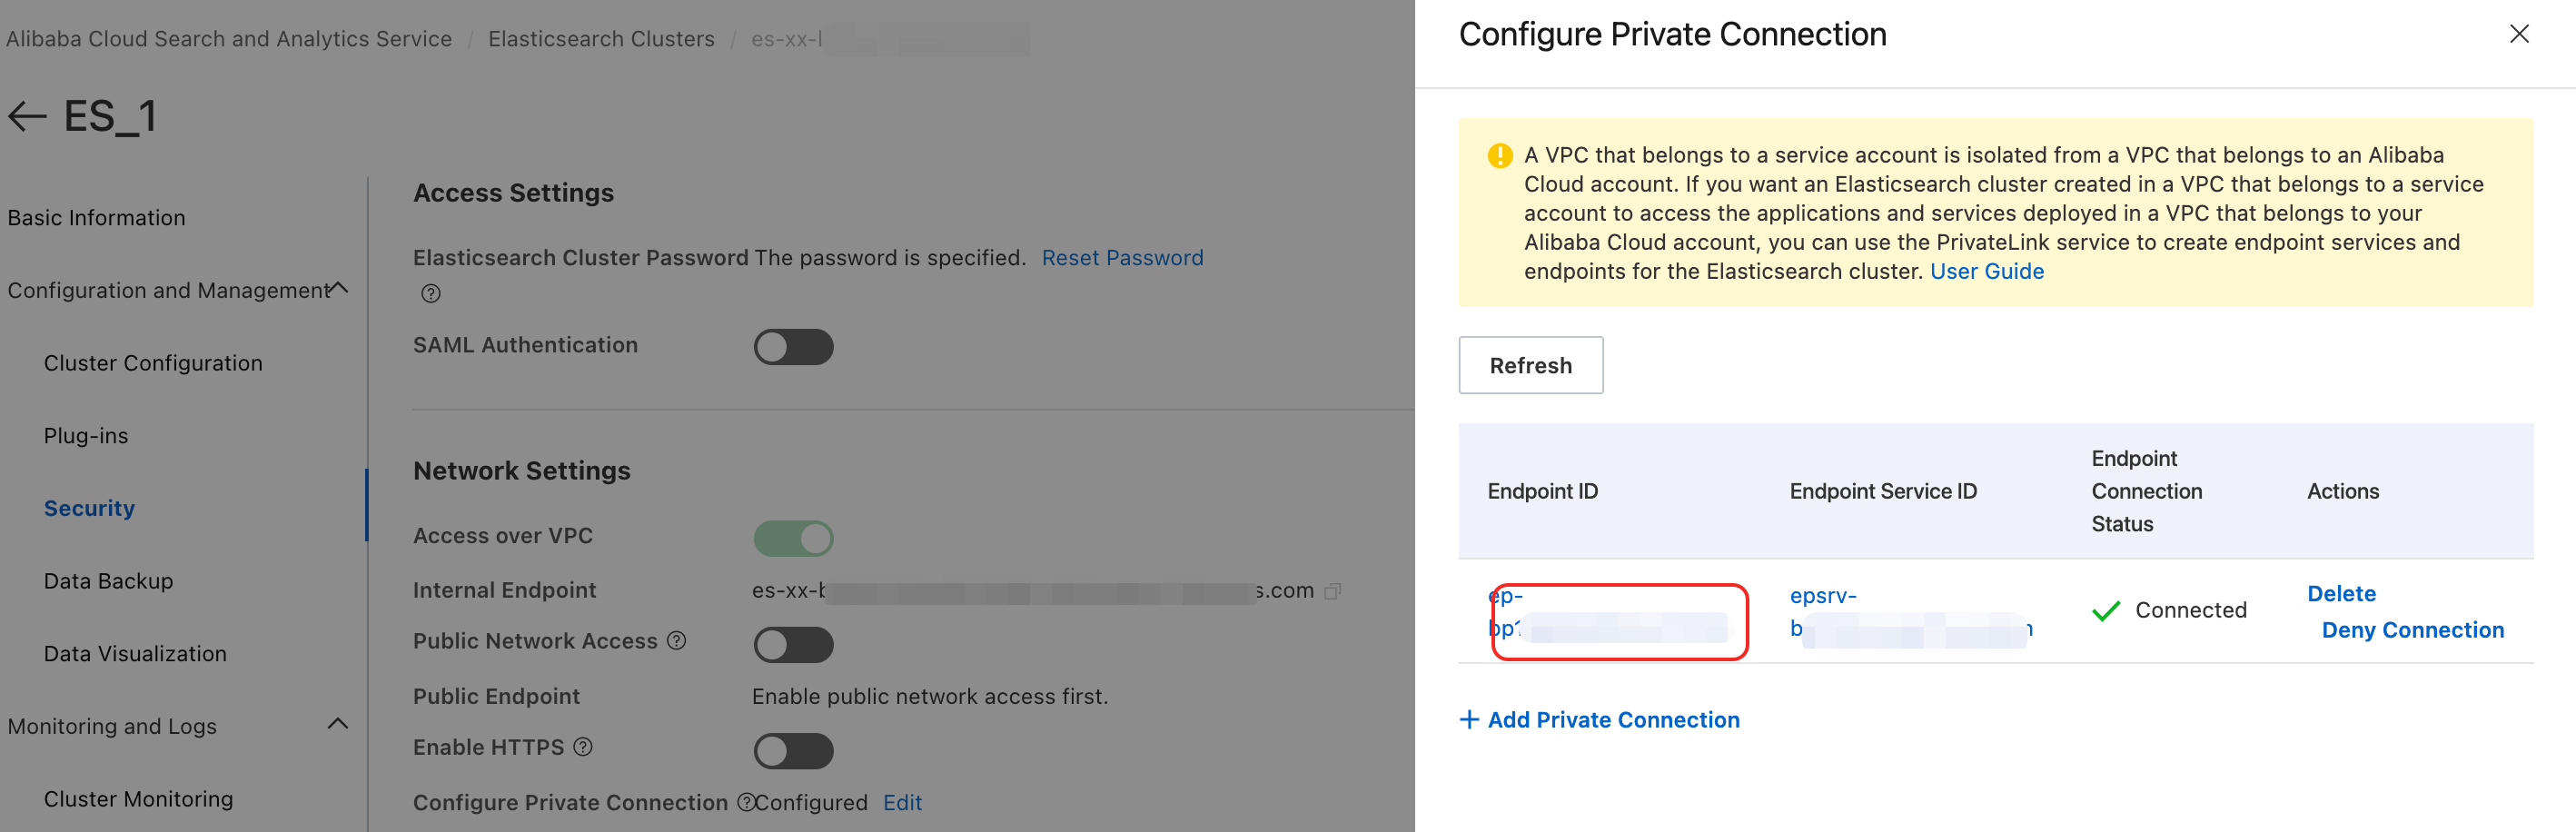
To ensure secure cross-cluster data migration, add the private connection address and port of the ES_2 cluster to the Reindex API whitelist of the ES_1 cluster.
-
On the page of the ES_1 cluster, click Configure Private Connection next to Edit. In the Configure Private Connection panel, click the target Endpoint ID.
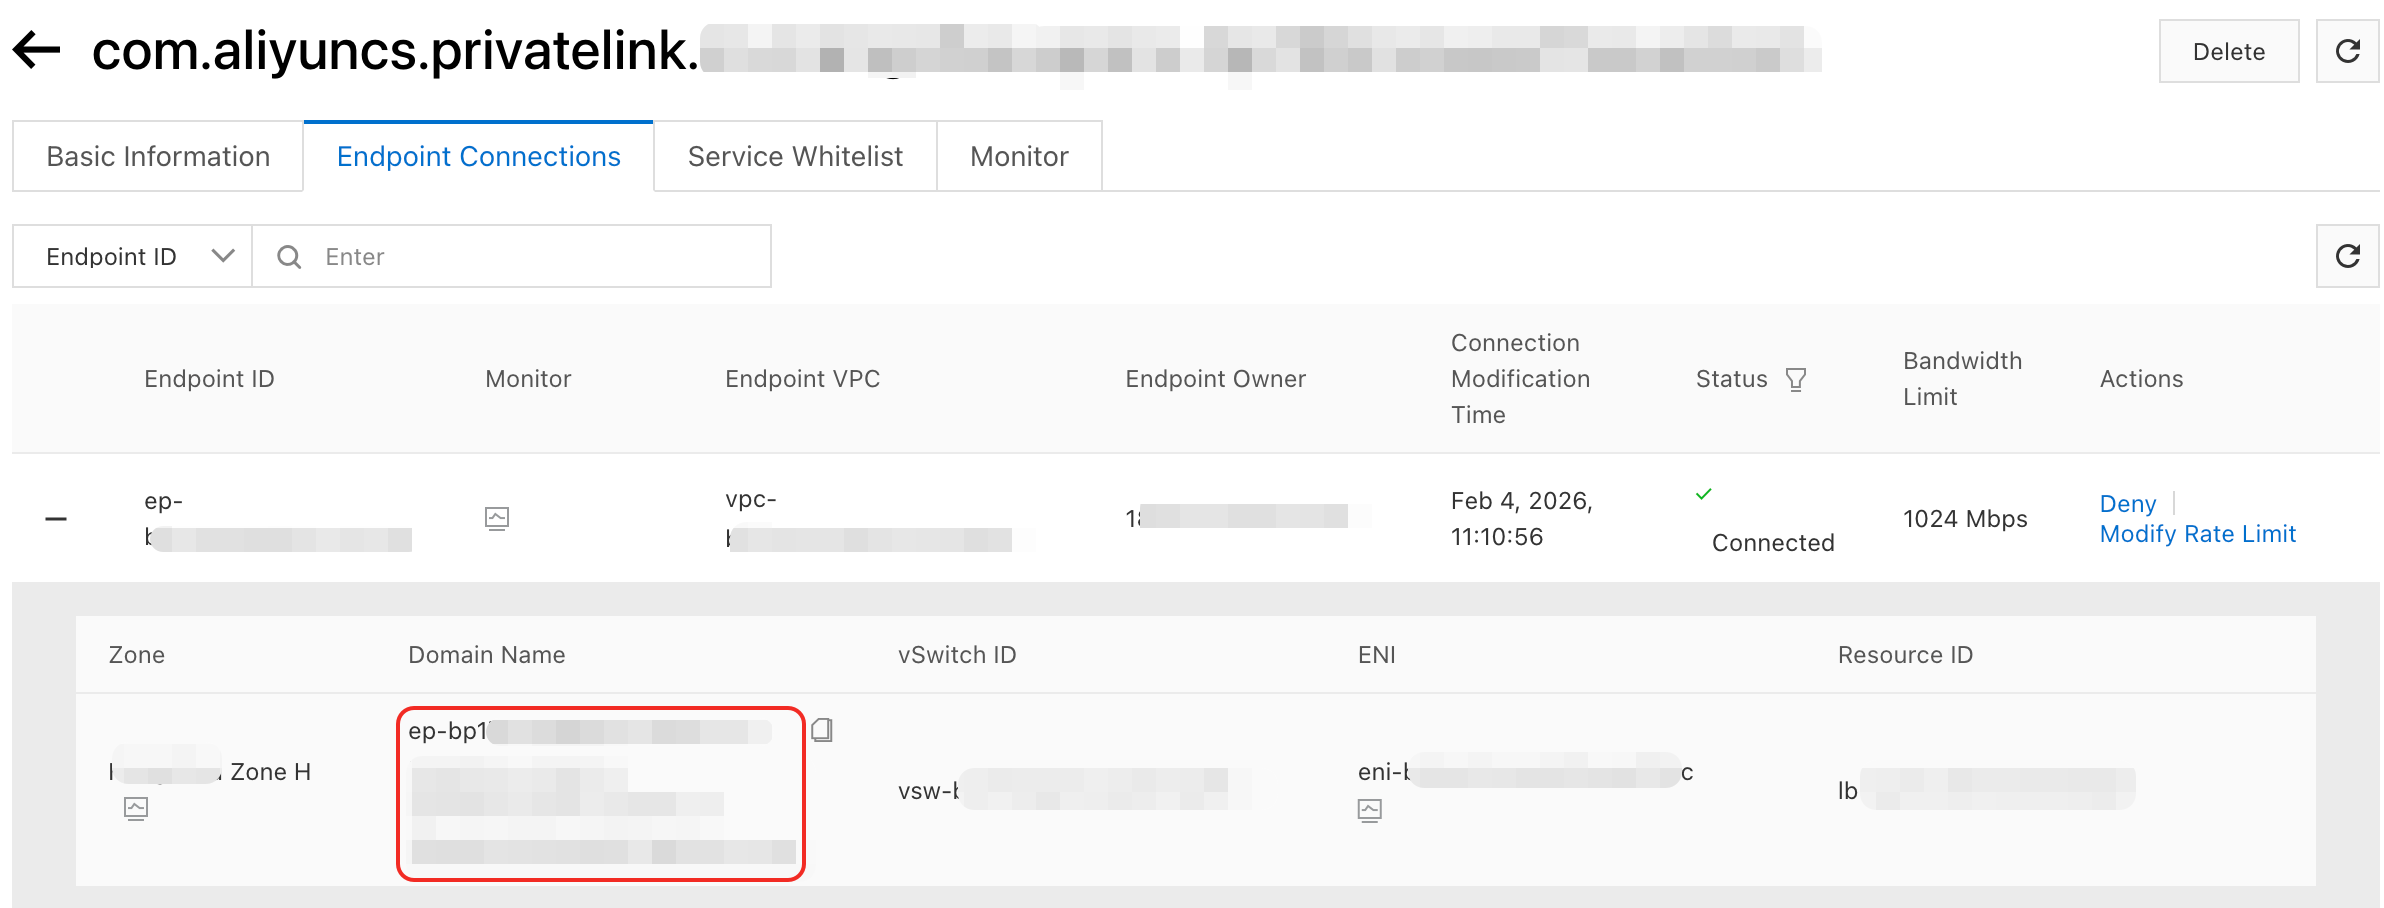
-
In the VPC console, go to the Endpoint Connections tab. Click the
 icon next to the endpoint ID to view the domain name associated with the endpoint.Important
Before configuring the Reindex API whitelist, remove the availability zone information from the domain name.
For example, if the full domain name is "ep-bp1****************-cn-hangzhou-i.epsrv-bp1****************.cn-hangzhou.privatelink.aliyuncs.com", remove the availability zone information "-cn-hangzhou-i" to get the final domain name "ep-bp1bp1****************.epsrv-bp1****************.cn-hangzhou.privatelink.aliyuncs.com".
-
In the YML configuration file of ES_1, add the endpoint's domain name and communication port to the Reindex API whitelist.
reindex:
  remote:
    whitelist: >-
      ep-bp1bp1****************.epsrv-bp1****************.cn-hangzhou.privatelink.aliyuncs.com:9200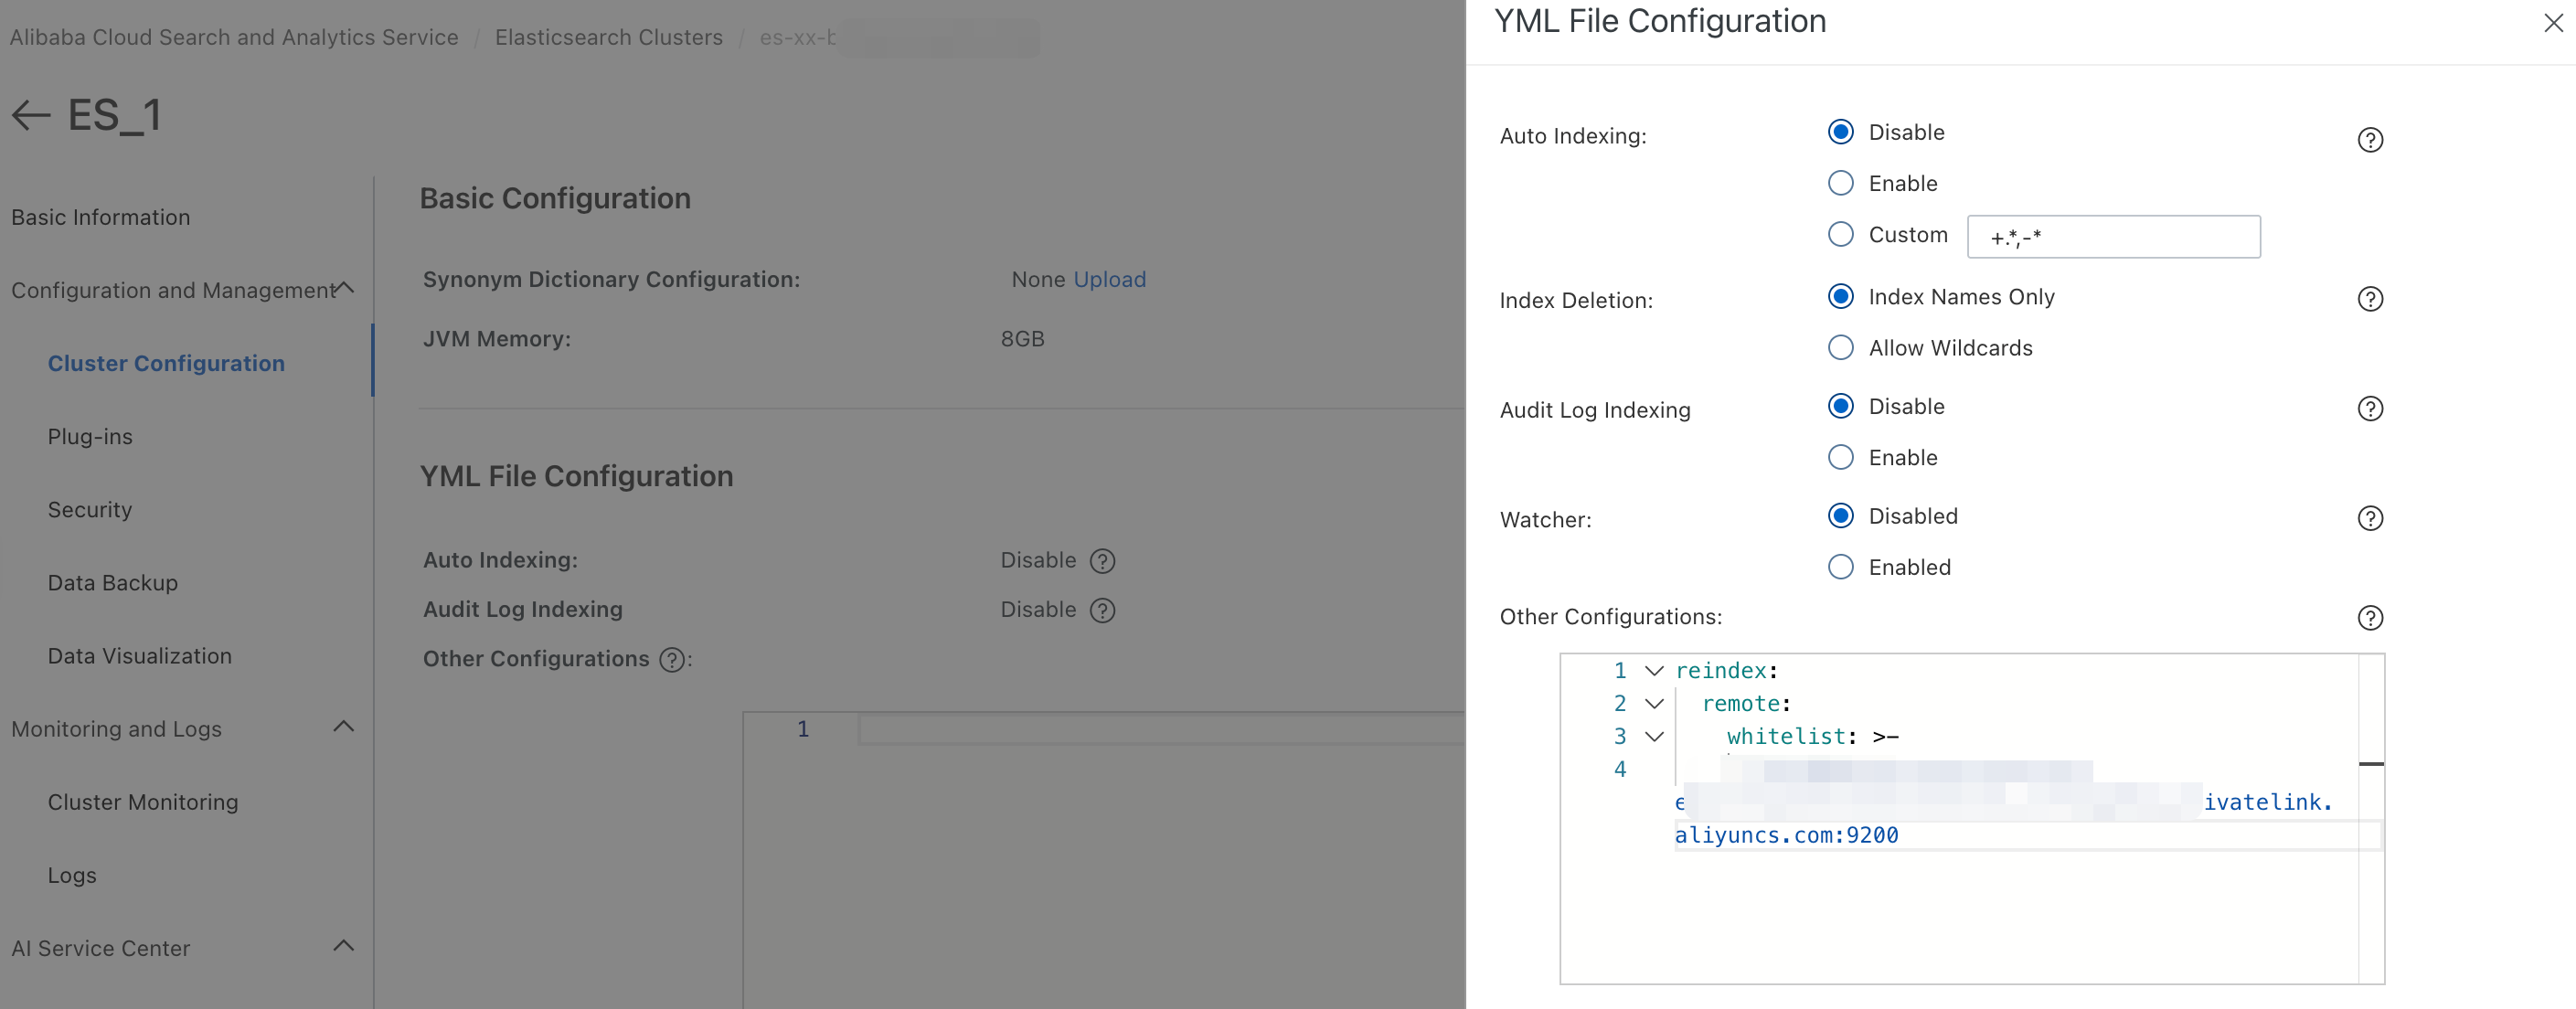
Configure audit logs
Audit logs are disabled by default. Before you can view audit logs, you must enable them. Once enabled, the system records logs for operations such as create, delete, update, and query. The procedure for enabling, configuring, and viewing audit logs varies by cluster version.
For more information about audit logs, see Auditing Security Settings.
Version 7.x and later
Go to the YML File Configuration panel.
For more information, see Modify the configuration.
In the Audit Log Indexing section, select Enable to enable audit logs.
Customize the audit log configuration.
After you enable audit log, you can configure the xpack.security.audit.logfile.events.include parameter in Other Configurations. Example:
xpack: security: audit: logfile: events: include: >- access_denied,anonymous_access_denied,authentication_failed,connection_denied,tampered_request,run_as_denied,run_as_grantedImportantFor clusters of version 7.x and later, you can configure only the xpack.security.audit.logfile.events.include parameter.
By default, the audit log configuration records logs for only denied or failed requests. To obtain logs for successful requests, add the access_granted event. This stores all access information on the disk, which may lead to high disk usage. After troubleshooting, disable the audit log feature.
View audit logs.
For clusters of version 7.x and later, after you enable Audit Log Indexing, you can view audit logs on the View Logs page of the console. For more information, see Query logs. This feature is available only in some regions. For more information, see Limitations.
Versions 5.x and 6.x
Go to the YML File Configuration panel.
For more information, see YML file configuration.
In the Audit Log Indexing section, select Enable to enable audit logs.
The following is the default configuration for audit log indexing. You can adjust it based on your business needs.
xpack.security.audit.index.bulk_size: 5000
xpack.security.audit.index.events.emit_request_body: false
xpack.security.audit.index.events.exclude: run_as_denied,anonymous_access_denied,realm_authentication_failed,access_denied,connection_denied
xpack.security.audit.index.events.include: authentication_failed,access_granted,tampered_request,connection_granted,run_as_granted
xpack.security.audit.index.flush_interval: 180s
xpack.security.audit.index.rollover: hourly
xpack.security.audit.index.settings.index.number_of_replicas: 1
xpack.security.audit.index.settings.index.number_of_shards: 10
Parameter
Default
Description
xpack.security.audit.index.bulk_size
1000
The number of audit events to write to an audit log index in a single batch request.
xpack.security.audit.index.flush_interval
1s
The frequency at which buffered events are flushed to the index.
xpack.security.audit.index.rollover
daily
The frequency at which a new index is created by rollover. Valid values are hourly, daily, weekly, or monthly.
xpack.security.audit.logfile.events.include
access_denied,anonymous_access_denied,authentication_failed, connection_denied,tampered_request,run_as_denied,run_as_granted
The types of audit log events to collect. This feature is available only in some regions. For more information, see Limitations. For a complete list of event types, see Audit event types (7.x).
xpack.security.audit.index.events.include
access_denied, access_granted, anonymous_access_denied, authentication_failed, connection_denied, tampered_request, run_as_denied, run_as_granted
The types of audit log events to write to the index. This parameter is supported only for clusters of version 5.x and 6.x. For a complete list of event types, see Audit event types (6.x).
xpack.security.audit.index.events.exclude
null (no events are excluded by default)
The audit log events to exclude from the index.
xpack.security.audit.index.events.emit_request_body
false
Specifies whether to ignore or include the request body sent over REST when a specific event type, such as authentication_failed, is triggered.
WarningIf an audit log contains request body information, sensitive data may be exposed in the log files.
View audit logs.
For clusters of version 5.x and 6.x, when audit logging is enabled, the audit logs are written to the Elasticsearch cluster in indices whose names start with .security_audit_log-*. Therefore, you can view the audit logs in the indices that start with .security_audit_log-* in the Kibana console.
ImportantAudit log indexes consume cluster storage space. Elasticsearch does not automatically expire or delete them, so you must delete old audit log indexes manually.
Optional: Configure shards for audit log indexes.
For clusters of version 5.x and 6.x, you can configure the shards for audit log indexes by using xpack.security.audit.index.settings. The following configuration sets both the number of primary shards and the number of replicas to 1.
xpack.security.audit.index.settings: index: number_of_shards: 1 number_of_replicas: 1NoteIf you want audit log indexes to be created with the parameters you provide, pass this configuration when you enable audit log indexing (by setting xpack.security.audit.enabled to true). Otherwise, audit log indexes use the default settings of
number_of_shards: 5andnumber_of_replicas: 1.
Configure queue size
You can tune the queue size for the document write and search thread pools. In the YML file configuration panel, configure the queue size as needed. The following example sets the write and search queue sizes to 500 and 1000, respectively. Adjust these values based on your workload.
Versions 5.x and 6.x
thread_pool.bulk.queue_size: 500
thread_pool.search.queue_size: 1000
Versions 6.x, 7.x, and 8.x
thread_pool.write.queue_size: 500
thread_pool.search.queue_size: 1000
Parameter | Default | Description |
thread_pool.bulk.queue_size | 200 | The document write queue size. This parameter applies to Alibaba Cloud Elasticsearch 5.x and 6.x versions. |
thread_pool.write.queue_size | 200 | The document write queue size. This parameter applies to Alibaba Cloud Elasticsearch 6.x, 7.x, and 8.x versions. |
thread_pool.search.queue_size | 1000 | The document search queue size. |
The preceding example values are recommended. For special scenarios, submit a ticket to technical support to request changes.
If you set thread_pool.search.queue_size to a value greater than 1000 in the YML file configuration panel in the console, the effective value remains 1000. For special scenarios, submit a ticket to contact technical support to modify the value. For more information about how to submit a ticket, see Scope and methods of technical support.