When events on a custom event bus need to reach an external API endpoint -- such as a third-party webhook, an internal microservice, or a SaaS API -- you configure an event rule that targets an API destination. EventBridge filters events by the pattern you define, transforms the payload, and delivers it to the endpoint with the authentication method you specify.
This topic walks through the end-to-end setup: creating a custom event source, building an event rule that targets an API destination, publishing a test event, and verifying delivery.
How it works
An API destination pairs a target URL with a connection that stores authentication credentials. When an event matches the rule's pattern, EventBridge constructs an HTTP request from the event data, authenticates using the connection, and sends the request to the target URL.
Core concepts:
API destination -- an endpoint URL plus HTTP method and request parameters.
Connection -- an authentication configuration (Basic, OAuth 2.0, API Key, or none).
Event pattern -- a filter that selects which events on the bus trigger the rule.
Before you begin
Before you begin, make sure that you have:
Step 1: Create a custom event source
Log on to the EventBridge console. In the left-side navigation pane, click Event Buses.
In the top navigation bar, select a region. On the Event Buses page, click the custom event bus you want to manage.
In the left-side navigation pane, click Event Sources, then click Add Event Source.
In the Add Custom Event Source panel, configure the following parameters and click OK:
Parameter Description Name A name for the event source. Description (Optional) A description of the event source. Event Provider Select Custom Application.
Step 2: Create an event rule with an API destination target
Event targets must reside in the same region as the event rule.
On the event bus details page, click Event Rules in the left-side navigation pane, then click Create Rule.
In the Create Rule wizard, complete the following steps:
Configure basic information
Set the Name and Description parameters, then click Next Step.
Configure the event pattern
Set Event Source Type to Custom Event Source.
From the Event Source drop-down list, select the event source created in Step 1.
Click Next Step.
Configure the target
Set Service Type to Triggered by API destination.
In the Basic Information section, configure the parameters described in the following table.
Parameter Description Method How to specify the API destination. Create Custom API Destination: create a new API destination inline. Use Existing API Destination: select an API destination you created earlier. For more information, see Create an API destination. API Destination Name A name for the API destination, for example, testAPI.Description (Optional) A description of the API destination. HTTP Parameter HTTP parameters to include in each request. Each parameter targets one of three locations: Header (key-value metadata), Body (request payload), or Query (URL query string). For Body parameters, select a data mode: Form Data -- map each key to Partial Event, Fixed Value, or Complete Event. Raw Data -- define Variables and a Template to construct a custom request body. For template syntax, see Event transformation. In the API Configuration section, configure the parameters described in the following table.
Parameter Description URL The API URL of the server resource that you want to access, for example, https://api.example.com/webhook.HTTP Method HTTP method for the request: GET, POST, PUT, PATCH, DELETE, or HEAD. In the Connection Configuration section, configure the parameters described in the following table. A connection defines how EventBridge authenticates with the target endpoint.
Parameter Description Method Create Connection: create a new connection inline. Select Existing Connection: reuse an existing connection. For more information, see Create a connection. Name A name for the connection, for example, Connection-test.Description (Optional) A description of the connection. Authentication The authentication method for the target endpoint. None: no authentication. The API destination responds to all requests. Basic: username and password. OAuth Client Credential: OAuth 2.0 client credentials flow. API Key: a key name and value pair. Network Network type for the connection. Internet: connect over the public internet. VPC: connect through a Virtual Private Cloud (VPC). Requires a VPC, vSwitch, and security group. For more information, see Create a VPC and a vSwitch, Create a vSwitch, and Create a security group. (Optional) In the Retry Policy and Dead-letter Queue section, configure retry behavior, fault tolerance, and a dead-letter queue. For more information, see Retry policies and dead-letter queues.
Click Create.
Step 3: Publish a test event
You can only publish events to custom event buses from the EventBridge console.
In the left-side navigation pane, click Event Buses.
In the top navigation bar, select a region.
On the Event Buses page, find the custom event bus and click Publish Event in the Operations column.
In the Publish Event to Custom Event Bus panel, select a custom event source from the Custom Event Source drop-down list, enter the event payload in the Event Body code editor, and click OK. For event parameter definitions, see Events overview. After you click OK, the event ID is copied to your clipboard automatically.
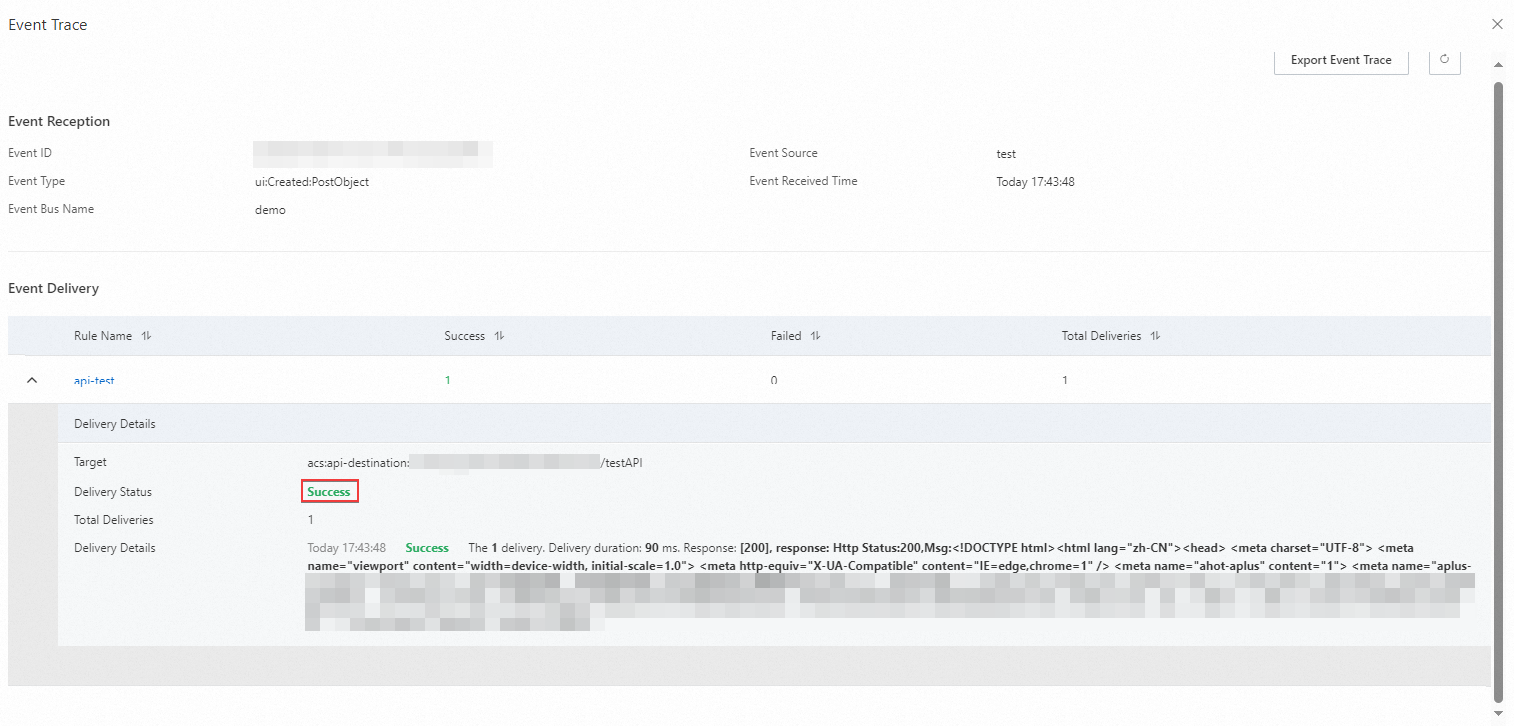
Verify event delivery
After publishing, confirm that the event reached the API destination:
Go to the Overview page of the event bus.
In the left-side navigation pane, click Event Tracking, then click the Query By Event ID tab.
Paste the copied event ID into the Event ID field and click Query.
In the Operations column, click Event Trace to confirm the event reached the API destination.