When you run multiple Apache Kafka clusters, you often need to copy topic data from one cluster to another for disaster recovery, data migration, or aggregation. Replicator handles this by continuously reading from an origin cluster and writing to a destination cluster. This tutorial walks you through setting up two single-node clusters and running Replicator to copy topic data between them.
Instructions for both KRaft mode and ZooKeeper mode are included.
As of Confluent Platform 7.5, ZooKeeper is deprecated for new deployments. Use Apache Kafka Raft (KRaft) mode instead. See KRaft Overview and Quick Start for Confluent Platform.
The KRaft examples use combined mode, where a single Kafka node acts as both broker and KRaft controller. Combined mode simplifies the setup but is not supported for production workloads. To run brokers and controllers on separate nodes, use isolated mode. See KRaft Overview and KRaft mode.
Prerequisites
Before you begin, ensure that you have:
Confluent Platform (Install Confluent Platform On-Premises)
Java 8, 11, or 17 (Java Downloads)
Port assignments
This tutorial runs both clusters on the same host. Each cluster uses different ports to avoid conflicts.
KRaft mode
| Component | Origin | Destination |
|---|---|---|
| Kafka brokers | 9082 | 9092 |
| KRaft controllers | 9071 | 9093 |
| Metadata server listeners (in brokers) | 8091 | 8090 |
| Connect Replicator worker | -- | 8083 |
| Control Center | -- | 9021 |
ZooKeeper mode
| Component | Origin | Destination |
|---|---|---|
| Kafka brokers | 9082 | 9092 |
| ZooKeeper | 2171 | 2181 |
| Metadata server listeners (in brokers) | 8091 | 8090 |
| Connect Replicator worker | -- | 8083 |
| Control Center | -- | 9021 |
Step 1: Start the destination cluster
The destination cluster uses default ports.
KRaft mode
Go to the Confluent Platform installation directory and create a working directory for the example files:
   cd $CONFLUENT_HOME
   mkdir my-examples
Copy the KRaft server properties template and rename it:
cp etc/kafka/kraft/server.properties my-examples/server_destination.propertiesGenerate a random cluster ID:
NoteThe
kafka-storagecommand runs only once per broker and controller. It cannot update an existing cluster. If you make a configuration mistake, delete the log directories and start over.KAFKA_CLUSTER_ID="$(bin/kafka-storage random-uuid)"Format the log directories for the destination cluster:
./bin/kafka-storage format -t $KAFKA_CLUSTER_ID -c my-examples/server_destination.propertiesStart the destination cluster:
./bin/kafka-server-start my-examples/server_destination.properties
For details, see Quick Start for Confluent Platform.
ZooKeeper mode
Go to the Confluent Platform installation directory and create a working directory:
   cd $CONFLUENT_HOME
   mkdir my-examples
Copy the ZooKeeper and Kafka server properties templates:
   cp etc/kafka/zookeeper.properties my-examples/zookeeper_destination.properties
   cp etc/kafka/server.properties my-examples/server_destination.properties
Start ZooKeeper in its own terminal:
./bin/zookeeper-server-start my-examples/zookeeper_destination.propertiesStart the Kafka broker in its own terminal:
./bin/kafka-server-start my-examples/server_destination.properties
Step 2: Start the origin cluster
Open a new terminal window. The origin cluster uses different ports to avoid conflicts with the destination.
KRaft mode
Go to the Confluent Platform installation directory:
cd $CONFLUENT_HOMECopy the KRaft server properties template:
cp etc/kafka/kraft/server.properties my-examples/server_origin.propertiesUpdate port numbers and data directories to avoid conflicts with the destination: These commands remap the origin broker to port 9082, the KRaft controller to 9071, and the metadata server listener to 8091. See Port assignments for the full mapping.
   sed -i '' -e "s/9093/9071/g" my-examples/server_origin.properties
   sed -i '' -e "s/9092/9082/g" my-examples/server_origin.properties
   sed -i '' -e "s/8090/8091/g" my-examples/server_origin.properties
   sed -i '' -e "s/#confluent.metadata.server.listeners/confluent.metadata.server.listeners/g" my-examples/server_origin.properties
   sed -i '' -e "s/confluent.metrics.reporter.bootstrap.servers=localhost:9092/confluent.metrics.reporter.bootstrap.servers=localhost:9082/g" my-examples/server_origin.properties
   sed -i '' -e "s/kraft-combined-logs/kraft-combined-logs-origin/g" my-examples/server_origin.properties
Generate a new cluster ID and format the log directories:
   KAFKA_CLUSTER_ID="$(bin/kafka-storage random-uuid)"
   ./bin/kafka-storage format -t $KAFKA_CLUSTER_ID -c my-examples/server_origin.properties
Start the origin broker in its own terminal:
./bin/kafka-server-start my-examples/server_origin.properties
ZooKeeper mode
Copy the ZooKeeper and Kafka server properties templates:
   cp etc/kafka/zookeeper.properties my-examples/zookeeper_origin.properties
   cp etc/kafka/server.properties my-examples/server_origin.properties
Update port numbers, broker ID, and data directories: These commands remap the origin broker to port 9082 and ZooKeeper to 2171. See Port assignments for the full mapping.
   sed -i '' -e "s/2181/2171/g" my-examples/zookeeper_origin.properties
   sed -i '' -e "s/9092/9082/g" my-examples/server_origin.properties
   sed -i '' -e "s/2181/2171/g" my-examples/server_origin.properties
   sed -i '' -e "s/#listeners/listeners/g" my-examples/server_origin.properties
   sed -i '' -e "s/8090/8091/g" my-examples/server_origin.properties
   sed -i '' -e "s/#confluent.metadata.server.listeners/confluent.metadata.server.listeners/g" my-examples/server_origin.properties
   sed -i '' -e "s/broker.id=0/broker.id=1/g" my-examples/server_origin.properties
   sed -i '' -e "s/zookeeper/zookeeper_origin/g" my-examples/zookeeper_origin.properties
   sed -i '' -e "s/kafka-logs/kafka-logs-origin/g" my-examples/server_origin.properties
Start ZooKeeper for the origin cluster in its own terminal:
./bin/zookeeper-server-start my-examples/zookeeper_origin.propertiesStart the origin Kafka broker in its own terminal:
./bin/kafka-server-start my-examples/server_origin.properties
Step 3: Create a test topic
Open a new terminal window.
Create a topic named
test-topicon the origin cluster:kafka-topics --create --topic test-topic --replication-factor 1 --partitions 1 --bootstrap-server localhost:9082Verify that the topic exists: Expected output: Topics prefixed with
_confluentare internal. Thetest-topicentry confirms successful creation.kafka-topics --list --bootstrap-server localhost:9082__confluent.support.metrics _confluent-command test-topic
Step 4: Configure and run Replicator
Create three configuration files in $CONFLUENT_HOME/my-examples/ to define the origin, destination, and replication settings.
Consumer properties (origin cluster)
Copy the default consumer configuration and update it to point to the origin cluster:
cp etc/kafka/consumer.properties my-examples/.Verify that the file contains:
# Origin cluster connection
bootstrap.servers=localhost:9082
Producer properties (destination cluster)
Copy the default producer configuration and update it to point to the destination cluster:
cp etc/kafka/producer.properties my-examples/.Verify that the file contains:
# Destination cluster connection
bootstrap.servers=localhost:9092
Replication properties
Create my-examples/replication.properties with the following content:
# Replication configuration
topic.rename.format=${topic}.replica
replication.factor=1
config.storage.replication.factor=1
offset.storage.replication.factor=1
status.storage.replication.factor=1
confluent.topic.replication.factor=1If no port is defined in
replication.properties, the Connect worker runs on its default port 8083.All replication factors are set to 1 for this test environment. For production, use a minimum replication factor of 3.
Start Replicator
Start the Replicator executable in its own terminal:
./bin/replicator \
  --cluster.id replicator \
  --consumer.config my-examples/consumer.properties \
  --producer.config my-examples/producer.properties \
  --replication.config my-examples/replication.properties \
--whitelist 'test-topic'| Parameter | Description |
|---|---|
--cluster.id | Identifier for the Replicator cluster. Instances with the same ID work together. |
--consumer.config | Path to the origin cluster configuration |
--producer.config | Path to the destination cluster configuration |
--replication.config | Path to non-connection-specific configuration. Command-line arguments override these settings. |
--whitelist | Topics to replicate from origin to destination |
Log messages about starting the source task and creating the replicated topic confirm that Replicator is running. For the full list of command-line options, see Command line parameters of Replicator executable.
Step 5: Verify topic replication
After Replicator starts, it checks the origin cluster for topics to replicate.
Verify that the
test-topic.replicatopic exists on the destination cluster: Expected output:./bin/kafka-topics --describe --topic test-topic.replica --bootstrap-server localhost:9092Topic: test-topic.replica PartitionCount: 1 ReplicationFactor: 1 Configs: message.timestamp.type=CreateTime,segment.bytes=1073741824 Topic: test-topic.replica Partition: 0 Leader: 0 Replicas: 0 Isr: 0 Offline: 0List all topics on the destination cluster:
NoteTo list topics on the origin cluster, use
--bootstrap-server localhost:9082.To view details of the original topic, run
kafka-topics --describe --topic test-topic --bootstrap-server localhost:9082.
./bin/kafka-topics --list --bootstrap-server localhost:9092Produce test data to the origin cluster. In a new terminal, pipe a sequence of 10,000 numbers into the console producer:
seq 10000 | ./bin/kafka-console-producer --topic test-topic --broker-list localhost:9082Consume from the replicated topic on the destination cluster in a separate terminal: If the numbers 1 through 10,000 appear in the consumer output, cross-cluster replication is working.
./bin/kafka-console-consumer --from-beginning --topic test-topic.replica --bootstrap-server localhost:9092
Step 6: Monitor Replicator with Control Center
Set up monitoring
Stop Replicator and brokers on both clusters, then stop any ZooKeeper instances.
Activate the Replicator monitoring extension (see Replicator monitoring extension):
Add the full path of
replicator-rest-extension-<version>.jarto yourCLASSPATH.Add the following line to
my-examples/replication.properties:rest.extension.classes=io.confluent.connect.replicator.monitoring.ReplicatorMonitoringExtension
Add or uncomment the following lines in both
my-examples/server_destination.propertiesandmy-examples/server_origin.properties. Setconfluent.metrics.reporter.bootstrap.serverstolocalhost:9092in both files:# Development mode -- replication factor of 1 confluent.metrics.reporter.topic.replicas=1 # Enable metrics reporting for Control Center metric.reporters=io.confluent.metrics.reporter.ConfluentMetricsReporter confluent.metrics.reporter.bootstrap.servers=localhost:9092Add the monitoring interceptor to
my-examples/producer.properties:interceptor.classes=io.confluent.monitoring.clients.interceptor.MonitoringProducerInterceptorAdd the monitoring interceptor to
my-examples/consumer.properties:interceptor.classes=io.confluent.monitoring.clients.interceptor.MonitoringConsumerInterceptorAdd the following lines to
etc/confluent-control-center/control-center-dev.propertiesto specify the bootstrap servers for both clusters:NoteControl Center requires the Connect REST endpoint to find Replicator monitoring metrics. In
control-center-dev.properties, the default is configured as:confluent.controlcenter.connect.cluster=http://localhost:8083Separate multiple host names with commas.
If you use
control-center-production.properties, the default value is commented out. Uncomment it or specify your Connect endpoints. For details, see General settings.If you run both Replicator and Connect clusters, specify them separately:
Connect
# Connect cluster
confluent.controlcenter.connect.<connect-cluster-name>.cluster=http://connect-host-1:8083
Replicator
confluent.controlcenter.connect.<replicator-name>.cluster=http://replicator-host:8083
   # Multi-cluster monitoring
   confluent.controlcenter.kafka.origin.bootstrap.servers=localhost:9082
   confluent.controlcenter.kafka.destination.bootstrap.servers=localhost:9092
Restart services and launch Control Center
Restart ZooKeeper instances (ZooKeeper mode only):
   ./bin/zookeeper-server-start etc/kafka/zookeeper.properties
   ./bin/zookeeper-server-start my-examples/zookeeper_origin.properties
Restart the brokers on both clusters:
   ./bin/kafka-server-start my-examples/server_destination.properties
   ./bin/kafka-server-start my-examples/server_origin.properties
Restart Replicator:
   ./bin/replicator \
     --cluster.id replicator \
     --consumer.config my-examples/consumer.properties \
     --producer.config my-examples/producer.properties \
     --replication.config my-examples/replication.properties \
     --whitelist 'test-topic'
Launch Control Center:
./bin/control-center-start etc/confluent-control-center/control-center-dev.propertiesOpen Control Center in your browser. The clusters appear with auto-generated names based on your configuration.
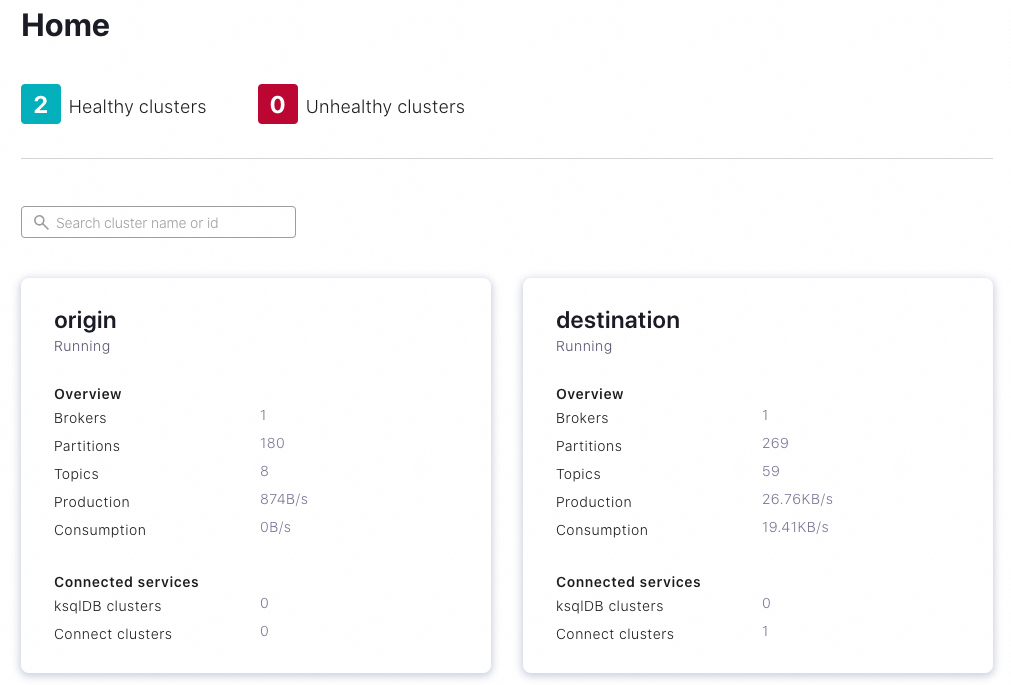
(Optional) Edit the cluster names to match your use case.
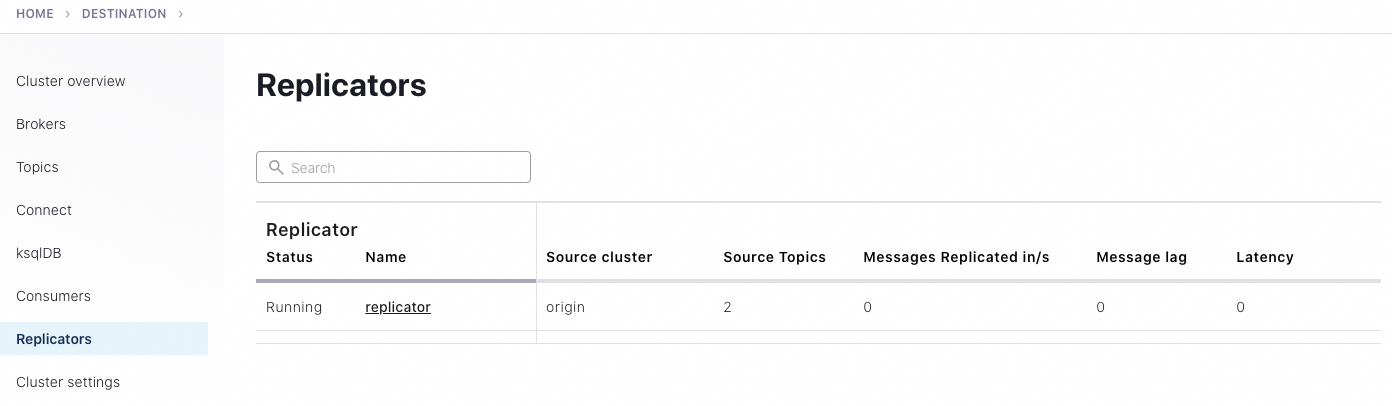
Select the destination cluster, then click Replicators in the left navigation pane to monitor replication throughput and drill down into source and replicated topics.
Generate test data for monitoring
To view message flow on Control Center, generate test data with kafka-producer-perf-test:
kafka-producer-perf-test \
  --producer-props bootstrap.servers=localhost:9082 \
  --topic test-topic \
  --record-size 1000 \
  --throughput 1000 \
  --num-records 3600000
Expected output:
4999 records sent, 999.8 records/sec (0.95 MB/sec), 1.1 ms avg latency, 240.0 ms max latency.
5003 records sent, 1000.2 records/sec (0.95 MB/sec), 0.5 ms avg latency, 4.0 ms max latency.
5003 records sent, 1000.2 records/sec (0.95 MB/sec), 0.6 ms avg latency, 5.0 ms max latency.
...
Confirm that the replicated topic receives the messages:
./bin/kafka-console-consumer --from-beginning --topic test-topic.replica --bootstrap-server localhost:9092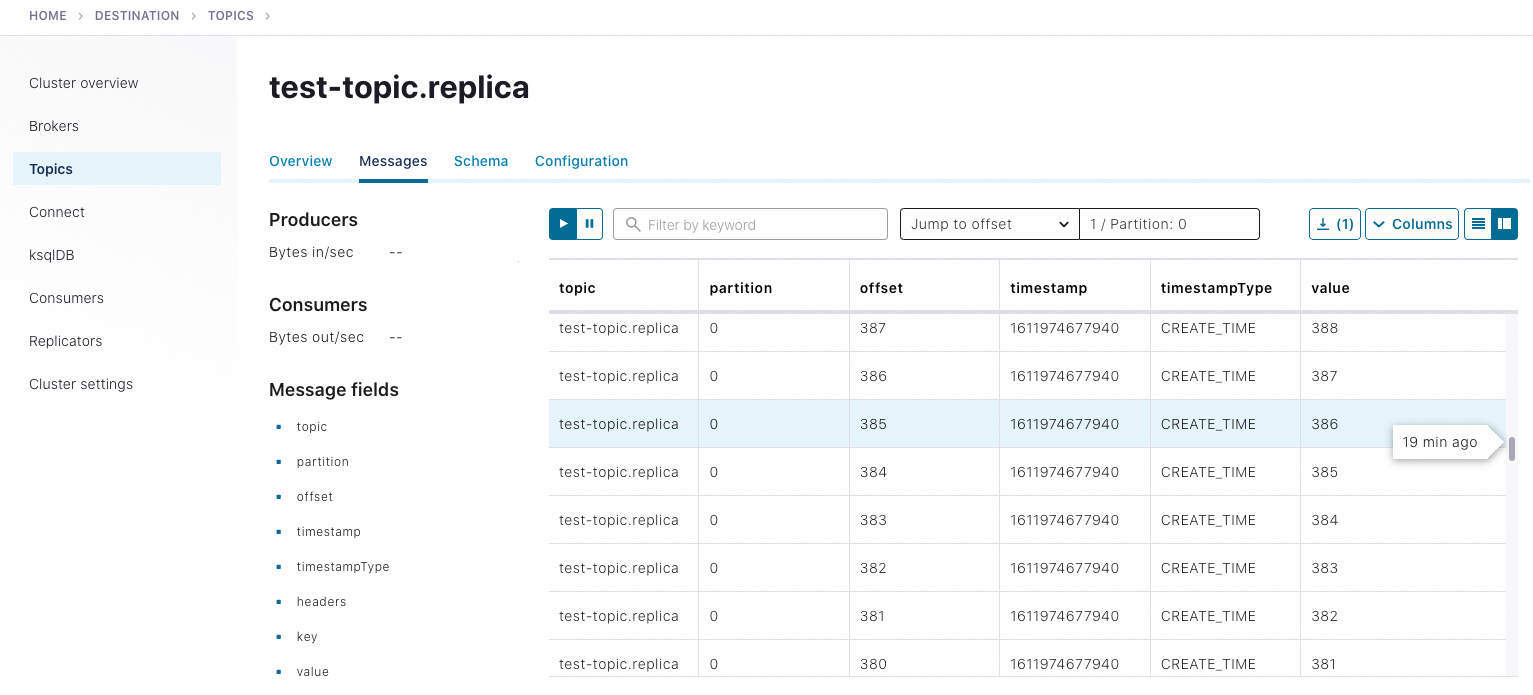
For more about monitoring, see Manage Replicator Using Control Center for Confluent Platform.
Clean up
After you finish the tutorial:
Stop producers and consumers by pressing Ctrl+C in each terminal window.
Stop services in reverse order: Control Center, then Replicator, then Kafka brokers, then ZooKeeper (if applicable).