After you attach a new data disk (empty data disk) to a Windows Elastic Compute Service (ECS) instance, you cannot directly use the disk to store data. To read data from or write data to the disk, you must partition the disk and mount file systems to partitions for the Windows operating system to recognize the disk. This topic describes how to initialize a data disk whose size is less than or equal to 2 TiB on a Windows ECS instance.
Prerequisites
The empty data disk that you want to initialize is separately created. For more information, see Create an empty data disk.
NoteData disks created together with a Windows ECS instance are automatically initialized. You do not need to perform the operations in this topic to initialize the data disks.
The data disk is attached to a Windows ECS instance and is in the In Use state. For more information, see Attach data disk.
Background
The following table describes the sample configurations of an ECS instance and a data disk. Operations may vary based on the actual condition.
Operating system | Resource | Description |
Windows | Image used by the instance | Windows Server 2016 64-bit |
Data disk |
|
Procedure
Connect to the ECS instance.
For more information, see Connect to Windows.
On the Windows desktop, right-click the
 icon and select Disk Management.
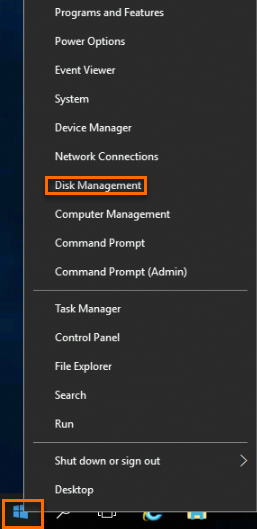
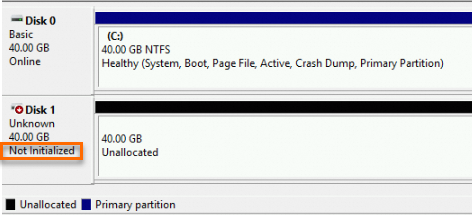
Find the data disk in the Offline state that you want to initialize. In this example, Disk 1 is used.

Right-click a blank area around Disk 1 and select Online.
When Disk 1 comes online, the disk enters the Not Initialized state.
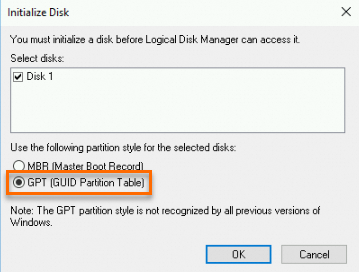
Right-click a blank area around Disk 1 and select Initialize Disk.
In the Initialize Disk dialog box, select the disk, select a disk partition format, and then click OK.
ImportantThe size of a disk that uses the master boot record (MBR) partition format is capped at 2 TiB. If your disk is larger than 2 TiB in size or the disk may be resized to larger than 2 TiB, use the GUID partition table (GPT) partition format.
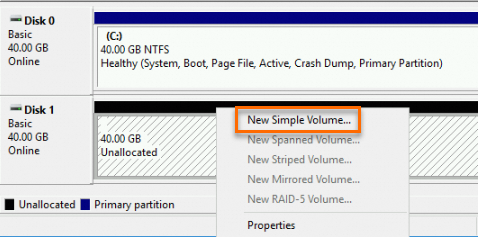
Right-click the Unallocated section of Disk 1 and select New Simple Volume.
In the New Simple Volume Wizard window, follow the wizard to perform initialization operations.
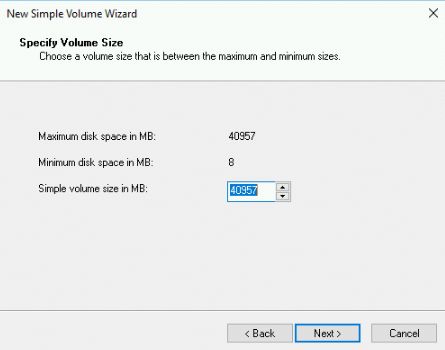
In the Specify Volume Size step, configure the Simple volume size in MB parameter and then click Next.
If you want to create only a single primary partition on the disk, use the default value. You can also specify a simple volume size based on your business requirements to divide Disk 1 into multiple partitions.
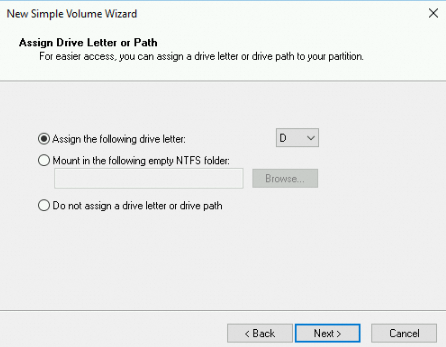
In the Assign Drive Letter or Path step, select Assign the following drive letter, select a drive letter, and then click Next. In this example, the drive letter D is selected.
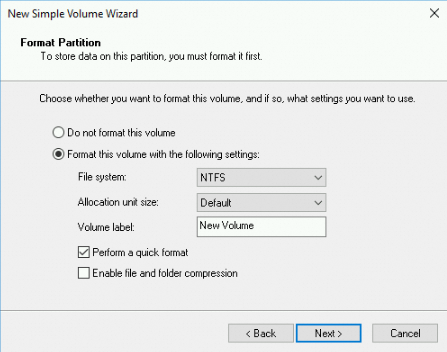
In the Format Partition step, select Format this volume with the following settings, configure formatting settings, and then click Next.
ImportantChoose the Allocation unit size carefully. This setting cannot be changed once it is set. For more information about disk capacity limits, see NTFS overview.
For disk sizes from 16 TiB to 32 TiB, select 8192.
For disk sizes from 32 TiB to 64 TiB, select 16K.
For all other cases, keep the default value.
View the information about the new simple volume and click Finish to close the New Simple Volume Wizard window.
Result
The following figure shows the state of Disk 1 in the Disk Management window after the disk is initialized.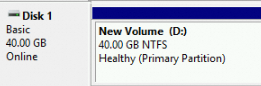
In This PC, you can find a new drive named New Volume (D:). The data disk is ready for use. 
Reference
If the storage space of a disk is insufficient, you can extend the capacity of the disk to increase the storage space. For more information, see Overview.