Data backfill lets you reprocess historical data by replaying your auto-triggered nodes for specific past dates. When a backfill runs, Scheduling Parameters in your code are automatically replaced with values derived from the selected Data Timestamp, so your code writes to the correct partitions without any manual changes. Your node's code determines the target partitions and execution logic.
Common use cases:
-
Fix incorrect data in historical partitions caused by a code bug or upstream data issue.
-
Reprocess a date range when data was missing because a node was frozen or failed.
-
Pre-populate a specific partition before a data migration or test run.
-
Immediately run hourly or minutely instances for a previous day that have not yet reached their scheduled time.
Prerequisites
Before you begin, make sure that you have:
-
Actionpermissions for every node in the data backfill workflow.-
Missing permissions on the root node or its descendant nodes: The backfill cannot run.
-
Missing permissions on an intermediate node (one whose ancestor and descendant nodes are both in scope): The system performs a Dry Run — it skips the actual computation and immediately returns
Succeededso downstream nodes can proceed. Dry Run nodes produce no real data, which may cause their descendant nodes to fail or produce incorrect output.
-
Execution rules and limits
Instance lifecycle and log retention
-
Instance cleanup:
Data Backfill Instancescannot be manually deleted. The platform removes them approximately 30 days after creation. To stop a node from running without deleting it, Freeze its instance. -
Retention policy: Instance and log retention periods vary by
Resource Grouptype.Resource group type Instance retention Log retention Shared Resource Group for Scheduling 30 days 7 days Exclusive Resource Group for Scheduling 30 days 30 days Serverless Resource Group 30 days 30 days -
Large log cleanup: For completed instances, the platform periodically purges run logs that exceed 3 MB.
Instance execution rules
-
Strict daily dependency: Backfill runs serially by
Data Timestamp. An instance for a given day does not start until all instances for the previous day have succeeded. A single failure blocks all subsequent dates. -
Concurrency for hourly and minutely nodes: When you backfill all instances of a node for a single day, the node's
Self-dependencysetting controls whether instances within that day run in parallel or serially:-
Self-dependencynot set: Instances within the day (for example, 00:00, 01:00) run in parallel, subject to their ancestor node dependencies. -
Self-dependencyset: Instances within the day run serially — for example, the 01:00 instance waits for 00:00 to succeed.
-
-
Conflicts with auto triggered instances: Auto Triggered Instances have higher priority than Data Backfill Instances. If both are scheduled at the same time, you may need to manually stop the Data Backfill Instance.
-
Blocklisted nodes: A blocklisted node that is an intermediate node in the workflow performs a
Dry Run, which may cause its descendant nodes to produce incorrect output.
Scheduling resources and priority
-
Resource planning: A large number of Data Backfill Instances or high parallelism can consume significant scheduling resources and affect normal Auto Triggered Instances. Size your backfill accordingly.
-
Priority degradation: The platform dynamically adjusts node priorities based on the backfill
Data Timestamp:-
T-1 (previous day): Node priority remains unchanged, determined by the baseline it belongs to.
-
T-2 or earlier (historical data): Node priority is automatically degraded:
-
Priorities 7 and 8 degrade to 3.
-
Priorities 5 and 3 degrade to 2.
-
Priority 1 remains unchanged.
-
-
Create a data backfill task
Step 1: Go to the data backfill page
-
Log on to the DataWorks console. In the top navigation bar, select the desired region. In the left-side navigation pane, choose Data Development and O&M > Operation Center, select the desired workspace, and click Go to Operation Center.
-
In the left-side navigation pane, choose O&M Assistant > Data Backfill.
To backfill data for a specific node directly, go to Auto Triggered Task O&M > Auto Triggered Nodes, then click Backfill Data in the Actions column for that node.
Step 2: Configure the backfill task
On the Data Backfill page, click Create Data Backfill Task and complete the following sections.
Basic information
The platform auto-generates a name for the task. Edit it as needed.
Select nodes
Choose one of the following methods to define which nodes to include.
Node selection methods
| Method | Best for | Notes |
|---|---|---|
| Manually Select | Precise control over root nodes and their descendant nodes | Replaces the legacy Current Node, Current and Descendant Nodes, and Advanced Mode options |
| Select by Link | A linear dependency chain between a known start and end node | The platform auto-identifies all intermediate nodes |
| Select by Workspace | Large-scale backfills across multiple workspaces | Blocklist not supported; replaces the legacy Massive Node Mode |
| Specify Task and All Descendant Tasks | Backfilling a root node and all its descendants when the full scope is unknown | The complete node list is only visible after the task starts — use with caution |
Manually Select
Select one or more root nodes, then include their descendant nodes in the backfill scope.
| Parameter | Description |
|---|---|
| Node Selection Method | Select Manually Select. |
| Add Root Nodes | Search by name or ID. Use Batch Add to filter by Resource Group, Scheduling Cycle, and Workspace to add multiple root nodes at once. Only nodes from workspaces where you are a member can be selected. |
| Selected Root Nodes | Displays the added root nodes. Select which descendant nodes to include. You can filter descendant nodes by dependency level — direct descendant nodes of a root node are at level 1. A single backfill supports a maximum of 500 root nodes and 2,000 total nodes (or 3,000 in the China (Beijing) and China (Hangzhou) regions). If a node has a maximum concurrent instances setting, Data Backfill Instances share that quota with Auto Triggered Instances. |
| Task Blacklist | Add nodes to the Blocklist to exclude them. Only root nodes can be added to the Blocklist. To exclude a descendant node, remove it from Selected Root Nodes instead. If a blocklisted node is an intermediate node, it performs a Dry Run. |
Select by Link
Select a start node and one or more end nodes. The platform automatically identifies all intermediate nodes in the dependency chain.
| Parameter | Description |
|---|---|
| Node Selection Method | Select Select by Link. |
| Select Nodes | Search by name or ID to add a start node and end nodes. Intermediate nodes are those that are both direct or indirect descendant nodes of the start node and direct or indirect ancestor nodes of the end nodes. |
| Intermediate Nodes | The auto-identified node list. Displays up to 2,000 nodes — nodes beyond this limit are not shown but are still included in execution. |
| Task Blacklist | Add nodes to the Blocklist to exclude them. If a blocklisted node is an intermediate node, it performs a Dry Run. |
Select by Workspace
Select a root node and scope the backfill to the workspaces where its descendant nodes are located. Blocklist configuration is not supported with this method.
| Parameter | Description |
|---|---|
| Node Selection Method | Select Select by Workspace. |
| Add Root Nodes | Search by name or ID. Only nodes from workspaces where you are a member can be selected. |
| Include Root Node | Specify whether to include the root node in the backfill. |
| Workspaces for Data Backfill | Select the workspaces containing the nodes to backfill. Only DataWorks workspaces in the current region are available. Data is backfilled for all nodes in the selected workspaces by default — use the Allowlist and Blocklist to customize. |
| Add to Whitelist | Add nodes that require backfill but are not in the selected workspaces. |
| Task Blacklist | Specify nodes within the selected workspaces to exclude. |
Specify Task and All Descendant Tasks
Select a root node and the platform automatically includes it and all its descendant nodes. The complete scope is only visible after the task starts running.
Use this method with caution — you cannot preview the full list of triggered nodes before starting.
| Parameter | Description |
|---|---|
| Node Selection Method | Select Specify Task and All Descendant Tasks. |
| Add Root Nodes | Search by name or ID. Only nodes from workspaces where you are a member can be selected. If the root node has no descendant nodes, only data for that root node is backfilled. |
| Task Blacklist | Add nodes to the Blocklist to exclude them. If a blocklisted node is an intermediate node, it performs a Dry Run. |
Configure the run policy
Data Timestamp
Specify the dates for which to backfill data using Manual Entry, AI-powered Generation, or Batch Entry. The system behavior depends on the dates you select:
-
Historical data (Data Timestamp < current date): The most common scenario. The system immediately creates and runs an instance for the specified date to reprocess past data. Use this to fix historical data errors or fill missing partitions.
-
Future date (Data Timestamp > current date): Creates a one-time scheduled task. The instance enters a waiting state and runs automatically when its Data Timestamp arrives. Use this to pre-schedule a task for a known future date.
-
Run now — select "Run Retroactive Instances Scheduled to Run after the Current Time": Available when the Data Timestamp is a future date, or when it is T-1 and the task includes instances scheduled after the current time. These instances run immediately instead of waiting. Use this to run instances ahead of schedule, prepare partitions for data migration or testing, or immediately process hourly or minutely T-1 instances that have not yet reached their scheduled time.
-
Example 1 (Backfill future data): The current date is
2024-03-12. You choose to backfill data for2024-03-17and select Immediately run Data Backfill Instances scheduled for a time later than the current time. The task instance starts immediately on2024-03-12, but uses2024-03-17as the Data Timestamp parameter at runtime, which affects the data partition. -
Example 2 (Backfill T-1 data): The current time is
2024-03-12 14:30. You choose to backfill data for2024-03-11(T-1). The task is scheduled to run hourly. If you do not select the option, instances scheduled for 15:00, 16:00, and other times after 14:30 must wait for their scheduled times. If you select Immediately run Data Backfill Instances scheduled for a time later than the current time, all instances run immediately.
-
To backfill multiple non-consecutive dates, click Add to configure additional time ranges. Avoid excessively long date ranges — a large number of instances consumes scheduling resources and may affect regular auto-triggered tasks.
| Parameter | Description |
|---|---|
| Specify Cycle | Limit instance generation to a specific time window within each day (default: 00:00–23:59). Use this only when backfilling a specific cycle of an hourly or minutely task. If a task's scheduled time falls outside this window, no instance is generated, which may produce isolated instances that block dependent tasks. |
| Run by Group | When backfilling multiple Data Timestamps, specify the number of groups (2–10) for concurrent execution. Yes splits timestamps into groups that run in parallel. No runs instances serially in timestamp order. For hourly and minutely tasks, whether instances within a day run in parallel within a group depends on the Self-dependency setting. |
| Alert for Data Backfill | Yes triggers an alert when the configured condition is met. No disables alerts for this backfill. |
| Trigger Condition | Available when Alert for Data Backfill is Yes. Options: Alert on Failure or Success, Alert on Success, or Alert on Failure. |
| Alert Notification Method | Available when Alert for Data Backfill is Yes. Choose Text Message and Email, SMS, or Email. The alert recipient is the user who initiated the backfill. Click Check Contact Information to verify the recipient's contact details are registered. |
| Order | Select Ascending by Business Date or Descending by Business Date. |
| Resource Group for Scheduling | Follow Task Configuration uses the same Resource Group as the original Auto Triggered Instance. Specify Resource Group for Scheduling uses a separate Resource Group to avoid contention with Auto Triggered Instances. For high-concurrency workloads, use a Serverless Resource Group to get dedicated resources. Alternatively, an Exclusive Resource Group for Scheduling also provides dedicated capacity. Make sure the Resource Group is bound to the relevant workspace and has network connectivity. |
| Execution Period | Follow Task Configuration runs each instance at its scheduled time. Specify Time Period restricts when instances can start. Instances not yet running when the period ends will not start. Instances already running will finish normally. |
| Computing Resources | Currently, only EMR and Serverless Spark compute resources can be set as the compute resource for Data Backfill. Make sure the mapped resource exists and is available. |
Set the verification policy
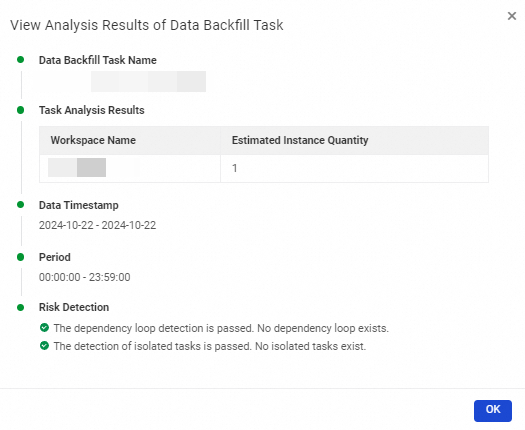
The platform validates the backfill task before execution, checking:
-
Basic information: Total node and instance counts, and potential issues such as node loops, isolated nodes, or missing permissions.
-
Risk detection: Checks for node loops and isolated nodes that would cause tasks to run abnormally.
Configure whether to stop the task if the validation check fails.
Submit
Click Submit. The Data Backfill Task is created.
Step 3: Run the backfill task
The task runs automatically at the configured time if validation passes.
The task cannot run if:
-
The verification policy is enabled and the check fails. For details, see the verification policy section above.
-
An extension program check is enabled and the check fails. For details, see Overview of extension programs.
Manage data backfill instances
Find a data backfill instance
In the left-side navigation pane, choose O&M Assistant > Data Backfill.

Click Show Search Options on the right side to filter instances by Retroactive Instance Name, Running Status, Node Type, and other conditions. You can also stop multiple running Data Backfill Instances in a batch from this view.
View data backfill instance status

The instance list shows the following information:
-
Task Name: The name of the data backfill instance. Click the
 icon to expand run dates, run status, included nodes, and their run details.
 -
Check Status: The validation status of the Data Backfill Instance.
-
Running Status: The current execution status —
Succeeded,Failed,Waiting for resources, orWaiting for Trigger. -
Nodes: The number of nodes in the instance.
-
Data Timestamp: The date for which the instance runs.
-
Max Concurrent Instances: The maximum number of concurrent instances configured for the node. Values range from Unlimited to a specific number between 1 and 10,000. This quota is shared among Auto Triggered Instances, Data Backfill Instances, and test instances.
-
View Task Analysis Results: Shows the estimated number of instances to generate, the run date, and risk validation results.
-
Actions: Operations available for each instance.
Action Description Stop Stop all Running instances in the batch. The status is set to Failed. Cannot stop instances in Not Running, Succeeded, or Failed state. Batch Rerun Rerun all instances in the batch at the same time, without considering dependencies. Can only rerun instances in Succeeded or Failed state. To rerun in dependency order, use Rerun Descendent Nodes or create a new Data Backfill task. Reuse Create a new Data Backfill Task using the same node set as an existing task.
Manage individual nodes
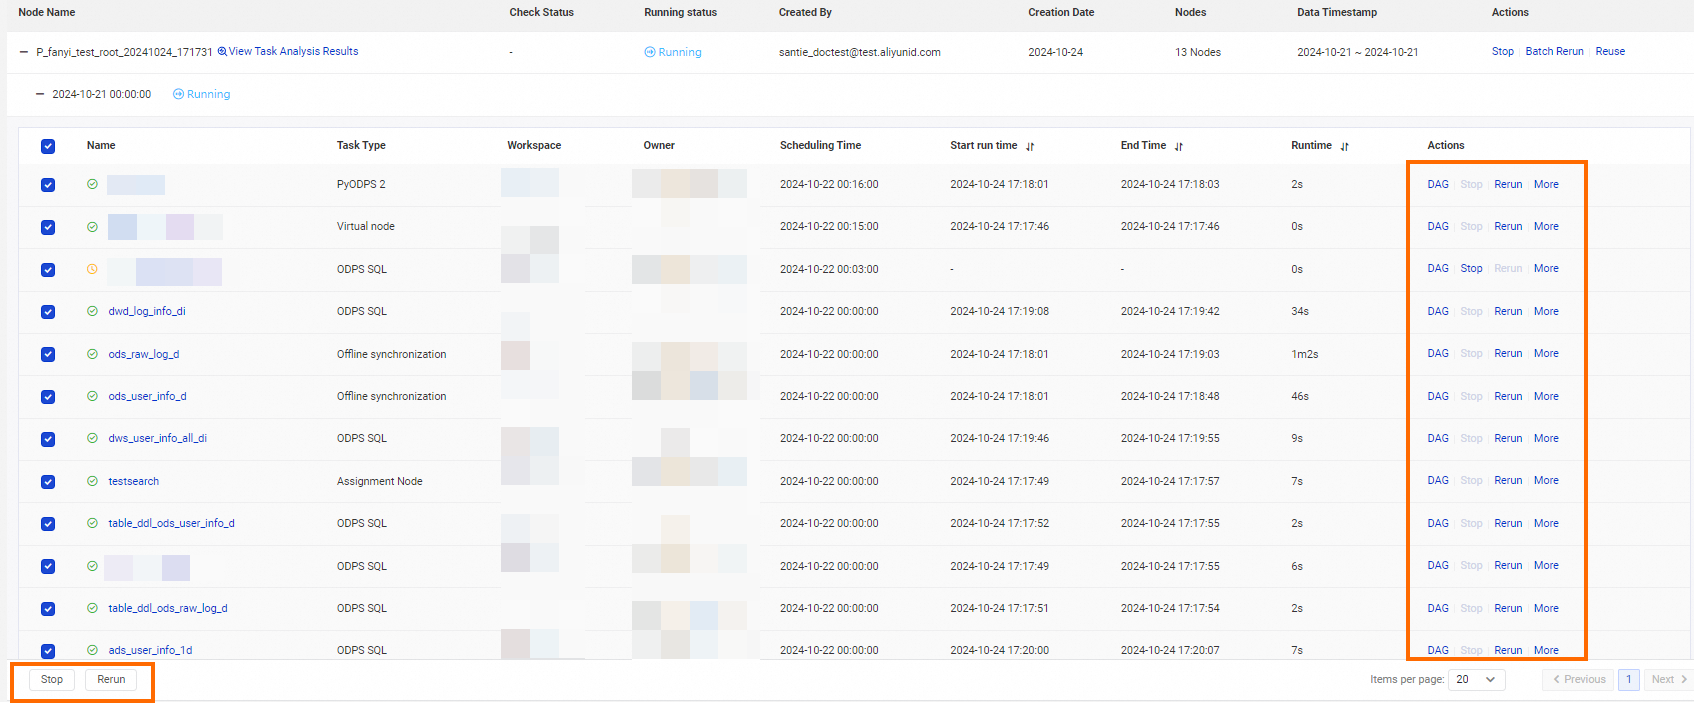
The node list shows details for each node in the Data Backfill Instance:
-
Name: Click the node name for more details.
-
Scheduling Time: The node's scheduled run time.
-
Start run time: The time the node started running.
-
End Time: The time the node finished.
-
Runtime: Total execution duration.
-
Actions: Operations available for individual nodes.
Action Description DAG View the node's Directed Acyclic Graph (DAG) to analyze ancestor and descendant nodes. See Introduction to DAG features. Stop Stop a Running node. Status is set to Failed. This causes the instance to fail and blocks descendant nodes — proceed with caution. Cannot stop nodes in Not Running, Succeeded, or Failed state. Rerun Rerun the node. Can only rerun nodes in SucceededorFailedstate.Rerun Descendent Nodes Rerun the descendant nodes of this node. Set as Successful Manually mark this node's status as Succeeded.Freeze Set the node to Frozenstate and stop its scheduling. Cannot freeze nodes in Waiting for resources, Waiting for Scheduling Time, or Running state.Unfreeze Resume scheduling for a frozen node. View Lineage View the node's Data Lineage graph.
Select one or more nodes and click Stop or Rerun to perform batch operations.
Instance status
| Status | Status icon |
|---|---|
| Succeeded | <img> |
| Not Running | <img> |
| Failed | <img> |
| Running | <img> |
| Waiting | <img> |
| Frozen | <img> |
FAQ
-
Why does group execution for data backfill not take effect for hourly and minutely nodes?
-
Why are multiple instances generated when I backfill data for the 00:00 to 01:00 period?
-
Why do instances show a "Waiting for resources" status during a large-scale data backfill?
-
Why are no Data Backfill Instances generated even though data backfill is selected for a node?
-
Unselected instances in a temporary workflow perform a dry run during a data backfill