Use Cloud Backup to protect files on your General-purpose NAS file systems from data loss or damage. Its flexible backup policies let you automate backups to the cloud and restore your data at any time.
Prerequisites
Cloud Backup has been activated. While the service activation is free, using the NAS backup feature incurs storage capacity fees. For more information, see Billing of the NAS backup feature.
Background information
In this topic, NAS refers to a General-purpose NAS file system.
Cloud Backup lets you back up NFS and SMB file shares from NAS file systems, regardless of whether the file systems are mounted. The backup process is the same for both. Cloud Backup performs backups using an efficient file system scanning mechanism instead of creating file system snapshots.
NAS backup does not support the SMB ACL feature. If you enable the access control list (ACL) feature for your SMB file system, Cloud Backup cannot back up the access control configurations.
NAS backup supports data backup for the Standard and Infrequent Access (IA) storage classes of General-purpose NAS file systems. It does not support data backup for the Archive Storage class.
If a backup fails because of permission issues on an SMB file system, grant the Cloud Backup client permissions to read the files and then back up the file system using an ECS file backup client.
You can also back up NFS NAS file systems using an ECS file backup client.
Usage notes
The first time you create a backup plan or associate a backup plan with a backup policy, Cloud Backup automatically creates a service-linked role named AliyunServiceRoleForHbrNasBackup. This role is used to obtain permissions to access related resources. In the dialog box that appears, grant the role as prompted.
During a NAS backup or restore job, the maximum length of a file name is 248 bytes. If a file name exceeds this limit, the file cannot be backed up or restored. The job is then marked as partially completed.
The socket files or hard links cannot be restored.
Create a backup plan to periodically back up NAS files
We recommend that each NAS backup job contains no more than 50 million files. Each directory should contain no more than 8 million files and subdirectories.
After you create a backup plan, the first backup job performs a full backup. Subsequent backup jobs perform incremental backups.
Perform the following steps to back up a NAS file system to a backup vault in the same region.
Log on to the Cloud Backup console.
In the navigation pane on the left, choose .
In the upper-left corner of the top menu bar, select a region.
On the Alibaba Cloud NAS tab, click Create Backup Plan.
In the Create Backup Plan panel, configure the parameters and click OK.
NoteA 30-day free trial is available but comes with significant limitations. It does not support backup policies (a paid feature) and has a fixed configuration for its source path and backup cycle.
Most importantly, the trial uses an isolated backup vault that cannot be changed after converting to a paid plan. Therefore, if you need a unified vault for all your data, you should skip the free trial and start with a paid plan.
Configure the basic settings.
Parameter
Description
File System
Select the file system that you want to back up.
Pay After Trial Ends
Specify whether to pay for the backup plan after the free trial ends.
Click Switch to Paid Plan to enable Advanced Settings and configure the parameters.
ImportantIn regions that support backup policies, backup plans must be created by associating them with a policy. The attached policy governs the periodic backup of the NAS file system.
To view the regions that support backup policies, click Policy Center in the navigation pane on the left. For more information about how to create a backup policy, see Create a backup policy .
Parameter
Description
Source Paths
Enter a path, for example,
/nas/folder.Backup Rule
Configure the rule to back up files. Only files that match the rule are backed up.
Include All Files: Backs up all files.
Include Files or Exclude Files: Manually enter a list of files. Files are backed up based on the specified rule.
Backup Policy
Select a backup policy from the drop-down list.
Cloud Backup automatically backs up data sources based on the backup policy that you configure. A backup policy includes settings such as the backup vault encryption method, backup interval, retention period, cross-region replication policy, automatic data archiving, and virus detection for backup points. This helps you flexibly manage data sources.
If the default backup policy does not meet your requirements, click Create Policy or Edit Policy to manage backup policies.
For more information about the parameters in a backup policy, see Policy center.
After the backup plan is created, its status is Running. Cloud Backup runs NAS backup jobs based on the specified start time and backup interval.
NoteMonitor the job's progress on the Backup Jobs tab. After a job completes successfully, its backup point can be used to restore data to any NAS file system in the same region.
Successful backup
When the scheduled backup time arrives, Cloud Backup starts and runs the backup job.
NoteThe backup progress percentage is a dynamic estimate that the system generates based on the current data volume and is for reference only. It may not reflect the exact completion percentage. During the backup process, the displayed total scanned size may be smaller than the actual total data size because the data scan is not yet complete. The completion of the backup job is determined by its final status.
On the Backup Jobs tab, if the Status of a backup job is Completed, the backup is successful.
View details about the backup job, such as Total Scan, Completed Backups, Written to Vault, and Backup Speed. For more information about these metrics, see the tooltips in the Cloud Backup console.
NoteFor backup jobs completed on or after June 1, 2025, statistics for both data volume and file count are displayed for Total Scanned at Source, Backup Completed, and Data Written to Vault. For backup jobs completed before this date, only data volume statistics are shown for these metrics.

On the Backup Plans tab, click the
 icon for the target file system to view the backup records and generated backup points in the Backup History section. These backup points can be used to restore an NAS file system.
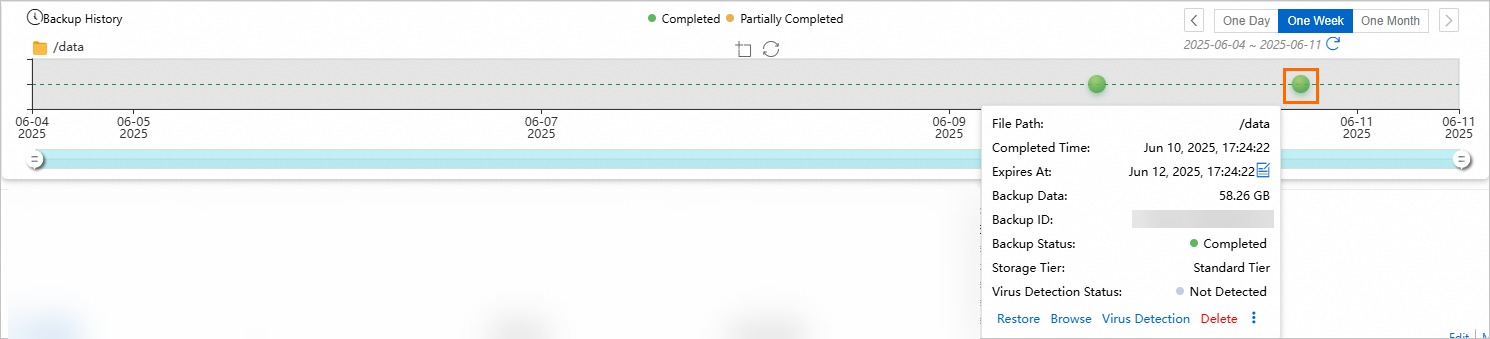
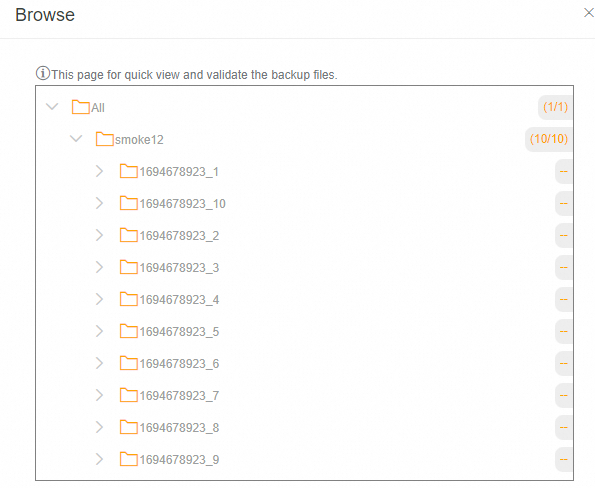
Browse and download backup files
Browse backup files
Use the Browse feature to view backed-up files. If a backup point was scanned for viruses, Cloud Backup marks any infected files.
On the Backup Plans tab, click the
icon for the target NAS file system.In the Backup History section, find the desired backup point and click Browse.
Download backup files
Backup files cannot be downloaded directly. To download them, you must first restore them to a temporary path in your NAS file system. Data restoration is free.
Extend the retention period of a backup point
To store existing NAS backup data for a longer period, extend the retention period of the relevant backup point.
The retention period of a backup point can only be extended. It cannot be shortened.
The retention period cannot be extended for backup points that are set to be retained permanently.
On the Backup Plans tab, click the
icon for the target NAS file system.In the Backup History tab, click an existing backup point and extend its retention period by setting Specify Time or selecting Never Expire.
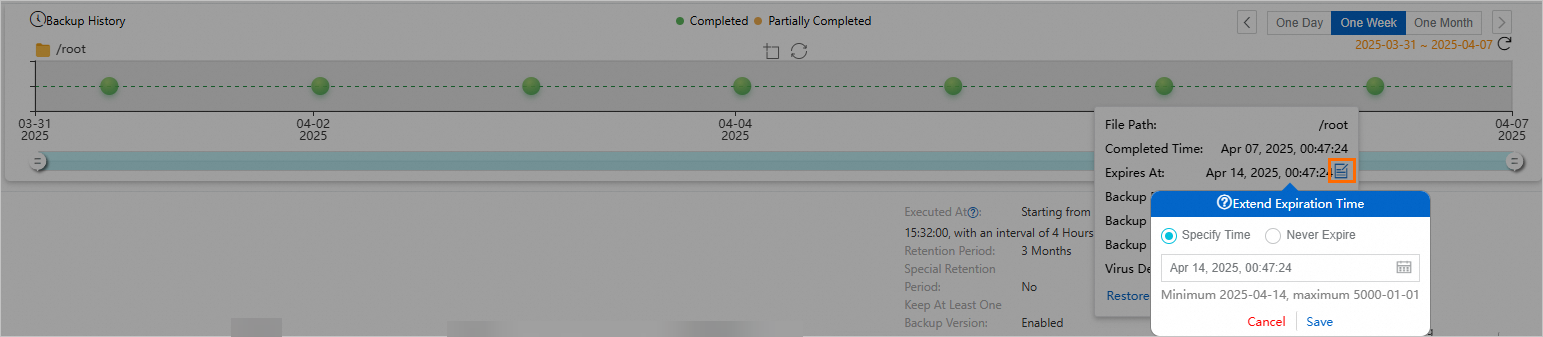
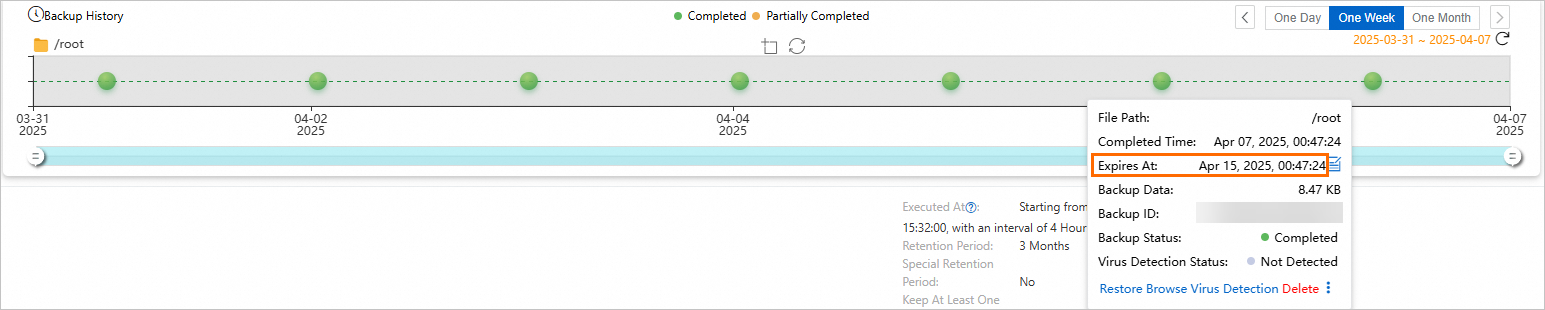
Click Save.
After the configuration is complete, the new expiration time is displayed in the Expires At field.
Virus detection
To prevent virus-infected files from being restored to the production environment, Cloud Backup provides the Backup Point Virus Detection feature. This feature helps you select a clean and safe backup point for future data restoration. Click Virus Detection to scan files for viruses. For more information, see Backup point virus detection.
Troubleshooting
If the Status of a backup plan or backup job is abnormal, refer to the following recommendations to resolve the issue.
Backup job Status: Failed (The path cannot be accessed.)
The path specified for Source Paths in the backup plan does not exist. Modify the source path to a valid network path. On the Backup Plans tab, find the target file system. In the Actions column, choose ┇ > Modify Plan.

Backup job Status: Failed (The specified file system does not exist.)
The NAS file system was deleted.
If the NAS file system was intentionally deleted, ignore the backup job status. To prevent extra storage fees, in the navigation pane on the left, click Storage Vaults. Find and delete the corresponding backup vault.
If the NAS file system was accidentally deleted, restore it. Create a NAS file system in the same region and use it as the destination for the restore job. For more information, see Create a restore job for a single NAS file system in the same region.
Backup plan Status: Suspended
The backup plan is suspended. While a backup plan is suspended, Cloud Backup does not back up files from the NAS file system. Resume the backup plan as soon as possible.
Create a restore job for a single NAS file system in the same region
Perform the following steps to restore a single NAS file system in the same region.
On the Restore Jobs tab, click Create Restore Job.
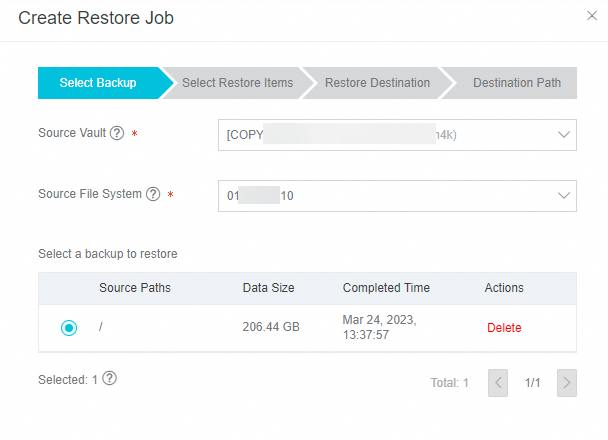
In the Create Restore Job panel, configure the following settings.
Select a backup and click Next.
Parameter
Description
Source Vault
Select the backup vault that stores the backup data of the source NAS file system.
Source File System
Select a backed-up NAS file system as the source for restoration.
Please select which backup to restore
From the list of backups, select the backup that you want to restore.
On the Select Restore Items tab, select Restore Items and click Next.
Parameter
Description
Restore Items
Select the items to restore.
Include All Files: Restores all files in the selected source NAS instance.
Include Files: Select the folders or files to restore, or manually enter a list of specific paths in the Enter Paths box.
Exclude Files: Select this option to specify files and folders to exclude from the restore job. Any items not on the exclusion list will be restored. Select the items or enter their paths manually in the Enter Paths box.
Enter one path per line in the file list. Each line must start with the last folder of the source path. For example, if the source path is
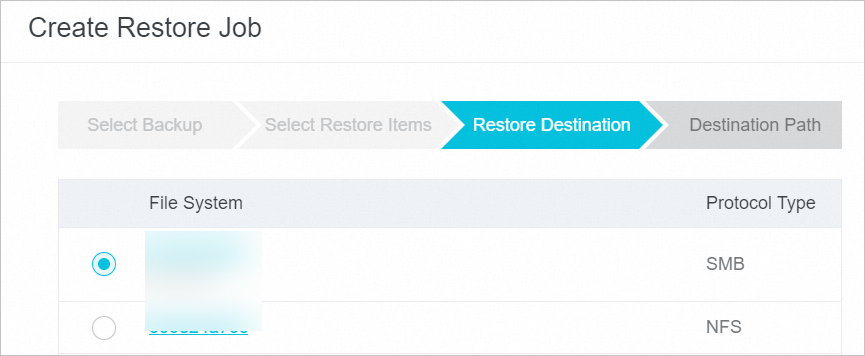
/test/dataand you want to restorefile.txtandabcin the data folder, enter the paths in the following format:/data/file.txt /data/abcOn the Restore Destination tab, select a File System in the region and click Next.
On the Destination Path tab, configure the restore path and click Create.
Parameter
Description
Restore Path Type
Select the type of restore path.
Specify Path: Specify a new path to restore the files to.
Origin Path: Restore files to the path from which they were backed up.
Destination Path
This parameter is required only if you set Restore Path Type to Specify Path. It specifies the destination path for the restored file system. For example, restore the file system to /nas/abc.
File Conflict Policy
Skip the file.
Overwrite the existing file.
Compare the update times and keep the newer version.
Virus Detection During Restoration
If you enable this option, Cloud Backup scans all files for viruses before restoring them. For more information, see the console or Backup point virus detection.
When Recovery Items Contain Detected Viruses
Do not restore the virus-infected files (find secure versions on the Virus Detection page.)
I am aware of the risks and still want to restore all the selected items
After the restore job is created, view its progress in the Status column on the Restore Jobs tab.
Backup vault replication
To prevent regional disasters from affecting business continuity, Cloud Backup supports creating cross-region mirror vaults for backup vaults with a Storage Vault Type of General Backup or Tablestore Backup. For general backup vaults that store ECS files, you can create a cross-region mirror vault for cross-region disaster recovery. After the mirror vault is created, data in the source backup vault is automatically replicated to the cross-region mirror vault to ensure data consistency between the two regions. You can also perform cross-region data restoration from the mirror vault when needed. For more information, see Cross-region backup. In addition, ECS file backup also supports enterprise-level features such as Cross-account backup, Automatic archiving, KMS encryption, Backup lock, Backup point virus scan, and Tag-based automatic resource association for backup.
For general backup vaults storing NAS files, backup vault replication provides an effective solution for cross-region or cross-account disaster recovery. In addition, NAS backup offers a range of enterprise-grade features, including Cross-account backup, Automatic archiving, KMS-based encryption, Immutable backup, Backup point virus detection, and Tag-based automatic resource association and backup.
Cross-region restore of NAS from a replication target vault
A backup vault is a cloud-based repository in Cloud Backup that stores backup data. Use a replication target vault to restore a single NAS file system across regions for disaster recovery.
Select the region where the replication target vault resides. In the navigation pane on the left, choose . Click Alibaba Cloud NAS.
Click the Restore Jobs tab and then click Create Restore Job.
On the Select Backup tab, configure the parameters as required.
You must select the created replication target vault. For more information about how to configure other parameters, see Create a restore job for a single NAS file system in the same region.
More operations
On the Backup Plans tab, click Manage Mounts on the right. The following operations are available:
View all file systems in the selected region. Click a file system link to view its details, such as the protocol type and the number of mount targets.
Remove Mount Target: When you create a backup plan, Cloud Backup automatically creates a mount target in the NAS file system. This mount target is created by an internal Alibaba Cloud service and cannot be directly deleted. Therefore, to delete the NAS file system, click Remove Mount Target for the file system on the Manage Mounts page. Deleting the NAS backup mount target causes backup jobs to fail. Ensure that all backup plans are deleted and no backup or restore jobs are running.
After a backup plan is created, NAS backup jobs are run based on the specified start time and backup interval. You can also perform the following operations in the Actions column on the Backup Plans tab:
Operation | Description |
Backup History | View the backup history of the file system for the last three months or all backup records. |
Immediately runs a backup plan. | |
Pauses a running backup plan. To resume the plan, choose . | |
Modifies a backup plan. | |
Deletes a running backup plan. After the backup plan is deleted, it no longer runs. However, the backed-up data is retained. | |
Configures the method for sending alert notifications.
|
References
Back up an on-premises NAS file system (self-managed NAS)
Cloud Backup provides resource plans for various backup scenarios. Resource plans offer greater price advantages and help you minimize costs. For more information, see Purchase resource plans.
The data synchronization feature of Cloud Backup supports synchronizing large numbers of OSS files from a source to a destination.