ApsaraDB for MongoDB provides standalone instances, replica set instances, and sharded cluster instances. Standalone instances are suitable in development environments and test environments that store unimportant data. Replica set instances and sharded cluster instances are suitable in production environments. This topic describes how to migrate data from a standalone instance to a replica set instance or sharded cluster instance by using Data Transmission Service (DTS).
Prerequisites
The available storage space of the destination instance is 10% larger than the total size of the data in the source instance. This is a recommended prerequisite.
Usage notes
DTS uses the resources of the source and destination databases during full data migration. This may increase the loads on the database servers. If you migrate a large amount of data or if the server specifications do not meet your requirements, database services may become unavailable. Before you migrate data, evaluate the impact of data migration on the performance of the source and destination databases. We recommend that you migrate data during off-peak hours.
DTS does not support incremental data migration from a standalone instance. To ensure data consistency, do not write data to the source instance during full data migration.
If the source and destination ApsaraDB for MongoDB instances have different versions or storage engines, make sure that the versions or storage engines are compatible. For more information, see MongoDB versions and storage engines.
ApsaraDB for MongoDB automatically updates the minor version of the instance to the latest version if the minor version of an ApsaraDB for MongoDB instance expires or is not included in the maintenance list and when you perform some operations. This ensures that the ApsaraDB for MongoDB instance can provide higher performance and stability. For more information, see Database version upgrade, Data migration, Overview, Restore backup data to a new ApsaraDB for MongoDB instance by backup point, Restore backup data to a new ApsaraDB for MongoDB instance by point in time, and Restore the databases of an ApsaraDB for MongoDB instance.
DTS cannot migrate data from the admin or local database.
The data is concurrently written to the destination database. Therefore, the storage space occupied in the destination database is 5% to 10% larger than the size of the data in the source database.
Make sure that the destination ApsaraDB for MongoDB instance does not have the same primary key as that in the source instance. The default primary key is _id. Otherwise, data may be lost. If the destination instance has the same primary key as that in the source instance, delete the same document that corresponds to the _id primary key in the destination instance as that in the source instance without affecting your business.
Billing
Migration type | Task configuration fee | Internet traffic fee |
Full data migration | Free of charge. | Free of charge. |
Migration types
Full data migration: DTS migrates all existing data of the source MongoDB database to the destination MongoDB database.
Full data migration is supported for databases, collections, and indexes.
Permissions required for database accounts
Instance | Permission |
Source ApsaraDB for MongoDB instance | Read permissions on the source database |
Destination ApsaraDB for MongoDB instance | Read and write permissions on the destination database |
For more information about how to create a database account and grant permissions to the database account, see Manage MongoDB databases by using DMS.
Procedure
Log on to the ApsaraDB for MongoDB console.
In the left-side navigation pane, click Replica Set Instances.
In the upper-left corner of the page, select the resource group and region to which the instance belongs.
On the page that appears, find the instance that you want to manage and click its ID.
In the upper-right corner of the page that appears, click Migrate Databases.
On the Create Migration Task page, create a migration task.
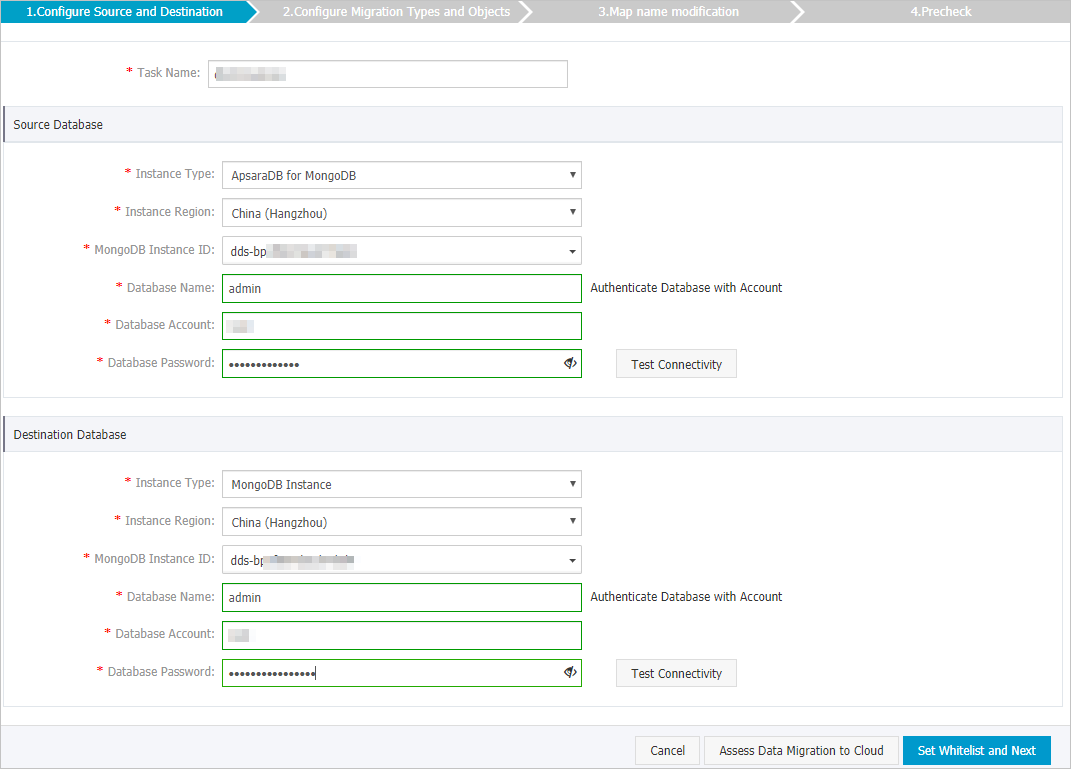
Specify the information about the source database and destination database.
Section
Parameter
Description
N/A
Task Name
The task name that DTS automatically generates. We recommend that you specify a descriptive name that makes it easy to identify the task. You do not need to specify a unique task name.
Source Database
Instance Type
The instance type of the source database. Select ApsaraDB for MongoDB.
Instance Region
The region in which the source ApsaraDB for MongoDB instance resides.
MongoDB Instance ID
The ID of the source instance.
Database Name
The name of the authentication database. The database account is created in this database.
NoteIf you want to use the root account, enter admin in the Database Name field.
Database Account
The username of the account that is used to connect to the source instance. For information about the permissions that are required for the account, see Permissions required for database accounts.
Database Password
The password of the database account.
NoteAfter you specify the information about the source database, you can click Test Connectivity next to Database Password to check whether the information is correct. If the information is correct, the Passed message appears. If the information is incorrect, the Failed message appears and you must click Check next to the Failed message to modify the information.
Destination Database
Instance Type
The instance type of the destination database. Select MongoDB Instance.
Instance Region
The region in which the destination ApsaraDB for MongoDB instance resides.
MongoDB Instance ID
The ID of the destination ApsaraDB for MongoDB instance.
Database Name
The name of the authentication database. The database account is created in this database.
NoteIf you want to use the root account, enter admin in the Database Name field.
Database Account
The username of the account that is used to connect to the destination instance. For information about the permissions that are required for the account, see Permissions required for database accounts.
Database Password
The password of the database account.
NoteAfter you specify the information about the destination database, you can click Test Connectivity next to Database Password to check whether the information is correct. If the information is correct, the Passed message appears. If the information is incorrect, the Failed message appears and you must click Check next to the Failed message to modify the information.
In the lower-right corner of the page, click Set Whitelist and Next.
WarningIf the CIDR blocks of DTS servers are automatically or manually added to the whitelist of the database or instance, or to the ECS security group rules, security risks may arise. Therefore, before you use DTS to migrate data, you must understand and acknowledge the potential risks and take preventive measures, including but not limited to the following measures: enhance the security of your username and password, limit the ports that are exposed, authenticate API calls, regularly check the whitelist or ECS security group rules and forbid unauthorized CIDR blocks, or connect the database to DTS by using Express Connect, VPN Gateway, or Smart Access Gateway.
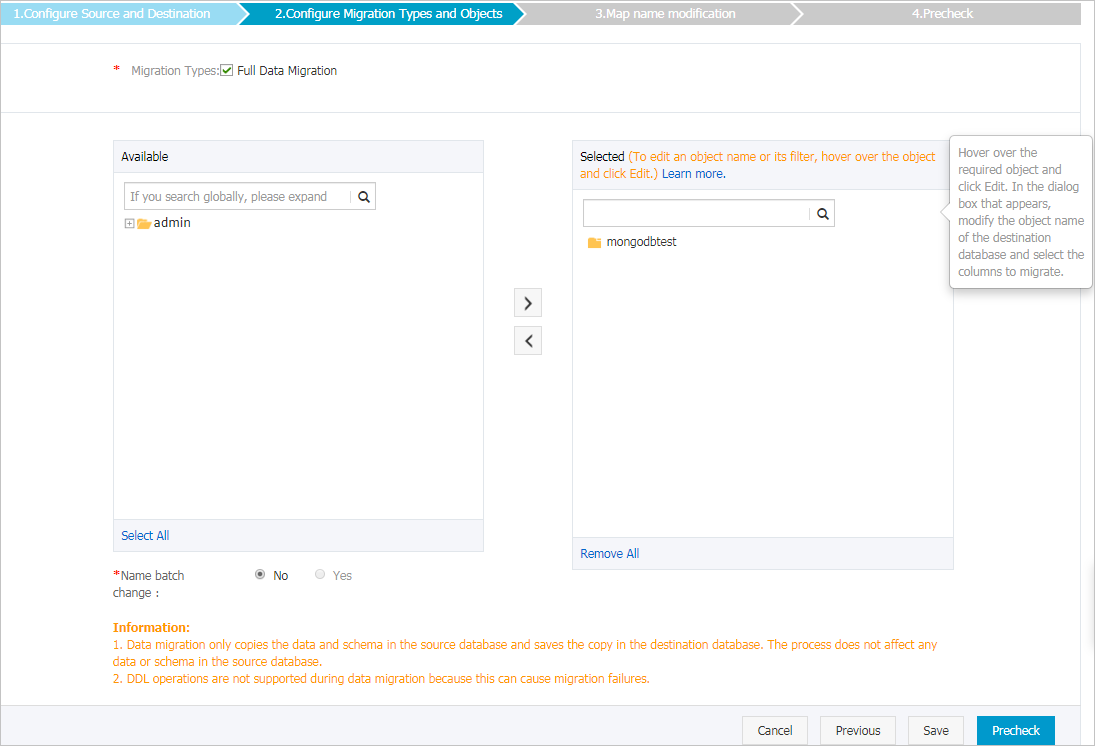
Select the migration types and the objects to be migrated.
Parameter
Description
Select the migration types
Select Full Data Migration.
NoteIf the source instance is a standalone instance, you can select only Full Data Migration. To ensure data consistency, do not write data to the source instance during full data migration.
Select the objects to be migrated
To select the objects to be migrated, perform the following steps:
Select one or more objects from the Available section.
Click the
 icon to add the objects to the Selected section.
NoteDTS cannot migrate data from the admin or local database.
The objects that you can migrate are databases, collections, and functions.
By default, after an object is migrated to the destination instance, the name of the object remains unchanged. If you want to rename an object in the destination instance, you can use the object name mapping feature. For more information, see Object name mapping.
Specify whether to rename objects
You can use the object name mapping feature to rename the objects that are migrated to the destination instance. For more information, see Object name mapping.
Specify the retry time for a failed connection to the source instance or destination instance
By default, if DTS fails to connect to the source and destination databases, DTS retries within the next 12 hours. You can specify the retry time range based on your business requirements. If DTS reconnects to the source and destination databases within the specified retry time range, DTS resumes the data migration task. Otherwise, the data migration task fails.
NoteWithin the time range in which DTS attempts to reconnect to the source and destination databases, you are charged for the DTS instance. We recommend that you specify the retry time range based on your business requirements. You can also release the DTS instance at the earliest opportunity after the source and destination databases are released.
In the lower-right corner of the page, click Precheck.
NoteBefore you can start the data migration task, DTS performs a precheck. You can start the data migration task only after the task passes the precheck.
If the task fails to pass the precheck, click View Details next to each failed item. After you analyze the causes based on the check results, troubleshoot the issues. Then, run a precheck again.
If an alert is triggered for an item during the precheck:
If an alert item cannot be ignored, click View Details next to the failed item and troubleshoot the issues. Then, run a precheck again.
If the alert item can be ignored, click Confirm Alert Details. In the View Details dialog box, click Ignore. In the message that appears, click OK. Then, click Precheck Again to run a precheck again. If you ignore the alert item, data inconsistency may occur, and your business may be exposed to potential risks.
After the data migration task passes the precheck, click Next.
In the Confirm Settings dialog box, configure the Instance Class parameter. Then, read and select the check box to agree to Data Transmission Service (Pay-As-You-Go) Service Terms.
Click Buy and Start to start the data migration task.
View the progress of the migration task.
When the status of the migration task changes to Completed, the data of the source instance is migrated to the destination instance.
NoteWe recommend that you do not manually stop the task during full data migration. Otherwise, the data migrated to the destination database may be incomplete. You can wait until the full data migration task automatically stops.

Switch your workloads to the destination ApsaraDB for MongoDB instance.
What to do next
If you no longer need the source instance, release the source instance.
If the source instance is billed based on the pay-as-you-go billing method, you can release the instance. For more information, see Release an ApsaraDB for MongoDB instance.
If the source instance is billed based on the subscription billing method, you are not allowed to release the instance.