This tutorial walks you through deploying Jenkins in an ACK Serverless cluster using Helm, then running your first pipeline build. Jenkins runs its controller on a persistent pod and dynamically creates agent pods in the cluster for each build job.
Prerequisites
Before you begin, ensure that you have:
-
An ACK Serverless cluster. See Create an ACK Serverless cluster
-
kubectl configured to connect to the cluster. See Connect to an ACK cluster by using kubectl
Usage notes
Jenkins is a community-maintained open source tool. Alibaba Cloud does not provide technical support for Jenkins. You are responsible for maintaining your Jenkins installation.
Step 1: Deploy Jenkins
Configure the Helm repository
Add the Jenkins Helm repository and update your local chart index:
helm repo add jenkins https://charts.jenkins.io
helm repo update
Expected output:
Hang tight while we grab the latest from your chart repositories...
...Successfully got an update from the "jenkins" chart repository
Update Complete. Happy Helming!
The Jenkins Helm repository is hosted outside the Chinese mainland. If your ACK Serverless cluster is deployed in the Chinese mainland, the helm repo update command may take longer than usual.
Install Jenkins
-
Create the
cicdnamespace:kubectl create ns cicd -
Create a NAS volume for the Jenkins home directory. Without persistent storage, all Jenkins configurations and job history are lost whenever the controller pod restarts. Create a Network Attached Storage (NAS) volume and a persistent volume claim (PVC) named
pvc-nasin thecicdnamespace before proceeding:-
If your cluster uses the Container Storage Interface (CSI) plugin, see Mount a statically provisioned NAS volume.
-
If your cluster uses the FlexVolume plugin, see Mount a statically provisioned NAS volume.
-
-
Deploy Jenkins in the
cicdnamespace:helm -n cicd install jenkins jenkins/jenkins \ --set persistence.existingClaim=pvc-nas \ --set controller.serviceType="LoadBalancer" \ --set controller.adminPassword="admin"Parameter Description Required persistence.existingClaim=pvc-nasName of the PVC that mounts the NAS volume. Must match the PVC you created in the cicdnamespace.Yes controller.serviceType="LoadBalancer"Exposes the Jenkins Service externally via a cloud load balancer. The default is ClusterIP, which is accessible only within the cluster. In an ACK Serverless cluster, set this toLoadBalancerso you can reach the Jenkins UI from a browser.No controller.adminPassword="admin"Sets a fixed admin password. If omitted, Jenkins generates a random password. See Get the randomly generated password if you skip this parameter. No For all available parameters, see jenkins/helm-charts.
-
Wait for the Jenkins controller pod to reach
Runningstatus:kubectl -n cicd get poExpected output:
NAME        READY   STATUS    RESTARTS   AGE
jenkins-0   2/2     Running   0          3m3s
Access Jenkins
Once the pod is running, open a browser and navigate to the external IP address of the Jenkins Service. Log in with the username admin and the password you set during installation.
To look up the external IP address, run:
kubectl -n cicd get svc jenkinsThe EXTERNAL-IP column shows the load balancer IP.
Get the randomly generated password
If you did not set controller.adminPassword during installation, retrieve the generated password with:
kubectl -n cicd exec -it svc/jenkins -c jenkins -- /bin/cat /run/secrets/additional/chart-admin-password && echoChange the Service type after installation
If you deployed Jenkins with the default ClusterIP Service type and want to expose it via a load balancer afterward, run:
kubectl -n cicd patch svc jenkins -p '{"spec": {"type": "LoadBalancer"}}'Step 2: Create a pipeline build
Jenkins integrates with the ACK Serverless cluster through the Kubernetes plugin. When you trigger a build, Jenkins dynamically creates an agent pod in the cluster to run the job. The pod contains a jnlp container that acts as the Jenkins agent and connects back to the controller. After the build completes, Jenkins immediately terminates the agent pod, so cluster resources are consumed only during active builds.
The following steps create a pipeline build named first-pipeline using the Hello World template.
-
Log in to Jenkins and click New Item in the left-side navigation pane.
-
In the Enter an item name field, type
first-pipeline, select Pipeline, and click OK. -
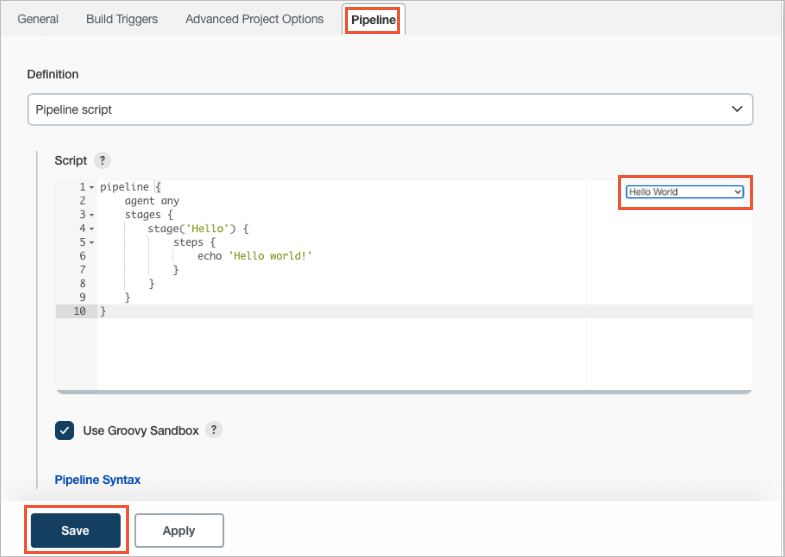
At the top of the configuration page, click the Pipeline tab. Select the Hello World template and click Save.
-
In the left-side navigation pane, click Build Now to trigger the build.
-
After the build starts, click Build History in the left-side navigation pane, then click 1# to open the build details. Click Console Output to view the build log and confirm the build succeeded.
What's next
-
Customize the agent pod template to use a specific container image or add multiple containers for language-specific builds. See Jenkins Kubernetes Plugin.
-
Configure source code management and webhooks to trigger pipeline builds automatically on code changes. See Jenkins documentation.