ApsaraDB for ClickHouse supports reading MaxCompute data through the MaxCompute table engine. Create an external table in ClickHouse that maps to a MaxCompute table, then query it directly.
Prerequisites
Before you begin, make sure you have:
An ApsaraDB for ClickHouse Community-Compatible Edition cluster running kernel version 20.3 or later
An active MaxCompute service. To activate it, see Activate MaxCompute
A MaxCompute project in the same region as your ClickHouse cluster. To create one, see Create a MaxCompute project
(For RAM users) MaxCompute permissions granted by your Alibaba Cloud account holder. See Prepare a RAM user
How it works
The workflow has four steps:
Create a MaxCompute external table with the source data schema.
Write data to the MaxCompute external table.
Create a ClickHouse external table that maps to the MaxCompute table using the
MaxComputetable engine.Query the ClickHouse external table.
The MaxCompute table engine connects to MaxCompute through the Tunnel service endpoint.
Import data from MaxCompute
Step 1: Create a MaxCompute external table
Log on to the MaxCompute console.
In the left navigation pane, choose DataWorks > Data Studio.
On the Data Studio page, hover over the
 icon, and choose New Table > MaxCompute > Table.
In the New Table dialog box, enter a Table Name. This example uses
maxcompute.Click Create.
In the Basic Properties section, configure the parameters.
Parameter Description Display name The display name of the table. Theme A subject in DataWorks, equivalent to a folder. Define level-1 and level-2 folders to classify tables by business purpose. To find the table later, go to the Table Management page and filter by subject. To create a subject, see Define table subjects. 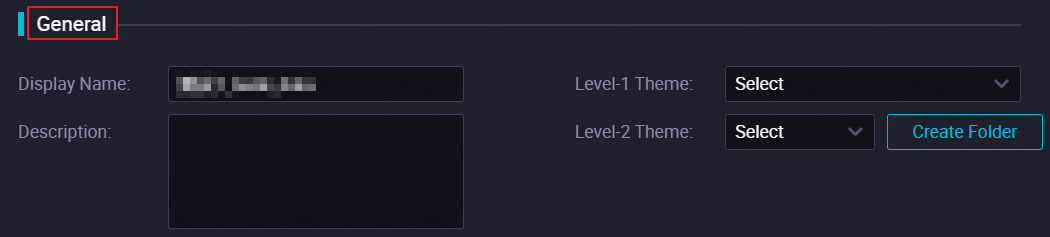
In the toolbar, click DDL.
In the DDL dialog box, enter the following statement and click Generate Table Schema.
CREATE TABLE IF NOT EXISTS maxcompute
(
    v1 INT,
    v2 INT
)
PARTITIONED BY
(
    v3 STRING
);
Click Submit to Development Environment, then click Submit to Production Environment.
Step 2: Write data to the MaxCompute external table
On the Data Studio page, click Ad-hoc Query in the left navigation pane.
Hover over the
icon, and choose New > ODPS SQL.In the New Node dialog box, select a Path and enter a Name.
Click Confirm.
On the node editing page, enter the following statement to insert data into the partition
v3='2021':INSERT INTO maxcompute PARTITION (v3='2021') VALUES (1, 2), (2, 3);In the toolbar, click the
 icon.
icon.In the Parameters window, select shared resource groups for scheduling and click OK.
In the MaxCompute Compute Cost Estimate window, confirm the Estimated Fee and click Run.
Step 3: Create a ClickHouse external table
Log on to the ApsaraDB for ClickHouse console.
On the Clusters page, click the ID of your cluster.
In the upper-right corner, click Log On to Database.
Enter the following statement and click Execute (F8):
The schema of the ClickHouse table must match the MaxCompute table. For data type mappings, see Data type mapping.If you use theMaxComputeRawtable engine instead ofMaxCompute, replacetunnel-endpointwithodps-endpoint. Theodps-endpointparameter specifies the VPC endpoint for the ODPS service. To get this endpoint, see Endpoint.Parameter Required Description Default tunnel-endpointYes The Tunnel service endpoint for the VPC. The MaxCompute service and your ClickHouse cluster must be in the same region. To get the VPC endpoint, see Endpoint. — project-nameYes The name of the MaxCompute project. — table-nameYes The name of the MaxCompute external table. — partition-specYes The MaxCompute partition. — access-key-idYes The AccessKey ID used to access the MaxCompute project. — access-key-secretYes The AccessKey secret used to access the MaxCompute project. — read-thread-numNo The number of concurrent threads for reading a single shard. 1quotaNo The MaxCompute compute resource quota. Shared quota CREATE TABLE <table_name> [ON CLUSTER default] ( '<col_name1>' col_type1, '<col_name2>' col_type2, ... ) ENGINE = MaxCompute('<tunnel-endpoint>', '<project-name>', '<table-name>', '<partition-spec>', '<access-key-id>', '<access-key-secret>', <read-thread-num>, '<quota>');The following table describes the ENGINE parameters. The following example creates a ClickHouse table that maps to the
maxcomputetable created in Step 1:CREATE TABLE default.maxcomputetest ON CLUSTER default ( v1 Int32, v2 Int32 ) ENGINE = MaxCompute('http://dt.cn-hangzh******.aliyun-inc.com', 'ckfwt', 'maxcompute', 'v3=2021', 'LTAI****************', 'yourAccessKeySecret');
Step 4: Query the ClickHouse external table
Log on to the ApsaraDB for ClickHouse console.
On the Clusters page, click the ID of your cluster.
In the upper-right corner, click Log On to Database.
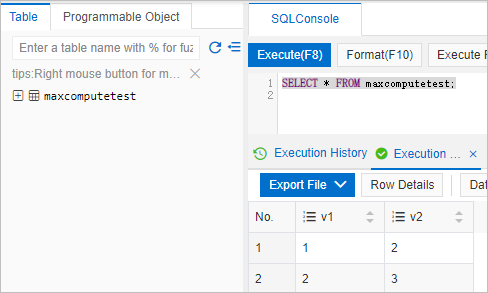
Enter the following query and click Execute (F8):
SELECT * FROM maxcomputetest;The query returns the data written to the MaxCompute table in Step 2.
Data type mapping
The following table lists how MaxCompute types map to ClickHouse types.
Nullable, and only single-level (non-nested) structures are supported. Omitting Nullable causes a table creation error.| MaxCompute type | ClickHouse type | Details |
|---|---|---|
| Boolean | UInt8 | — |
| Tinyint | UInt8, Int8 | — |
| Smallint | UInt16, Int16 | — |
| Int | UInt32, Int32 | — |
| Bigint | UInt64, Int64 | — |
| Float | Float32 | — |
| Double | Float64 | — |
| Char | String | — |
| Varchar | String | — |
| Binary | String | — |
| String | String | — |
| Date | Date | — |
| Datetime | Datetime | — |
| Decimal | String | — |
| Map | Nested(Nullable(keyType), Nullable(valueType)) | Single-level only. Example: map<string, string> maps to Nested(k Nullable(String), v Nullable(String)). All inner types must be Nullable. |
| Array | Array(Nullable(Type)) | Single-level only. Example: array<int> maps to Array(Nullable(Int32)). The inner type must be Nullable. |
| Struct | Tuple(Nullable(Type)) | Single-level only. Example: struct<x:int, y:string> maps to Tuple(Nullable(Int32), Nullable(String)). All inner types must be Nullable. |
| UUID | Not supported | — |
| INTERVAL | Not supported | — |
| Timestamp | Not supported | — |