By Gaoyang Cai
Elastic Stack is a widely used open-source log processing technology stack, originally known as ELK. Elasticsearch is a search and analysis engine.
Logstash is a server-side data processing pipeline that can collect data from multiple sources at the same time, convert the data, and send it to repositories (such as Elasticsearch). Kibana allows users to use graphs and charts to visualize the data in Elasticsearch. Later, a series of lightweight single-function data collectors (called Beats) were added to the collector (L), and the most commonly used is FileBeat. But you can also see the name, EFK.
Logstash and Beats are supported to facilitate the connection between RocketMQ and Elastic Stack.
Rocketmq-logstash-integration project adds input and output plug-ins for connecting to Logtash in RocketMQ. You can use Logstash to transfer data from other data sources to RocketMQ or consume messages from RocketMQ to ES.
Logtash allows you to install RocketMQ input and output on a run time as a plug-in. Currently, rockemq-logstash-integration supports Logtash 8.0 [3].
1. Refer to the following documents to create the Logtash input or output plug-in gem:
2. Enter the logstash installation directory and run the following command to install the plug-in (replace the gem file path with the file path extracted in the previous step):
bin/logstash-plugin install --no-verify --local /path/to/logstash-input-rocketmq-1.0.0.gem
bin/logstash-plugin install --no-verify --local /path/to/logstash-output-rocketmq-1.0.0.gem
If the installation process is slow, you can try to replace the source in Gemfile with a https://gems.ruby-china.com
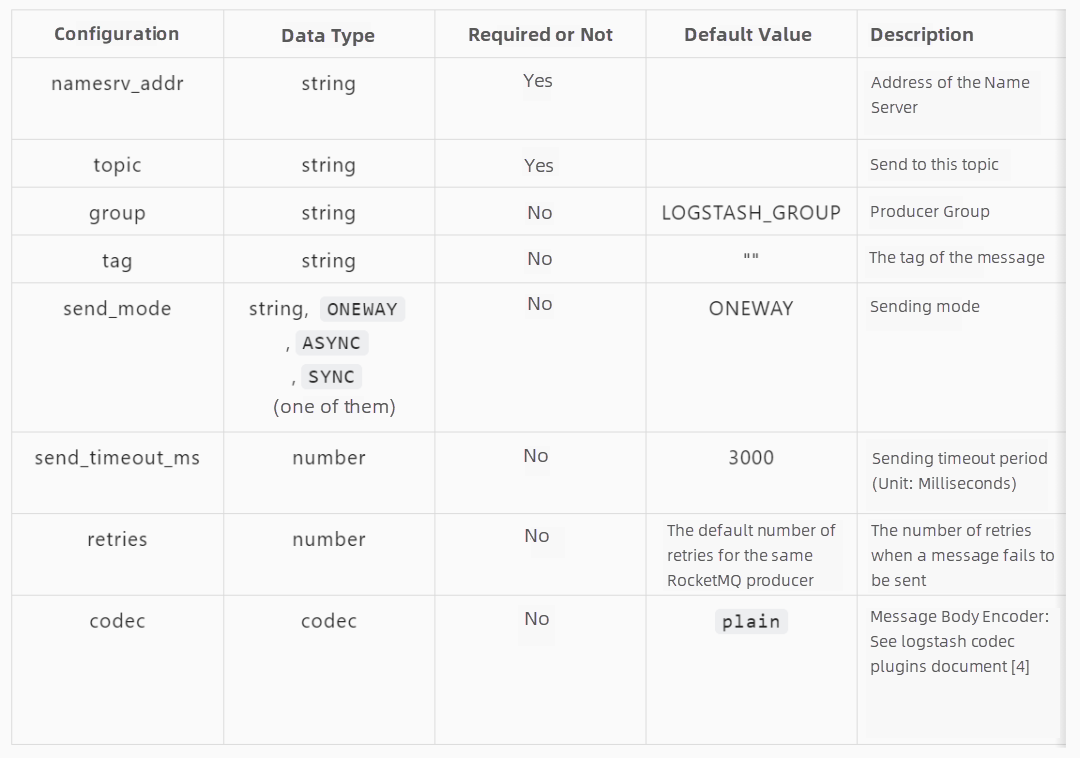
The following configuration sends the content of the file with the file name suffix .log in the collection /var/log/ and its subdirectories to RocketMQ in the form of a message. The topic is topic-test.
input {
  file {
    path => ["/var/log/**/*.log"]
  }
}
output {
  rocketmq {
    namesrv_addr => "localhost:9876"
    topic => "topic-test"
  }
}
Save the preceding configurations to the rocketmq_output.conf and start Logstash:
bin/logstash -f /path/to/rocketmq_output.conf
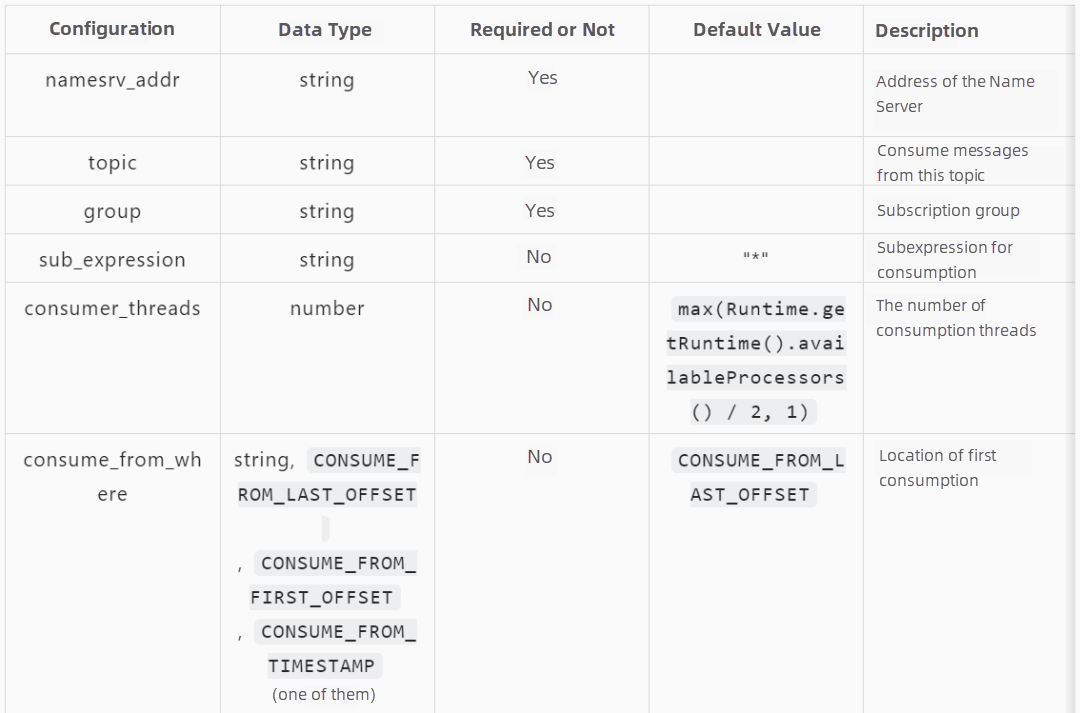
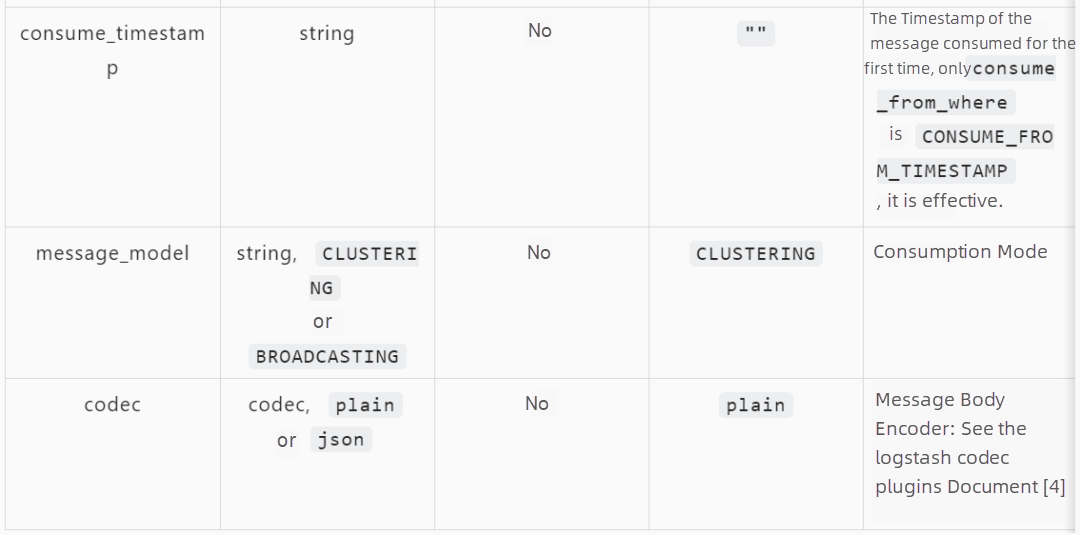
The following configuration file enables you to consume messages in a consumer topic-test and write them to a local ES cluster, where the index is specified as a test-%{+YYYY.MM.dd}:
input {
  rocketmq {
    namesrv_addr => "localhost:9876"
    topic => "topic-test"
    group => "GID_input"
  }
}
output {
  elasticsearch {
      hosts => ["127.0.0.1:9200"]
      index => "test-%{+YYYY.MM.dd}"
  }
}
Save the preceding configurations to the rocketmq_input.conf and start Logstash:
bin/logstash -f rocketmq_input.conf

Beats is a series of collectors, originally FileBeat[5]. Later, different data source collectors (such as Heartbeat[6] and Metricbeat[7]) were added.
The rocketmq-beats-integration project supports Beats to send data to RocketMQ.
Unlike Logtash, Beats does not support run-time loading plug-ins. Therefore, you need to download Beats v7.17.0[8] and recompile it to add support for RocketMQ integration. Please see this link for more information.
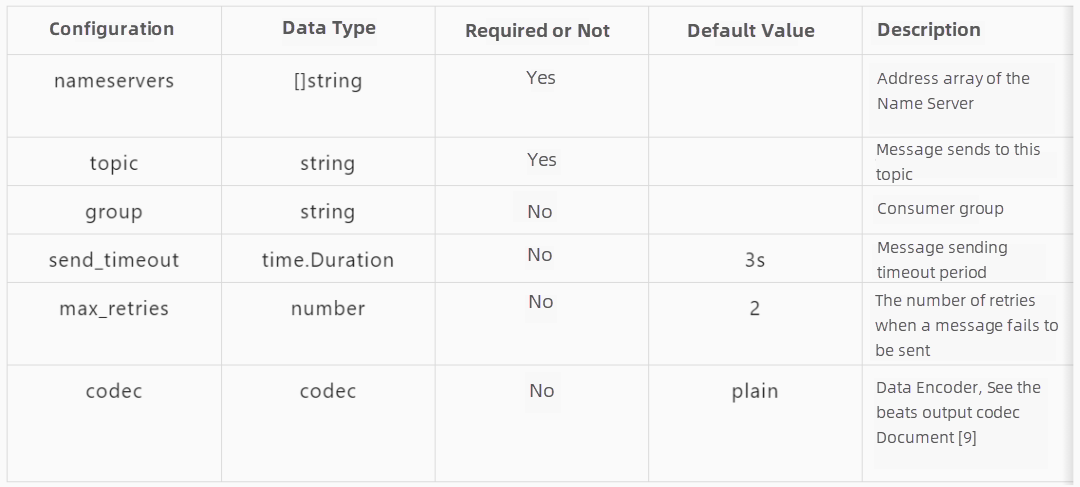
Let’s take FileBeat as an example. The following configuration file can be used to collect data from /var/log/messages and send it to the TopicTest topic of RocketMQ:
filebeat.inputs:
  - type: filestream
    enabled: true
    paths:
      - /var/log/messages
output.rocketmq:
  nameservers: [ "127.0.0.1:9876" ]
  topic: TopicTest
Save the preceding content to the rocketmq_output.yml and run the following command:
./filebeat -c rocketmq_output.ymlThe configurations of the output.rocketmq are the same for other types of Beats. You only need to configure their data sources based on specific Beats.

Finally, let's introduce an example of importing Nginx access logs to RocketMQ and using RocketMQ Streams to count the number of HTTP return codes by the minute. The results are recorded to RocketMQ and finally saved to Elasticsearch.
FileBeat occupies fewer resources and is suitable for collecting original logs as an agent. The following configuration file can be used to collect logs from /var/log/nginx/access.log and send them to the TopicNginxAcc topic of RocketMQ:
filebeat.inputs:
  - type: filestream
    enabled: true
    paths:
      - /var/log/nginx/access.log
output.rocketmq:
  nameservers: [ "127.0.0.1:9876" ]
  topic: TopicNginxAcc
Start the FileBeat that supports RocketMQ in this topic to enable log collection.
./filebeat -c nginx-beat.yml -eIn the previous step, we sent the log data to RocketMQ. Next, you can use RocketMQ Streams to process these log data.
We consume data from the topic TopicNginxAcc that stores the Nginx access log data, parse the log content, only retain the time used for statistics and the HTTP code field returned, perform statistics based on the dimension of one minute, and send the statistics results to the TopicNginxCount in the form of messages.
You must introduce dependencies to use RocketMQ Streams.
        <dependency>
            <groupId>org.apache.rocketmq</groupId>
            <artifactId>rocketmq-streams-clients</artifactId>
            <version>1.0.1-preview</version>
        </dependency>
As shown in the following code:
package org.apache.rocketmq;


import com.alibaba.fastjson.JSONObject;
import org.apache.rocketmq.streams.client.StreamBuilder;
import org.apache.rocketmq.streams.client.source.DataStreamSource;
import org.apache.rocketmq.streams.client.strategy.WindowStrategy;
import org.apache.rocketmq.streams.client.transform.window.Time;
import org.apache.rocketmq.streams.client.transform.window.TumblingWindow;

import java.time.LocalDateTime;
import java.time.format.DateTimeFormatter;
import java.util.Locale;
import java.util.regex.Matcher;
import java.util.regex.Pattern;

public class RocketMqStreamsDemo {
    // nginx access log pattern
    public static final String LOG_PATTERN = "^(?<remote>[^ ]*) (?<host>[^ ]*) (?<user>[^ ]*) \\[(?<time>[^\\]]*)\\] \"(?<method>\\S+)(?: +(?<path>[^ ]*) +\\S*)?\" (?<code>[^ ]*) (?<size>[^ ]*)(?: \"(?<referer>[^\\\"]*)\" \"(?<agent>[^\\\"]*)\" \"(?<forwarder>[^\\\"]*)\")?";

    // The date format of the nginx access log
    private static final DateTimeFormatter fromFormatter = DateTimeFormatter.ofPattern("dd/MMM/yyyy:HH:mm:ss Z", Locale.US);
    // rocektmq-streams window supported date format
    private static final DateTimeFormatter toFormatter = DateTimeFormatter.ofPattern("yyyy-MM-dd HH:mm:ss", Locale.CHINA);

    private static final String NAMESRV_ADDRESS = "localhost:9876";


    public static void main(String[] args) {
        Pattern pattern = Pattern.compile(LOG_PATTERN);
        DataStreamSource dataStream = StreamBuilder.dataStream("my-namespace", "nginx-acc-job");
        dataStream
                .fromRocketmq("TopicNginxAcc", "GID-count-code", true, NAMESRV_ADDRESS) //Consume TopicNginxAcc
                .map(event -> ((JSONObject) event).get("message"))
                .map(message -> { // Only the useful code and time fields are retained
                    final String logStr = (String) message;
                    final Matcher matcher = pattern.matcher(logStr);
                    JSONObject logJson = new JSONObject();
                    if (matcher.find()) {
                        logJson.put("code", matcher.group("code"));
                        final String dateTime = matcher.group("time");
                        logJson.put("time", LocalDateTime.parse(dateTime, fromFormatter).format(toFormatter));
                    }
                    System.out.println(logJson);
                    return logJson;
                })
                .window(TumblingWindow.of(Time.minutes(1)))
                .groupBy("code") // Aggregate by code
                .setTimeField("time")
                .count("total")
                .waterMark(1)
                .toDataSteam()
                .toRocketmq("TopicNginxCount", "GID-result", NAMESRV_ADDRESS) // 保存到TopicNginxCount
                .with(WindowStrategy.highPerformance())
                .start();
    }
}Finally, we use Logstash to import the statistical results saved in the previous step to the TopicNginxCount to Elasticsearch.
After the logstash-input-rocketmq plug-in is installed, start Logstash and use the following configuration files:
input {
  rocketmq {
    namesrv_addr => "localhost:9876"
    topic => "TopicNginxCount"
    group => "GID-nginx-result"
  }
}

filter {
  json {
    source => "message"
  remove_field => ["message"]
  }
}

output {
  elasticsearch {
    hosts => ["http://localhost:9200"]
    index => "nginx-access-%{+YYYY.MM.dd}"
  }
}
The data is saved to an index that starts with an nginx-access in Elasticsearch and is saved daily.
You can list the data in the index to call the Elasticsearch Rest API.
curl -X GET "localhost:9200/nginx-access-2022.03.11/_search?pretty" -H 'Content-Type: application/json' -d'
{
    "query": {
        "match_all": {}
    }
}
'
The following are some results. The start_time and end_time are the starting and ending times of statistics, respectively. The total is the number of which the HTTP code is code during this period.
{
    "hits" : [
      {
        "_index" : "nginx-access-2022.03.11",
        "_id" : "er-ed38Bn85qBf4OFHDW",
        "_score" : 1.0,
        "_source" : {
          "@version" : "1",
          "end_time" : "2022-03-11 14:12:00",
          "start_time" : "2022-03-11 14:11:00",
          "fire_time" : "2022-03-11 14:12:01",
          "total" : 52,
          "@timestamp" : "2022-03-11T06:15:22.928736Z",
          "code" : "200"
        }
      },
    {
        "_index" : "nginx-access-2022.03.11",
        "_id" : "eb-ed38Bn85qBf4OFHDW",
        "_score" : 1.0,
        "_source" : {
          "@version" : "1",
          "end_time" : "2022-03-11 14:12:00",
          "start_time" : "2022-03-11 14:11:00",
          "fire_time" : "2022-03-11 14:12:01",
          "total" : 1,
          "@timestamp" : "2022-03-11T06:15:22.928472Z",
          "code" : "404"
        }
      }
    ]
}[1]https://github.com/apache/rocketmq-externals/tree/master/rocketmq-logstash-integration
[2]https://github.com/apache/rocketmq-externals/tree/master/rocketmq-beats-integration
[3]https://github.com/elastic/logstash/tree/8.0
[4]https://www.elastic.co/guide/en/logstash/current/codec-plugins.html
[5]https://www.elastic.co/products/beats/filebeat
[6]https://www.elastic.co/products/beats/heartbeat
[7]https://www.elastic.co/products/beats/metricbeat
[8]https://github.com/elastic/beats/tree/v7.17.0/filebeat
[9]https://www.elastic.co/guide/en/beats/filebeat/current/configuration-output-codec.html
Cloud-Native Activates New Paradigms for Application Construction, Bringing Serverless Singularity

480 posts | 48 followers
FollowAlibaba Cloud Community - December 9, 2022
Alibaba Cloud Native Community - January 5, 2023
Alibaba Cloud Native Community - April 13, 2023
Alibaba Cloud Native Community - July 19, 2022
Alibaba Cloud Native Community - March 20, 2023
Alibaba Cloud Native Community - March 20, 2023

480 posts | 48 followers
Follow Log Service
An all-in-one service for log-type data
Learn More ApsaraMQ for RocketMQ
ApsaraMQ for RocketMQ is a distributed message queue service that supports reliable message-based asynchronous communication among microservices, distributed systems, and serverless applications.
Learn More Hologres
A real-time data warehouse for serving and analytics which is compatible with PostgreSQL.
Learn More Data Lake Analytics
A premium, serverless, and interactive analytics service
Learn MoreMore Posts by Alibaba Cloud Native Community