By Amit Maity, Alibaba Cloud Tech Share Author. Tech Share is Alibaba Cloud's incentive program to encourage the sharing of technical knowledge and best practices within the cloud community.
Batch Compute is a distributed cloud service suitable for processing massive volumes of data concurrently. The system automates resource management, job scheduling, and data loading and supports billing on a Pay-As-You-Go basis. This tutorial demonstrates how you can submit or schedule jobs automatically simply by sending message from Alibaba Cloud Message Service.
Alibaba Cloud Message Service is a high performance, reliable, safe, extensible distributed message and notification service that supports massive messages, concurrent operations. It help facilitate message transfer between applications and system decoupling.
We will use Queue based model of messaging service to receive message and automatically submit job in batch compute.
There are various real world applications of this idea. For example,

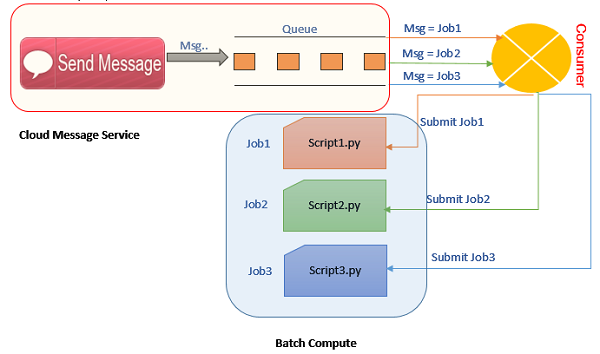
Figure 1 Architecture of Demo Application
In this tutorial, we will simulate the message alert using send message function in Message Service web console. From the console, job names will be passed as message text or body to consumer script. Consumer is a custom python script, which will monitor messages from Message Queue in certain frequencies and depending on the message text received, consumer will submit the job corresponds to the job name mentioned in each message.
This tutorial can easily be understood and followed if you are familiar with the below technologies and conceipts,
First, you'll need Alibaba cloud account. If you don't have one, then sign up for free cloud account with $5/$10 credit using the following link,
https://www.alibabacloud.com/referral?referralCode=kwfk44
To develop and run the consumer script you will need a host server (Alibaba Cloud ECS or any other windows/unix Server) with python 2.7 installed.
Download and install following Alibaba Cloud SDKs in host server
Activate following products/services in your cloud account.
Write 3 different python scripts for 3 different jobs as follows,
print ("This is Script1 Output!")
print ("This is Script2 Output!")
print ("This is Script3 Output!")
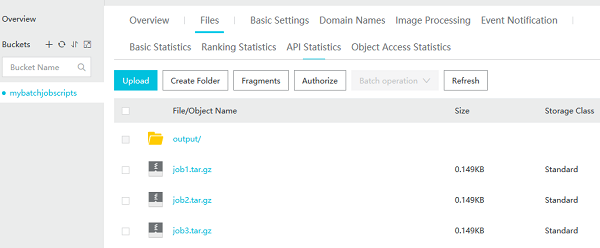
Pack 3 scripts and upload into OSS bucket mybatchjobscripts using osscmd python script. Please make sure Batch Compute and OSS bucket regions are same. Otherwise, batch compute job submission will fail with invalid OSS bucket path.
$> tar -czf job1.tar.gz Script1.py

$> tar -czf job2.tar.gz Script2.py

$> tar -czf job3.tar.gz Script3.py

$> python osscmd config --id=<AccessKeyID>

--key=<AccessKeySecret>

--host=oss-cn-shenzhen.aliyuncs.com

$> python osscmd put job1.tar.gz oss://mybatchjobscripts/job1.tar.gz

$> python osscmd put job2.tar.gz oss://mybatchjobscripts/job2.tar.gz

$> python osscmd put job3.tar.gz oss://mybatchjobscripts/job3.tar.gz

Figure 2OSS Bucket

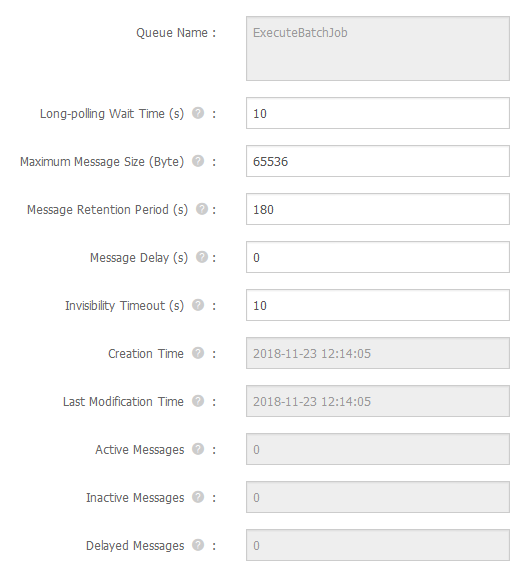
Figure 3 Message Queue Details

Figure 4 Message Service Region End Point
https://github.com/itexpertshire/AlibabaMessageQueueBatchCompute
There are 3 files/scripts in the github repository
MsgService.cfg
Configuration file to hold the values of AccessKeyId, AccessKeySecret, Endpoint. These 3 config variables should be updated as per your cloud account.
[Base]

AccessKeyId = <>

AccessKeySecret = <>

Endpoint = http://<>.mns.us-east-1.aliyuncs.com/
common.py
This is a generic script, which parses the access security parameters from MsgService.cfg file and returns the parameter values to main consumer script.
Read the parameter values using ConfigParser module,
cfg_fn = os.path.join(os.path.dirname(os.path.abspath(__file__)) + "\MsgService.cfg")
parser = ConfigParser.ConfigParser()

parser.read(cfg_fn)
accessKeyId, accessKeySecret will be used in message and batch compute API,
accessKeyId = parser.get("Base", "AccessKeyId")

accessKeySecret = parser.get("Base", "AccessKeySecret")

endpoint = parser.get("Base", "Endpoint")
ConsumerMsg.py
This is the main script which will poll messages from a specific message queue (queue name will be passed as argument to the script) in every 3 seconds and once message is received, script will call batch compute API to trigger the job.
First, let's import the messaging service and batch compute python libraries.
from mns.account import Account

from mns.queue import *

from batchcompute import Client, ClientError
Below line is to get the batch compute region end_point info. In SDK, only 4 end points available which can be used as region like below.
CN_HANGZHOU, CN_QINGDAO, CN_SHENZHEN, CN_BEIJING
from batchcompute import CN_SHENZHEN as REGION
If you want to use some other region, then get the end point url corresponds to your preferred region and pass the end point url to batch compute Client API.
Below is the batch job description template in JSON format. This description will be dynamically built according to the job name received from the message queue. CommandLine and PackagePath attribute will point to appropriate script name and path of the job depending on the job name received via message queue.
job_desc = """{
"Name": "RunJob-%s",
"Type": "DAG",
"JobFailOnInstanceFail": true,
"Description": "",
"Priority": 0,
"DAG": {
"Tasks": {
"T1": {
"ClusterId": "",
"InstanceCount": 1,
"MaxRetryCount": 0,
"Parameters": {
"Command": {
"CommandLine": "python %s.py",
"PackagePath": "oss://mybatchjobscripts/%s.tar.gz"
---------------------
Now load the access key id, secret code and end point of MNS from MsgService.cfg file and instantiate batch compute and message service interface class.
#Load config values

accid,acckey,endpoint,token = MNSCommon.LoadConfig()

#Instantiate batchcompute client

client=Client(REGION, accid, acckey)

# Instantiate message service account class

my_account = Account(endpoint, accid, acckey, token)
Read the message from message queue with long polling mode with long polling time is set 3 seconds. When there is a message in the queue, the request returns immediately. When there is no message in the queue, the request hangs on the MNS server for 3 seconds. During this period, a message is written to the queue, and the request will return the message immediately. After 3 seconds, the request returns to the queue without a message.
recv_msg = my_queue.receive_message(wait_seconds)
If there is no message, then loop will continue to repeat and check the queue after every 3 seconds, if there are any new messages.
If message available, then will build the job description attribute JSON format string and call create_job function to submit the job.
if recv_msg.message_body.lower() == "job1":

job_json_argument = job_desc % ("job1","Script1","job1")

elif recv_msg.message_body.lower() == "job2":

job_json_argument = job_desc % ("job2","Script2","job2")

elif recv_msg.message_body.lower() == "job3":

job_json_argument = job_desc % ("job3","Script3","job3")

else:

continue

job_id = client.create_job(json.loads(job_json_argument)).Id
If job submission is successful, then delete the received message from queue.
my_queue.delete_message(recv_msg.receipt_handle)

print "Delete Message Succeed!  ReceiptHandle:%s" % recv_msg.receipt_handle
Now let's execute the python code. Pass the message queue name as argument to the script. Here "ExecuteBatchJob" is the message queue name
PS> python ConsumerMsg.py ExecuteBatchJob
You'll see bellow messages in the terminal as output,

Now, go to the message service web UI console and query the queue name. Use Send Message form to send message with text 'job1'. As soon as message is successfully sent, you will see job successfully submitted message in your python console as below.

To see the submitted job, go to batch compute console and open the job list or if the page is already open, hit refresh button. Initially, the submitted jobs will be in waiting status. After a while, the job status will be changed to 'Finished'. You can see the job outputs in OSS bucket folder named 'output'.

Figure 5 Batch Compute Console

2,605 posts | 747 followers
FollowAlibaba Clouder - June 30, 2020
Alibaba Clouder - July 2, 2019
Alibaba Clouder - August 5, 2020
Alibaba Clouder - July 2, 2019
Alibaba Clouder - August 12, 2019
Alibaba Cloud Native Community - March 11, 2024

2,605 posts | 747 followers
Follow Message Service
A message queuing and notification service that facilitates smooth transfer of messages between applications
Learn More Batch Compute
Resource management and task scheduling for large-scale batch processing
Learn More OSS(Object Storage Service)
An encrypted and secure cloud storage service which stores, processes and accesses massive amounts of data from anywhere in the world
Learn MoreMore Posts by Alibaba Clouder