By Jiexing
The evolution of Java from Java 8 to Java 9 and later versions introduces an important new feature--modular system (Project Jigsaw). The purpose of modular system is to solve dependency management of large applications, improve performance, simplify JRE, enhance compatibility and security, and improve development efficiency. Through modular, Java can better support micro-services architecture, provide finer-grained encapsulation and control, and clearer dependencies.
This article introduces the concepts of modular system in detail, such as MODULE DESCRIPTOR, main parameters, key instructions, and modular strategy. In addition, this article provides the best practices to help developers better understand and apply the Java modular system.
If Java 8 is compared to a monolithic application, then after the introduction of modular system, Java turns into micro-services from Java 9. Modular system, codenamed Jigsaw, was first proposed in August 2008 (six years before Martin Fowler proposed micro-services). It officially entered the development phase in 2014 and was finally released in September 2017 with Java 9.
The official definition is:
A uniquely named, reusable group of related packages, as well as resources (such as images and XML files) and a module descriptor.
As shown in the figure, the carrier of the module is a JAR file and a module is a JAR file. However, compared with the traditional JAR file, there is one more module-info.class file in the root directory of the module, that is, module descriptor. It contains information, such as the module name, modules it depends on, packages in the module to be exported [allowed to be directly imported], packages in the module to be opened [allowed to be accessed through Java reflection], services it provides, and services it depends on.
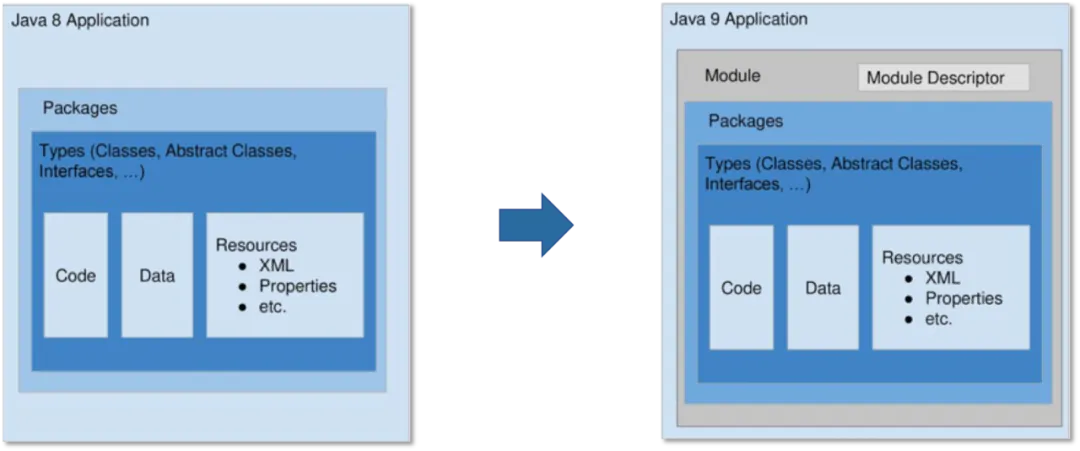
Any JAR file can be upgraded to a module by adding a valid module descriptor. This seemingly small change, in my opinion, brings at least four benefits:
• Java can calculate the dependencies between each module based on the module descriptor. Once a circular dependency is found, the start will be terminated.
• Since modular system does not allow different modules to export the same package (that is, split package), Java can accurately locate a module when searching for packages, thus achieving better performance.
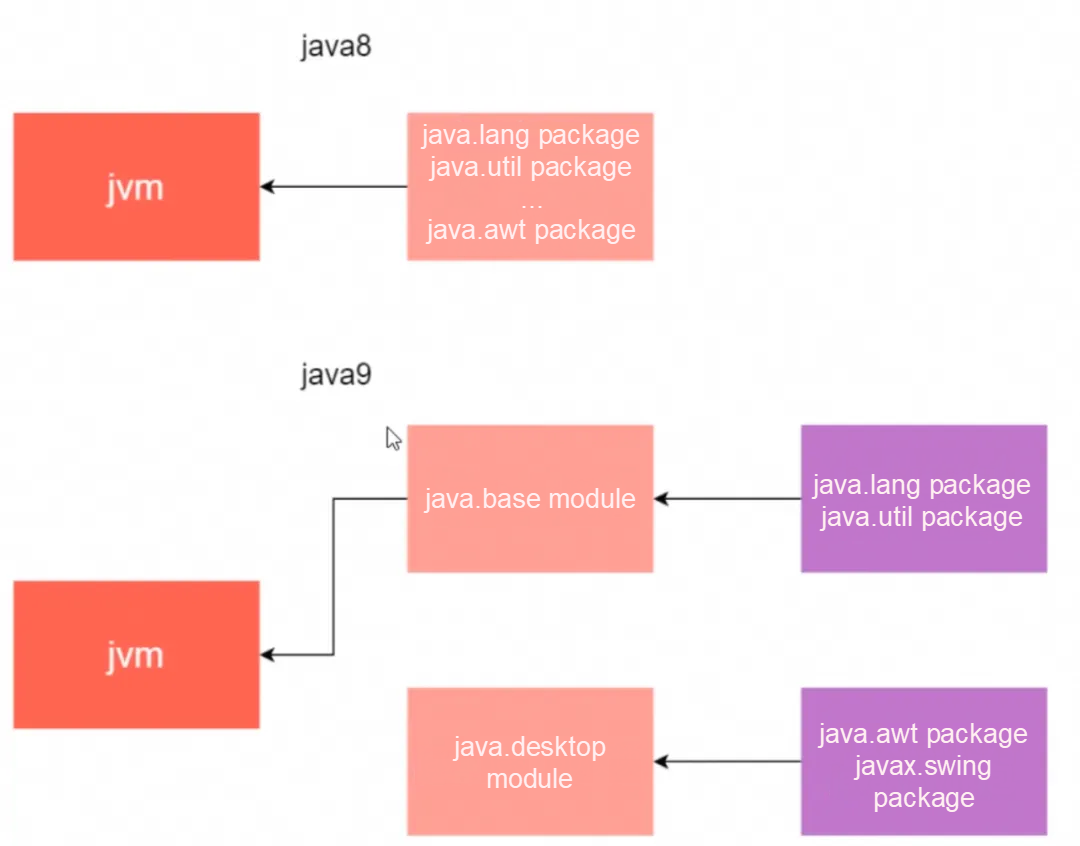
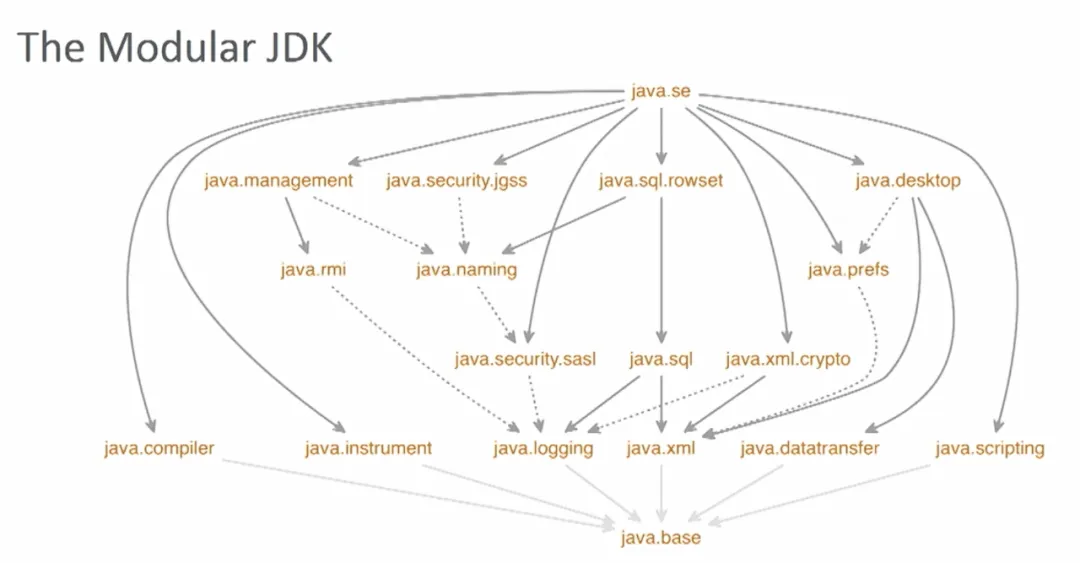
After the introduction of modular system, the JDK itself is divided into 94 modules (as shown in the figure). With the jlink tool added in Java 9, developers can combine these modules based on actual application scenarios, remove unnecessary modules, and generate a custom JRE, thus effectively reducing the size of JRE.
Thanks to this, the size of JRE 11 is only 53% of that of JRE 8, reduced from 218.4 MB to 116.3 MB, and the large rt.jar file that is widely criticized is also removed. Smaller JRE means less memory usage, which makes Java more friendly for embedded application development.
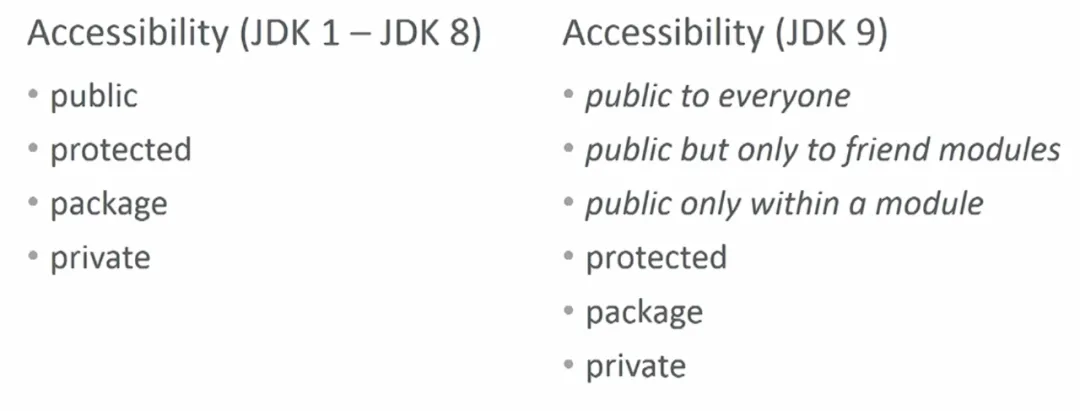
Java has always had only four types of accessibilities, which greatly reduces its support for encapsulation.
After Java 9, with the exports keyword in the module descriptor, module maintainers can precisely control which classes can be publicly available and which classes are only for internal use. In other words, it no longer relies on documents but is guaranteed by the compiler. The refinement of class accessibility brings better compatibility and security.
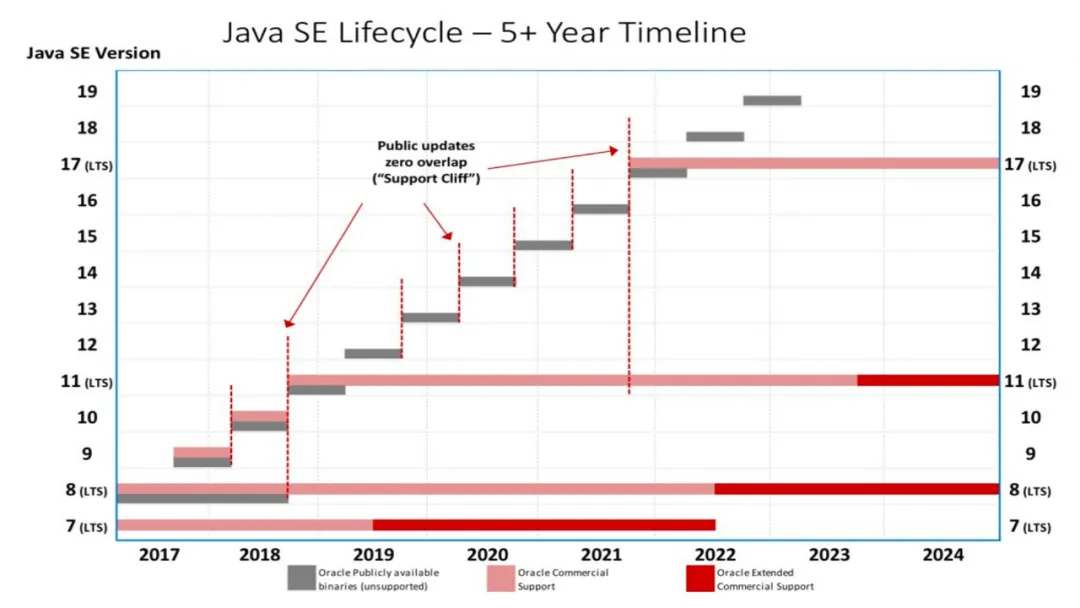
After Java 9, Java changed its original style of repeated delays and followed the release strategy of one major version every six months. From September 2017 to March 2020, from Java 9 to Java 14, six versions were released in three years, without any delay, as shown in the following figure. This is undoubtedly related to the introduction of modular system.
As mentioned before, after Java 9, JDK was split into 94 modules. Each module has a clear module descriptor and independent unit testing. For each Java developer, each person only needs to focus on the module they are responsible for, thus greatly improving development efficiency. The difference is like upgrading the monolithic application architecture to micro-services architecture. Thus the version iteration is fast.
1) Strong Encapsulation: Modular allows developers to specify which are public APIs of the module and which are internal implementations, thus enhancing encapsulation. This allows developers to control the visibility of their code to the outside world, which reduces coupling and improves code security.
2) Clear Dependency Management: In modular system, each module must explicitly declare the other modules it depends on. This explicit dependency declaration promotes a clearer and more stable dependency management mechanism for building and maintaining large projects.
3) Improved Performance: Modular system helps JVM and the compiler make better decisions because they know exactly which modules will be used and which will not. This can contribute to faster start time and smaller memory usage, especially in micro-services and cloud-native application scenarios.
4) More-easily-built Large Systems: Modular system encourages developers to split large and complex programs into smaller and more manageable parts. This approach makes it easier to build, test, and maintain large systems while improving code reusability.
5) Better Security: Modular system limits unnecessary access to the internal implementation of the module, thus reducing security risks. It allows the application to explicitly control which parts are publicly accessible, thus enhancing the security of the entire application.
6) Reduced Application Size: Since modular allows the application to contain only the required modules, unused modules can be removed, thus reducing the total size of the application. This is particularly valuable when it needs to be deployed into the resource-constrained environment.
7) Facilitated Module Descriptors between Modules: By enforcing clear boundaries between modules, modular helps avoid the "jar hell", that is, conflicts and confusion caused by multiple versions of JAR files in the project.
The core of the module is the module descriptor, which corresponds to the module-info.class file in the root directory. This class file is compiled from the module-info.java in the root directory of the source code. Java designs a dedicated syntax for module-info.java, including module, requires, exports, and other keywords.
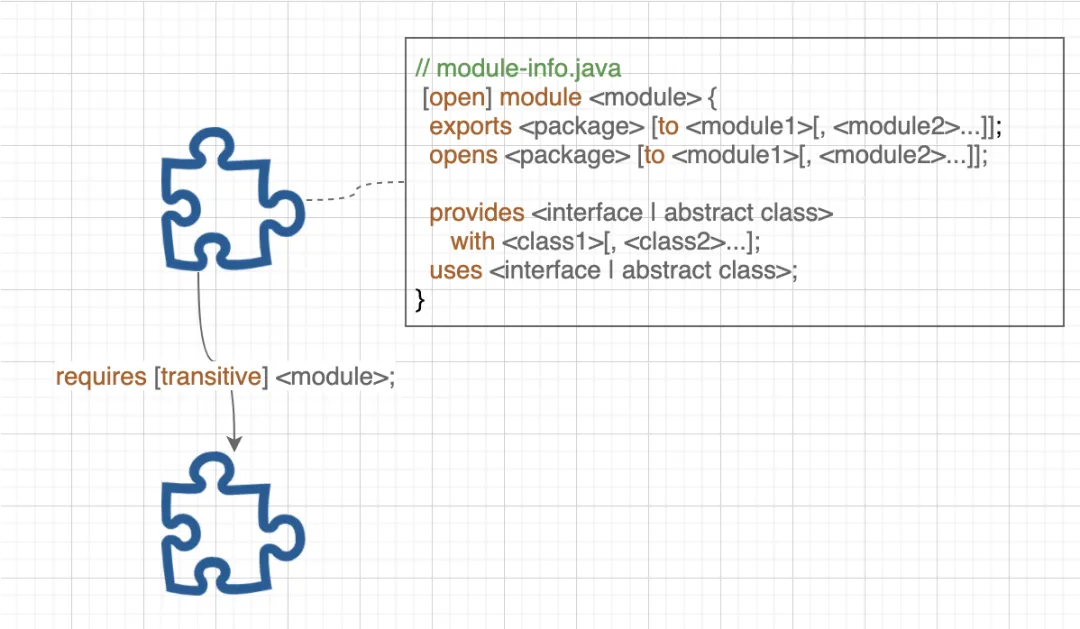
[open] module <module>: Declare a module. The module name must be globally unique and cannot be repeated. Add the open keyword to indicate that all packages within the module are allowed to be accessed through Java reflection, and the opens statement is no longer allowed within the module declaration.
requires [transitive] <module>: Declare module dependencies. Only one dependency can be declared at a time. If multiple modules are depended on, multiple declarations are required. Add the transitive keyword to indicate transitive dependencies. For example, if module A depends on module B and module B transitively depends on module C, then module A automatically depends on module C, similar to Maven.
exports <package> [to <module1>[, <module2>...]]: Export packages within the module (allowed to be directly imported) and export one package at a time. If multiple packages need to be exported, multiple declarations are required. If it is a targeted export, you can use the to keyword followed by a list of modules (separated by a comma).
opens <package> [to <module>[, <module2>...]]: Open the packages within the module (allowed to be accessed through Java reflection) and open one package at a time. If multiple packages need to be opened, multiple declarations are required. If it is a targeted open, you can use the to keyword followed by a list of modules (separated by a comma). provides <interface | abstract class> with <class1>[, <class2> ...]: Declare the Java SPI service provided by the module. Multiple service implementation classes can be declared at a time (separated by a comma).
uses <interface | abstract class>: Declare the Java SPI service that the module depends on. The code in the module can load all the implementation classes of the declared SPI service at a time through ServiceLoader.load(Class).
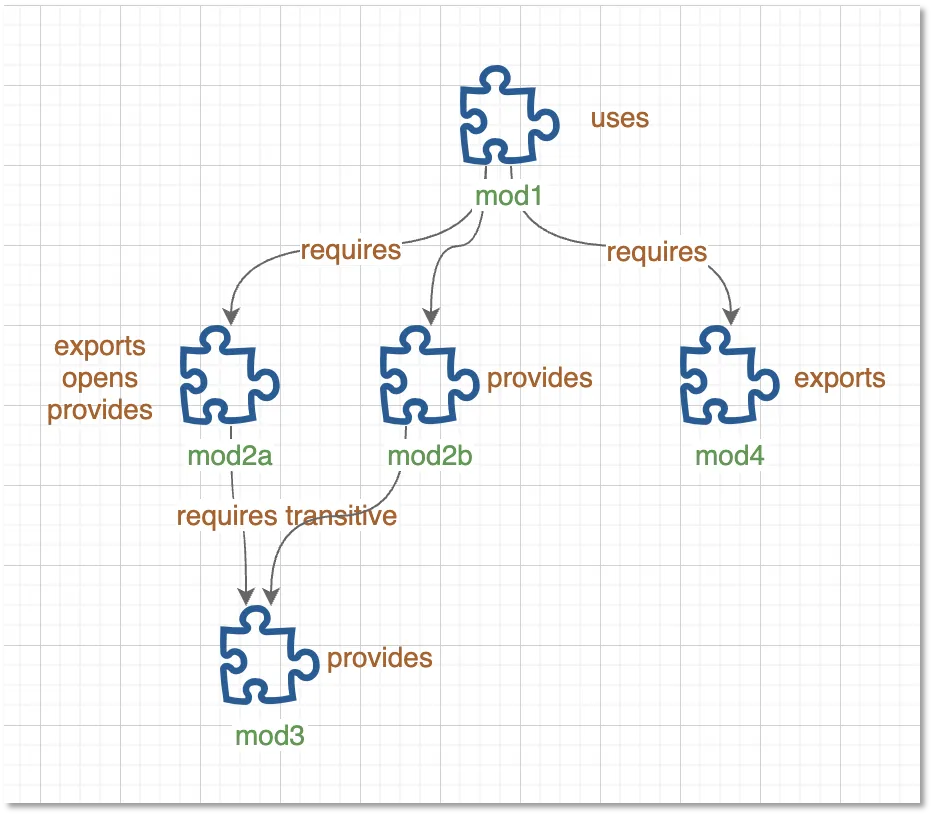
o mod1: The main module. It shows two methods to use the service implementation class.
module-info.java:
import mod3.exports.IEventListener;
module mod1 {
    requires mod2a;
    requires mod4;
    uses IEventListener;
}
EventCenter.java (main function):
package mod1;
import mod2a.exports.EchoListener;
import mod3.exports.IEventListener;
import mod4.Events;
import java.util.ArrayList;
import java.util.ServiceLoader;
import java.util.stream.Collectors;
public class EventCenter {
   // Method 1: Use exports and opens
    System.out.println("Demo: Direct Mode");
    var listeners = new ArrayList<IEventListener>();
    // Use the exports class
    listeners.add(new EchoListener());
    //Use the opens class
    // compile error: listeners.add(new ReflectEchoListener());
    listeners.add((IEventListener<String>) Class.forName("mod2a.opens.ReflectEchoListener").getDeclaredConstructor().newInstance());
    var event = Events.newEvent();
    listeners.forEach(l -> l.onEvent(event));
    System.out.println();

    // Method 2: Use SPI
    System.out.println("Demo: SPI Mode");
    // Load all IEventListener implementation classes, regardless of whether they are exports/opens or not.
    var listeners2 = ServiceLoader.load(IEventListener.class).stream().map(ServiceLoader.Provider::get).collect(Collectors.toList());
    // compile error: listeners.add(new InternalEchoListener());
    // compile error: listeners.add(new SpiEchoListener());
    var event2 = Events.newEvent();
    listeners2.forEach(l -> l.onEvent(event2));
}
shell execution script:
#!/bin/zsh

# mod4
javac -d out/mods/mod4 mod4/src/**/*.java
jar -cvf out/mods/mod4.jar -C out/mods/mod4 .

# mod3
javac -d out/mods/mod3 mod3/src/**/*.java
jar -cvf out/mods/mod3.jar -C out/mods/mod3 .

# mod2b
javac -p out/mods/mod3.jar -d out/mods/mod2b mod2b/src/**/*.java
jar -cvf out/mods/mod2b.jar -C out/mods/mod2b .

# mod2a
javac -p out/mods/mod3.jar -d out/mods/mod2a mod2a/src/**/*.java
jar -cvf out/mods/mod2a.jar -C out/mods/mod2a .

# mod1
javac -p out/mods/mod2a.jar:out/mods/mod2b.jar:out/mods/mod3.jar:out/mods/mod4.jar -d out/mods/mod1 mod1/src/**/*.java
jar -cvf out/mods/mod1.jar -C out/mods/mod1 .

# run
java -p out/mods/mod1.jar:out/mods/mod2a.jar:out/mods/mod2b.jar:out/mods/mod3.jar:out/mods/mod4.jar -m mod1/mod1.EventCenter
o mod2a: Export and open a package respectively, and declare two service implementation classes.
module-info.java:
import mod3.exports.IEventListener;
module mod2a {
    requires transitive mod3;
    exports mod2a.exports;
    opens mod2a.opens;
    provides IEventListener
            with mod2a.exports.EchoListener, mod2a.opens.ReflectEchoListener;
}
EchoListener.java & ReflectEchoListener.java:
package mod2a.exports;
import mod3.exports.IEventListener;
public class EchoListener implements IEventListener<String> {

    @Override
    public void onEvent(String event) {
        System.out.println("[echo] Event received: " + event);
    }
}

package mod2a.opens;
import mod3.exports.IEventListener;
public class ReflectEchoListener implements IEventListener<String> {

    @Override
    public void onEvent(String event) {
        System.out.println("[reflect echo] Event received: " + event);
    }
}
o mod2b: Declare an undisclosed service implementation class.
module-info.java:
import mod3.exports.IEventListener;
module mod2b {
    requires transitive mod3;
    provides IEventListener
            with mod2b.SpiEchoListener;
}
SpiEchoListener.java:
package mod2b;
import mod3.exports.IEventListener;
public class SpiEchoListener implements IEventListener<String> {

    @Override
    public void onEvent(String event) {
        System.out.println("[spi echo] Event received: " + event);
    }
}
o mod3: Define an SPI service (IEventListener) and declare an undisclosed service implementation class.
module-info.java:
import mod3.exports.IEventListener;
module mod1 {
    requires mod2a;
    requires mod4;
    uses IEventListener;
}
IEventListener.java & InternalEchoListener.java:
package mod3.exports;
public interface IEventListener<T> {
    void onEvent(T event);
}


package mod3.internal;
import mod3.exports.IEventListener;
public class InternalEchoListener implements IEventListener<String> {

    @Override
    public void onEvent(String event) {
        System.out.println("[internal echo] Event received: " + event);
    }
}
o mod4: Export the public model class.
module-info.java:
module mod4 {
    exports mod4;
}
Events.java:
package mod4;
import java.util.UUID;
public class Events {

    public static String newEvent() {
        return UUID.randomUUID().toString();
    }
}• Java 9 introduces a series of new parameters for compile and run modules. The two most important parameters are -p and -m. -p parameter specifies the module path. Multiple modules are separated by : (Mac, Linux) or ; (Windows). It applies to both the javac command and the java command. Its usage is very similar to -cp in Java 8. -m parameter specifies the main function of the module to be run. The input format is the module name or the class name of the main function. This parameter only applies to the java command. The basic usage of the two parameters is as follows:
javac -p <module_path> <source>java -p <module_path> -m <module>/<main_class>• The fastest method to identify whether it is a module is jar -d -f <jar_file>.
2.3 Key Instructions
1) --add-exports: access internal API
When the old code is migrated to JDK9+, the compilation may report an error of package x.x.x is not visible because the old code accesses the internal API of the module. To access the internal API, it is necessary to add --add-exports java.xx/x.x.x=ALL-UNNAMED during compilation.
2) --add-open: access internal API through reflection
However, this method only works during the compilation period. Those problems that are not known to access the internal API until runtime need to be solved with a new method. Errors are usually java.lang.reflect.InaccessibleObjectException.
The solution is to add --add-opens x.x/x.x.x=All-UNNAMED at runtime to call classes and methods through reflection.
• --add-modules: add dependent modules
• --patch-modules: specify the specific module
When discussing splitting the package during the migration, we see an example of a project using annotations @ Generated (from the java.xml.ws.annotation module) and @ NotNull (from the JSR 305 implementation). We can find three things:
We can use --patch-module to patch the split:
java --add-modules java.xml.ws.annotation
     --patch-module java.xml.ws.annotation=jsr305-3.0.2.jar
     --class-path $dependencies
     -jar $appjar
• --add-reads: read another module
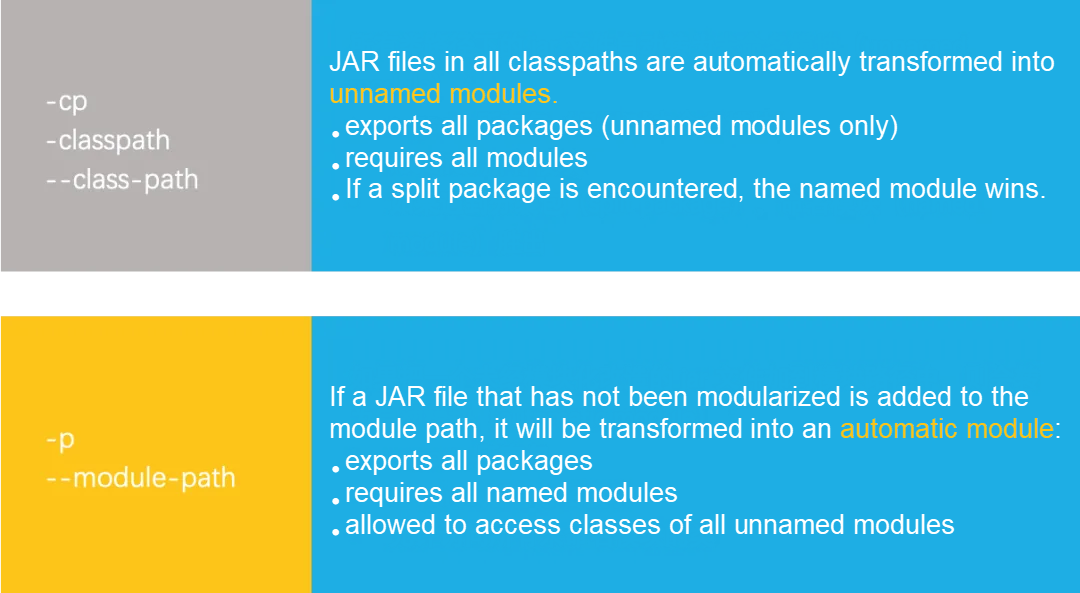
In order to be compatible with old versions of applications, first let us understand two advanced concepts: unnamed module and automatic module.
Judgment:
Whether a JAR file that has not been modularized is transformed into an unnamed module or an automatic module depends on the path where the JAR file appears. If it is a classpath, it will be transformed into an unnamed module. If it is a module path, it will be transformed into an automatic module.
1) Note: The automatic module also belongs to the category of the named module. Its name is automatically deduced by modular system based on the JAR file name. For example, the automatic module name deduced from the com.foo.bar-1.0.0.jar file is com.foo.bar.
2) The key difference: The split package rule applies to automatic modules, but not to unnamed modules. That is, multiple unnamed modules can export the same package, but automatic modules are not allowed.
The significance of unnamed modules and automatic modules is that no matter whether the JAR file input is a valid module (including module descriptor), Java can uniformly process it as a module. This is also the architecture principle of Java 9 to be compatible with old versions of applications. When running old versions of applications, all JAR files appear in the classpath, that is, they are converted into unnamed modules. For unnamed modules, all packages are exported and depend on all modules by default so the application can run normally. For further interpretation, please refer to the relevant chapters of the official white paper.
Solutions:
Based on the JAR package dependency (analyzed by the jdeps tool), modularize the JAR package from the bottom up along the dependency tree (add the valid module description file module-info.java in the root directory of the JAR package source code).
Initially, all JAR packages are non-modular and placed in the classpath (converted into unnamed modules), and the application is started in a traditional way.
Then, start to modularize the JAR packages from the bottom up, and move the modified JAR packages to the module path. During this period, the application is still started in a traditional way.
Finally, when all JAR packages are modularized, the application is started in -m mode. This also indicates that the application has been migrated to a real Java 9 application.
Examples:

java -cp mod1.jar:mod2a.jar:mod2b.jar:mod3.jar:mod4.jar mod1.EventCenter.java -cp mod1.jar:mod2a.jar:mod2b.jar -p mod3.jar:mod4.jar --add-modules mod3,mod4 mod1.EventCenter.Compared with the preceding command, mod3.jar and mod4.jar are first moved from the classpath to the module path. This is easy to understand since these two JAR packages have been transformed into real modules. Then, there is an additional parameter --add-modules mod3,mod4. Why? This is about the module discovery mechanism of modular system.
Whether at compile time or runtime, modular system must first determine one or more root modules and then start from these root modules to look through the module path to find all observable modules based on module dependencies. These observable modules plus JAR files in the classpath finally form the compile-time environment and the runtime environment.
So how is the root module determined? For the runtime, if the application is started in -m mode, the root module is the main module specified by -m. If the application is started in a traditional way, the root module is all java.* modules, that is, JRE. Back to the preceding example, if the --add-modules parameter is not added, in addition to JRE, there are only mod1.jar, mod2a.jar, and mod2b.jar but no mod3 and mod4 modules in the runtime environment, and java.lang.ClassNotFoundException will be reported.
As you can imagine, the --add-modules parameter is used to manually specify additional root modules so that the application can run normally.
• After mod2a and mod2b are modularized, run the command: java -cp mod1.jar -p mod2a.jar:mod2b.jar:mod3.jar:mod4.jar --add-modules mod2a,mod2b,mod4 mod1.EventCenter.
--add-modules parameter.• Finally, the modularization of mod1 is completed and the final run command is simplified to java -p mod1.jar:mod2a.jar:mod2b.jar:mod3.jar:mod4.jar -m mod1/mod1.EventCenter.
• Problem: The bottom-up strategy is easy to understand with a clear implementation path, but it has a problem that some modules cannot be modularized.
• Solution: Based on the JAR package dependencies, starting from the main application, analyze the possibility of modularization of each JAR package from top to bottom along the dependency tree, and divide JAR packages into two categories:
• Example: Take the sample project as an example. Assume that mod4 is a third-party JAR package and cannot be modularized. After the final transformation, although the application run command is still java -p mod1.jar:mod2a.jar:mod2b.jar:mod3.jar:mod4.jar -m mod1/mod1.EventCenter, only mod1, mod2a, mod2b, and mod3 are real modules. mod4 is not modularized and is transformed into an automatic module through modular system.
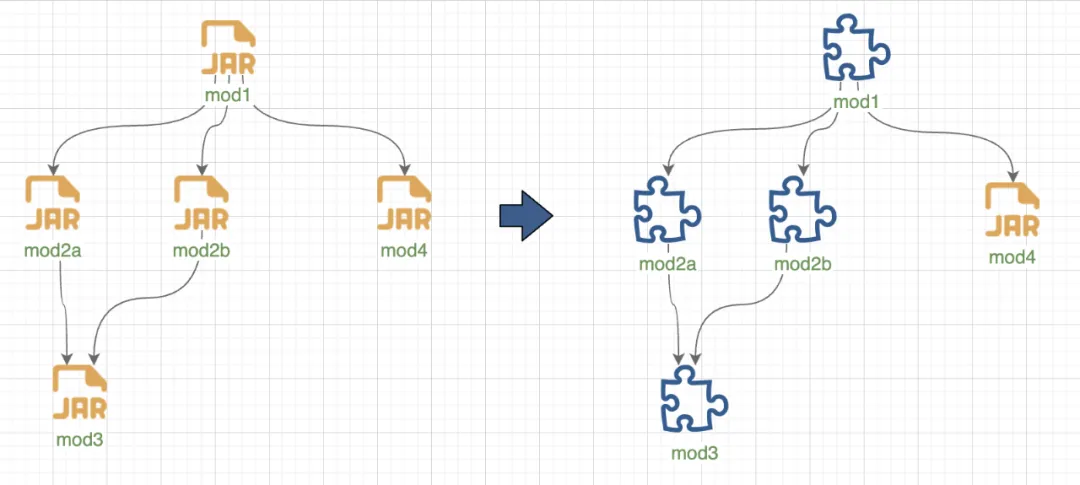
• Imperfection: Everything seems perfect, but what if there are multiple automatic modules with split packages between them? As mentioned earlier, automatic modules, like other named modules, must adhere to the split package rule. In this scenario, if modularization is necessary, either simplify the dependencies and keep only one automatic module, or create a customized version.
• Module Naming Convention: Give the module a meaningful name, usually using reverse domain name notation (such as com.example.myapp).
• Clear Dependencies: Clearly declare the dependencies of modules in the module-info.java file to ensure that the dependencies between the modules of the application are visible.
• Minimal Dependency Principle: Minimize the dependencies between modules and only depend on the modules that are needed.
• Versioned Dependencies: If possible, use versioned dependencies to ensure that modules depend on the correct version.
• Single Responsibility Principle: Limit each module to a specific function or area to improve maintainability and reusability.
• Testing and Verification: Ensure that dependencies and interactions between modules work at compile time and runtime.
• Module Path Management: Manage the module path to ensure that applications load and run correctly.
• Module Dependencies: Carefully consider the dependencies between modules. Ensure that dependencies between modules are clear and avoid circular dependencies. Use the requires statement to declare dependencies and use requires transitive or requires static as needed.
• Version Management: Learn about version management between modules. Java 9 introduces the concept of modular versions, which allows modules to depend on other modules of specific versions. Consider using requires static to declare optional dependencies that are valid only at a specific version.
• Module Naming: Choose an appropriate name for modules. Module names should be unique and easy to understand. Based on Java package naming conventions, use reverse domain names (such as com.example.mymodule).
• Module Path: Specify the module path with the --module-path option when running the application. Ensure that the module path is set correctly so that Java can find and load modules.
• Non-modular Libraries: If you use non-modular JAR files, wrap them as automatic modules or create modular versions. Dependencies of non-modular libraries can introduce complexity.
• Modular Libraries: Consider using libraries that are already modularized to reduce issues related to module path and version management.
• Runtime Image: If you use jlink to create a custom runtime image, make sure to include all necessary modules and exclude unnecessary ones to reduce the size of the application.
• Testing: Write unit tests to ensure the correctness of the modular application. Use the module path and the --module option to simulate a modular environment for testing.
• module-info.java: It is a key component of the modular application. Ensure that dependencies are declared correctly, modules are exported and packaged, and other keywords are used to manage visibility.
• Inter-module Communication: Communication between modules should be done based on dependent modules. Do not try to bypass the visibility control of modular system.
• Cross-module Access: If you need to share data between modules or access non-public members, use the opens and opens...to statements to allow trusted modules to perform reflection operations.
• Performance and Memory Overhead: The modular application may experience an increase in start time and memory overhead. Consider performance when deploying and testing the application.
• Migration: If you are migrating an existing application to a modular architecture, make sure to migrate gradually to reduce interruptions and issues.
• Documentation and Training: Provide development teams with documentation and training on modular to ensure that all developers understand and adhere to the best practices of modular.
• Tool Support: Use Java 9 and later versions to take full advantage of modular system and related tools such as jdeps, jlink, and jmod.
Disclaimer: The views expressed herein are for reference only and don't necessarily represent the official views of Alibaba Cloud.
In-Depth Exploring of the Spring MVC Best Practice for Cross-Origin Issues
Alibaba Cloud Unveils New AI Models and Revamped Infrastructure for AI Computing

1,344 posts | 471 followers
Followvangie - January 23, 2019
Alibaba Cloud Native Community - June 20, 2025
Alibaba Cloud Native Community - July 15, 2025
Alibaba Container Service - March 12, 2021
anycode - November 3, 2021
ApsaraDB - October 18, 2022

1,344 posts | 471 followers
Follow Web Hosting Solution
Explore Web Hosting solutions that can power your personal website or empower your online business.
Learn More Web Hosting
Explore how our Web Hosting solutions help small and medium sized companies power their websites and online businesses.
Learn More DBStack
DBStack is an all-in-one database management platform provided by Alibaba Cloud.
Learn More EMAS Superapp
Build superapps and corresponding ecosystems on a full-stack platform
Learn MoreMore Posts by Alibaba Cloud Community