You can access the tutorial artifact including deployment script (Terraform) from the github project
More tutorial around Alibaba Cloud Database, please refer to this link.
Active Directory (AD) is a directory service developed by Microsoft for Windows domain networks. It is included in most Windows Server operating systems as a set of processes and services.
In this solution tutorial, let's see how to deploy and setup Microsoft AD on ECS Windows Server 2016 or later, and setup LDAP Authentication with this AD Domain Service for RDS for PostgreSQL on Alibaba Cloud.
Deployment architecture of this tutorial:
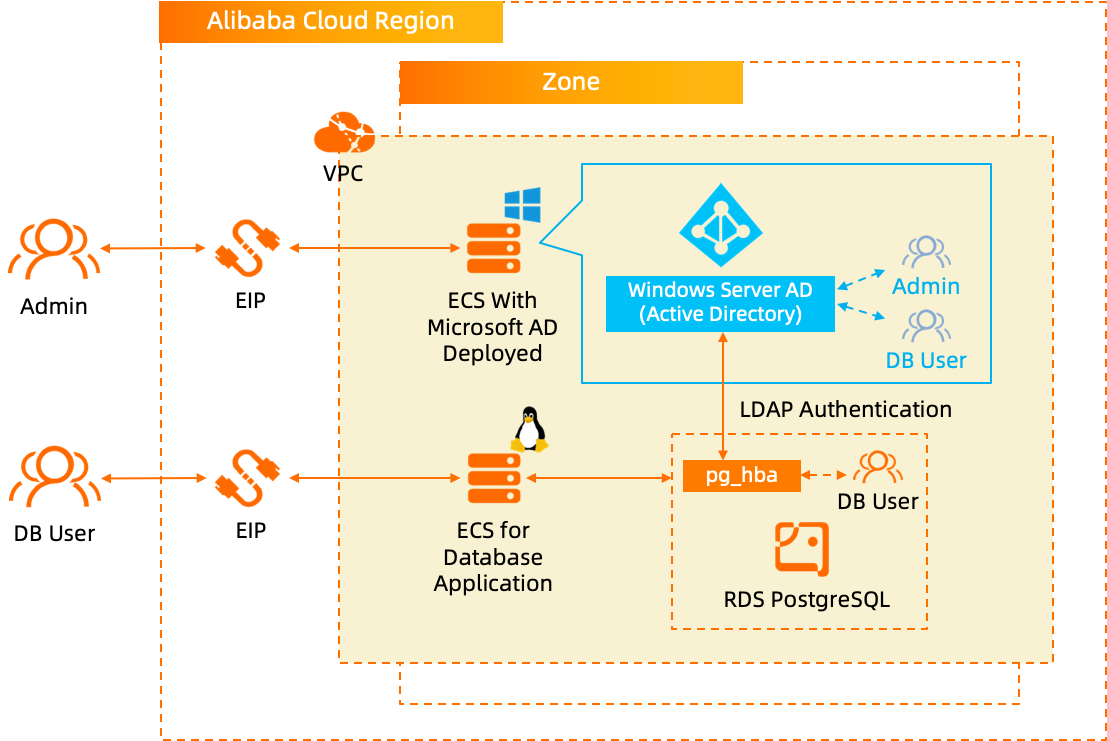
Step 1. Use Terraform to provision ECS and RDS PostgreSQL database on Alibaba Cloud
Step 2. Setup AD DS and LDAP user for RDS PostgreSQL database authentication
Step 3. Configure AD DS information on RDS PostgreSQL
Step 4. Verify the AD LDAP authentication for RDS PostgreSQL
If you are the 1st time to use Terraform, please refer to this link to learn how to install and use the Terraform on different operating systems.
Run the terraform script to initialize the resources (in this tutorial, we use 1 RDS for PostgreSQL, 1 Windows Server 2019 ECS for AD installation and 1 Ubuntu ECS for demo database application connecting to RDS PostgreSQL). Please specify the necessary information and region to deploy.

After the Terraform script execution finished, the ECS instance and RDS for PostgreSQL information are listed as below.
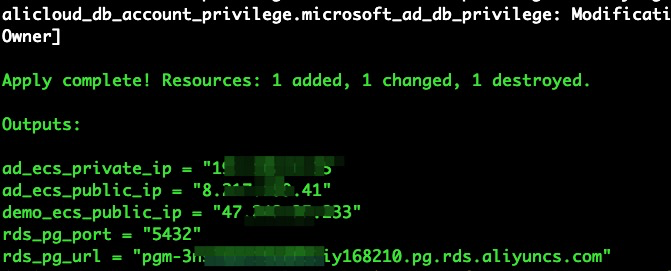
ad_ecs_private_ip: The private IP of the Windows Server ECS with Microsoft AD installationad_ecs_public_ip: The public IP of the Windows Server ECS with Microsoft AD installationdemo_ecs_public_ip: The public IP of the ECS for demo database applicationrds_pg_url: The RDS for PostgreSQL database connection URLrds_pg_port: The RDS for PostgreSQL database service portUsing Remote desktop to connect to Windows Server ECS. The log on password for user administrator is WindowsN1cetest, which is predefined in the terraform script.
Follow the screenshots below to setup the Microsoft AD DS on the Windows Server ECS.
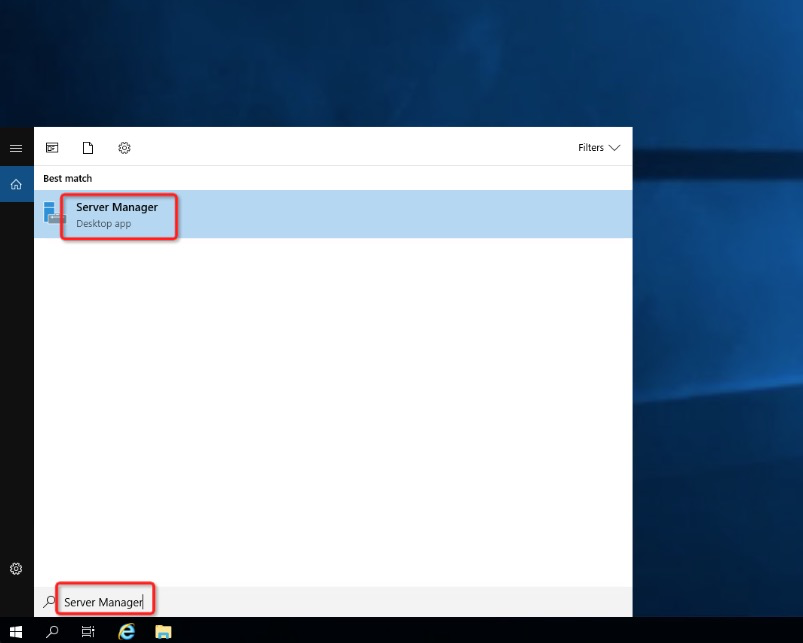
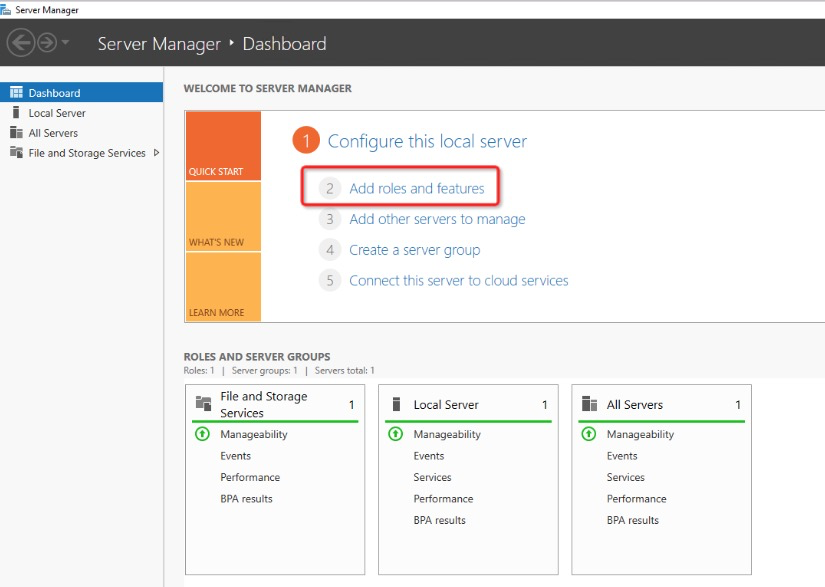
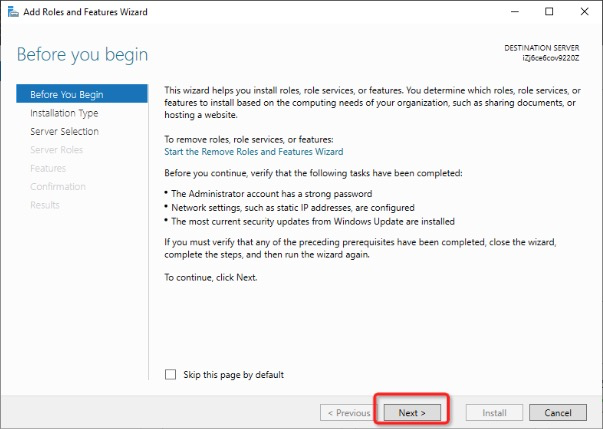
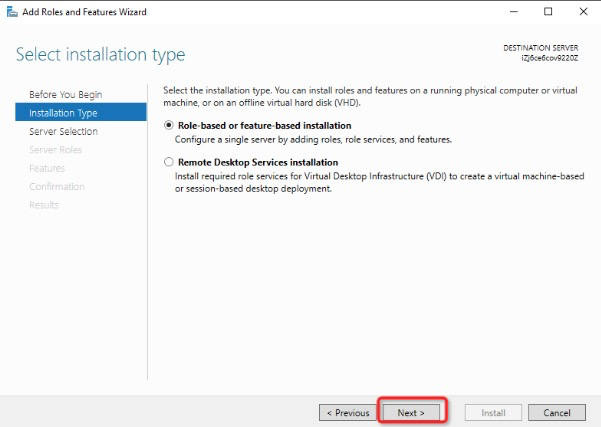
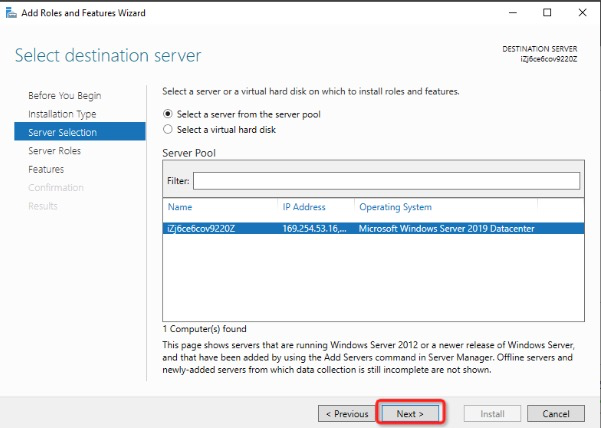
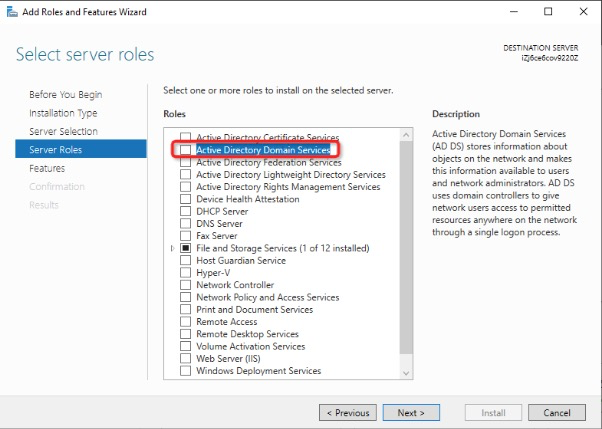
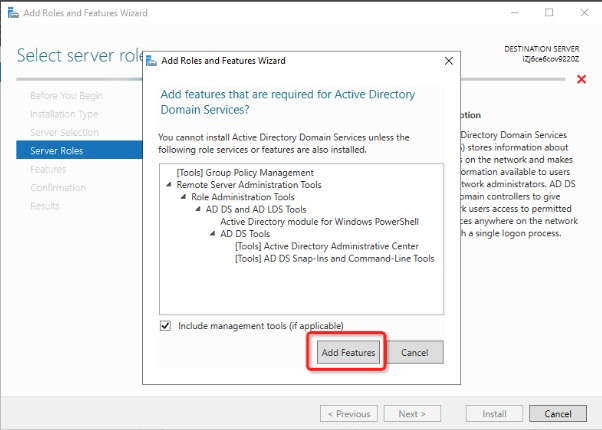
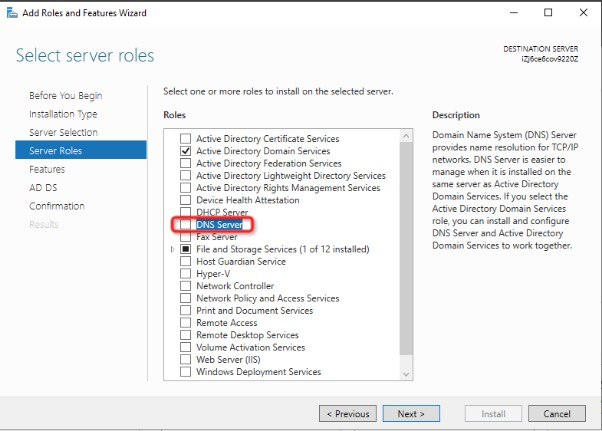
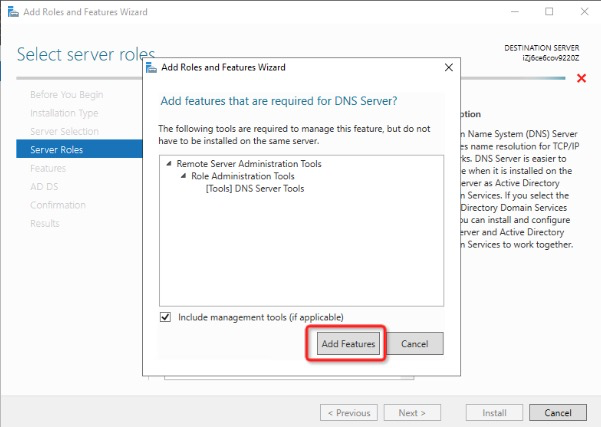
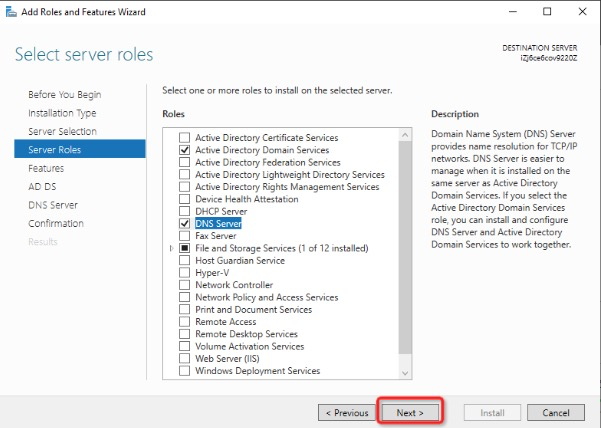
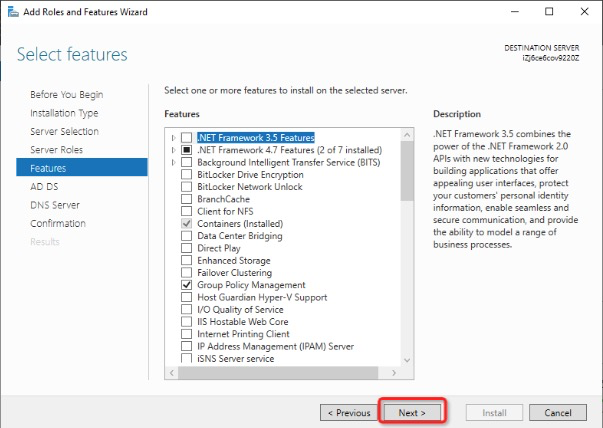
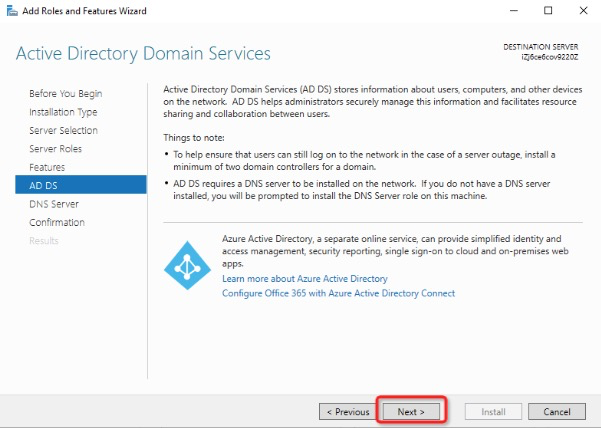
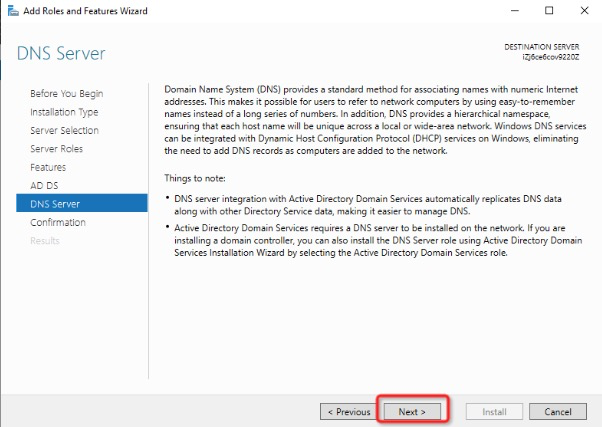
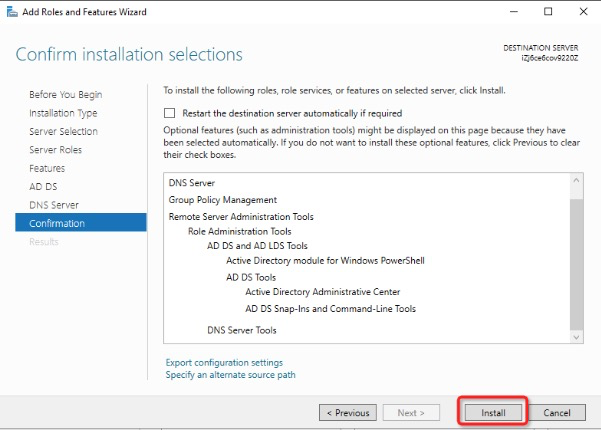
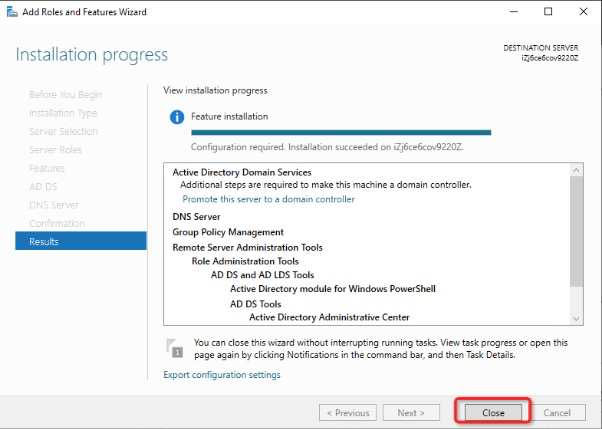
Now, the AD DS and DNS Server have been setup successfully.
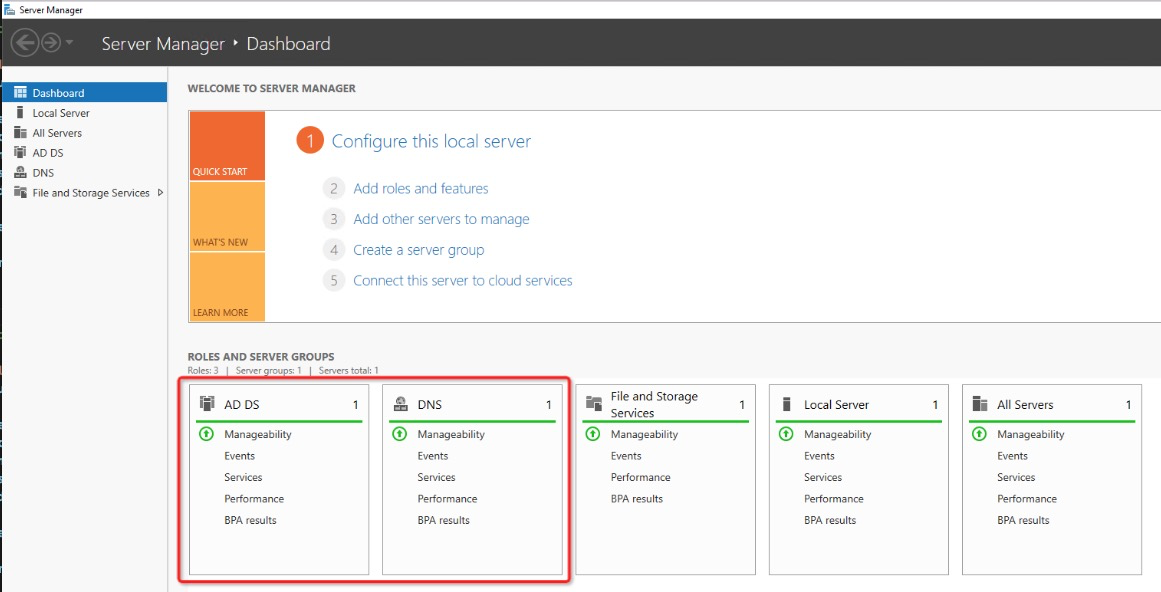

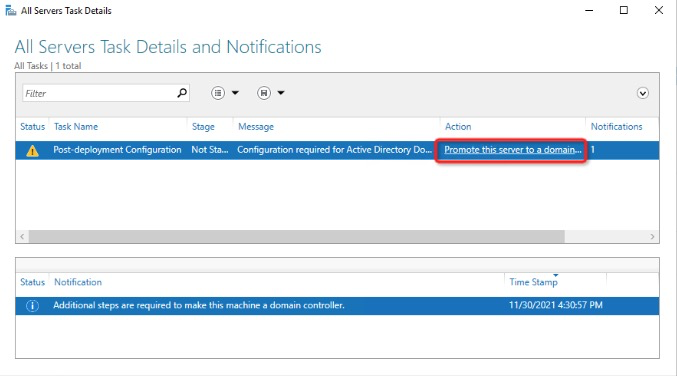
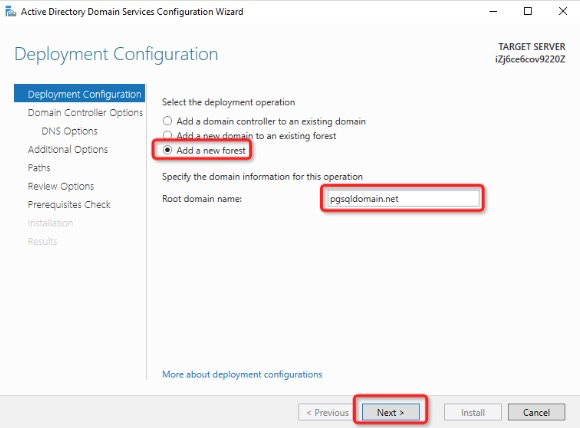
Configure the AD domain name. In this tutorial, we use pgsqldomain.net.
Set password for DSRM (Directory Services Restore Mode):
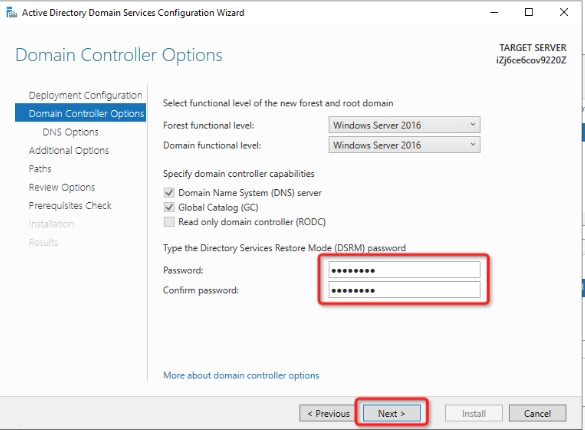
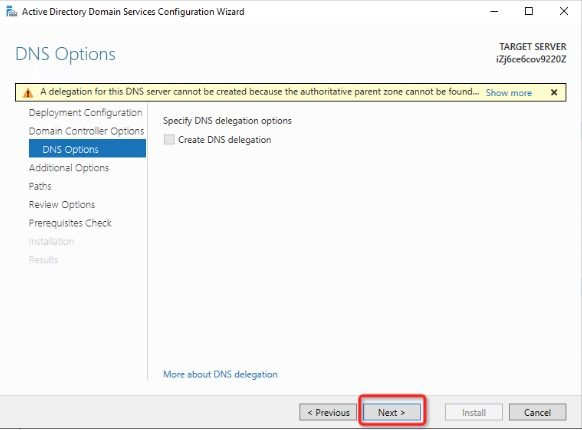
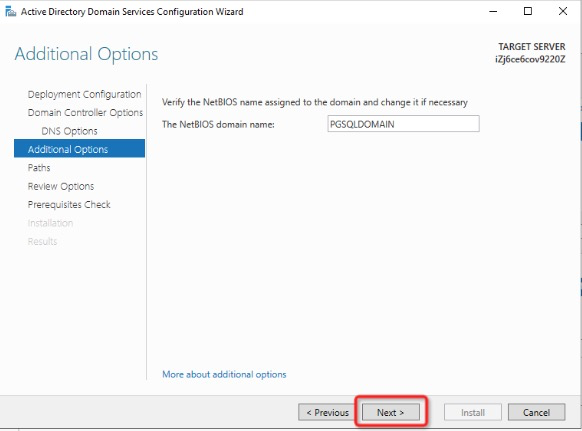
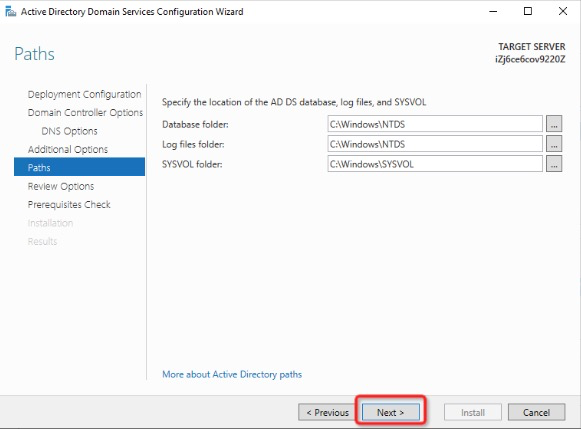
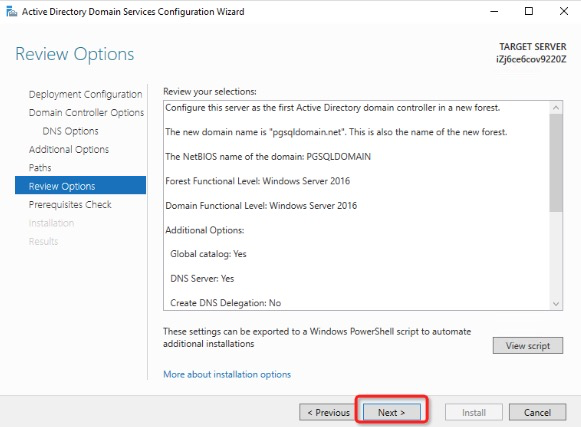
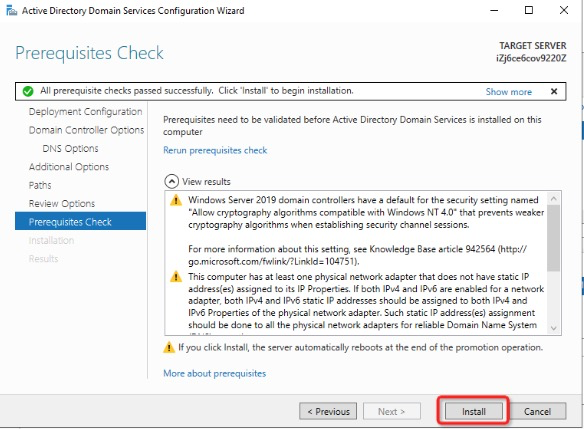
After the installation procedure finished, then the basic AD DS has been setup successfully. Then follow the steps to add users of domain administrator and database user for RDS PostgreSQL:
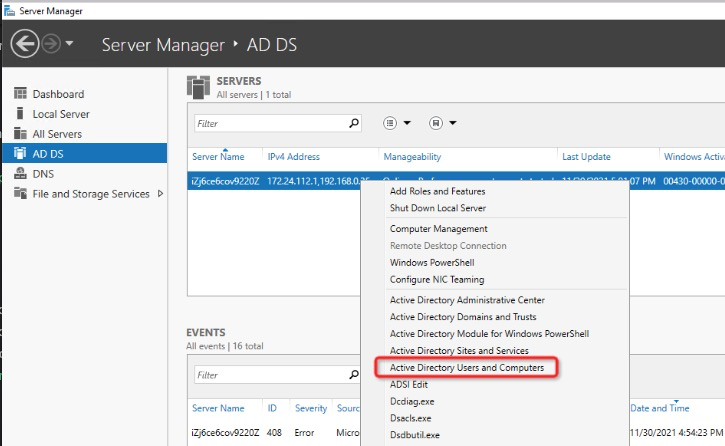
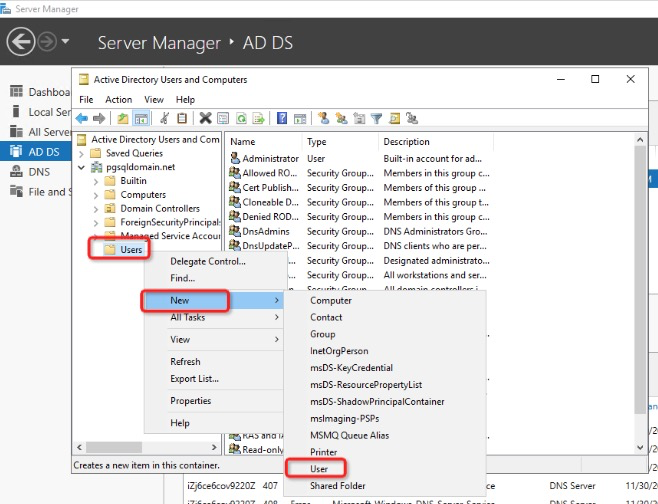
Define the domain administrator name as dbadmin and set the password. In this tutorial, let's set it as N1cetest, which will be used in RDS PostgreSQL AD DS setting.
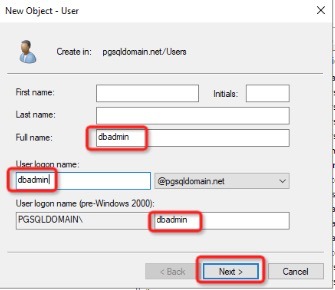
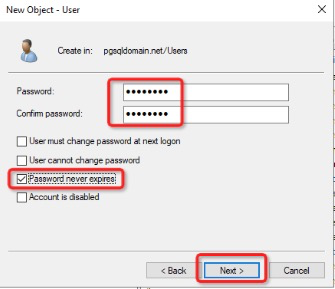
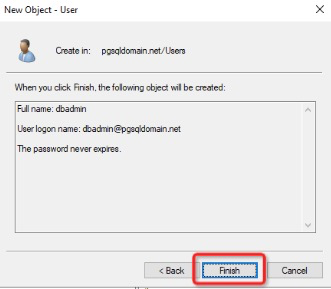
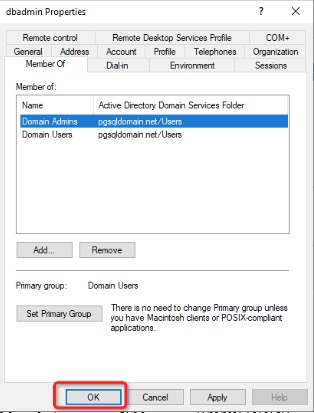
Then set this domain administrator dbadmin as the member of the Domain Admins group.
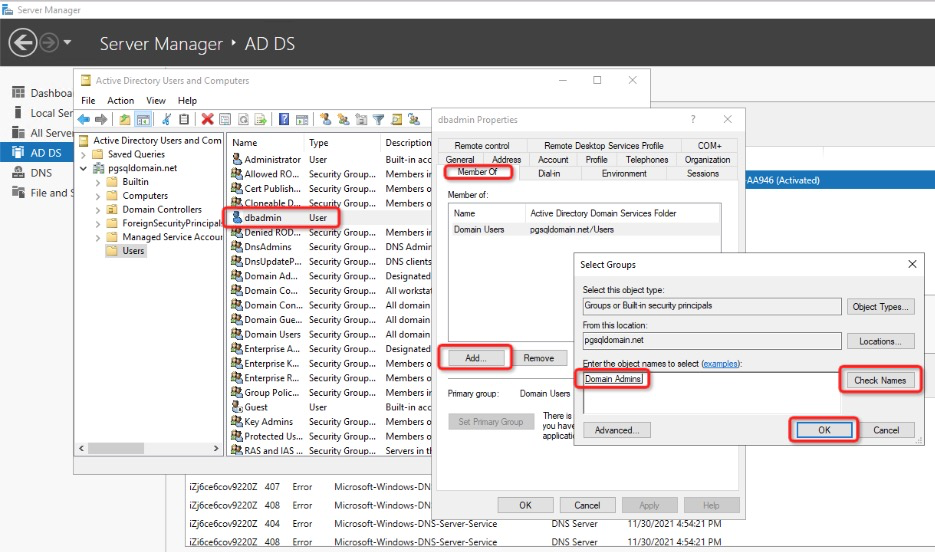
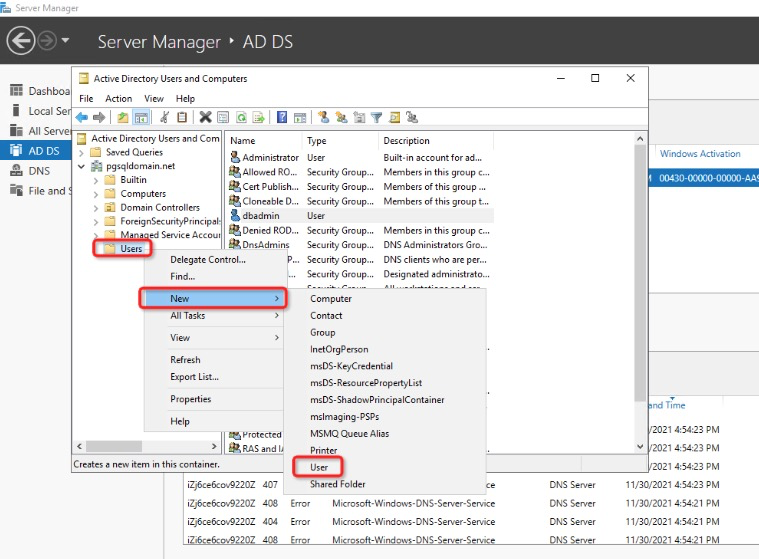
Similarly, add database user for RDS PostgreSQL:
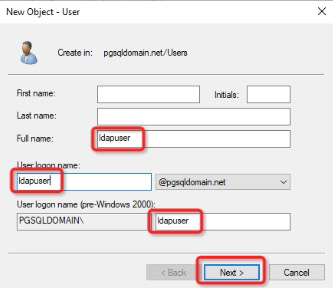
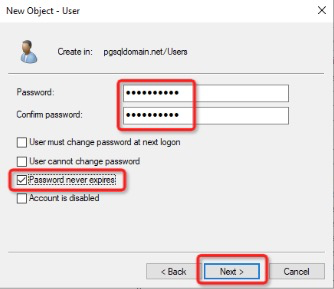
Define the database user name as ldapuser and set the password. In this tutorial, let's set it as ADN1cetest, which will be used as the password to connect to RDS PostgreSQL. Please be noticed that, there must be an account also with the name ldapuser created in RDS PostgreSQL.
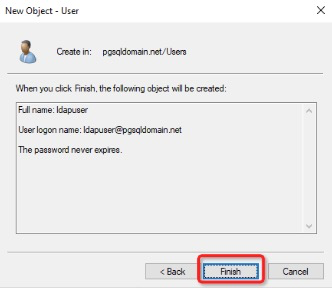
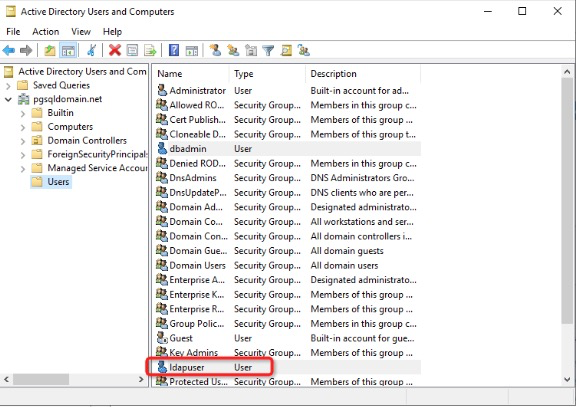
Now, the AD has been setup successfully on Windows Server ECS.
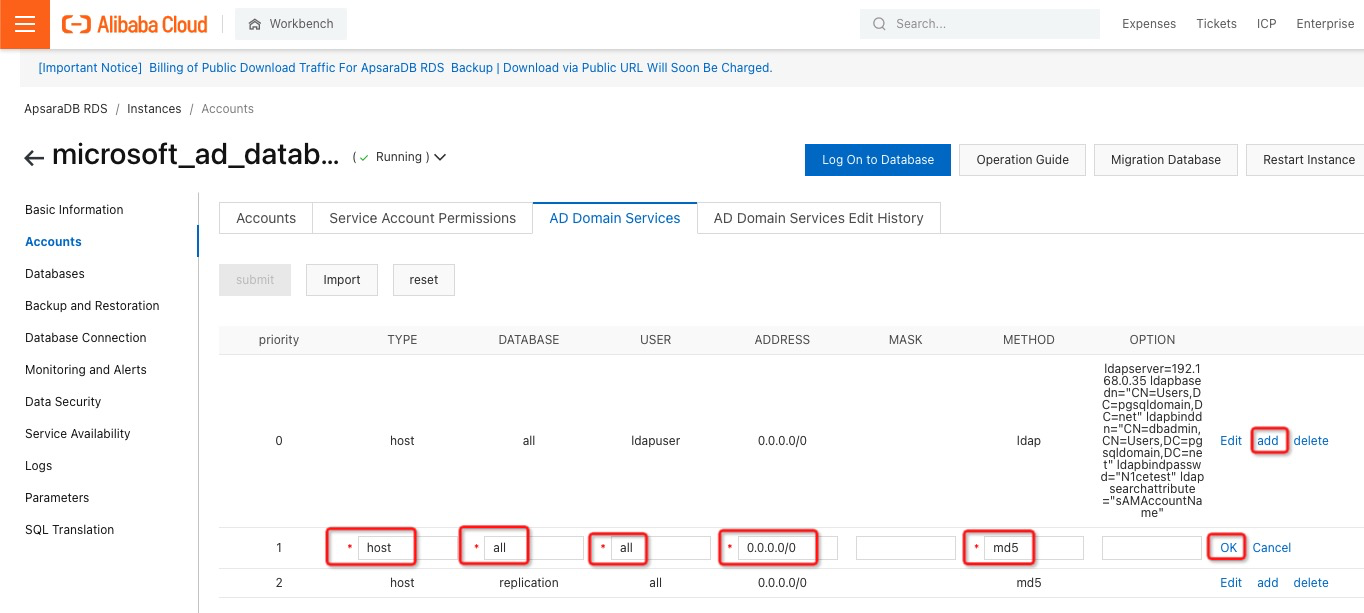
Log on to the RDS PostgreSQL web console, then follow the screenshots below to setup the Microsoft AD DS information on RDS PostgreSQL.
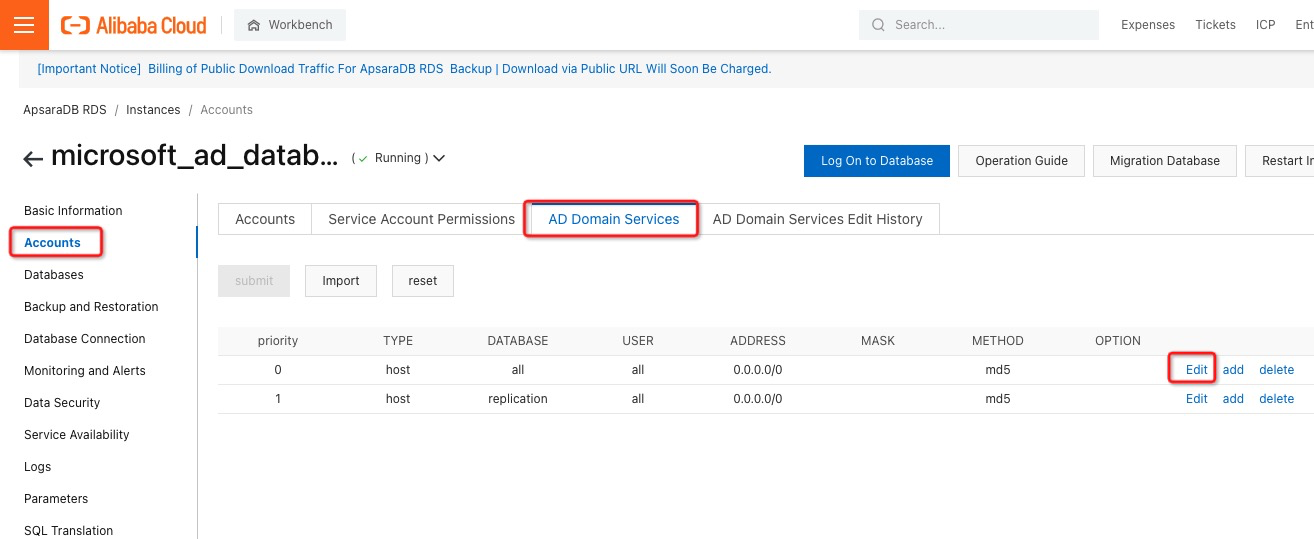
When editing the AD domain service, the content of the OPTION column should be set as:
ldapserver=<ECS AD Server Private IP> ldapbasedn="CN=Users,DC=pgsqldomain,DC=net" ldapbinddn="CN=<Domain Administrator User Name in AD>,CN=Users,DC=pgsqldomain,DC=net" ldapbindpasswd="<Domain Administrator User Password in AD>" ldapsearchattribute="sAMAccountName"<ECS AD Server Private IP>: should be ad_ecs_private_ip in Step 1<Domain Administrator User Name in AD>: should be the Domain Administrator User Name defined in Step 2, that is dbadmin in this tutorial<Domain Administrator User Password in AD> should be the Domain Administrator User Password in Step 2, that is N1cetest in this tutorialpgsqldomain.net in this tutorialSuch as the content is the following specifically,
ldapserver=192.168.0.35 ldapbasedn="CN=Users,DC=pgsqldomain,DC=net" ldapbinddn="CN=dbadmin,CN=Users,DC=pgsqldomain,DC=net" ldapbindpasswd="N1cetest" ldapsearchattribute="sAMAccountName"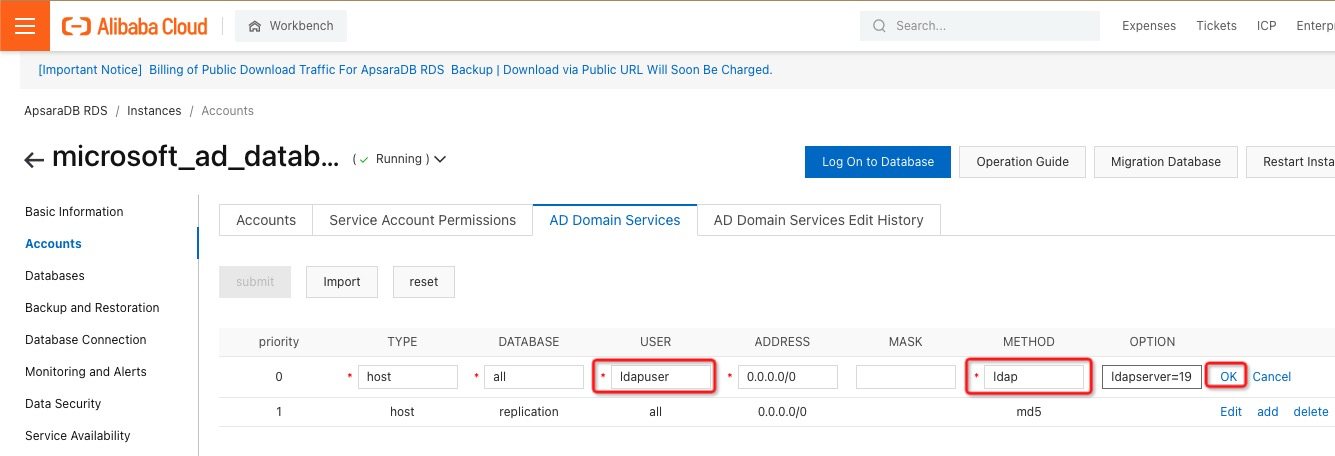
Then add another record as following.
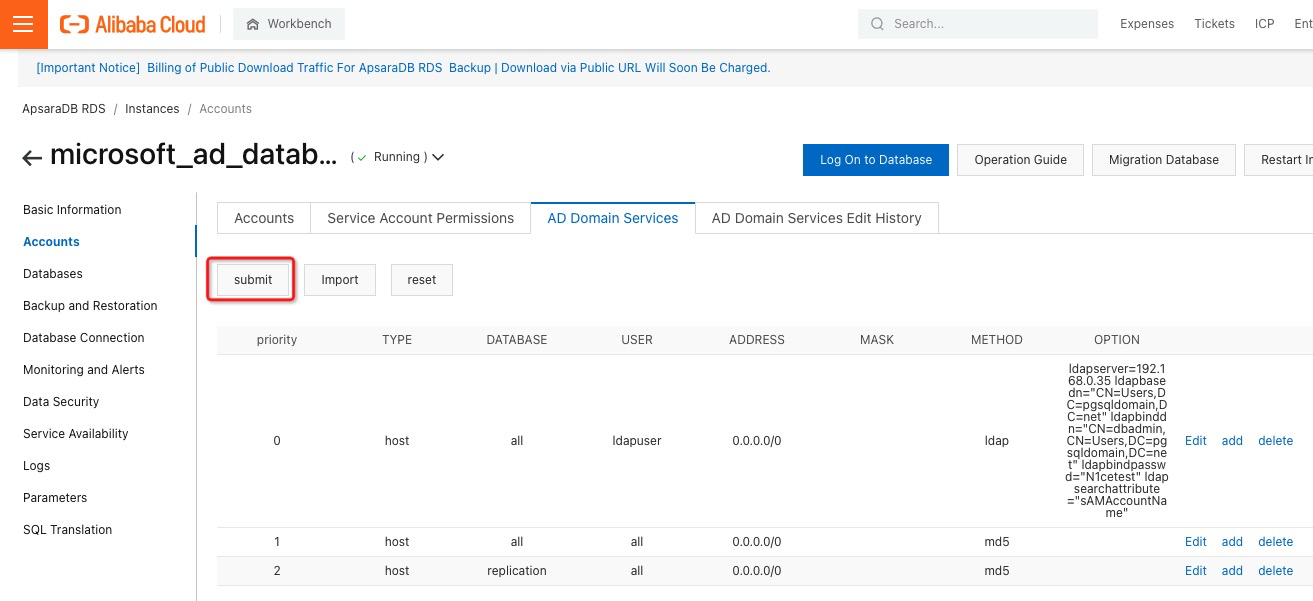
After submit the changes, the instance is going into Maintaining Instance status, and waiting for complete and back to the Running status.
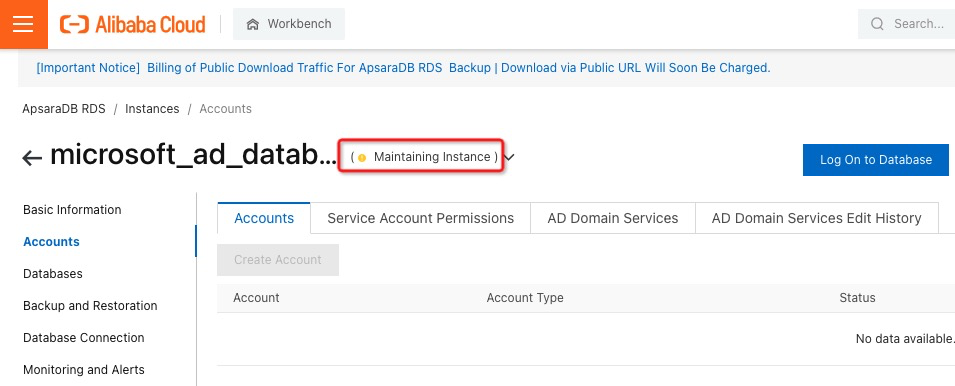
Now, the AD has been setup successfully on RDS PostgreSQL.
Please log on to ECS with <demo_ecs_public_ip> and the password is N1cetest by default, which is preset in the terraform provision script in Step 1. If you've already changed it, please update accordingly.
ssh root@<demo_ecs_public_ip>Execute the command to connect to RDS PostgreSQL:
psql -h <rds_pg_url> -U ldapuser -p <rds_pg_port> -d postgres<rds_pg_url>: the in Step 1<rds_pg_port>: the in Step 2Such as the command is like below, please use the password of database user defined in Microsoft AD configured in Step 2 (it is ADN1cetest in this tutorial). If the connection succeeds, then all the setup and configuration is successful.
psql -h pgm-3nsl6a419da052iy168210.pg.rds.aliyuncs.com -U ldapuser -p 5432 -d postgres
Deploy Sharding Service with Apache ShardingSphere Proxy on RDS for MySQL
Alibaba Cloud Community - November 25, 2022
Alibaba Cloud Indonesia - February 8, 2022
Alibaba Cloud Community - February 17, 2022
Alibaba Clouder - January 11, 2021
Alibaba Cloud Community - September 27, 2021
Alibaba Clouder - December 16, 2020
 PolarDB for PostgreSQL
Alibaba Cloud PolarDB for PostgreSQL is an in-house relational database service 100% compatible with PostgreSQL and highly compatible with the Oracle syntax.
Learn More ApsaraDB RDS for PostgreSQL
An on-demand database hosting service for PostgreSQL with automated monitoring, backup and disaster recovery capabilities
Learn More AnalyticDB for PostgreSQL
An online MPP warehousing service based on the Greenplum Database open source program
Learn More ApsaraDB for OceanBase
A financial-grade distributed relational database that features high stability, high scalability, and high performance.
Learn MoreMore Posts by ApsaraDB