By Xulun
In the Quick Start to VSCode Plug-Ins: Language Server Protocol, we introduced the basic framework and some benefits of the LSP protocol, and the three-way handshake principle involved with using the protocol.
Now in this part of this tutorial series, we start with the simplest function protocol of the many different LSP protocol, which is the one used to "To send a notification to VSCode".
As for the LSP protocol, you can see that three window-related protocols are provided, which are the following protocols:
We can use the Connection.window.sendxxxMessage function to send messages to the client. Based on degree of severity, messages can be further divided into three different levels: Information, Warning and Error.
For example, we can send a message to the client after the three-way handshake between the client and the server is complete (that is, after onInitialized).
connection.onInitialized(() => {
    connection.window.showInformationMessage('Hello World! form server side');
});
The result is shown as follows:

Let's "warm up" with a window notification to test the link connection failure. Next, we go straight to one of the topics we are most interested in: code completion.
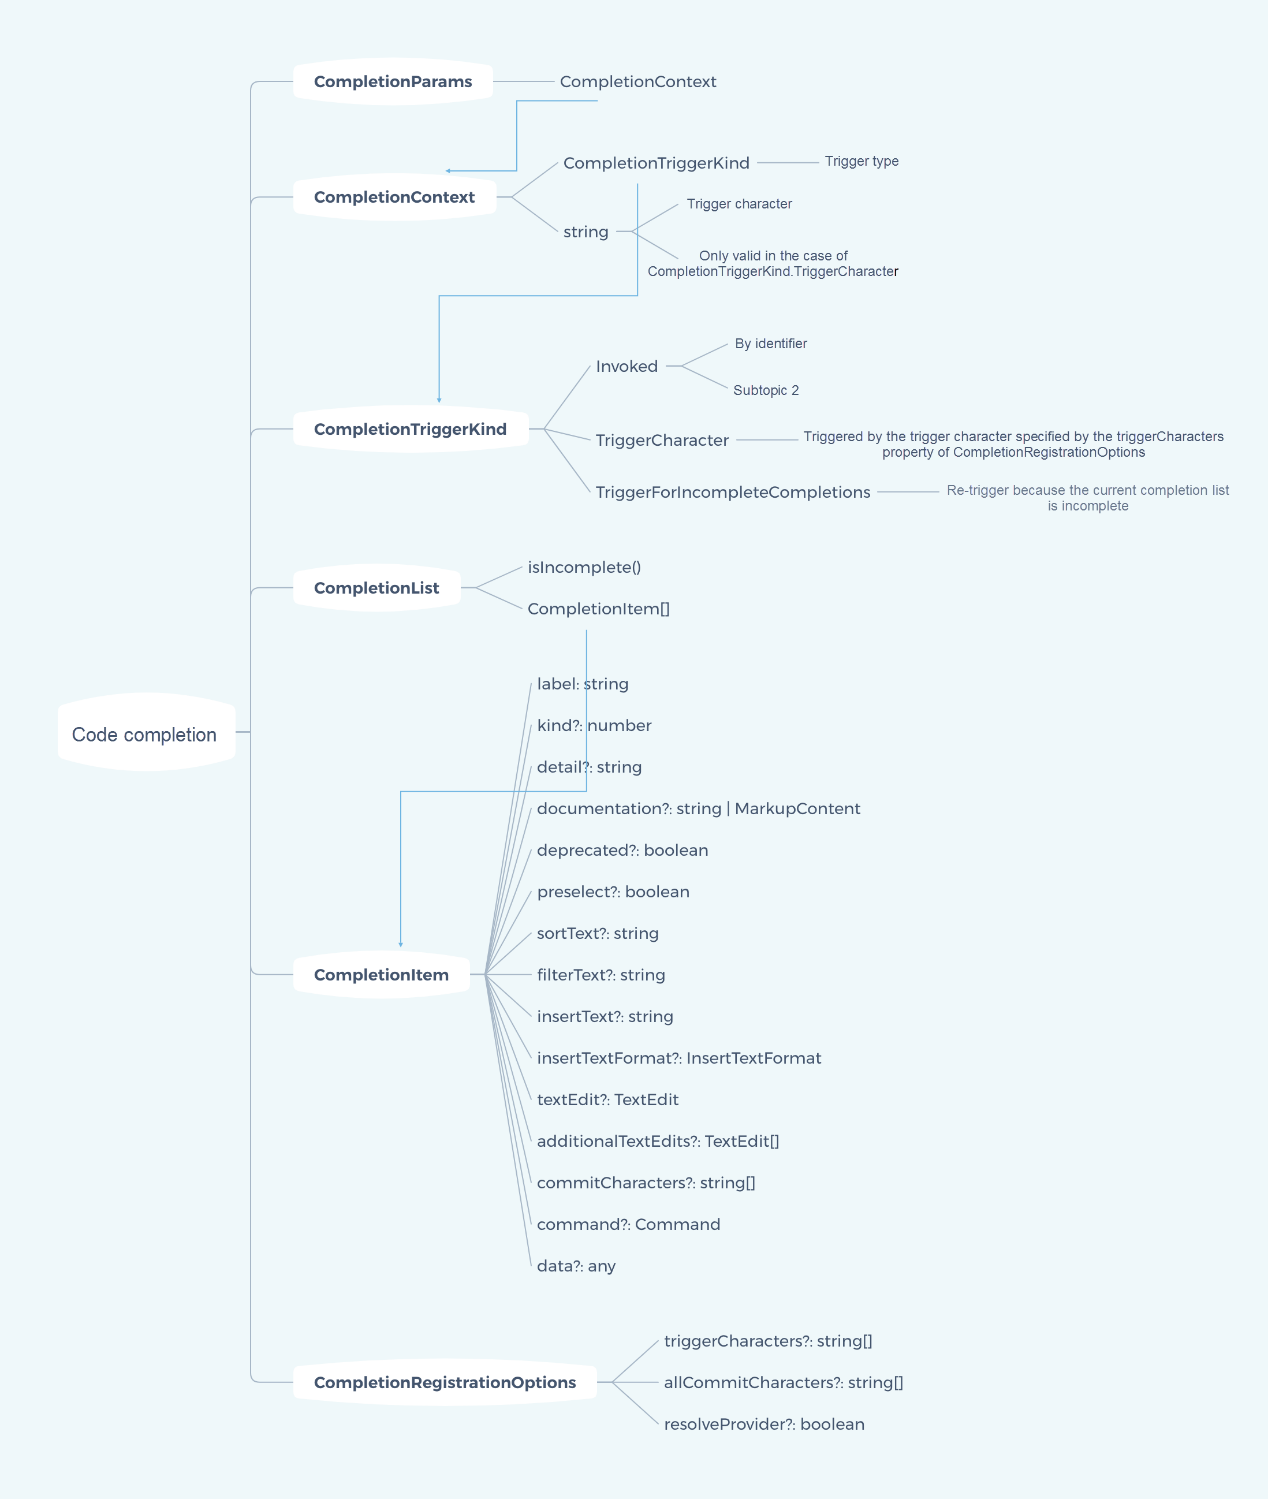
The form of code completion is actually very simple. The input is a TextDocumentPositionParams, and the output is an array of CompletionItem. This function is registered in connection.onCompletion:
connection.onCompletion(
    (_textDocumentPosition: TextDocumentPositionParams): CompletionItem[] => {});
The main data structure used in code completion is shown in the following figure:

The "kind" property is defined by an enumeration, which is one of the many kinds available.

Don't let this intimidate you. Let's take a look at a simple example. In fact, the basic implementation method is actually pretty simple:
connection.onCompletion(
    (_textDocumentPosition: TextDocumentPositionParams): CompletionItem[] => {
        connection.console.log('[xulun]Position:' + _textDocumentPosition.textDocument);

        return [
            {
                label: 'TextView',
                kind: CompletionItemKind.Text,
                data: 1
            },
            {
                label: 'Button',
                kind: CompletionItemKind.Text,
                data: 2
            },
            {
                label: 'ListView',
                kind: CompletionItemKind.Text,
                data: 3
            }
        ];
    }
)In addition to textDocument/completion for completing information, LSP also supports the completionItem/resolve request. The input and output are both CompletionItem, and further information is returned.
Support for the completionItem/resolve request can be registered through the connection.onCompletionResolve method:
connection.onCompletionResolve(
    (item: CompletionItem): CompletionItem => {
        if (item.data === 1) {
            item.detail = 'TextView';
            item.documentation = 'TextView documentation';
        } else if (item.data === 2) {
            item.detail = 'Button';
            item.documentation = 'JavaScript documentation';
        } else if (item.data === 3) {
            item.detail = 'ListView';
            item.documentation = 'ListView documentation';
        }
        return item;
    }
)
The effect is as follows:

The input parameter contains the location information for sending the completion request. We can use this information to control the information to be completed.
Here is an example:
connection.onCompletion(
    (_textDocumentPosition: TextDocumentPositionParams): CompletionItem[] => {

        return [
            {
                label: 'TextView' + _textDocumentPosition.position.character,
                kind: CompletionItemKind.Text,
                data: 1
            },
            {
                label: 'Button' + _textDocumentPosition.position.line,
                kind: CompletionItemKind.Text,
                data: 2
            },
            {
                label: 'ListView',
                kind: CompletionItemKind.Text,
                data: 3
            }
        ];
    }
)
At this time, we not only complete a widget name, but also add the current row number or column number.
The following is the operation for the completion of Button. The current row number will be added to the completion information. The completion is triggered in row 934, so the prompt information for the completion is changed to Button933:

Quick Start to VSCode Plug-Ins: Language Server Protocol (LSP)
Quick Start to VSCode Plug-Ins: LSP protocol initialization parameters
Louis Liu - August 26, 2019
Louis Liu - August 27, 2019
Louis Liu - August 27, 2019
Alibaba F(x) Team - June 20, 2022
Louis Liu - August 26, 2019
Louis Liu - August 26, 2019
 YiDA Low-code Development Platform
A low-code development platform to make work easier
Learn More mPaaS
mPaaS
Help enterprises build high-quality, stable mobile apps
Learn More Super App Solution for Telcos
Alibaba Cloud (in partnership with Whale Cloud) helps telcos build an all-in-one telecommunication and digital lifestyle platform based on DingTalk.
Learn MoreMore Posts by Louis Liu