By Jeff Cleverley, Alibaba Cloud Tech Share Author. Tech Share is Alibaba Cloud's incentive program to encourage the sharing of technical knowledge and best practices within the cloud community.
In this series of tutorials we will implement a modern development and deployment workflow for WordPress on an Alibaba Cloud Elastic Compute Service (ECS) instance with LEMP (Linux, Nginx, MariaDB, PHP) installed. In Part 4, we will look at Git version controlled deployment.
Previously in this series we copied the main production site, with which we created a local development environment, alongside an online staging site. The staging will be used to test code changes to the site on an exactly matching environment to the production site.
In this final tutorial, we will set up the Git distributed version control system (git-scm.com/) and connect all our environments. We will use 'git' to push changes between the local, staging and production environments.
This tutorial follows on directly from two of the previous tutorials in this series, and can not be completed without finishing Part 1 together with either Part 2 or Part 3. So if you haven't completed either of those combinations of tutorials yet, then please do so first before returning here.
As in the previous tutorials, all instructions will be issued by my superuser 'new_user' using the sudo command where necessary. Please replace my superuser with your own when issuing the tutorial's commands.
The tutorial examples will also be using 'another-example-domain.com' as my main site domain, and 'staging.another-example-domain.com' as my staging site subdomain, remember to replace these with your own site's domain and staging site's domain in the relevant files and commands.
First login to your server if you haven't already:
$ ssh new_user@another-example-domain.comYou may already have 'git' installed on your system, especially if you used something like EasyEngine or other automation tools to install your LEMP stack. You can check to see if it installed with:
$ git --versionAssuming 'git' is not installed, you can install it using the 'apt' package manager. If this is the first time using the package manager since you logged in to your server, remember to update its package list first.
$ sudo apt-get update
$ sudo apt-get install git
Your package manager will list the new packages that will be installed, and also make some suggestions regarding other useful associated packages that could be installed. We don't require any of the suggested packages immediately, so proceed and click yes to proceed.
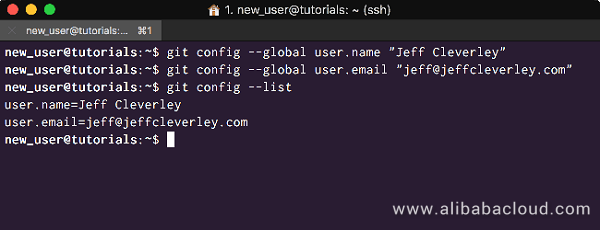
Once the installation of 'git' is complete, we should use the 'git config' command to ensure that our commit messages contain the correct user information. We need to configure 'git' with our name and email address like so:
$ git config --global user.name "New User"
$ git config --global user.email "new_user@another-example-domain.com"
At any time you can check these configurations using the following command:
$ git config --list Your terminal should now look something like this:
Your origin repository, is the repository that is used to store all changes and acts like a complete backup of your code and any work that you have done. Think of it like a time machine for your development work. You could create an origin repository on your own server, however there are many great online providers including GitHub, Bitbucket, and Gitlab.
If you choose to use an online repository, they all have a user friendly GUI to enable you to inspect changes and track back through the commit log. If you use your own server as an Origin repository, then it is easiest to track changes visually using GUI based third party desktop software. Some of the most popular include:
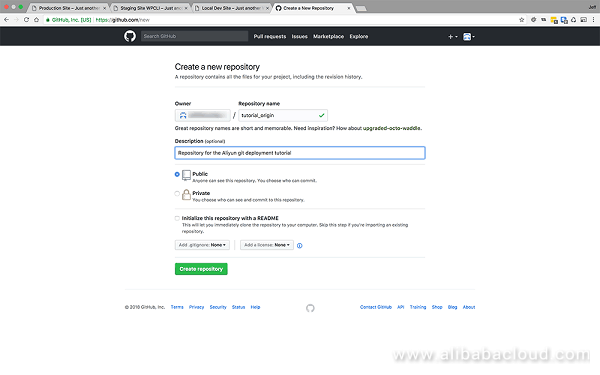
In this tutorial we will be using GitHub for your original repository, however they all have similar interfaces and essentially do the same thing. If you don't have an account with GitHub, sign up for a free account now and login. Click to select New repository from the drop down selector next to your user icon in the top right.
This will take you to the Create a New Repository Page. You will be asked to name your repository and choose whether it is a Public or Private repository. GitHub offers unlimited free public repositories, which is what we will be using today.
You will also be given the option of initializing the repository with a README file, for the purposes of today's tutorial this isn't necessary. Name your repository and click Create Repository:
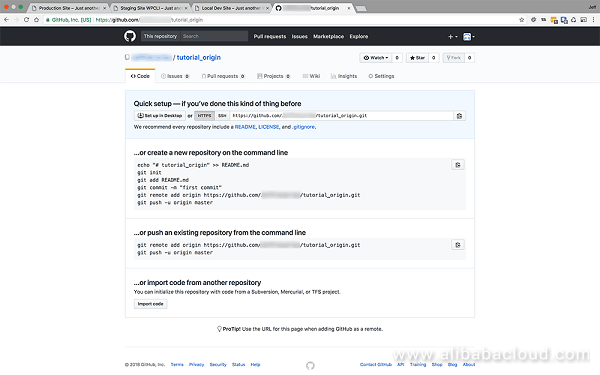
Your empty repository will be created, and GitHub will provide you with some git commands to be used in different situations to push to this repository. Specifically:
git remote add origin https://github.com/user_name/repository_name.git
git push -u origin master
We will use these commands later.
You will need to have git installed on your local computer. There are a variety of different ways to install this depending on your machine and OS.
If you are on Linux, then you can use your distribution's package manager. For MacOS and Windows there are standard installers.
Open a terminal on your local machine and change directory to the root folder of your local development copy of your WordPress site.
$ cd /path/to/your/local/site/root/folderIn my case, I set up 'Local by Flywheel' to install my test WordPress application to the following directory:
$ cd /local/sites/anotherexampledomain/app/publicOnce in your local WordPress site's root folder, initialize an empty 'git' repository:
$ git initYour terminal will display a message confirming the Git repository has been created and provide you with the full path to the repository. The newly created 'git' repository will be named '.git', this is a hidden directory. If you want to view the root directory and see your hidden directories you can use the '-a' flag on the 'ls' list command:
$ ls -aYour terminal should now look like this:
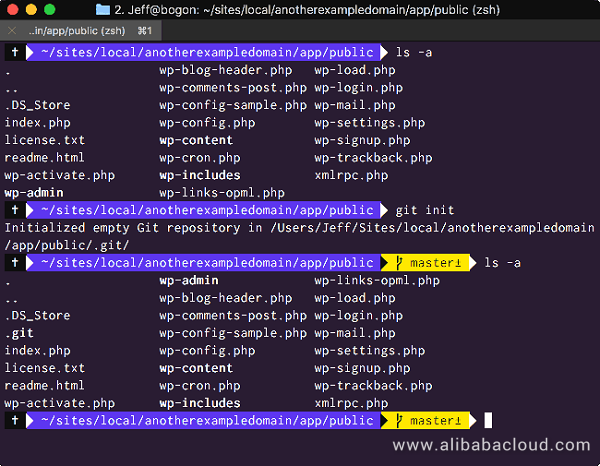
As you can see the terminal prompt message will have changed to 'master', this shows you that you are on the default branch, which will be used when pushing to your various remote repositories.
Note: We created our local 'git' repository in the root folder of the site. This is where we would likely create it if we were working on whole site development. If this were the case, we may be developing several feature plugins, must-use plugins, a custom theme and potentially folders at a higher directory level.
If you are only working on theme or specific plugin development, you may prefer to initialize your 'git' repository in the root directory of the plugin or theme you are working on.
At this point, if you were to push from your local repository to the remote origin repository, it would upload all the files from your local WordPress root folder. Every. Single. File.
We don't want that. When we are developing WordPress sites, we are usually only concerned with either one or several plugins and or a theme. We only need to track the directories and files we are working on and would therefore undergo code changes.
To make sure 'git' only tracks the files we want tracked, we need to create a '.gitignore' file to instruct it to ignore everything but those files we specify to track. A good starter '.gitignore' file for WordPress site development, including feature plugins and theme would include:
# Ignore everything inside the root directory
/*

## Exceptions - track these inside the root directory
!wp-content
!.gitignore
!README.md

# Ignore everything inside the "wp-content" directory
wp-content/*

## Exceptions - track these inside the "wp-content" directory
!wp-content/themes/
!wp-content/plugins/

# Ignore everything inside the "themes" and "plugins" directory
wp-content/themes/*
wp-content/plugins/*

## Exceptions - track these inside the "themes" and "plugins" directory
!wp-content/themes/your_theme
!wp-content/plugins/your_plugin
The above will track your '.gitignore' file, your 'README.md' file (if you created one), and any theme 'your_theme' or plugin 'your_plugin' that you specify. It is common practice to add other file-types to the ignore file depending on your set up. You can fine a useful selection of '.gitignore' files for different types of development here, it is worth looking through them.
For the purposes of this tutorial I will only be making changes to the 'style.css' file of the WordPress default Twentyseventeen theme for demonstrative purposes. So I have tailored my '.gitignore' file, below, for this purpose.
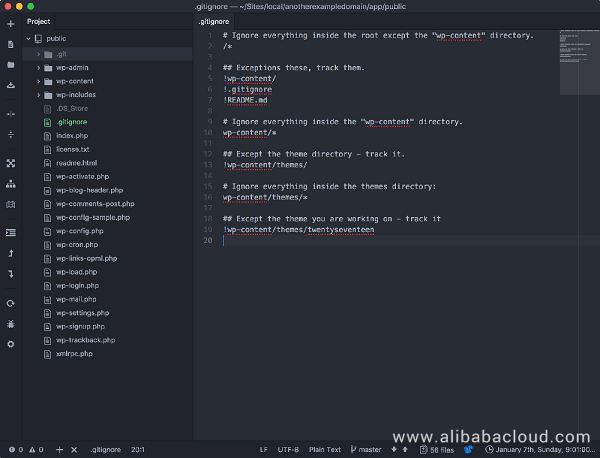
With your '.gitignore' file created, you can make your first commit. Use the '-m' flag to add a commit message. Commit messages are the human-readable introductions for each commit, so they're very important to help you track changes as development progresses.
From within your local site root folder:
$ git commit -m "first commit"Git will scan your local directory, ignoring everything as instructed in the '.gitignore' and compare the contents to the origin repository. All differences will be 'committed', meaning they are now tracked and ready to be pushed. When you push, git will only push these 'commits' files and track their contented code changes.
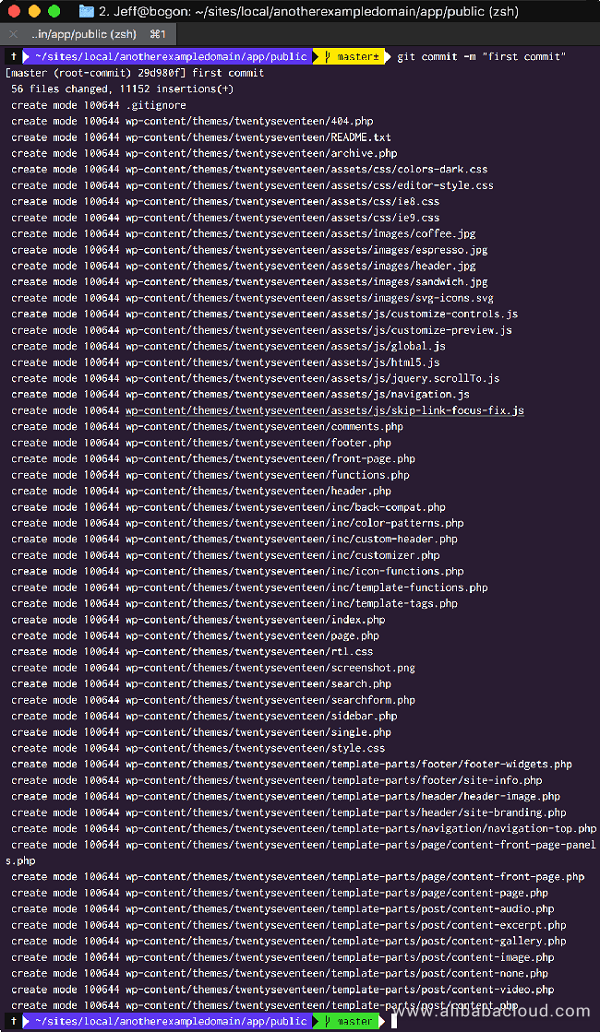
However, before we can issue the 'push' command, we need to add our origin as a remote repository to the local project. To do that we will use the command provided by GitHub in Step 2 above. From within your local site root folder:
$ git remote add origin https://github.com/user_name/repository_name.gitWe can view our remote repositories and their names at any time using:
$ git remote -vOnce the origin repository has been added, push to it with the following:
$ git push origin masterGit will process your request, do the push and report back upon success or error. If successful, your terminal should now look like this:
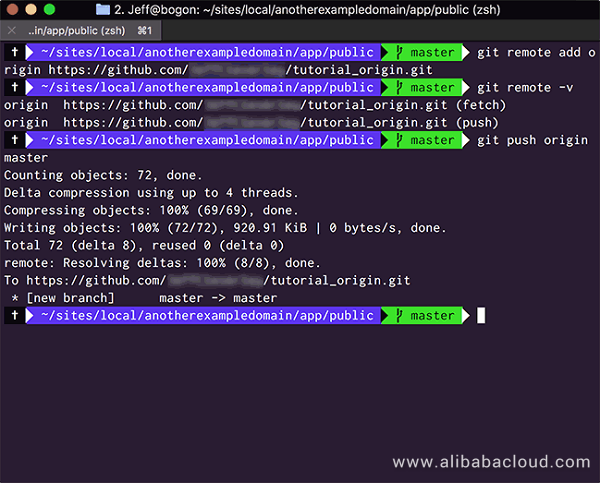
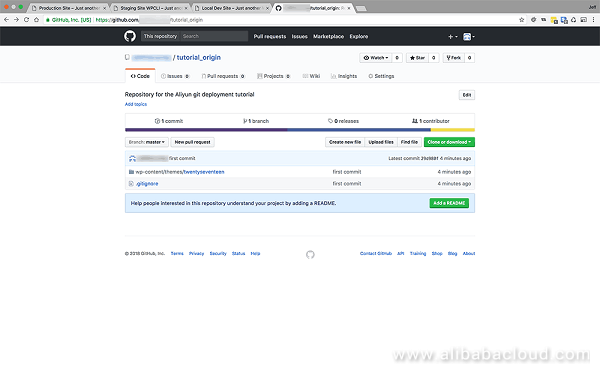
You can visit your origin repository at GitHub and will now see all of your directories and files have been created.
On your server change directory to your staging site root directory, and create a new directory named 'staging.git':
$ cd /var/www/staging.another-example-domain.com
$ sudo mkdir staging.git
Change directory into the newly created 'staging.git' directory and initialize a bare repository within:
$ cd staging.git
$ sudo git init --bare
We now have a bare repository on the server that will be used for deploying into staging.
Now we need to set up our deploy hooks for the staging repository. Inside the 'staging.git' directory you will find a 'hooks' directory. Change into that directory and create a new file called 'post-receive' and then open it for editing:
$ cd /var/www/staging.another-example-domain.com/staging.git/hooks
$ sudo touch post-receive
$ sudo nano post-receive
Within the opened 'post-receive' file add the following code:
#!/bin/sh
git --work-tree=/var/www/staging.another-example-domain.com --git-dir=/var/www/staging.another-example-domain.com/staging.git checkout -f
Make sure the path for the '--work-tree' is the path to your staging site's root directory, while the path for the '--git-dir' is the path to the 'staging.git' directory. These lines will check the latest version of your code from the version control into your site's document root.
If you check the directory permissions of the directories within your Staging site's root directory:
$ cd /var/www/staging.another-example-domain.com
$ ls -l
You will see that the 'staging.git' directory is owned by 'root'. It also has 'drwxr-xr-x' permissions, which translates to 755 - Only the owner has full permissions, while group users have read and execute only.
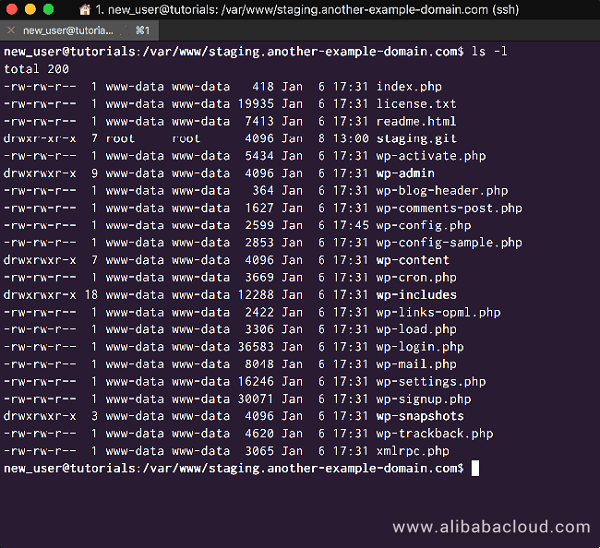
Now we will change the ownership of the root directory and it's subdirectories to the 'www-data' user and group. We will also change the permissions to 'drwxrwxr-x' or 775 which gives the owner and the group full read, write and execute permissions. After that list out the directory contents with the '-l'ownership and permissions flag to ensure the changes have taken:
$ sudo chown -R www-data/www-data /var/www/staging.another-example-domain.com
$ sudo chmod -R 775 /var/www/staging.another-example-domain.com
$ ls -l
You can now confirm the changes, and your terminal should look like the following:
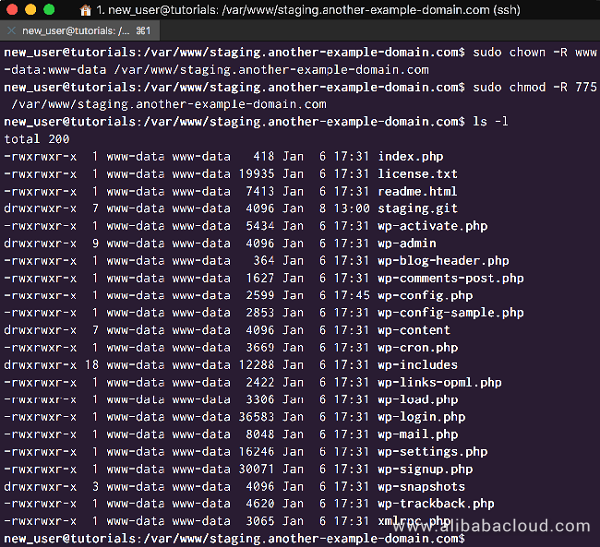
Since we will be logging into our server as our superuser when pushing to the remote repository, we need to make sure that our superuser also belongs to the 'www-data' group. Do this, and check your users groups with:
$ sudo user mod -a -G www-data new_user
$ groups
We can also ensure that our user group has write permissions to the directories contents with:
$ sudo chmod -R g+w /var/www/staging.another-example-domain.comIf we are going to be working with other developers, all of whom will be committing to the same repositories, it is best that we set up the repository as a 'group' repository. To do this, we need to change directory into the 'staging.git' directory and issue the following commands like so:
$ cd /var/www/staging.another-example-domain.com/staging.git
$ git config core.sharedRepository group
We can check whether the repository is a group repository with:
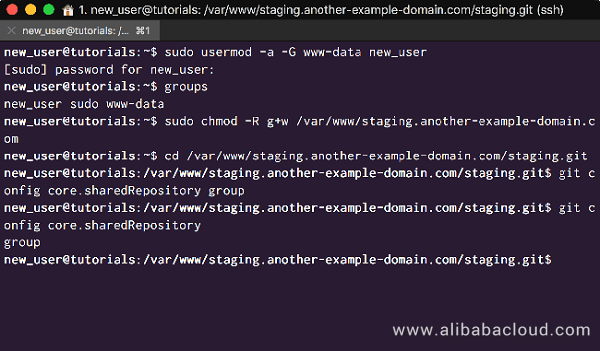
$ git config core.sharedRepositoryGit should return 'group', and our terminal should look like this:
There is no point in pushing from local to staging, if we haven't made any changes. So for demonstration purposes, I have made some changes to the Twentyseventeen 'style.css':
.site-content-contain {
    background-color: yellow;
}

h1.site-title a {
    font-size: 300%;
    color: purple !important;
}
We can see the css changes by visiting the local site:
http://another-example-domain.local
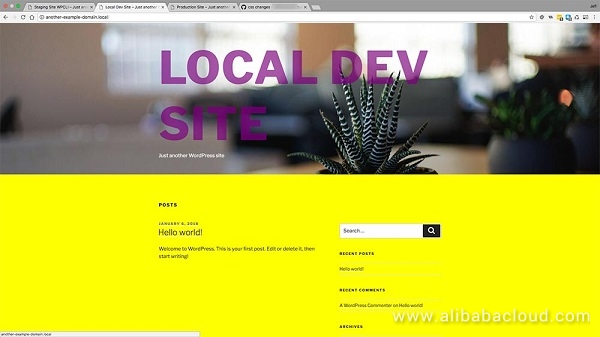
Yes, hideous I know, but good for demonstration. We now need to add our staging remote to the local project, in the same manner as we did previously with our origin remote. We should also check that it has been added correctly.
On your local machine, from within the local site's root issue the following commands:
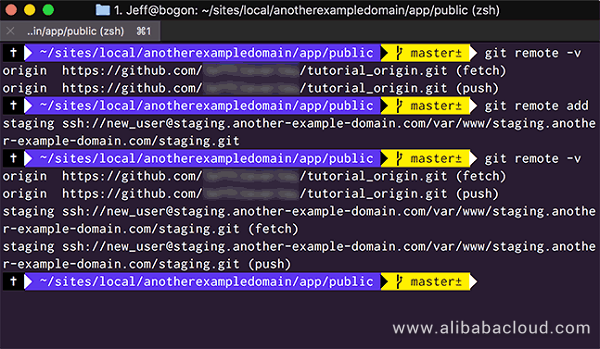
$ git remote add staging ssh://new_user@staging.another-example-domain.com/var/www/staging.another-example-domain.com/staging.git
$ git remote -v
The remote address will include the 'ssh://' prefix, followed by the required superuser username and domain address used for SSH login, immediately appended with the full path on the server to the staging site's 'staging.git' repository.
Your terminal should look similar to:
Now we need to add our changes and then commit them with an appropriate message:
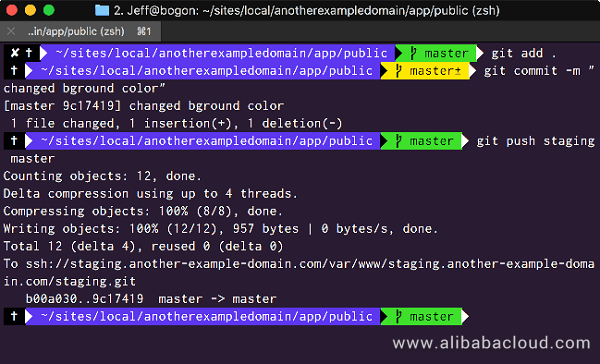
$ git add .
$ git commit -m "changed ground color"
The option 'add . ' means 'add all file changes'. Git will display information about the commit and you are now ready to push:
$ git push staging masterGit will process your request, do the push and report back upon success or error. If successful your terminal should now look like this:
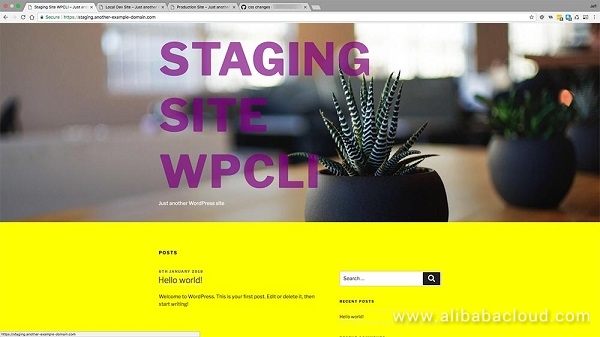
Now when you visit your staging site, you will see the changes you made in your local development environment have been exactly replicated on your live staging site:
https://staging.another-example-domain.com
The process of setting up the Production Site 'git' deployment workflow is identical to the Staging Site 'git' deployment. All we need to do is make some slight modifications to paths and directory names.
For brevity I will add the steps in a summarized fashion. If you need further clarification about each step, please see the above corresponding step's information
On your server, change directory to your production site root directory, and issue the following commands:
$ cd /var/www/another-example-domain.com
$ sudo mkdir production.git
Change directory into the 'production.git' directory and initialize a bare repository:
$ cd production.git
$ sudo git init --bare Change directory into '/var/www/another-example-domain/production.git/hooks', create a new file called 'post-receive', and open it for editing:
$ cd /var/www/another-example-domain.com/production.git/hooks
$ sudo touch post-receive
$ sudo nano post-receive
Add the following code:
#!/bin/sh
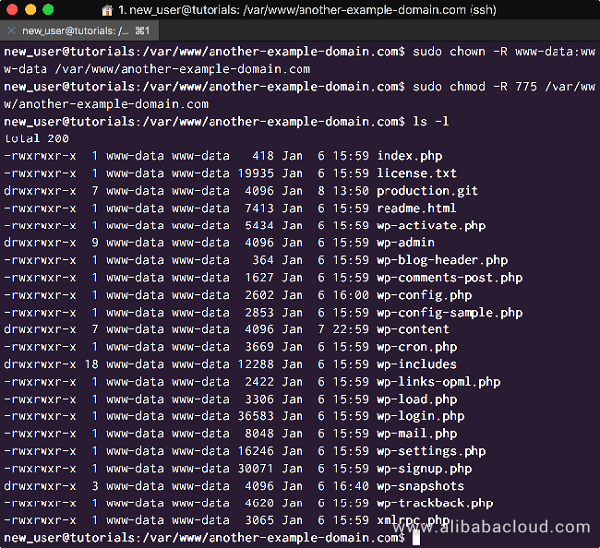
git --work-tree=/var/www/another-example-domain.com --git-dir=/var/www/another-example-domain.com/production.git checkout -f Issue the following commands to correct ownerships and permissions:
$ sudo chown -R www-data/www-data /var/www/another-example-domain.com
$ sudo chmod -R 775 /var/www/another-example-domain.com
$ ls -l
Your terminal should look like the following:
Ensure our user group has write permissions, and our production repository is a shared group repository:
$ sudo chmod -R g+w /var/www/another-example-domain.com
$ cd /var/www/another-example-domain.com/production.git
$ git config core.sharedRepository groupAdd our production remote locally. On your local machine, from within the local site root issue the following commands:
$ git remote add production ssh://new_user@another-example-domain.com/var/www/another-example-domain.com/production.git
$ git remote -v
Your terminal should look similar to:
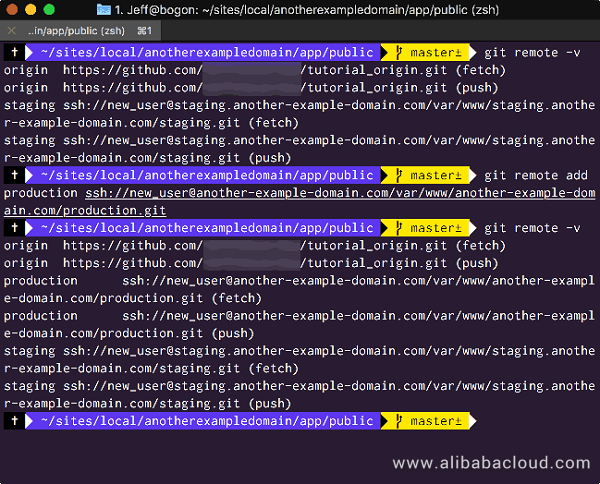
Since our changes have already been added and committed, we need only push them:
$ git push production masterGit will process your request, do the push and report back upon success or error. If successful, your terminal should now look like this:
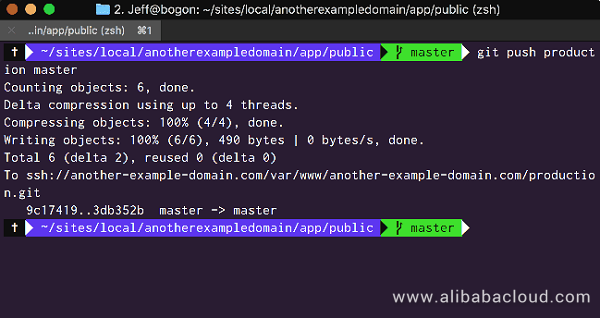
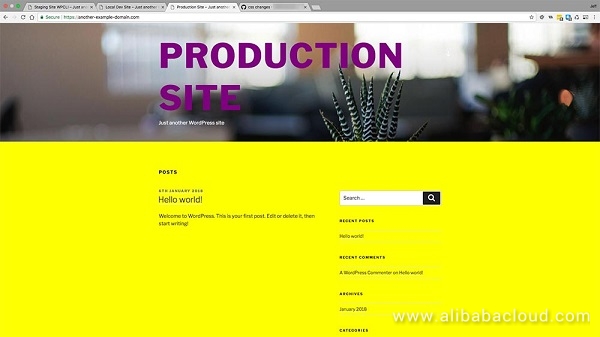
Visit your production site to confirm your local changes are now live:
https://another-example-domain.com
When we have tested our changes on the Staging site, we push them to our live site and our origin repository. This ensures that our origin repository contains a backup of all our work and code changes, so we can revert back to any previously committed point in our code.
From your local machines local site's root push to the origin repository:
$ git push origin master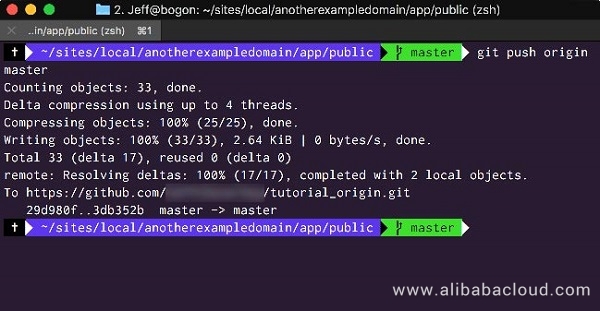
Now let's visit our GitHub repository, and inspect the changes. Locate the commit by name, and view it. Any code additions will be highlighted in green, any deletions will be highlighted in red.
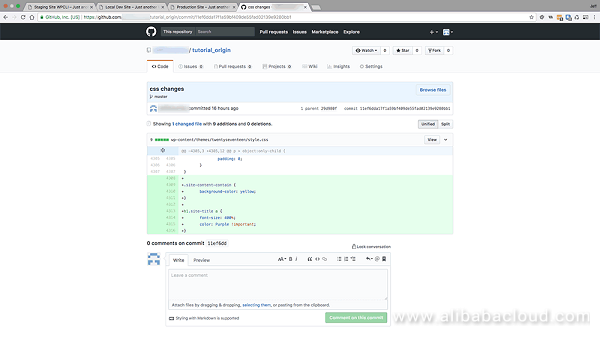
Remember we temporarily disabled the HTTP Authentication on our Staging site in both the previous tutorials, that we could complete the series without requiring password entry etc.
Now we have finished implementing our deployment workflow, we need to re-enable authentication, so that the Staging sites are only viewable by authorized users.
To do that, open a terminal window and login to your staging server and open the staging site domain's Nginx configuration file:
$ sudo nano /etc/nginx/sites-available/staging.another-example-domain.comRemove the '#' from infront of the 'auth_basic' and 'auth_basic_user_file' directives within the 'location / ' block.
Change this:
location / {
    ……
    # auth_basic "Staging Site - Access Restricted!";
    # auth_basic_user_file /etc/nginx/.htpasswd;
}
To this:
location / {
    ……
    auth_basic "Staging Site - Access Restricted!";
    auth_basic_user_file /etc/nginx/.htpasswd;
}
Save and close the file. Check your Nginx configuration for syntax errors, and if there are none, reload Nginx:
$ sudo nginx -t
$ sudo systemctl reload nginxAs you can see, this workflow omits the need to be constantly saving files locally, then using SFTP to upload and download files between different sites, we can achieve the same thing with a simple 'git push' command now.
It also provides the benefit of a completely safe and secure backup, not only for your code as it stands today, but each and every change you commit. You now have the ability to revert changes, and travel back in time through your development.
Git offers so much more though, using the tool effectively you can work on teams with each developer working on different branches independently without affecting each others code.
Even if you work alone, you can create branches to work on to test new code that will protect and isolate your main code master branch and provide an efficient way to manage your development process.
The staging environment not only provides you with a place to test your own code, but also is an important part of testing WordPress core updates, and featured plugin updates to ensure they don't break your production sites before updating production.
Implementing a Modern WordPress Workflow on Alibaba Cloud - Part 3
FortiGuard Labs Report – Exponential Growth of IoT Device Attacks

2,593 posts | 793 followers
FollowAlibaba Clouder - July 3, 2018
Alibaba Clouder - July 3, 2018
Alibaba Clouder - July 4, 2018
Alibaba Clouder - May 9, 2018
Alibaba Clouder - May 17, 2019
Alibaba Clouder - February 21, 2020

2,593 posts | 793 followers
Follow ECS(Elastic Compute Service)
Elastic and secure virtual cloud servers to cater all your cloud hosting needs.
Learn More Domains
Over 20 million domain, free WHOIS privacy protection.
Learn MoreLearn More
More Posts by Alibaba Clouder