By Arslan Ud Din Shafiq, Alibaba Cloud Tech Share Author. Tech Share is Alibaba Cloud's incentive program to encourage the sharing of technical knowledge and best practices within the cloud community.
Buildbot is an open-source job scheduling system. It is a framework that is used to automate software building, testing and releasing processes to validate the changes in the project code. Buildbot is programmed in python and support all major operating systems.
In this tutorial, we will be installing and configuring Buildbot on an Alibaba Cloud Elastic Compute Service (ECS) instance with CentOS 7.
Automation is beneficial in software development due to its repetitive nature and reliability, as it minimizes human errors. It is a fast way for developers to get results, reports, and feedback regarding build and test. With Buildbot, you can automate release and deployment, avoid errors and hassles, and deploy software efficiently.
Buildbot manages queues for jobs, and when resources are available, the job is executed. Buildbot has masters and workers. The workers work on various operating systems (OS) while the masters monitor the changes in source code repos, manage coordination of activities of the workers and make reports of results for developers and users.
After completing the prerequisites, log in as a non-root user with sudo privileges. You can refer to this guide if you are not sure how to set up your Alibaba Cloud ECS instance. I have chosen "aareez" as my username.
You will need to update your CentOS system Enter the command below:
# sudo yum updateYou will be prompted a message Is this ok?. Type Y and hit Enter.
Install nano editor with the command below:
# sudo yum install nanoYou will be prompted a message Is this ok?. Type Y and hit Enter.
Pip is a package management system for software packages in Python. For easy installation of Buildbot, I will use pip in this tutorial. To upgrade pip execute the following command:
# sudo pip install --upgrade pipFor installation of Buildbot, you will require some development tools such as gcc. Execute the following command to install these required tools:
# sudo yum groupinstall 'Development Tools' -yTo install Buildbot, I will recommend to use pip for faster installation. You will need to install both Master and Worker for Buildbot to work.
For installation of Master, execute the following command:
# sudo pip install BuildbotIn case, you are willing to use SSL, you will need to use the following command for installation.
# sudo pip install buildbot[tls] For installation of worker, execute the following command.
# sudo pip install buildbot-workerAs everybody will need to check the project's status, buildmaster runs on a publicly visible host. To create buildmaster, you will need to create a directory and populate the required files. Use the following command to do so,
# buildbot create-master -r buildboldNavigate to created directory
# cd buildboldExecute the following command to get configuration file copy for buildmaster.
# sudo cp master.cfg.sample master.cfgFor installation of buildbot-www, execute the following command.
# sudo pip install buildbot-wwwTo install waterfall view for Buildbot, execute the following command.
# sudo pip install buildbot-waterfall-viewTo install grid view for Buildbot, execute the following command.
# sudo pip install buildbot-grid-viewTo install console view for Buildbot, execute the following command.
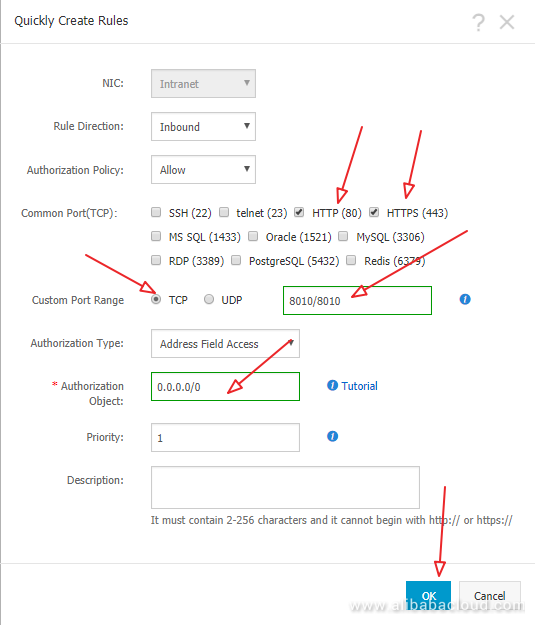
# sudo pip install buildbot-console-viewIf you have activated firewalls, you will have to define a rule in Alibaba Cloud Security Group for your cloud server to add exception for port 80/tcp, 443/tcp and 8010/tcp. You can enable these ports while creating ECS instance, but in case, if you have forgotten to unblock these ports, you can follow the procedure below. By default, these ports are blocked by the firewalls.
To do this, follow these steps. Go to your Elastic Compute Service section.
Click on More on the ECS that you are using for Buildbot. Navigate to Security Group Configuration.
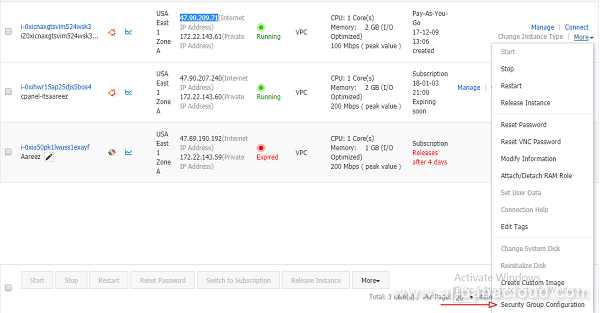
Click on Configure Rules.
Click on Quickly Create Rules.
Add the configurations as shown in screenshot below and click OK.
In the process, you may encounter a warning about misconfigured Buildbot URL. To correct it, execute the following command.
# sudo nano master.cfgIn the opened file, find the following line and modify localhost with your IP address as shown below.
Modify the following line from
c['buildbotURL'] = "http://localhost:8010/"To
c['buildbotURL'] = "http://47.254.152.126:8010/"Press Ctrl+X, then type Y, and press Enter to save the changes.
CentOS supports MariaDB server by default. Buildbot supports SQLite, MySQL and Postgres database. In this tutorial, I will use MySQL database. To install MariaDB server, execute the command below.
# sudo yum install mariadb-server -yNow enable MariaDB server so that when system restarts, it boots automatically and start MariaDB server.
# sudo systemctl enable mariadb
# sudo systemctl start mariadbFor starting Buildbot, MySQL-Python package must be installed. To do so, execute the following command.
# sudo pip install mysqlclientUse MySQL shell to login as root user and execute the following command:
# sudo mysql -u root -pNow the command prompt will ask you to enter password. By default password for MariaDB is empty string, leave it blank and hit Enter.
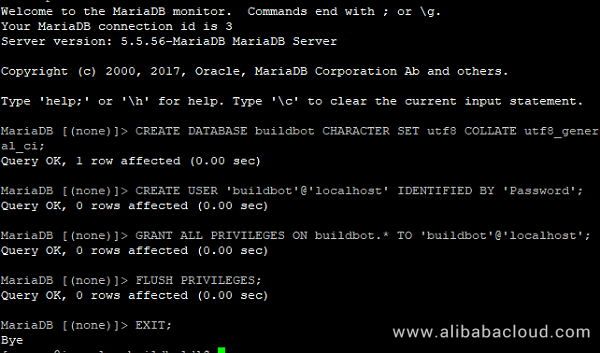
To create the database and user for this database for your Buildbot, run the following queries in the following sequence:
CREATE DATABASE buildbot CHARACTER SET utf8 COLLATE utf8_general_ci;
CREATE USER 'buildbot'@'localhost' IDENTIFIED BY 'Password';
GRANT ALL PRIVILEGES ON buildbot.* TO 'buildbot'@'localhost';
FLUSH PRIVILEGES;
EXIT;
Note that buildbot can be changed to your desired name.
You may receive warning about misconfigured Buildbot URL. To correct it, execute the following command.
# sudo nano master.cfgIn the opened file, find the following line and modify db_url with your mysql url as shown below.
Modify value of 'db_url' to
mysql://buildbot:Password@localhost/buildbot?max_idle=300
In the opened file, paste the following line in the end of the file to opt-out from sharing data with Buildbot.
c['buildbotNetUsageData'] = NonePress Ctrl+X, then type Y, and press Enter to save the changes.
You can check whether you have configured your master.cfg file correctly by executing the command
# sudo buildbot checkconfigYou should see the message "Config file is good!"
Buildmaster database must be upgraded before starting Buildbot. To do so, execute the command below. Remember to change aareez with your own username.
# sudo buildbot upgrade-master /home/aareez/buildboldTo start buildmaster, execute the following command.
# sudo buildbot startNow open your browser and use your Alibaba Cloud ECS' IP Address with port 8010 to access your Buildbot installation. In my case, I have used http://47.254.152.126:8010
You will see the following screen:
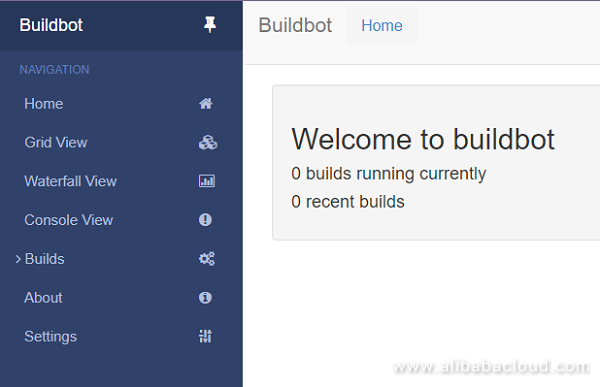
As you may have noticed, you are able to access Buildbot by accessing IP address directly without passing through any authentication system. To secure Buildbot access, follow the steps below.
Open the master.cfg file. Remember you should be in your base directory of Buildbot installation. In my case, directory is buildbold.
# sudo nano master.cfgUpdate aareez to your desired username on both places and 654321 to your desired password. Add the following lines in the end of opened master.cfg file.
c['www']['authz'] = util.Authz(
       allowRules = [
           util.AnyEndpointMatcher(role="admins")
       ],
       roleMatchers = [
           util.RolesFromUsername(roles=['admins'], usernames=['aareez'])
       ]
)
c['www']['auth'] = util.UserPasswordAuth({'aareez': '654321'})
Save changes by pressing Ctrl+X, type Y and then press Enter.
Now restart your Buildbot to load changes by using the command.
# sudo buildbot restartYou have successfully enabled authentication. Refresh your browsers page and you will see the following screen.


After login, you can see the logged in status.

Open the master.cfg file. Remember you should be in your base directory of Buildbot installation. In my case, directory is buildbold.
# sudo nano master.cfgFind the following line in opened file.

From the above screenshot, example-worker is username and pass is password. You may change it according to your needs but keep in mind that you will need to use the same username and password when building worker.
To create worker, execute the command.
# sudo buildbot-worker create-worker ~/worker localhost example-worker passYou may edit information including your name and email and you can add description of your system by navigating to /worker/info directory and opening admin and host file.
To start worker, execute the following command.
# sudo buildbot-worker start ~/workerYou can see the worker details edited in admin and host file here. I have not changed any information; hence, default information is available in the given screen.

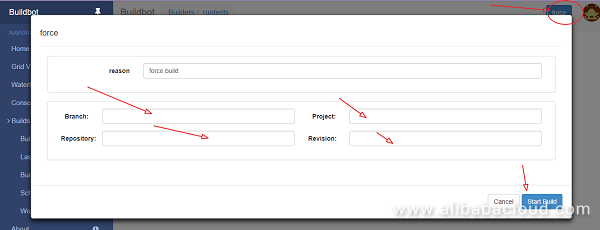
To run sample test, navigate to Builds > Builders from sidebar and then click runtests.

Click Force button to build, give project name, revision, repository, branch and click Start Build.
That's it! You have successfully completed installation and configuration of Buildbot on your Alibaba Cloud Elastic Compute Service (ECS) CentOS 7 instance.

2,605 posts | 747 followers
FollowAlibaba Clouder - October 26, 2018
Hiteshjethva - January 8, 2020
Alibaba Clouder - August 16, 2019
Hiteshjethva - December 12, 2019
Sajid Qureshi - August 8, 2018
Hiteshjethva - December 12, 2019

2,605 posts | 747 followers
Follow ECS(Elastic Compute Service)
Elastic and secure virtual cloud servers to cater all your cloud hosting needs.
Learn More RAM(Resource Access Management)
Secure your cloud resources with Resource Access Management to define fine-grained access permissions for users and groups
Learn MoreLearn More
More Posts by Alibaba Clouder