By Léon Rodenburg, Alibaba Cloud MVP.
When you have an application with lots of moving parts, ensuring the availability of your services can be a real challenge. If one of the components goes down, a tightly coupled architecture might cause the error to snowball. This can quickly take down your full application and sometimes requires several hours to fix. Decoupling the components in your application can help prevent the snowball effect and increase availability. In this post, we will investigate how you can achieve more resilience by using the queues and topics of the Alibaba Cloud Message Notification Service.
Let us say you run a webshop that sells shoes. Logically, you have an order processing component that receives incoming orders and checks the stock levels. If the shoes are in stock, a payment is triggered. Finally, a delivery is scheduled with a third party logistic service provider. As the project had a tight schedule, the team decided to put the workflow in a single component that handles these tasks from top to bottom. The application went live and people started ordering. On Friday afternoon that week, you get a phone call: the servers of the logistic service provider are down. People have ordered shoes and paid for them, but the application was unable to schedule any deliveries. This means the customers will never get their new shoes. There are two ways to recover from this. You can either undo the payment and fail the order, or wait until the logistic service provider resolves the issues and try to manually fabricate the needed messages. All in all, you are in a pickle.
How could these issues have been prevented? By decoupling the coupled architecture! In a more decoupled approach, the workflow will be processed by multiple individual components. Every component receives a message, does its work and triggers the next step in the workflow. If a step fails, that component can retry the processing for as long as it sees fit. The failure will not influence any other steps in the process, although it might take a little bit longer before orders can be finalized. But a customer would probably be happy to wait for a few minutes, rather than not being able to order at all.
Decoupling an application using messages like this is usually done using queues and topics, that we will look at next.
When you know that only a single logical component should receive a message, you can use a queue. A queue is a stack of messages that a component can receive one by one. The receiving component is sometimes called a consumer. If a message was processed successfully, it is removed from the queue. If something unexpected happens during the processing of a message, it is put back on the queue. The message will then be received again at a later point in time. Normally, consumers can decide for themselves how many messages they will process concurrently, so the throughput is at an acceptable rate. It is also very common to see multiple consumers for any given queue.
Queues are ideal for batch calculations, generating invoices or images, sending emails or doing any kind of work that takes a fair amount of time. The beauty of it is that the component that sends the message, the producer, can keep on sending messages even if the consumer is down. The queue will fill up with messages that will be processed when the consumer comes up again. In this way, not a single message gets lost if an outage occurs. That makes an application more resilient and ensures a good user experience.
Topics can be used if multiple components should receive a message. These consumers are called subscribers in the context of a topic. The messages on a topic are often events triggered by the application. An example might be that an order was processed. Multiple subscribers might be interested in that event, like the shipment service and the payment service. Theoretically, a topic differs from a queue because the publishing side does not know anything about the consumers. It has no idea how many components will pick up the message, nor does it know what subscribers might want to do with it. This is a very powerful concept and sometimes referred to as a Publish-Subscribe pattern.
The best thing about queues and topics is that you can combine them to create an extremely flexible setup. When adding subscribers to a topic, you can specify the transport protocol of the message. An HTTP call can be made whenever a message is published on the topic, but you could also have the message delivered into a queue. That way, the fault tolerance of queues is combined with the fan-out kind of architecture topics provide.
Enough with all the theory. To get a feel for how queues and topics can help decouple application components, let us create a simple demo application that uses both queues and topics. To get started, log in to the Alibaba Cloud console and find the Message Notification Service (MNS).

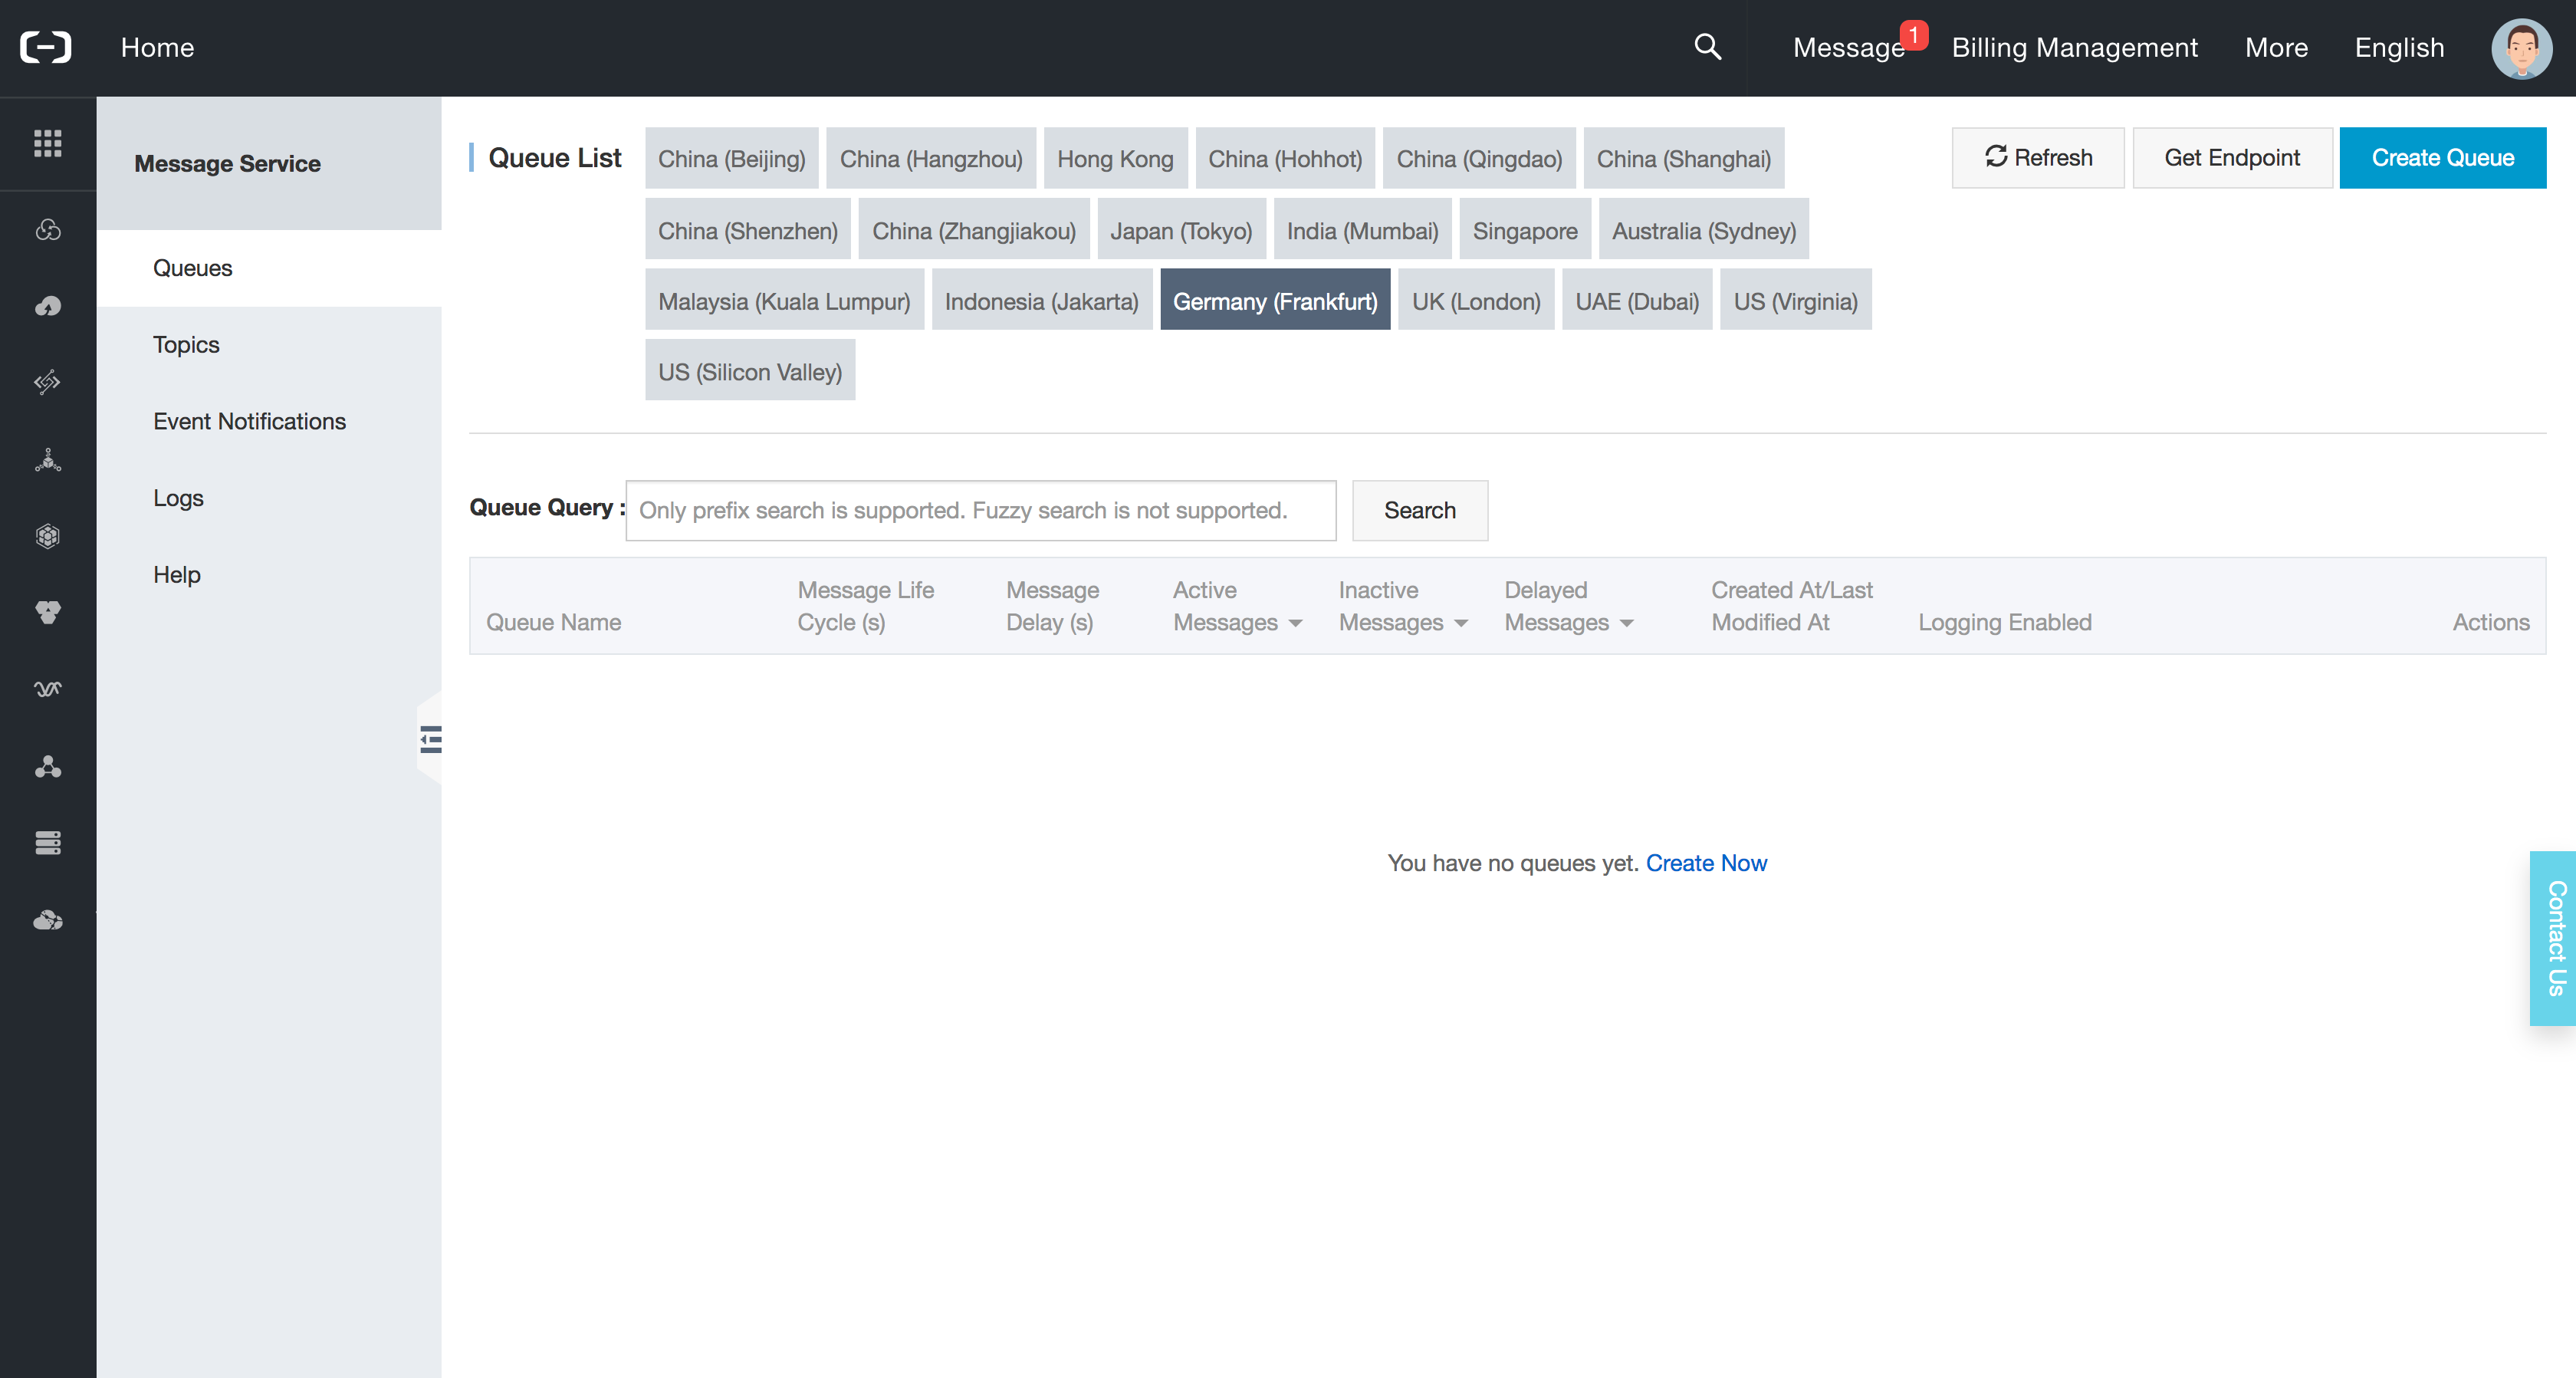
We will create three queues, named Consumer1, Consumer2 and Consumer3. To create the first queue, click on the 'Create Queue' button in the top-right corner. This will ask you for the following details:
Consumer1
You should only have to put in the queue name (Consumer1) and press 'OK' to create the queue. Repeat the same steps for the two other queues (Consumer2 and Consumer3).
Now switch to the 'Topic' dashboard on the left and click 'Create Topic'. Fill in the topic name AllConsumers and leave the rest at its default value. Click 'OK' to create the topic.
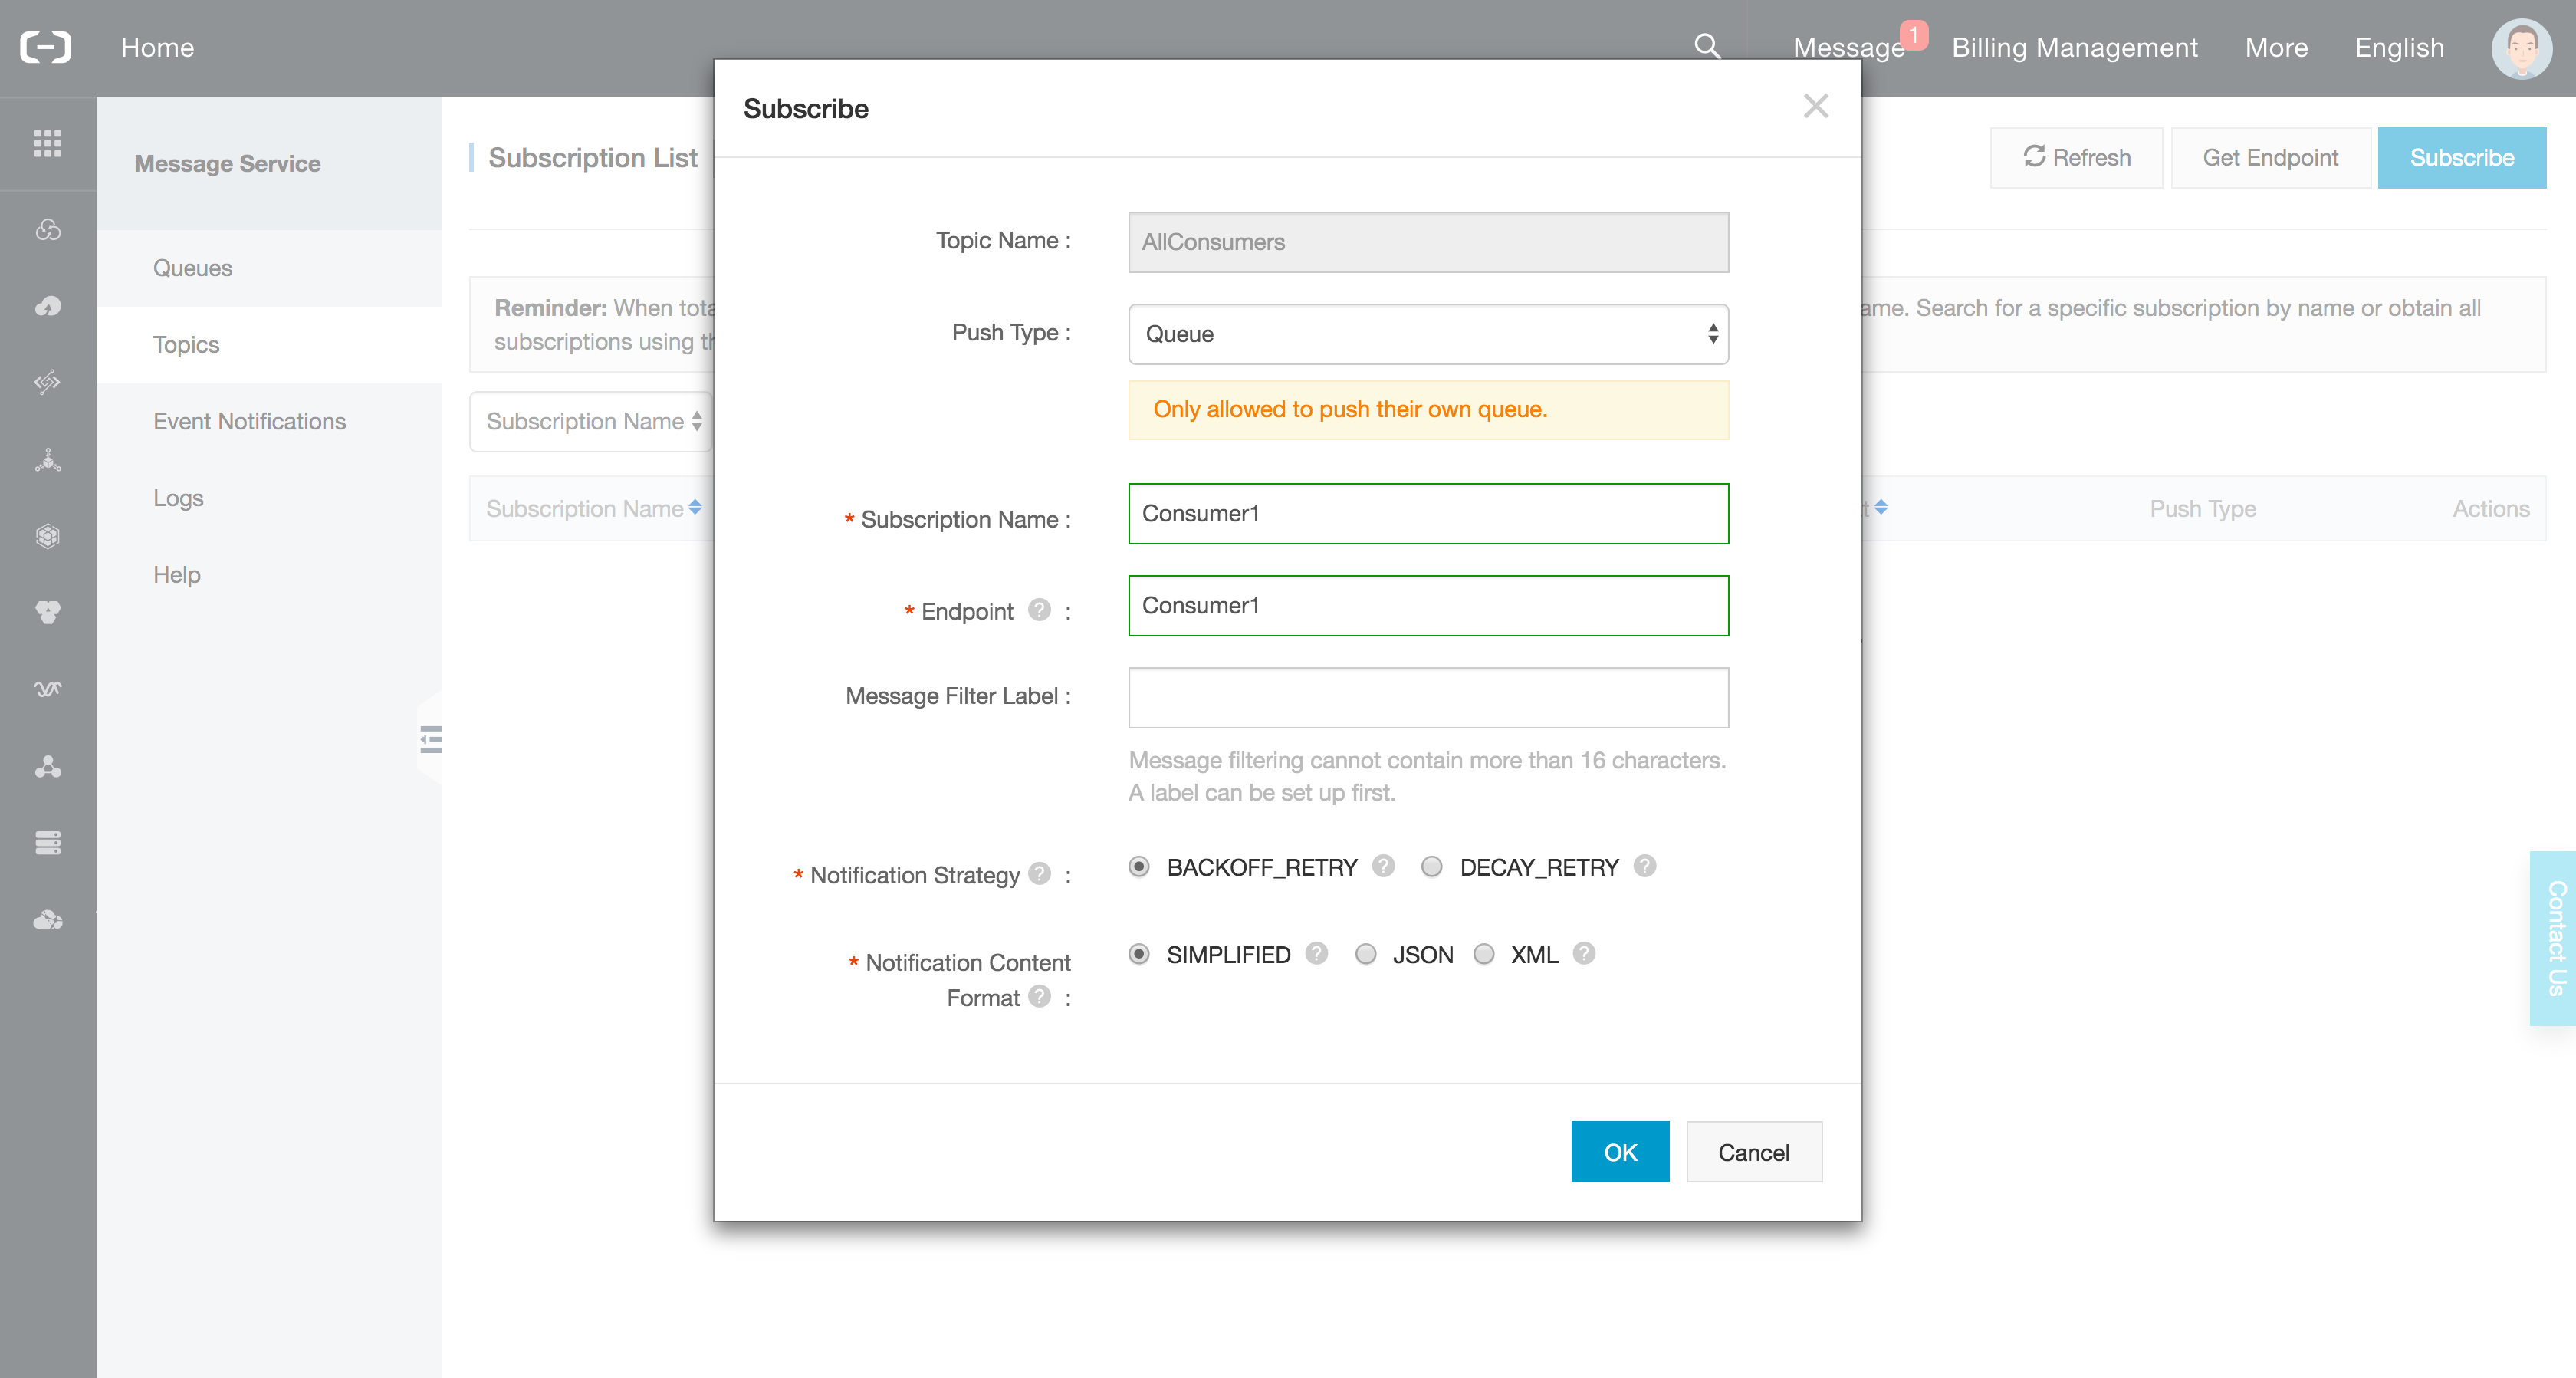
When the topic has been created, click on its name to see the subscription list. We will subscribe all three queues to the topic, so a message will get delivered to every queue when we publish it on the topic. To add a subscription, click 'Subscribe'. Fill in the details as shown below:

Repeat the same steps for Consumer2 and Consumer3. You have now configured three queues, a topic, and subscriptions to that topic for every queue.
The Alibaba Cloud Message Notification Service (MNS) has an official SDK to quickly get started with messaging on the JVM. You can find the SDK here. The following code snippet demonstrates how we could publish a message on a topic:
val mnsClient = CloudAccount(
  accessKeyId,
  accessKeySecret,
  mnsEndpoint
).mnsClient
val topic = mnsClient.getTopicRef("AllConsumers")
val message = Base64TopicMessage()
message.messageBody = "Topic message"
topic.publishMessage(message)
We create a CloudAccount object and request an MNS client from it. Then we get a reference to the AllConsumers topic, build a base64 encoded message from a string and publish it on the topic. If you run this code, all the three queues that you created earlier will have received a message. Make sure to replace the access key ID, access key secret and MNS endpoint with the values for your account. You can find your access key information in the Security Management dashboard. The MNS endpoint can be requested when you click the 'Get Endpoint' button on the Queue or Topic dashboards.
The message body will be encoded in base64 to ensure non-ASCII characters will be transported correctly. It is therefore very important to remember to decode the message body in the consumer.
When publishing to a queue, the process is very similar. See the following code snippet:
val mnsClient = CloudAccount(
  accessKeyId,
  accessKeySecret,
  mnsEndpoint
).mnsClient
val queue = mnsClient.getQueueRef("Consumer1")
val message = Message()
message.setMessageBody("Queue message", Message.MessageBodyType.BASE64)
queue.putMessage(message)
Note that the message body will also be base64-encoded.
Using the SDK, we can also easily consume the messages on a queue. There are several APIs that you can call for receiving message, but we will demonstrate the ReceiveMessage API here. A message can be received from a queue using the popMessage() call, or a batch of messages can be received using batchPopMessage(). The messages will be taken from the queue and hidden for other consumers during the configured length of the Invisibility Timeout. If you receive a message in a batch, you can specify how large you want the batch to be. Both the unbatched and the batched ReceiveMessage API optionally include a waitSeconds parameter. This specifies how long the consumer can long-poll for new messages. If a message is put on the queue during the long-polling, it will be returned immediately. If no messages become available during long-polling, an empty response is returned. Consumers can then reconnect and long-poll again for any new messages.
The following snippet shows how this works with the SDK in Kotlin:
val mnsClient = CloudAccount(
  accessKeyId,
  accessKeySecret,
  mnsEndpoint
).mnsClient
val queue = mnsClient.getQueueRef("Consumer1")
while (true) {
    val message: Message? = queue.popMessage(10)
  message?.let {
    lastMessage = it.messageBodyAsString
    println("Received message: $lastMessage")
    // More work here
    queue.deleteMessage(it.receiptHandle)
  }
}
The 10 indicates that the consumer will wait for a maximum of 10 seconds for new messages. When it receives a message, it gets the body as a string (decoded from base64) and prints it. The code then deletes the message from the queue, thereby acknowledging that the message was successfully retrieved. Normally you would do more work than printing the message body of course. Take care when implementing longer-running processes in the consumer. If the visibility timeout of the message is shorter than the amount of time the processing will take, the message will become visible again for other consumers before it was deleted! It is often a good idea to implement some kind of idempotency in the message processing. This means that if a message is delivered multiple times, the processing will be done only once.
A full example with the three queues and a topic you created can be found in this repository. Follow the instructions there to run the demo. One of the three queues will receive a message every 5 seconds, and a message will be published to the topic every 12 seconds. If you configured the topic subscriptions correctly, all three consumers will print out the contents of that message. You can also try bringing down one of the three consumers and see what happens. If you start it again, it should happily continue processing all the messages it missed.
Using the code snippets above and the Alibaba Cloud MNS SDK, it should be relatively straightforward to start decoupling components in your own Java applications as well. Try implementing the order processing logic we discussed earlier. If your application is not running on the JVM, you can try and find a third-party implementation of the SDK for your language. The last option is to implement the necessary HTTP calls yourself using the tooling that you like. In the end all the messaging over queues and topics is done using HTTP.
When you are working with queues and topics, don't forget to use the 'Publish' and 'Receive Messages' functions in the Alibaba Cloud MNS dashboard to quickly debug your setup. Alternatively, you could use this custom CLI to interface with MNS on your terminal. That should help you create queues, topics and publish messages in your build pipeline for example.
Happy messaging!
Alibaba Now Exclusive Provider of Salesforce CRM in Greater China

2,593 posts | 793 followers
FollowAlibaba Clouder - August 5, 2020
Alibaba Clouder - June 30, 2020
Alibaba Clouder - August 2, 2019
Alibaba Developer - December 17, 2018
Alibaba Clouder - March 19, 2019
Alibaba Cloud Native - April 13, 2021

2,593 posts | 793 followers
Follow Message Service
A message queuing and notification service that facilitates smooth transfer of messages between applications
Learn More ECS(Elastic Compute Service)
Elastic and secure virtual cloud servers to cater all your cloud hosting needs.
Learn More API Gateway
API Gateway provides you with high-performance and high-availability API hosting services to deploy and release your APIs on Alibaba Cloud products.
Learn MoreMore Posts by Alibaba Clouder