By Lenghui from F(x) Team
Fiber is the refactoring of the React core algorithm, which took more than two years of effort from the Facebook Team. Fiber architecture was introduced in React v16.0, and some of the design philosophies are worth learning.
For a browser, the pages are made frame by frame, and the frame rendering rate is consistent with the refresh rate of the device. In general, the screen refresh rate is 60 times per second, and the page is rendered smoothly when the frames per second (FPS) exceed 60. Otherwise, the page may get frozen. The following figure shows what happens in a complete frame:

window.resize, scroll, media query change, etc.requestAnimationFrame (rAF). Before painting, rAF callback is executed.requestIdleCallback. requestIdleCallback forms the foundation of React Fiber, but we’ll get back to it later.The js engine and the page rendering engine work in the same rendering thread in a mutually exclusive manner. If the task executed at a certain stage is very time-consuming (for example, the Timers or Begin Frame stage takes longer than 16ms), the page rendering will be interrupted, leading to page stuttering.
Before the Fiber architecture was introduced, React would compare the virtual DOM tree recursively to find the nodes that need to be changed and update them synchronously. In this process, which was called reconciliation, React would keep consuming browser resources, so the browser might fail to respond to user-triggered events. Please see the following figure:
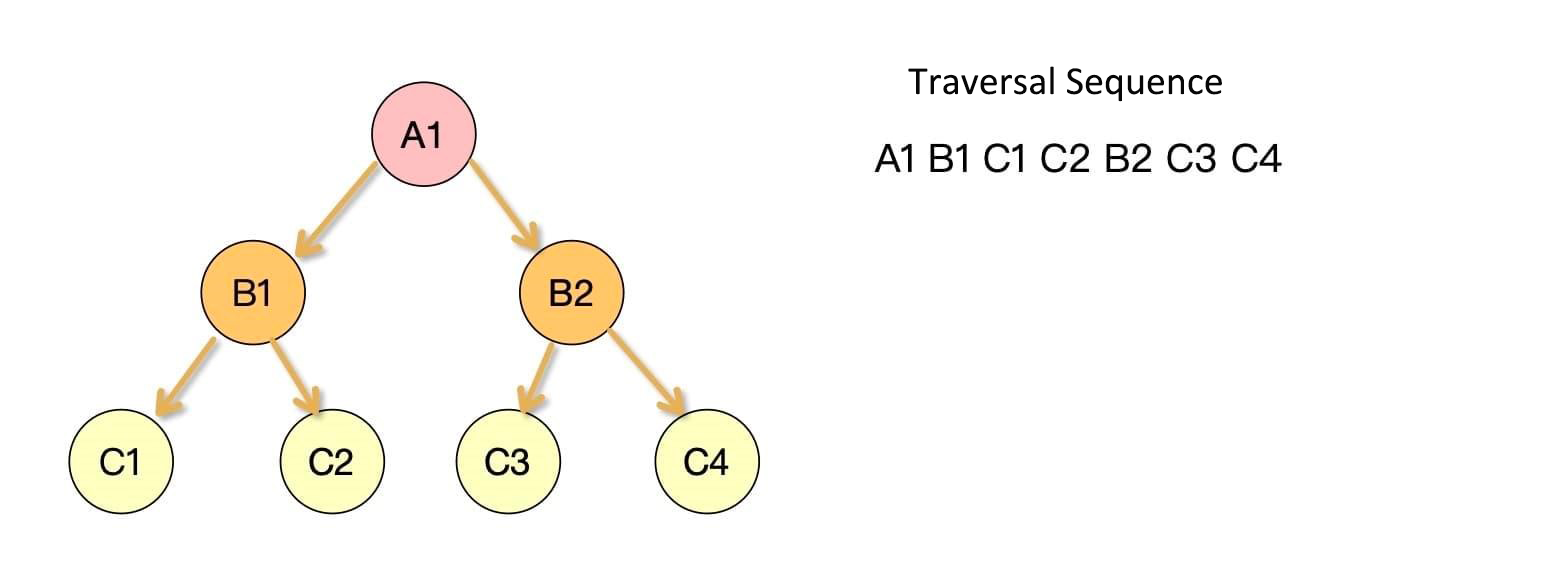
For the seven nodes in the figure, B1 and B2 are child nodes of A1, C1 and C2 are child nodes of B1, and C3 and C4 are child nodes of B2. Conventionally, the Depth-First Traversal method is used to search for the nodes. Please see the following code:
const root = {
  key: 'A1',
  children: [{
    key: 'B1',
    children: [{
      key: 'C1',
      children: []
    }, {
      key: 'C2',
      children: []
    }]
  }, {
    key: 'B2',
    children: [{
      key: 'C3',
      children: []
    }, {
      key: 'C4',
      children: []
    }]
  }]
}
const walk = dom => {
  console.log(dom.key)
  dom.children.forEach(child => walk(child))
}
walk(root)
Print:
A1
B1
C1
C2
B2
C3
C4
The traversal is a recursive call, which leads to a deeper execution stack that cannot be interrupted. Otherwise, it cannot be recovered. If the recursion goes very deep, the browser stutters. If the recursion takes 100ms, the browser cannot respond to user actions during this period. So, the longer it takes to execute the code, the more serious stuttering the user will encounter. The conventional method is not ideal for its incapability of dealing with interruption, and its execution stack is too deep.
To address these issues, Fiber is introduced to split the rendering and updating process into small tasks. These are executed as per an appropriate scheduling mechanism to specify the timing for task execution to reduce stuttering and improve the page interaction experience. The Fiber architecture allows break-offs in the reconciliation process. Then, the browser can use released CPU resources to respond to user actions promptly.
React v16.0 uses Fiber, while Vue does not. Why? It is because the two are optimized differently:
setState is called. This results in huge update tasks that need Fiber to break them down into small ones. As such, break-offs and resumption are allowed, and the main thread can execute high-priority tasks.Now, let's dive into the introduction of Fiber to see how it works.
It can be considered as an execution unit or a data structure.
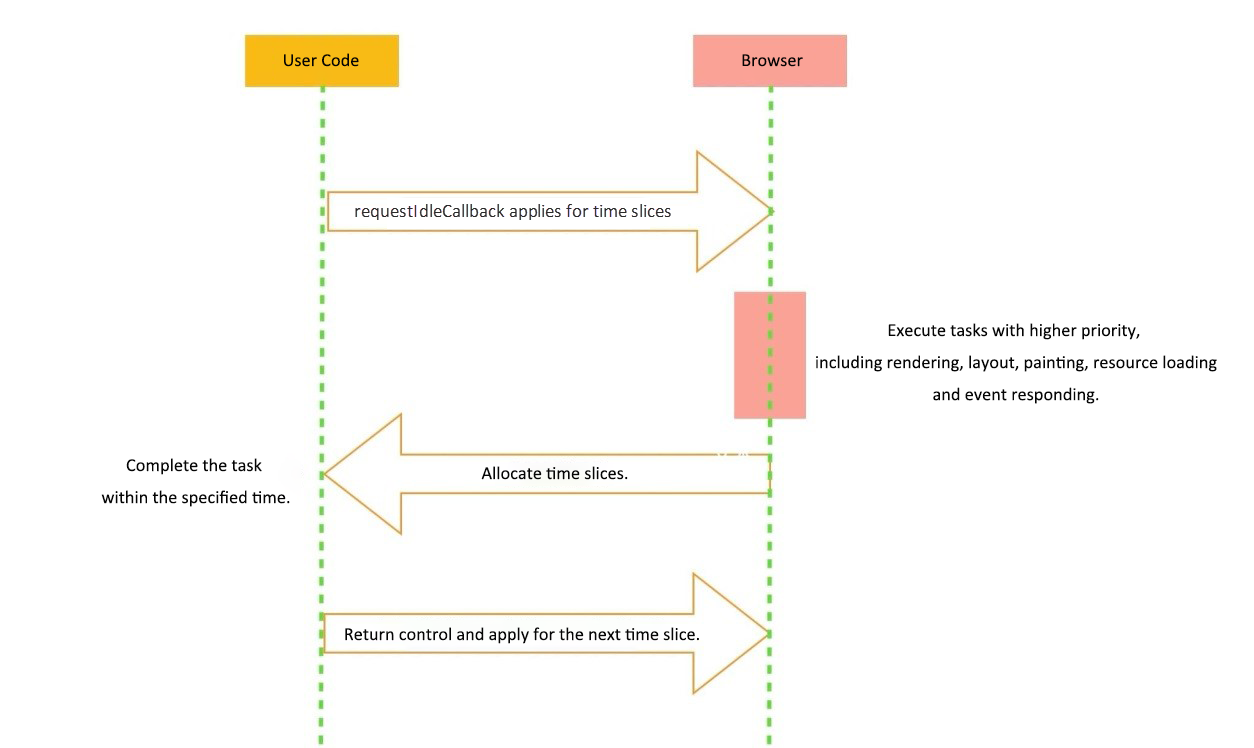
As an execution unit, every time it is executed, React checks how much time is left. If there is not enough time, React gives away its control. The following figure shows key interactions between React Fiber and the browser:

First, React requests scheduling from the browser. If the browser has some time left in a frame, React will check whether there are pending tasks. If not, React gives control to the browser; otherwise, the task is executed. When the execution is completed, React checks the time again. If there is time left with pending tasks, React will execute the next task. Otherwise, it gives control to the browser.
In this process, Fiber splits big tasks into many smaller task units. While the execution of a small task must be completed without a pause, there could be break-offs between adjacent small tasks to hand over control to the browser. As such, the user gets responses promptly without waiting for the original big task to be completed.
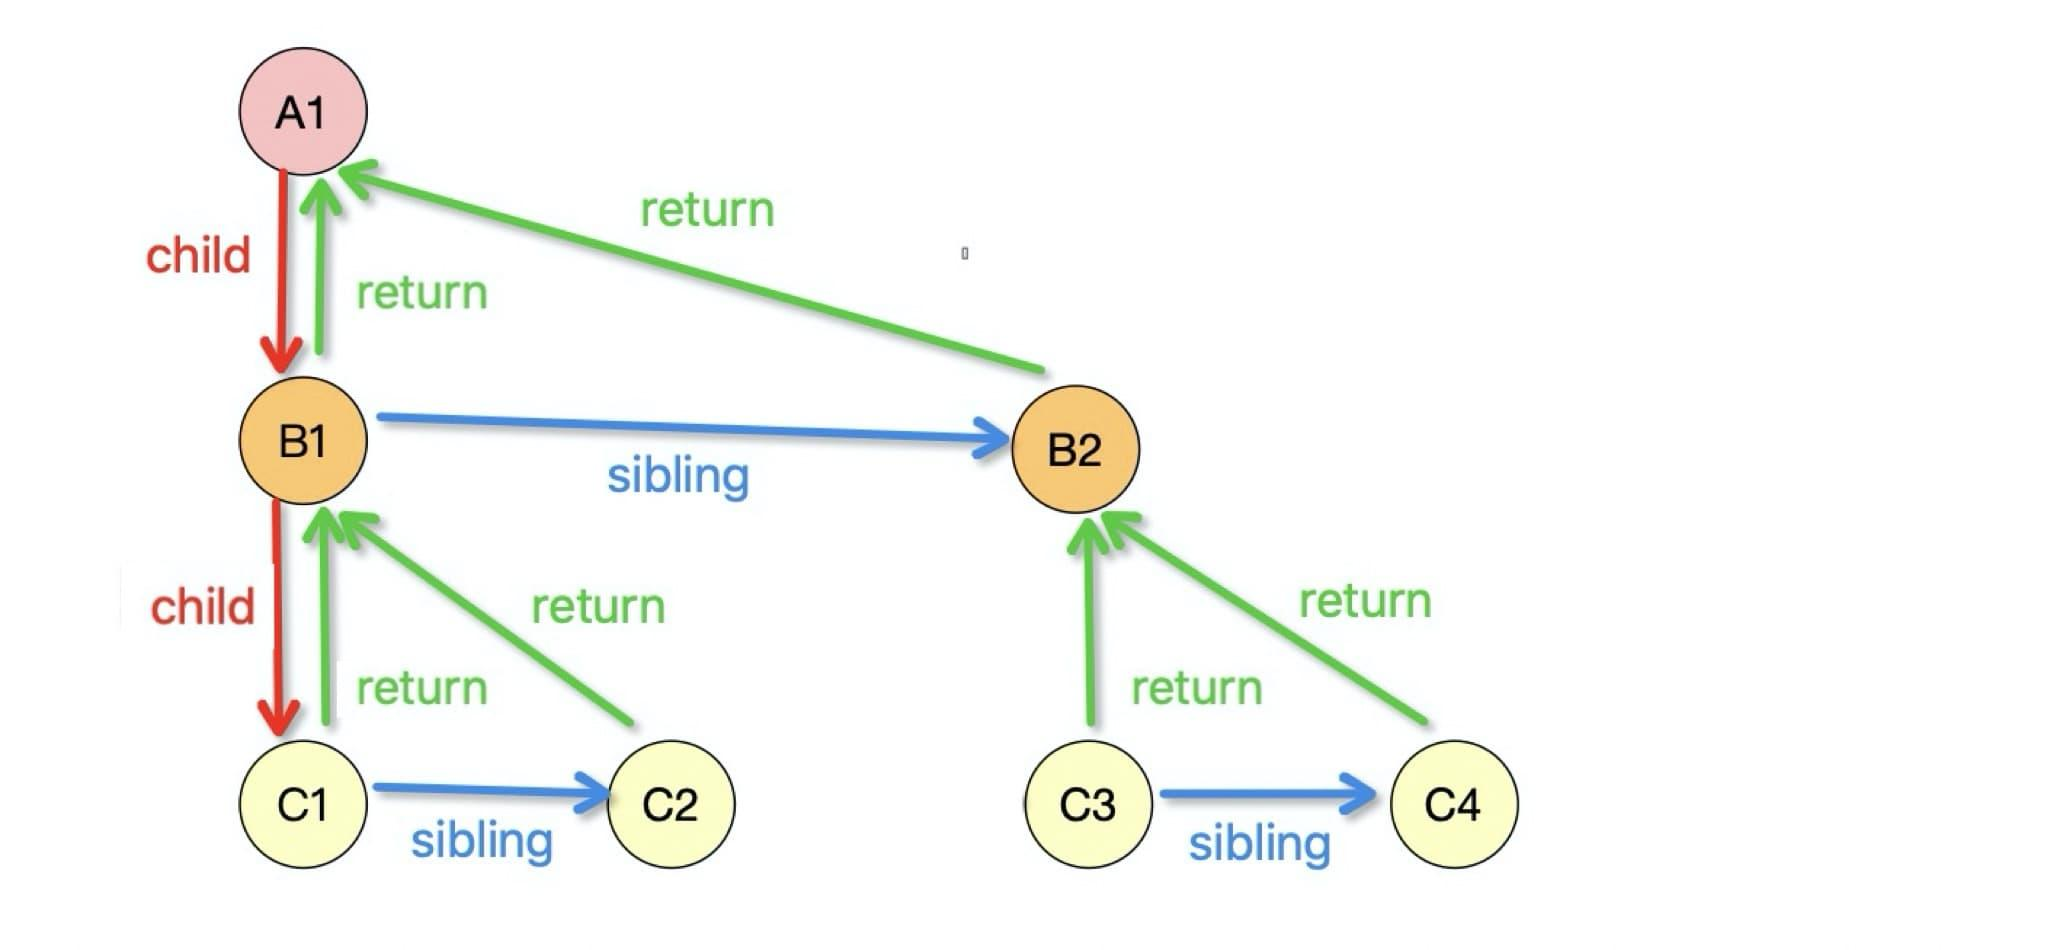
Fiber is also considered as a data structure, and React Fiber is implemented in a linked list. Each Virtual DOM can be taken as a fiber. As shown in the following figure, each node is a fiber, including attributes such as child (the first child node), sibling (sibling nodes), and return (the parent nodes). The implementation of the React Fiber mechanism relies on the following data structure. Now, we will discuss how Fiber is implemented based on this linked list.
Note: Fiber is the core algorithm of React for refactoring, and Fiber refers to each node in the data structure. As shown in the following figure, A1 and B1 are fibers.
requestAnimationFrameFiber uses requestAnimationFrame, an API provided by the browser for animation painting. It requires the browser to call the specified callback function to update the animation before the next repainting, namely the next frame.
For example, in a browser, the requestAnimationFrame can be used here if I want to extend the width of the div element by 1px in each frame until it reaches 100px.
<body>
  <div id="div" class="progress-bar "></div>
  <button id="start">Start Animation</button>
</body>

<script>
  let btn = document.getElementById('start')
  let div = document.getElementById('div')
  let start = 0
  let allInterval = []

  const progress = () => {
    div.style.width = div.offsetWidth + 1 + 'px'
    div.innerHTML = (div.offsetWidth) + '%'
    if (div.offsetWidth < 100) {
      let current = Date.now()
      allInterval.push(current - start)
      start = current
      requestAnimationFrame(progress)
    } else {
      console.log(allInterval) // Print all the time intervals of the requestAnimationFrame
    }
  }

  btn.addEventListener('click', () => {
    div.style.width = 0
    let currrent = Date.now()
    start = currrent
    requestAnimationFrame(progress)
    console.log(allInterval)
  })

</script>
Now, the browser will do what is mentioned above. Then, the time interval for each frame is printed as shown below (about 16ms):

requestIdleCallbackrequestIdleCallback is another fundamental API implemented in React Fiber. In order to enable quick response to users for smooth, flowing interactions, requestIdleCallback allows developers to execute background and low-priority tasks while running the main event, without causing latency during critical events, such as playing animations and input response. If a regular frame task is completed in 16ms, there is some time left for the execution of the tasks registered in requestIdleCallback.
The following figure shows a typical execution process. Using the requestIdleCallback method, the developer registers a corresponding task and tells the browser that the task has a low priority so that the browser can execute it if there is some idle time in each frame. In addition, the developer can pass in a timeout parameter. The browser must execute tasks when the timeout is reached:
window.requestIdleCallback(callback, { timeout: 1000 })
After the browser executes a task this way, if there is no time or no tasks left for execution, React returns control and run requestIdleCallback again to apply for the next time slice. Please see the following figure:
By default, the callback of window.requestIdleCallback(callback) will receive the parameter deadline, which contains the following two attributes:
timeRamining returns how much time is available in the current frame.didTimeout returns whether the callback task has timed out.Since the requestIdleCallback method is very important, the following two examples are given to help you understand. In each example, multiple tasks are executed at different times. Now, let’s see how the browser allocates time for these tasks:
Run task1, task2, and task3 directly. Each task is completed in less than 16ms:
let taskQueue = [
  () => {
    console.log('task1 start')
    console.log('task1 end')
  },
  () => {
    console.log('task2 start')
    console.log('task2 end')
  },
  () => {
    console.log('task3 start')
    console.log('task3 end')
  }
]

const performUnitWork = () => {
  // Retrieve the first task in the first queue for execution
  taskQueue.shift()()
}

const workloop = (deadline) => {
  console.log(`The remaining time of this frame: ${deadline.timeRemaining()}`)
  // If the remaining time is greater than 0 or the defined timeout is reached, the task is executed
  // If there is no time left, the task is given up and the control returns to the browser
  while ((deadline.timeRemaining() > 0 || deadline.didTimeout) && taskQueue.length > 0) {
    performUnitWork()
  }

  // If there are pending tasks, requestIdleCallback is called to apply for the next time slice
  if (taskQueue.length > 0) {
    window.requestIdleCallback(workloop, { timeout: 1000 })
  }
}

requestIdleCallback(workloop, { timeout: 1000 })
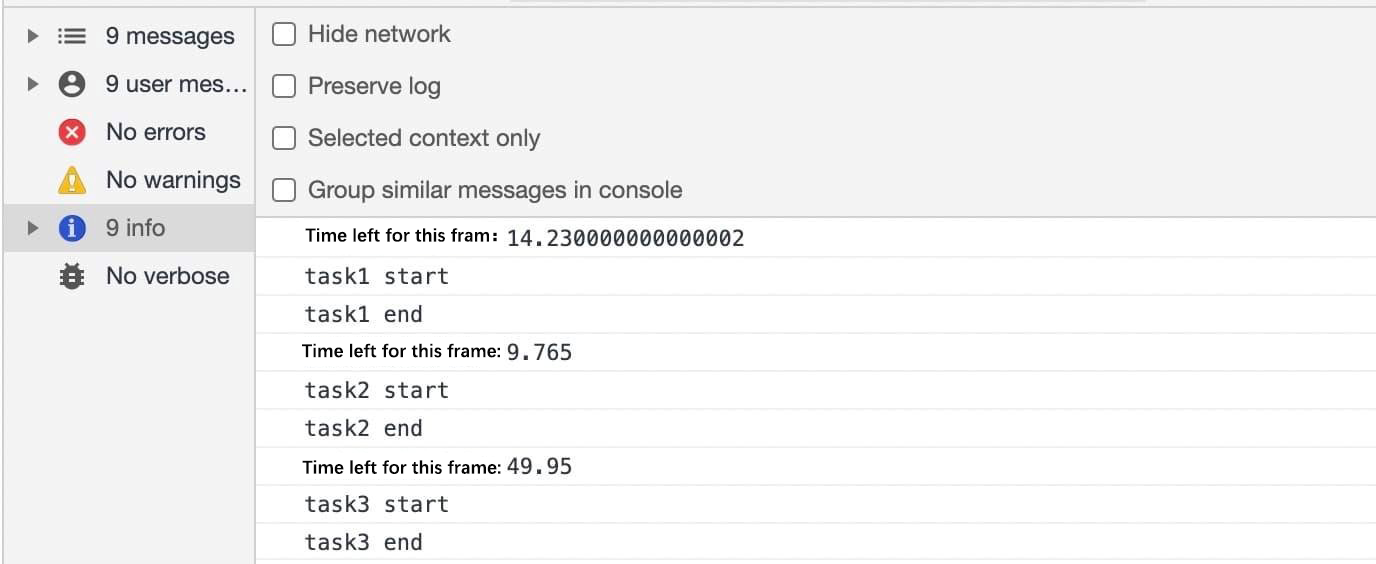
The preceding example defines a task queue named taskQueue and a workloop function. It uses window.requestIdleCallback(workloop, { timeout: 1000 }) to execute the tasks in the taskQueue. In each task, only a quite limited amount of time is taken to process the console.log, so the browser has 15.52ms left in this frame, which is enough to complete the three tasks. The result is printed below:
Sleep time is added to task1, task2, and task3. Each task takes more than 16ms to complete.
const sleep = delay => {
  for (let start = Date.now(); Date.now() - start <= delay;) {}
}

let taskQueue = [
  () => {
    console.log('task1 start')
    sleep(20) // The task takes more than a frame (16.6ms) to complete, and needs to give control to the browser
    console.log('task1 end')
  },
  () => {
    console.log('task2 start')
    sleep(20) // The task takes more than a frame (16.6ms) to complete, and needs to give control to the browser
    console.log('task2 end')
  },
  () => {
    console.log('task3 start')
    sleep(20) // The task takes more than a frame (16.6ms) to complete, and needs to give control to the browser
    console.log('task3 end')
  }
]
Based on the preceding example, some modifications have been made so that each task in the taskQueue takes more than 16.6ms to execute. The printed result shows that the idle time of the browser in the first frame is 14ms, which is enough for only one task. It is the same case with the second and third frames. Therefore, three tasks are completed in three frames respectively. The result is printed below:
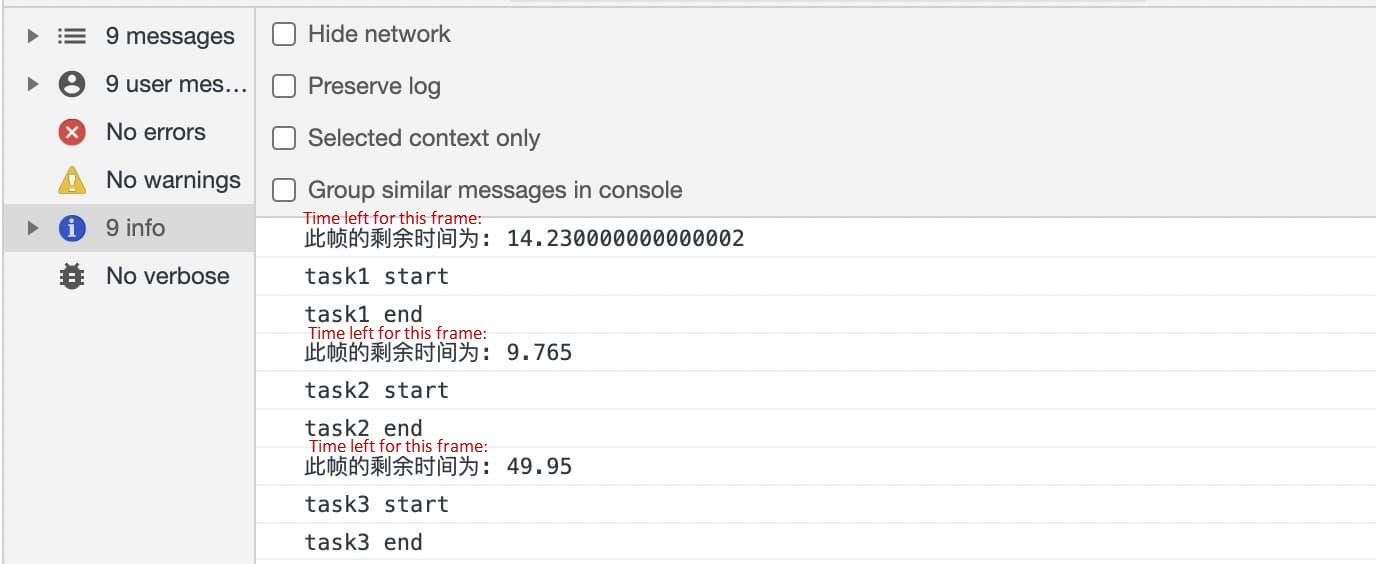
The duration of a browser frame is not fixed at 16ms but can be dynamically controlled. For example, the remaining time of the third frame is 49.95ms. If the time of a subtask is longer than the remaining time of a frame, the subtask is stuck here for execution until it is completed. If there is an endless loop in the code, the browser will crash. If the remaining time of the frame is greater than 0 or the defined timeout is reached, and there is a pending task at that time, the pending task is executed. If no time is left, the task is given up, and control is returned to the browser. If the total execution time of multiple tasks is less than the idle time, they can be executed in one frame.
The Fiber structure is a single tree of linked lists. For more information, please see ReactFiber.js source code. Now, let’s take a look at this structure that may make it easier for you to understand the subsequent Fiber traversal process.

Each of the preceding units contains the payload (data) and nextUpdate (the pointer to the next unit.) The structure is defined below:
class Update {
  constructor(payload, nextUpdate) {
    this.payload = payload // Payload data
    this.nextUpdate = nextUpdate // The pointer to the next unit
  }
}
Next, a queue is defined to link each unit in series. Two pointers are defined here: the firstUpdate pointer, which points to the first unit, and the lastUpdate pointer, which points to the last unit. Also, the baseState attribute is added to store the state in React. Please see the following example:
class UpdateQueue {
  constructor() {
    this.baseState = null // state
    this.firstUpdate = null // The first update
    this.lastUpdate = null // The last update
  }
}
Let’s now define two methods: insert node units (enqueueUpdate) and update queues (forceUpdate). Before running the enqueueUpdate, check whether the nodes already exist. If not, call the firstUpdate and lastUpdate. The forceUpdate traverses these linked lists and updates the state value based on the payload.
class UpdateQueue {
  //.....

  enqueueUpdate(update) {
    // Current linked list is empty
    if (!this.firstUpdate) {
      this.firstUpdate = this.lastUpdate = update
    } else {
      // Current linked list is not empty
      this.lastUpdate.nextUpdate = update
      this.lastUpdate = update
    }
  }

  // Obtain the state, traverse the linked list, and update the result
  forceUpdate() {
    let currentState = this.baseState || {}
    let currentUpdate = this.firstUpdate
    while (currentUpdate) {
      // Determine whether it's a function or an object. If it is a function, execute it. Otherwise, return it directly
      let nextState = typeof currentUpdate.payload === 'function' ? currentUpdate.payload(currentState) : currentUpdate.payload
      currentState = { ...currentState, ...nextState }
      currentUpdate = currentUpdate.nextUpdate
    }
    // Clear the linked list after the update is complete
    this.firstUpdate = this.lastUpdate = null
    this.baseState = currentState
    return currentState
  }
}
Here is a demo. It shows how to instantiate a queue, add nodes to it, and update the queue:
let queue = new UpdateQueue()
queue.enqueueUpdate(new Update({ name: 'www' }))
queue.enqueueUpdate(new Update({ age: 10 }))
queue.enqueueUpdate(new Update(state => ({ age: state.age + 1 })))
queue.enqueueUpdate(new Update(state => ({ age: state.age + 1 })))
queue.forceUpdate()
console.log(queue.baseState);
The result is printed below:
{ name:'www',age:12 }Fiber splits a task into fibers; each is a node on the fiber tree. It is split by the Virtual DOM node. We only need to generate the Fiber tree based on the Virtual DOM. In this section, each node is referred to as a fiber. The following example shows the structure of a typical fiber node. For the source code, please see ReactInternalTypes.js.
{

    type: any, // For a class component, it points to constructors; for a DOM element, it specifies HTML tags
    key: null | string, // The unique identifier
    stateNode: any, // Save the references to class instances of components, DOM nodes, or other React element types associated with the fiber node
    child: Fiber | null, // The first child node
    sibling: Fiber | null, // The next child node
    return: Fiber | null, // The parent node
    tag: WorkTag, // Define the type of fiber action. For more information,see https://github.com/facebook/react/blob/master/packages/react-reconciler/src/ReactWorkTags.js
    nextEffect: Fiber | null, // The pointer to next node
    updateQueue: mixed, // The queue for status update, callback function, and DOM update
    memoizedState: any, // The fiber state for output creation
    pendingProps: any, // The props that are updated from the new data of React elements and need to be applied to child components or DOM elements
    memoizedProps: any, // The props used to create the output during the previous rendering
    // ……
}
The fiber node includes the following attributes:
(1) type & key
(2) stateNode
(3) child & sibling & return
Every fiber node generates its linked list based on the preceding attributes. Please see the following figure:

Other properties include memoizedState (the state of the fiber that creates the output), pendingProps (the props to be changed), memoizedProps (the props that were generated during the last rendering), and pendingWorkPriority (which defines the work priority).
The rendering and scheduling process from the root node can be divided into two stages: render and commit.
In this stage, all node changes, such as node creation, deletion, and attribute modification, are identified. These changes are collectively referred to as effect. In this stage, a Fiber tree is built to split a task by virtual DOM node. Every virtual DOM node represents a task. The final output is the effect list, which shows the nodes that are updated, added, and deleted.
React Fiber converts the Virtual DOM tree to a Fiber tree, so that each node has attributes of child, sibling, and return. The Fiber tree features a postorder traversal:
1. The traversal starts from the vertex.
2. If there is a child, traverse the child first; otherwise, the traversal is completed.
3. For the traversal of the child:
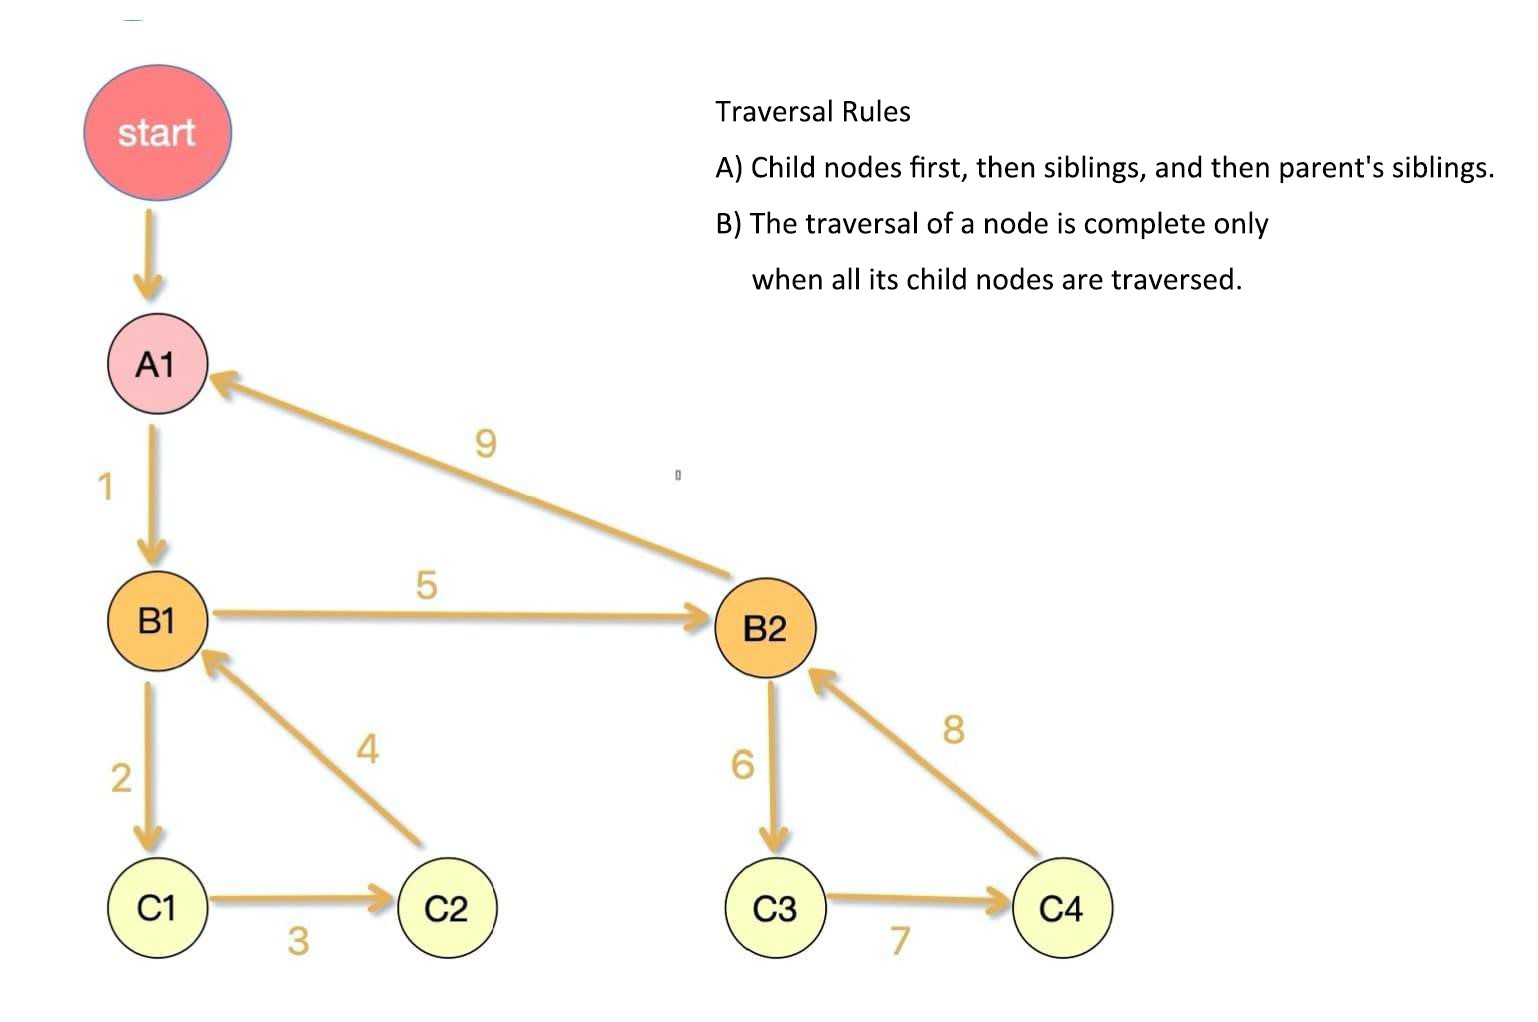
Define the tree structure:
const A1 = { type: 'div', key: 'A1' }
const B1 = { type: 'div', key: 'B1', return: A1 }
const B2 = { type: 'div', key: 'B2', return: A1 }
const C1 = { type: 'div', key: 'C1', return: B1 }
const C2 = { type: 'div', key: 'C2', return: B1 }
const C3 = { type: 'div', key: 'C3', return: B2 }
const C4 = { type: 'div', key: 'C4', return: B2 }

A1.child = B1
B1.sibling = B2
B1.child = C1
C1.sibling = C2
B2.child = C3
C3.sibling = C4

module.exports = A1
Code the traversal method:
let rootFiber = require('./element')

const beginWork = (Fiber) => {
  console.log(`${Fiber.key} start`)
}

const completeUnitWork = (Fiber) => {
  console.log(`${Fiber.key} end`)
}

// Traversal function
const performUnitOfWork = (Fiber) => {
  beginWork(Fiber)
  if (Fiber.child) {
    return Fiber.child
  }
  while (Fiber) {
    completeUnitWork(Fiber)
    if (Fiber.sibling) {
      return Fiber.sibling
    }
    Fiber = Fiber.return
  }
}

const workloop = (nextUnitOfWork) => {
  // Execute the pending execution unit and return the next execution unit
  while (nextUnitOfWork) {
    nextUnitOfWork = performUnitOfWork(nextUnitOfWork)
  }
  if (!nextUnitOfWork) {
    console.log('The end of reconciliation')
  }
}

workloop(rootFiber)
Print the result:
A1 start
B1 start
C1 start
C1 end // C1 completed
C2 start
C2 end // C2 completed
B1 end // B1 completed
B2 start
C3 start
C3 end // C3 completed
C4 start
C4 end // C4 completed
B2 end // B2 completed
A1 end // A1 completed
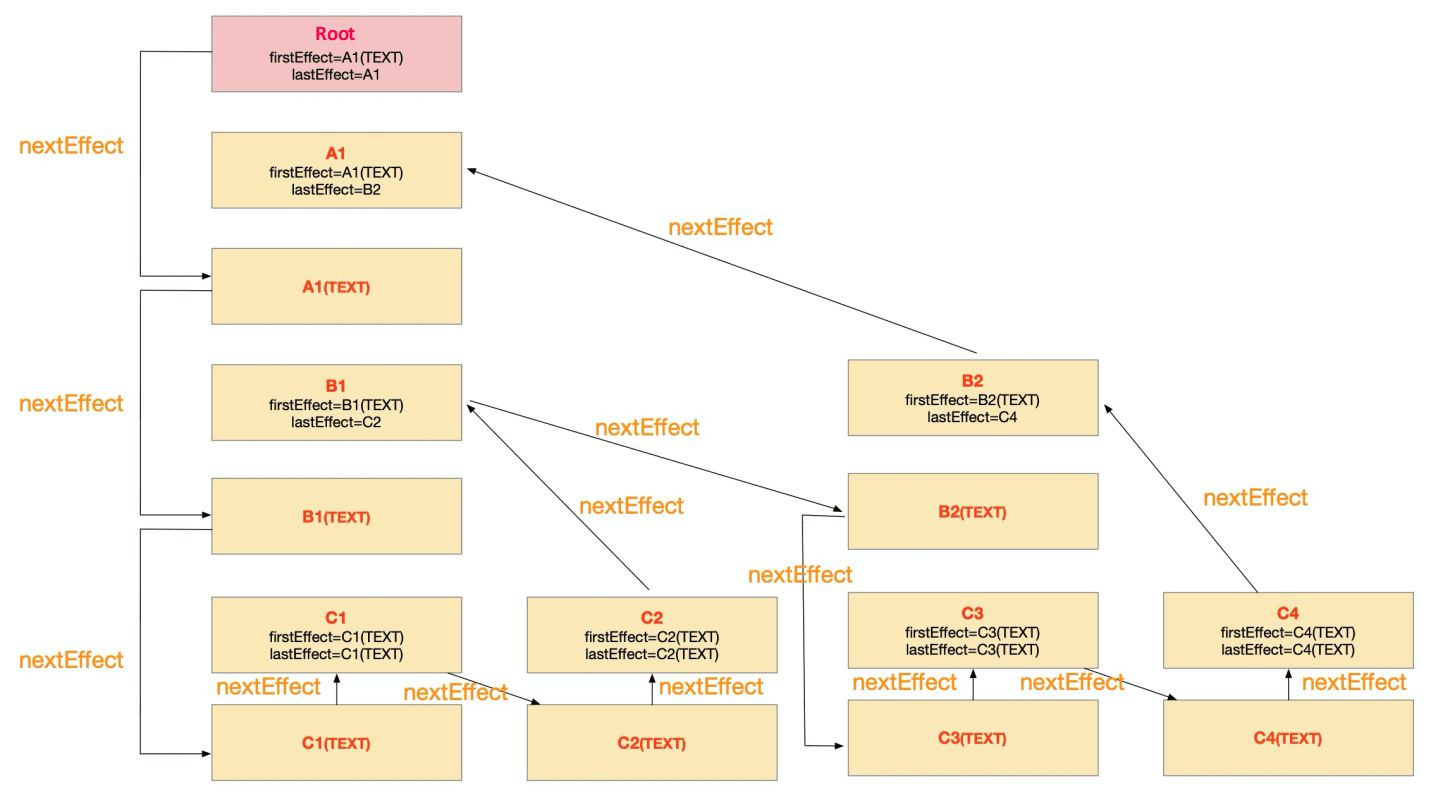
reconciliation endAfter you have learned the traversal method, the next job is to collect all node changes during the traversal to generate the effect list. Note: Only the nodes to be changed are included in the effect list. The task results are collected by merging the effect list from the bottom up when each node is updated, so that all changes are recorded in the effect list of the root node.
Take the following steps to collect the effect list:
pendingCommit status. This denotes when the collection of the effect list is completed.The following figure shows the traversal sequence for the effect list collection:
Traverse the array of child Virtual DOM elements to create a child fiber for each Virtual DOM element:
const reconcileChildren = (currentFiber, newChildren) => {
  let newChildIndex = 0
  let prevSibling // The previous child fiber

  // Traverse the array of child Virtual DOM elements and create a child fiber for each Virtual DOM element
  while (newChildIndex < newChildren.length) {
    let newChild = newChildren[newChildIndex]
    let tag
    // Add a tag to define the fiber type
    if (newChild.type === ELEMENT_TEXT) { // This is a text node
      tag = TAG_TEXT
    } else if (typeof newChild.type === 'string') {  // If the type is a string, the DOM node is a native node
      tag = TAG_HOST
    }
    let newFiber = {
      tag,
      type: newChild.type,
      props: newChild.props,
      stateNode: null, // No DOM elements have been created
      return: currentFiber, // The parent fiber
      effectTag: INSERT, // The effect identifier, including addition, deletion, and update
      nextEffect: null, // Point to the next fiber. The effect lists are linked by the nextEffect pointer
    }
    if (newFiber) {
      if (newChildIndex === 0) {
        currentFiber.child = newFiber // Child is the first child
      } else {
        prevSibling.sibling = newFiber // Point the sibling of the first child to the second child
      }
      prevSibling = newFiber
    }
    newChildIndex++
  }
}
Define a method to collect all the effects under this fiber node and generate an effect list. Note: Each fiber has two attributes:
firstEffect: pointing to the first child fiber with an effectlastEffect: pointing to the last child fiber with an effectThe nextEffect is used to link up child fibers in between and make a linked list.
// Collect fibers with effects upon completion to produce an effect list
const completeUnitOfWork = (currentFiber) => {
  // In a postorder traversal, the traversal of a node is complete only when all its child nodes are traversed. Finally, the chain-like structure in the above figure is obtained.
  let returnFiber = currentFiber.return
  if (returnFiber) {
    // If the firstEffect of the parent fiber has no value, point it to the firstEffect of the current fiber
    if (!returnFiber.firstEffect) {
      returnFiber.firstEffect = currentFiber.firstEffect
    }
    // If the lastEffect of the current fiber has a value
    if (currentFiber.lastEffect) {
      if (returnFiber.lastEffect) {
        returnFiber.lastEffect.nextEffect = currentFiber.firstEffect
      }
      returnFiber.lastEffect = currentFiber.lastEffect
    }
    const effectTag = currentFiber.effectTag
    if (effectTag) { // This indicates a side-effect
      // Each fiber has two attributes:
      // 1)firstEffect:pointing to the first child fiber with an effect
      // 2)lastEffect:pointing to the last child fiber with an effect
      // The nextEffect is used to link up child fibers in between
      if (returnFiber.lastEffect) {
        returnFiber.lastEffect.nextEffect = currentFiber
      } else {
        returnFiber.firstEffect = currentFiber
      }
      returnFiber.lastEffect = currentFiber
    }
  }
}
Now, it’s time to define a recursive function to traverse all fiber nodes from the root node and generate the final general effect list:
// Complete tasks on the node and its child nodes
const performUnitOfWork = (currentFiber) => {
  beginWork(currentFiber)
  if (currentFiber.child) {
    return currentFiber.child
  }
  while (currentFiber) {
    completeUnitOfWork(currentFiber) // Complete the node itself
    if (currentFiber.sibling) { // Return to the sibling, if any
      return currentFiber.sibling
    }
    currentFiber = currentFiber.return // If no sibling, go to the parent, will find its own sibling
  }
}The effects obtained in the previous stage are all executed together in the commit stage, which cannot be paused. Otherwise, the user may experience stuttering. At this stage, all updates are committed to the DOM tree according to the effect list.
The following example describes how to update the view based on the effect list of a fiber. Here, only addition, deletion, and update of nodes are described:
const commitWork = currentFiber => {
  if (!currentFiber) return
  let returnFiber = currentFiber.return
  let returnDOM = returnFiber.stateNode // Elements of the parent
  if (currentFiber.effectTag === INSERT) {  // The current fiber is the node to be inserted if its effectTag is INSERT
    returnDOM.appendChild(currentFiber.stateNode)
  } else if (currentFiber.effectTag === DELETE) {  // The current fiber is the node to be deleted if its effectTag is DELETE
    returnDOM.removeChild(currentFiber.stateNode)
  } else if (currentFiber.effectTag === UPDATE) {  // The current fiber is the node to be updated if its effectTag is UPDATE
    if (currentFiber.type === ELEMENT_TEXT) {
      if (currentFiber.alternate.props.text !== currentFiber.props.text) {
        currentFiber.stateNode.textContent = currentFiber.props.text
      }
    }
  }
  currentFiber.effectTag = null
}Write a recursive function to complete all the updates according to the effect list from the root node:
const commitRoot = () => {
  let currentFiber = workInProgressRoot.firstEffect
  while (currentFiber) {
    commitWork(currentFiber)
    currentFiber = currentFiber.nextEffect
  }
  currentRoot = workInProgressRoot // Assign the current root fiber that is successfully rendered to currentRoot
  workInProgressRoot = null
}Now, let’s define a loop execution. After the effect list of each fiber is obtained, call commitRoot to complete the View update:
const workloop = (deadline) => {
  let shouldYield = false // Whether to give control
  while (nextUnitOfWork && !shouldYield) {
    nextUnitOfWork = performUnitOfWork(nextUnitOfWork)
    shouldYield = deadline.timeRemaining() < 1 // The browser should take control if no more than 1ms is left after the task execution
  }
  if (!nextUnitOfWork && workInProgressRoot) {
    console.log('The end of the render stage ')
    commitRoot() // No more task is pending. Update the view based on the result of effect list
  }
  // Request the browser to reschedule another task
  requestIdleCallback(workloop, { timeout: 1000 })
}
At this moment, the view has been refreshed based on the collected information of changes.
This article is a general overview of React Fiber. It explains why Fiber was introduced in React, the design ideas of Fiber, and how it is implemented step by step. However, many details, such as how to define the priorities of tasks and how to suspend and resume a task, are not explained. If you are interested, learn more about React source code to continue your research!
Intelligent Design: Detailed Interpretation of the Color System

66 posts | 5 followers
FollowXG Lab - April 29, 2021
Alibaba Clouder - May 27, 2019
Yee - September 9, 2020
Alibaba Cloud Native Community - November 21, 2025
Alibaba Clouder - June 23, 2020
Alibaba Clouder - January 20, 2017

66 posts | 5 followers
Follow Mobile Testing
Provides comprehensive quality assurance for the release of your apps.
Learn More mPaaS
mPaaS
Help enterprises build high-quality, stable mobile apps
Learn More Web Hosting Solution
Explore Web Hosting solutions that can power your personal website or empower your online business.
Learn More Web Hosting
Explore how our Web Hosting solutions help small and medium sized companies power their websites and online businesses.
Learn MoreMore Posts by Alibaba F(x) Team