By John Hanley, Alibaba Cloud Tech Share Author. Tech Share is Alibaba Cloud’s incentive program to encourage the sharing of technical knowledge and best practices within the cloud community.
When you create an Alibaba Cloud Elastic Compute Service (ECS) instance, you also create or specify a security group. This security group acts as a firewall controlling what can access your ECS instance. For Linux instances, one of the rules allows SSH (TCP port 22) access. Best practices require that you only allow SSH access from TCP/IP addresses that you control. By only allowing your TCP/IP addresses through the security group (firewall) you reduce the exposure footprint of your ECS instance.
Creating a security group rule for SSH is very easy on the Alibaba Cloud Console. However, keeping that rule up to date with your current TCP/IP address can be a pain. First you must figure out what your public TCP/IP address is, login to the Alibaba Cloud Console, find your security group and then modify the security group with a new rule for your public IP address and finally delete the old rule.
Alibaba Cloud has APIs and SDKs to programmatically create, modify and delete rules in security groups. This article will demonstrate how to use the Alibaba SDK to automatically update your security group with your public TCP/IP address. You can then run the program manually from the command prompt, or automatically via a task scheduler. This article will show how to use Windows Task Scheduler to setup a recurring task to always keep your security group up to date with your public TCP/IP address.
The program saves the current TCP/IP address in a file named "last_ip.txt". The next time you run the program, it checks if the current TCP/IP address is the same as the last time. If true, then no changes are made to the security group. If the addresses are different, then a new rule is created and the rule for the last address is deleted. This keeps your security group current without old entries polluting the security group.
This program can also support Windows ECS instances. Just change the port number in the source code to support Remote Desktop (RDP).
Your public TCP/IP address is determined by going to NeoPrime's web server and accessing the URL http://www.neoprime.io/test/getmyip.php The source code for getmyip.php is included in the download. This URL simply returns your public TCP/IP address when you access the page. You can use any public server that returns your public TCP/IP address as simple text without HTML markup.
Download the source code for this program by clicking on this link: Source Code (Zip - 3 KB)
Last Update: June 28, 2018
Requirements: Python 3.6 or newer (Python 2 is not supported)
Platforms: Tested on Windows 10
Note: Antivirus software will complain about this download because it is a zip file with Python source code.
This program will require permissions to modify security groups. Security best practices recommend only providing the minimum permissions required. Let's follow that recommendation. This program requires the ability to describe security group rules (DescribeSecurityGroupAttribute), create security group rules (AuthorizeSecurityGroup) and delete security group rules (RevokeSecurityGroup) and for good measure the ability to list security groups (DescribeSecurityGroups).
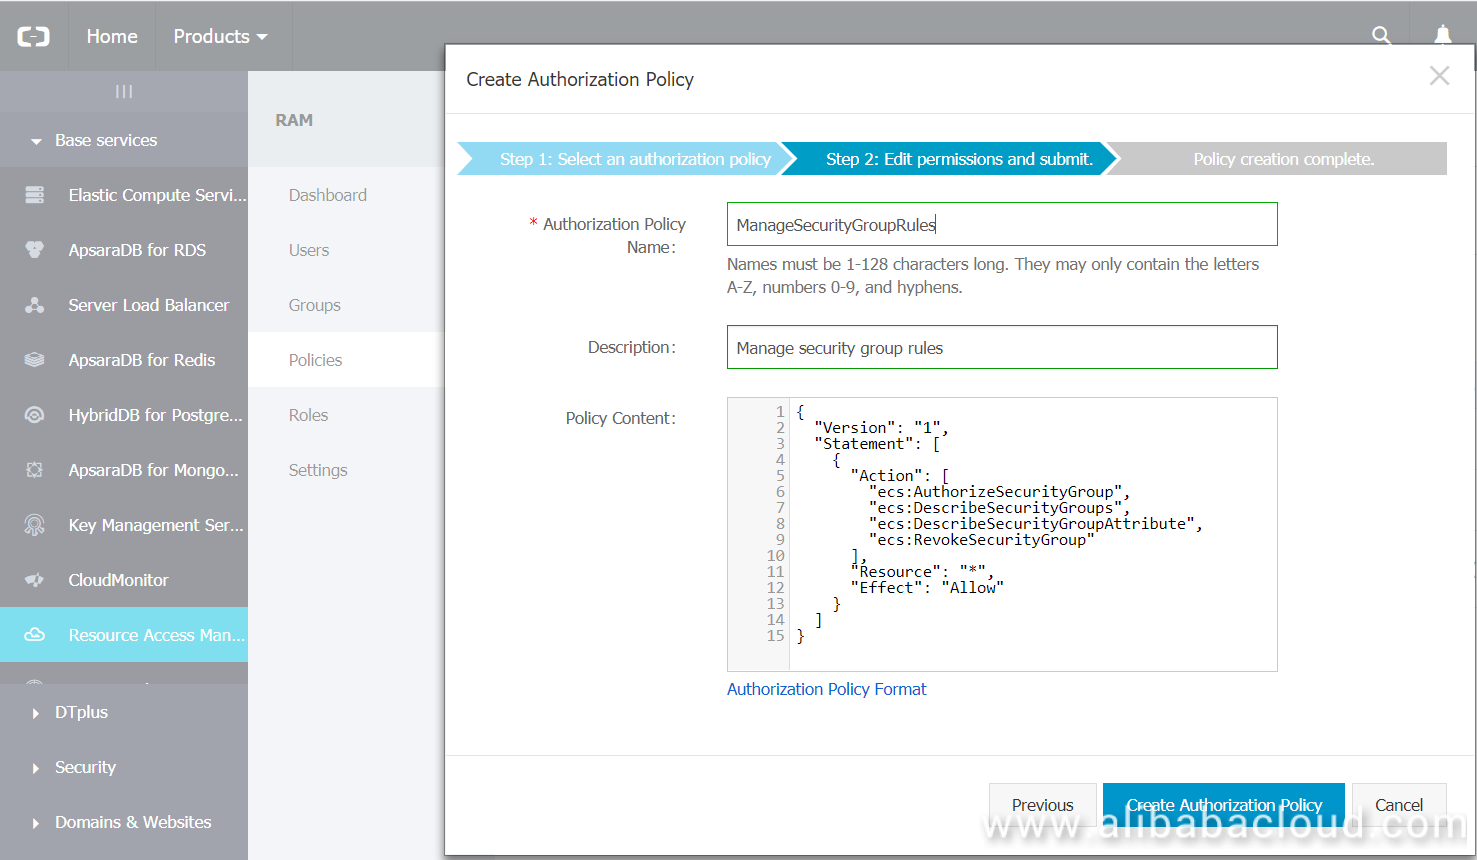
The following policy describes the required permissions in JSON. Later in this article we will use this JSON when we create a custom policy.
Download the JSON policy file by clicking on this link: Download policy.json
{
  "Version": "1",
  "Statement": [
    {
      "Action": [
        "ecs:AuthorizeSecurityGroup",
        "ecs:DescribeSecurityGroups",
        "ecs:DescribeSecurityGroupAttribute",
        "ecs:RevokeSecurityGroup"
      ],
      "Resource": "*",
      "Effect": "Allow"
    }
  ]
}You may desire finer grained control over your security groups. For example, let's say that you have five people in your DevOps teams with each person responsible for a different set of servers / services. You could create different security groups for each user's resources and then assign resource level permissions to control who can modify which security groups. The following policy specifies which security group can be modified. Then create different policies assigned to different users. Now, User-A cannot accidentally modify User-B's security groups.
{
  "Version": "1",
  "Statement": [
    {
      "Action": [
        "ecs:AuthorizeSecurityGroup",
        "ecs:DescribeSecurityGroups",
        "ecs:DescribeSecurityGroupAttribute",
        "ecs:RevokeSecurityGroup"
      ],
      "Resource": "acs:ecs:*:*:securitygroup/sg-rj01234567890abcdefg",
      "Effect": "Allow"
    }
  ]
}In this part we will use the Alibaba Cloud Console to create a custom policy that only has the permissions that we required to manage security groups.

Create Custom Policy:
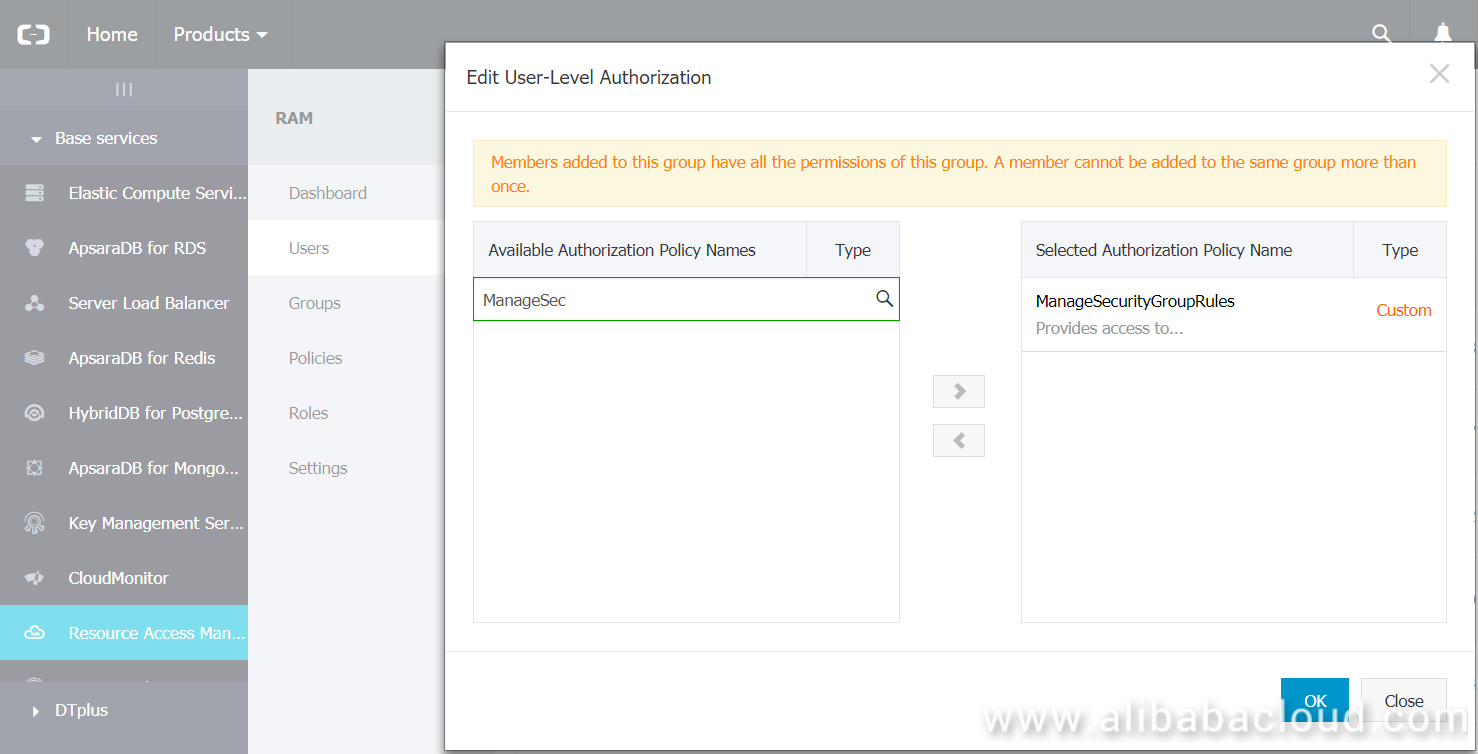
In this part we will use the Alibaba Console to create a new user and assign the custom policy to this user.

In this part we will create a new profile using the Alibaba Cloud CLI with the user's access key and secret key. We will also specify the default region and output format.
c:\Python27\Scripts\aliyuncli configure --profile sg_auth
Aliyun Access Key ID [None]:
Aliyun Access Key Secret [None]:
Default Region Id [None]:
Default output format [None]: jsonTo execute the example python program, open a command prompt and execute the program as follows:
python sg_auth.py --profile sg_authNote: You can modify the python source code to specify the profile name to use by default.
PROFILE_NAME = 'default' # specify the credentials profile name to use############################################################
# Version 0.90
# Date Created: 2018-06-28
# Last Update: 2018-06-28
# https://www.neoprime.io
# Copyright (c) 2018, NeoPrime, LLC
# Author: John Hanley
############################################################
""" Add my public IP to an Alibaba Cloud Security Group """
import os
import json
import logging
import optparse
import requests
from aliyunsdkcore.client import AcsClient
from aliyunsdkecs.request.v20140526 import AuthorizeSecurityGroupRequest
from aliyunsdkecs.request.v20140526 import RevokeSecurityGroupRequest
from aliyunsdkecs.request.v20140526 import DescribeSecurityGroupAttributeRequest
g_debug = False
g_print = True # Set to diplay messages to console
LAST_IP_FILENAME = 'last_ip.txt'
IP_ENDPOINT = 'http://www.neoprime.io/test/getmyip.php'
PROFILE_NAME = 'default' # specify the credentials profile name to use
sg_auth_params = {
'sg_id': 'sg-rj01234567890abcdefg', # Change this value to your security group
'ip_protocol': 'tcp',
#'port_range': '3389/3389', # Use this port range for Remote Desktop (RDP)
'port_range': '22/22', # Use this port range for SSH
'description': 'My public IP address',
'source_cidr_ip': ''
}
logger = logging.getLogger('sg_auth')
def setup_logging():
""" This creates sets the logging configuration """
f1 = '%(asctime)s %(name)s %(levelname)s %(message)s'
f2 = '%(message)s'
if g_debug is False:
if g_print is False:
logging.basicConfig(filename='sg_auth.log', level=logging.INFO, format=f1)
else:
logging.basicConfig(level=logging.INFO, format=f2)
else:
if g_print is False:
logging.basicConfig(filename='sg_auth.log', level=logging.DEBUG, format=f1)
else:
logging.basicConfig(level=logging.DEBUG, format=f2)
logger.info('########################################')
logger.info('Program start')
def usage():
""" Command Usage Help """
print("Usage: sg_auth [-d, --debug] [-p, --purge]")
def process_cmdline():
""" Process the Command Line """
parser = optparse.OptionParser()
parser.set_defaults(debug=False, profile=False, region_id=False, slb_id=False)
parser.add_option(
'-d',
'--debug',
action='store_true',
dest='debug',
default=False,
help="enable debugging")
parser.add_option(
'-p',
'--purge',
action='store_true',
dest='purge',
default=False,
help="purge security groups rules with same port range")
parser.add_option(
'--profile',
action = 'store',
dest = 'profile',
default = PROFILE_NAME,
help = "specify the credentials profile name")
(cmd_options, cmd_args) = parser.parse_args()
return (cmd_options, cmd_args)
def get_current_ip():
""" Get my public IP address """
resp = requests.get(IP_ENDPOINT)
resp.raise_for_status()
ip = resp.content.strip().decode('utf-8')
ip += '/32'
return ip
def get_last_ip():
""" Get my last public IP address that was saved """
if not os.path.exists(LAST_IP_FILENAME):
return None
try:
with open(LAST_IP_FILENAME, 'r') as fp:
ip = fp.readline().strip()
except:
ip = None
return ip
def save_new_ip(ip):
""" Save my public IP address """
with open(LAST_IP_FILENAME, 'w') as fp:
fp.write(ip + '\n')
def sg_authorize(client, params):
""" Authorize an IP address """
# Initialize a request and set parameters
request = AuthorizeSecurityGroupRequest.AuthorizeSecurityGroupRequest()
request.set_SecurityGroupId(params['sg_id'])
request.set_IpProtocol(params['ip_protocol'])
request.set_PortRange(params['port_range'])
request.set_Description(params['description'])
request.set_SourceCidrIp(params['source_cidr_ip'])
response = client.do_action_with_exception(request)
if g_debug:
logger.debug(response)
r = json.loads(response)
logger.debug('Request ID: %s', r['RequestId'])
def sg_revoke(client, params):
""" Revoke an IP address """
logger.info('Removing IP: %s', sg_auth_params['source_cidr_ip'])
# Initialize a request and set parameters
request = RevokeSecurityGroupRequest.RevokeSecurityGroupRequest()
request.set_SecurityGroupId(params['sg_id'])
request.set_IpProtocol(params['ip_protocol'])
request.set_PortRange(params['port_range'])
request.set_Description(params['description'])
request.set_SourceCidrIp(params['source_cidr_ip'])
response = client.do_action_with_exception(request)
if g_debug:
logger.debug(response)
r = json.loads(response)
logger.debug('Request ID: %s', r['RequestId'])
def purge_rules(client, params):
""" Remove all rules with the same port range """
logger.info('Purging all security groups rules for port range %s', params['port_range'])
# Initialize a request and set parameters
request = DescribeSecurityGroupAttributeRequest.DescribeSecurityGroupAttributeRequest()
request.set_SecurityGroupId(params['sg_id'])
response = client.do_action_with_exception(request)
if g_debug:
logger.debug(response)
r = json.loads(response)
logger.debug('Request ID: %s', r['RequestId'])
for permission in r['Permissions']['Permission']:
if permission['PortRange'] == params['port_range']:
sg_auth_params['source_cidr_ip'] = permission['SourceCidrIp']
sg_revoke(client, sg_auth_params)
def main_cmdline(options):
""" This is the main function """
last_ip = None
current_ip = get_current_ip()
if options.purge is False:
last_ip = get_last_ip()
if last_ip == current_ip:
logger.info('Last ip and current ip are the same. No changes are required.')
return 0
# My library for processing Alibaba Cloud Services (ACS) credentials
# This library is only used when running from the desktop and not from the cloud
import mycred_acs
# Load the Alibaba Cloud Credentials (AccessKey)
logger.info('Loading credentials for profile %s', options.profile)
credentials = mycred_acs.LoadCredentials(options.profile)
if options.debug:
logger.info('Access Key ID: %s', credentials['accessKeyId'])
if credentials is False:
logger.error('Error: Cannot load credentials')
return 1
# Initialize AcsClient instance
client = AcsClient(
credentials['accessKeyId'],
credentials['accessKeySecret'],
credentials['region'])
if options.purge:
purge_rules(client, sg_auth_params)
sg_auth_params['source_cidr_ip'] = current_ip
logger.info('Adding IP: %s', sg_auth_params['source_cidr_ip'])
sg_authorize(client, sg_auth_params)
save_new_ip(current_ip)
if last_ip is not None:
sg_auth_params['source_cidr_ip'] = last_ip
sg_revoke(client, sg_auth_params)
return 0
# Setup logging
setup_logging()
# Process the command line
(g_options, g_args) = process_cmdline()
if g_options.debug:
g_debug = True
ret = main_cmdline(g_options)
Monitoring SSL Certificates with Alibaba Cloud Function Compute

2,593 posts | 793 followers
FollowAlibaba Clouder - July 19, 2019
Alibaba Clouder - July 18, 2019
Alibaba Clouder - April 19, 2019
Alibaba Clouder - March 10, 2021
Alibaba Clouder - August 14, 2020
Anna Chat APP - July 31, 2024

2,593 posts | 793 followers
Follow ECS(Elastic Compute Service)
Elastic and secure virtual cloud servers to cater all your cloud hosting needs.
Learn More Anti-DDoS
A comprehensive DDoS protection for enterprise to intelligently defend sophisticated DDoS attacks, reduce business loss risks, and mitigate potential security threats.
Learn MoreLearn More
More Posts by Alibaba Clouder