By Nick Triller, Alibaba Cloud Tech Share Author. Tech Share is Alibaba Cloud's incentive program to encourage the sharing of technical knowledge and best practices within the cloud community.
Dokku is an extensible, lightweight, open source Platform as a Service (PaaS) that runs on your server, such as Alibaba Cloud Elastic Compute Service (ECS). Dokku makes it easy to use ECS resources with Docker and allows you to focus on code instead of server management. Deploying your code is as easy as running a "git push". Using your own PaaS instead of third party platforms grants full control over your stack at lower costs.
This guide describes how to setup Dokku on Ubuntu 16.04 LTS and how to deploy your first Application to Dokku.
Make sure you have an Alibaba Cloud account before you start. Sign up now to receive 300 $ in free credit. Create an ECS server or connect to an existing one with SSH to follow along. Your server should have at least 1GB of RAM to run Dokku. You will need Git and SSH on your computer. You will also need a SSH Key to configure authentication in Dokku. Optionally, you can use a domain. Using a domain allows mapping individual applications as subdomains. If an IP address is used to access the Dokku server, applications can only be mapped as sub paths.
The first step is setting the hostname of your server. Run 'hostname <hostname>' to set the hostname. We will use the hostname 'dokku.local' in this example. The hostname set with the 'hostname' command will only be used until the next reboot. After a reboot, the hostname will be read from the file '/etc/hostname'. Change the hostname in the Alibaba Cloud Console or open '/etc/hostname' directly with a text editor of your choice and replace the hostname.
Verify the hostname was set by running 'hostname' without any arguments. The output should be the hostname you set previously with the hostname command. It must match the hostname that was entered into '/etc/hostname'.
The file '/etc/hosts' is used to map hostnames to IP addresses. Debian-based operating systems use the IP 127.0.1.1 as the hostname IP. Open '/etc/hosts' with a text editor and add a line that maps the hostname IP address to your hostname. Dokku can't be installed without this mapping.
127.0.0.1       localhost
127.0.1.1       dokku.local
Run 'ping dokku.local' to verify the mapping works as expected.
# ping dokku.local
PING dokku.local (174.44.44.44) 56(84) bytes of data.
64 bytes from dokku.local (174.44.44.44): icmp_seq=1 ttl=64 time=0.016 ms
Now Dokku can be installed. Download the setup script from Dokku's GitHub repository with 'wget'.
# wget https://raw.githubusercontent.com/dokku/dokku/master/bootstrap.sh
Next, run the setup script with bash. You have to provide the Dokku version you want to install with the environment variable DOKKU_TAG.
# sudo DOKKU_TAG=v0.10.5 bash bootstrap.sh
The script checks if all prerequisites are fulfilled, creates a Linux user named 'dokku', installs Dokku and its dependencies (e.g. Docker and Nginx) etc.
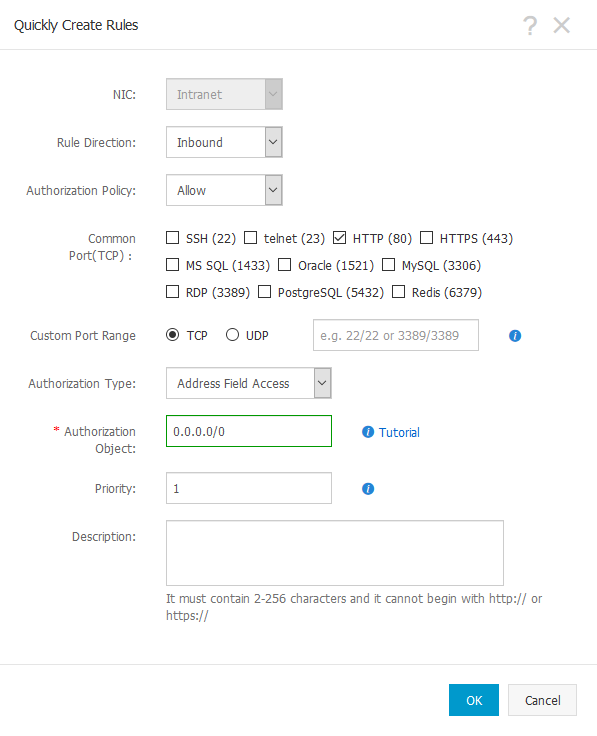
The next step is opening the Dokku web installer. It is currently unavailable on CentOS. Use the Dokku CLI Tool to configure SSH keys and virtualhosts on CentOS. Port 80 of the ECS instance has to be exposed to allow access to the web installer. Open the Elastic Compute Section in the Alibaba Cloud Console. Choose your ECS instance and navigate to the 'Security Group' settings. Click on 'Configure Rules' on the relevant Security Group. Use the 'Quickly Create Rules' button to allow access on port 80 from all IPs.

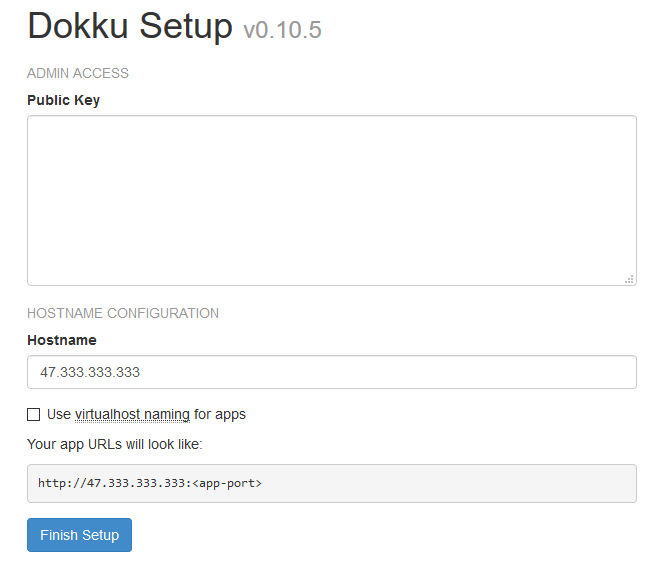
Access the public IP address of your server to continue the setup with the Dokku web installer. You can find the public IP address in the Alibaba Cloud Console.
WARNING: If you don’t complete the web setup, anyone who finds the setup page can insert their SSH key, even if you configure the SSH key with the Dokku CLI Tool. The SSH key is used to deploy applications to Dokku.
Copy and paste the SSH public key you want to use for Dokku deployments into the intended field. Enter your server's public IP address or a domain name you own into the 'Hostname' field. If you use an IP address, deployed applications will be available on sub paths, e.g. http://47.333.333.333/myapp. If a domain is used, deployed applications can be made available on either sub paths or on subdomains, e.g. http://myapp.example.com. Tick the 'Use virtualhost naming for apps' checkbox if you want to mount applications as subdomains. In any case, make sure to configure your Domain's DNS settings if you use a domain. The domain has to point to point Dokku server. For example, create an A record with the public IP address of your server. Press 'Finish Setup' to save the Dokku settings.

Congratulations! You have successfully setup your Dokku server.
http://dokku.viewdocs.io/dokku/deployment/application-deployment/
You will learn how to deploy an application to Dokku next. First, clone a sample app project with Git on your computer:
git clone https://github.com/heroku/ruby-rails-sample.git
You will find the sample app code in a directory named "ruby-rails-sample" in your current working directory.
Next, we will take a look at the sample application repository. The only Dokku-specific file in the repository is the file 'Procfile'. Otherwise, the project is a standard ruby on rails project. These are the contents of the Procfile:
web: bundle exec puma -C config/puma.rb
'web' is the process type. 'web' processes are automatically scaled to 1 on the initial application deployment. The command after the double colon specifies the command that is used to start the application.
The goal is to deploy this sample application on the Dokku server. Before we can do so, we will have to configure the app and the backing services in Dokku.
SSH into your server. Dokku provides a command line tool with the same name. Dokku can be extended with plugins. You can find a list of plugins here. Some notable official plugins include the Elasticsearch, Grafana, MariaDB, RabbitMQ, Redis, Let's Encrypt and HTTP Auth plugins. Of course, you can implement your own plugins, too. The sample application needs a PostgreSQL database. Run the following command on your server to install the Dokku PostgreSQL plugin from GitHub. Make sure to install plugins as a root user (or with sudo):
sudo dokku plugin:install https://github.com/dokku/dokku-postgres.git
Use the command 'dokku plugin:list' to verify the PostgreSQL plugin was installed successfully.
# dokku plugin:list
plugn: 0.3.0
  […]
  nginx-vhosts         0.10.5 enabled    dokku core nginx-vhosts plugin
  plugin               0.10.5 enabled    dokku core plugin plugin
  postgres             1.0.0 enabled    dokku postgres service plugin
  proxy                0.10.5 enabled    dokku core proxy plugin
[…]
We will create a PostgreSQL database instance with the name 'rails-database' with Dokku next. The database will be created as a Docker container. Therefore, the PostgreSQL container will be listed if you run 'docker ps' after you create the PostgreSQL database instance.
dokku postgres:create rails-database
Run the following command to create the sample application in Dokku:
dokku apps:create ruby-rails-sample
Verify the application was created by running 'dokku ps:report'. The application is not deployed or running yet.
root@dokku:~# dokku ps:report
=====>; ruby-rails-sample process information
  Processes:           0
  Deployed:            false
  Running:             false
  Restore:             true
  Restart policy:      on-failure:10
The PostgreSQL database instance and the application are isolated. We have to link them together to allow the application to access the database instance. Linking the PostgreSQL service with the application sets the environment variable 'POSTGRES_URL' to the appropriate value once the sample application is deployed. Services can be shared between applications, too.
dokku postgres:link rails-database ruby-rails-sample
We are ready to deploy the application. Navigate to the sample code repository on your computer. Add the Dokku server as a remote to the sample code Git repository. Make sure to use the 'dokku' user as demonstrated below. Replace with your domain name or the server's public IP address:
git remote add dokku dokku@:ruby-rails-sample
Run 'git remote' to verify the remote was added successfully.
# git remote
dokku
origin
The SSH key that was provided in the Dokku web installer is used to authenticate with the Dokku server. The SSH program on your computer needs to be configured to use the appropriate SSH keys when you push code with Git to the Dokku server. Create a file with the name 'config' in the directory '~/.ssh'. The '~' denotes the home directory. On windows, it might be 'C:Users<Username>'. The config file maps hosts to SSH keys that should be used when you connect to the host. The private part of the SSH key is named 'id_rsa' in this example. The public part should have the same name with '.pub' appended.
Host 47.333.333.333
  User dokku
  HostName 47.333.333.333
  IdentityFile ~/.ssh/id_rsa
We are ready to deploy the application. The next command will push the master branch of the sample application's repository to Dokku with SSH.
# git push dokku master
Counting objects: 236, done.
Delta compression using up to 4 threads.
Compressing objects: 100% (135/135), done.
Writing objects: 100% (236/236), 41.85 KiB | 10.46 MiB/s, done.
Total 236 (delta 85), reused 236 (delta 85)
remote: -----> Cleaning up...
remote: -----> Building ruby-rails-sample from herokuish...
[…]
remote: =====> Application deployed:
remote:        http://ruby-rails-sample.example.com
If a domain is used and applications are mounted as subdomains, you might need to configure your DNS settings to access the deployed application. For example, add an A-Record with the host set to the subdomain 'ruby-rails-sample' and point it to the public IP of the Dokku server. The subdomain corresponds to the application name. Alternatively, a wildcard entry can be used to point all subdomains to the Dokku server. Dokku will use Nginx to route requests to the appropriate applications. Updated DNS settings can take up to 48 hours to propagate.
Dokku will fetch all necessary dependencies, build the application from the source code and deploy it. So called buildpacks contain the logic that is necessary to fetch the dependencies and build the application for different programming languages and platforms. The sample application is built with the ruby-buildpack. Like plugins, you can create your own buildpacks, too.
Congratulations! The sample application is up and running on the Dokku server. Verify the application works by accessing it on 'ruby-rails-sample.<domain>' or '<domain or IP>/ruby-rails-sample', depending on the Dokku configuration. You should see a web page with the text 'Hello World'. Redeploying the application after source code changes are made is as simple as running 'git push dokku master'.
Deploy Web Apps with High Availability, Fault Tolerance, and Load Balancing on Alibaba Cloud

2,593 posts | 793 followers
FollowAlibaba Clouder - July 24, 2019
Alibaba Clouder - April 23, 2019
Alibaba Clouder - May 23, 2018
Alibaba Clouder - April 26, 2019
Alibaba Clouder - May 14, 2018
Alibaba Clouder - April 26, 2019

2,593 posts | 793 followers
Follow CloudAP
A new-generation wireless network access product based on cloud and big data platforms.
Learn MoreMore Posts by Alibaba Clouder